Ortopedia Impuls ORTOform User manual

1
FOLDING WHEELCHAIR
Impuls ORTOform
S T A Y M O B I L E
OperatingManual

32
Table of contents
1. Introduction .................................................................................................................. 6
2. Handling the wheelchair .............................................................................................. 7
2.1 Use ..................................................................................................................................... 7
2.2 Performance ....................................................................................................................... 8
2.3 Safety information .............................................................................................................. 8
2.4 Additional user/safety information ..................................................................................... 9
2.4.1 User information .................................................................................................. 10
2.5 Folding/unfolding............................................................................................................. 14
2.5.1 Folding the wheelchair ........................................................................................ 14
2.5.2 Unfolding the wheelchair .................................................................................... 14
2.6 Transportation .................................................................................................................. 15
3. Overview ...................................................................................................................... 15
3.1 Impuls-ORTOform ............................................................................................................ 16
3.2 Components..................................................................................................................... 17
3.2.1 30°-adjustable backrest (gas spring adjustment)................................................ 17
3.2.2 30°-mechanically-adjustable backrest ................................................................. 18
3.2.3 Height-adjustable sliding handles ...................................................................... 19
3.2.4 Back stiffening bar................................................................................................ 19
3.2.5 Armrests ............................................................................................................... 20
3.2.5.1 Armrest with double locking .............................................................. 20
3.2.5.2 Height-adjustable armrest ................................................................. 21
3.2.6 Leg supports ........................................................................................................ 22
3.2.6.1 Leg support with angle adjustment (774-1) ...................................... 22
3.2.6.2 Leg support with angle adjustment and length compensation
(774-2 AL) ........................................................................................... 23
3.2.6.3 Folding up the foot plates .................................................................. 24
3.2.6.4 Swivelling leg supports aside............................................................. 25
3.2.6.5 Removal of leg supports ..................................................................... 26
3.2.6.6 Attachment of leg supports ................................................................ 26
3.2.6.7 Height-adjustment of foot plates (774-1) .......................................... 27
3.2.6.8 Height-adjustment of foot plates (774-2 AL)...................................... 27
3.2.6.9 Angle-adjustment of foot plates (774-2 AL) ....................................... 28
3.2.6.10 Height-adjustment of calf pads (774-1) ............................................. 28
3.2.6.11 Depth-adjustment of calf pads (774-1) .............................................. 29
3.2.6.12 Depth-adjustment of calf pads (774-2 AL) ......................................... 29
3.2.7 Upholstered backrest........................................................................................... 30
3.2.7.1 Detaching the upholstered backrest .................................................. 30
3.2.7.2 Attaching the upholstered backrest ................................................... 30
3.2.8 Upholstered seat.................................................................................................. 31
3.2.9 Headrest .............................................................................................................. 32

54
6. Care and maintenance ................................................................................................ 48
6.1 Care ................................................................................................................................. 48
6.2 Maintenance .................................................................................................................... 49
6.2.1 Tools ..................................................................................................................... 49
6.2.2 Maintenance instructions ..................................................................................... 50
6.2.3 Punctures.............................................................................................................. 51
6.2.3.1 Tyre change on the drive wheels........................................................ 51
6.2.3.2 Tyre change on the swivel wheels ...................................................... 51
6.3 Repairs.............................................................................................................................. 52
6.4 Customer service .............................................................................................................. 52
6.5 Spare parts....................................................................................................................... 52
6.6 Disposal ............................................................................................................................ 52
7. Technical data ............................................................................................................. 53
8. Guarantee .................................................................................................................... 54
3.2.10 Driving wheels ..................................................................................................... 33
3.2.10.1 Full floating axle ................................................................................. 33
3.2.11 Hand wheels ........................................................................................................ 34
3.2.12 Brakes ................................................................................................................... 34
3.2.12.1 Safety information .............................................................................. 35
3.2.12.2 Toggle joint brake .............................................................................. 35
3.2.12.3 Drum brake ........................................................................................ 35
3.2.12.4 Service brake function ........................................................................35
3.2.12.5 Locking the brake ............................................................................... 36
3.2.12.6 Releasing the brake ............................................................................ 36
3.2.12.7 Changing or replacing driving wheels............................................... 36
3.2.12.8 Drum brake for carers ......................................................................... 37
3.2.12.9 Adjustment of toggle joint brake ....................................................... 37
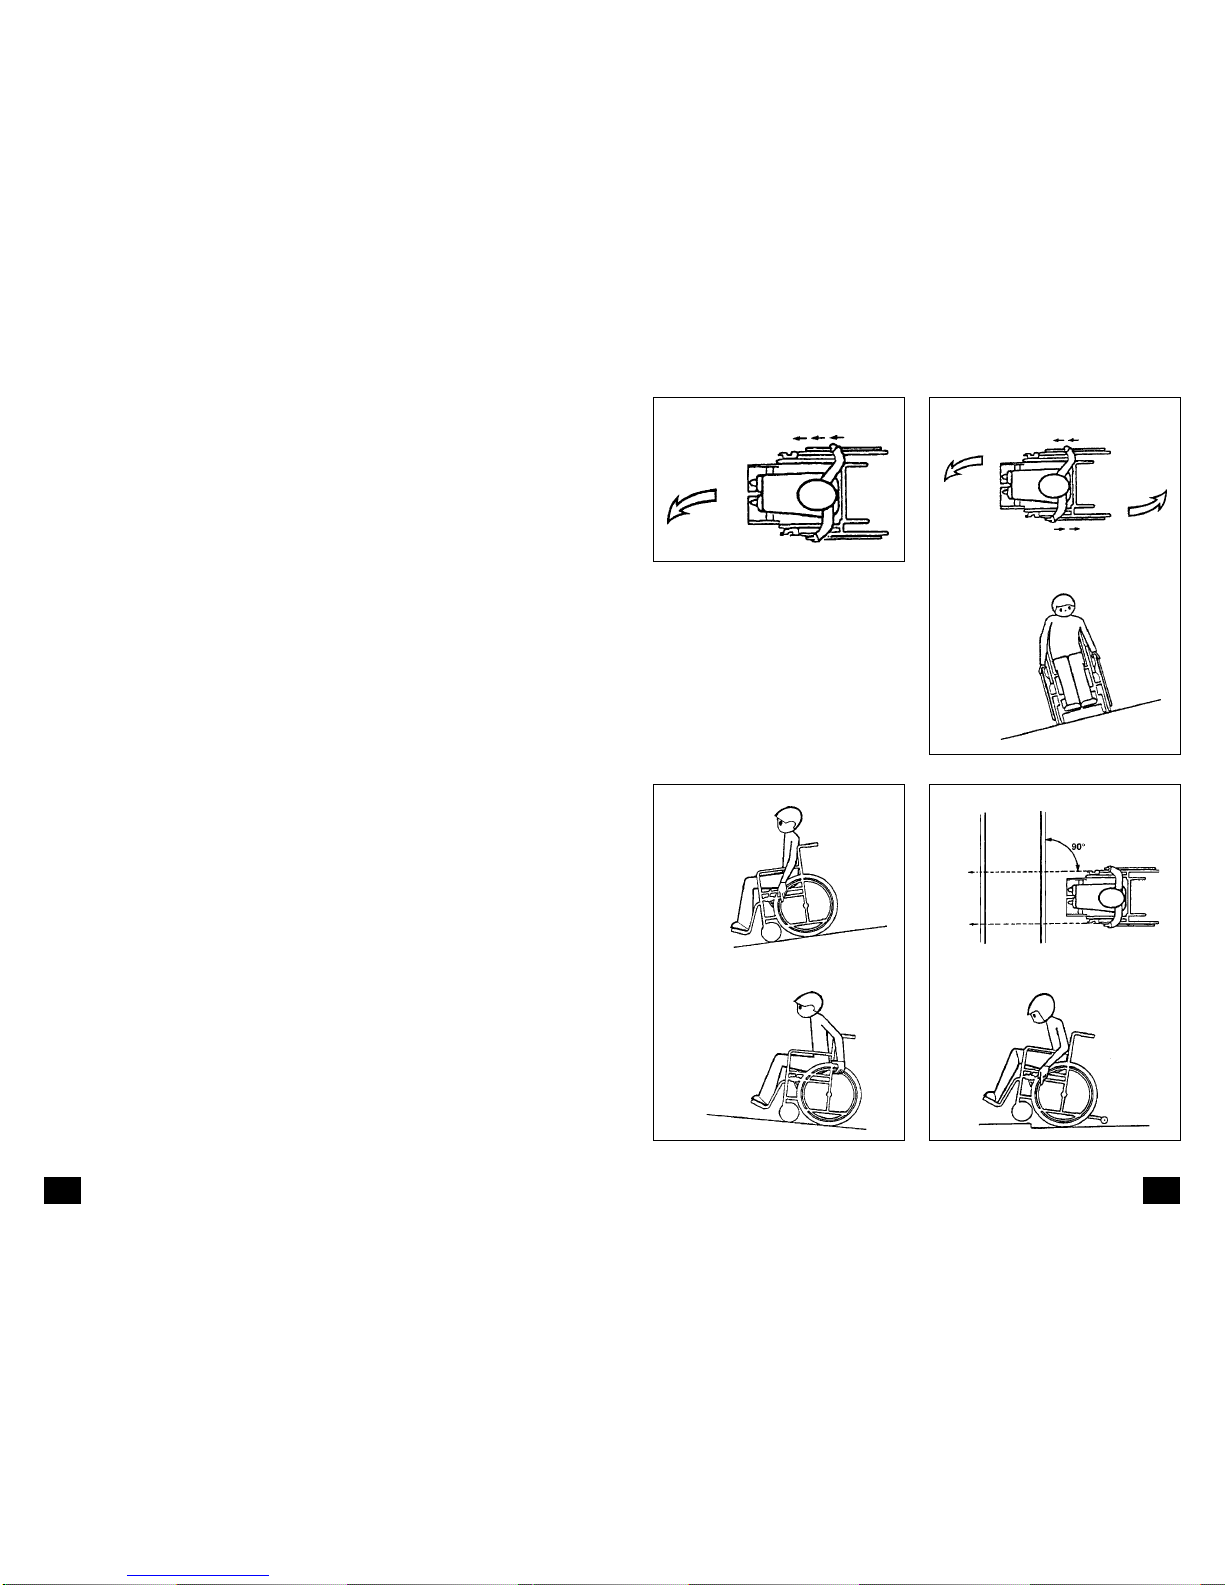
3.2.13 Swivel wheels ...................................................................................................... 38
3.2.14 Tyres ..................................................................................................................... 38
4. Individual customisation ........................................................................................... 39
4.1 Seat depth ....................................................................................................................... 39
4.2 Seat height/seat inclination ............................................................................................. 40
4.2.1 Driving wheel position......................................................................................... 40
4.2.2 Swivel wheel position .......................................................................................... 41
5. Optional accessories ................................................................................................... 42
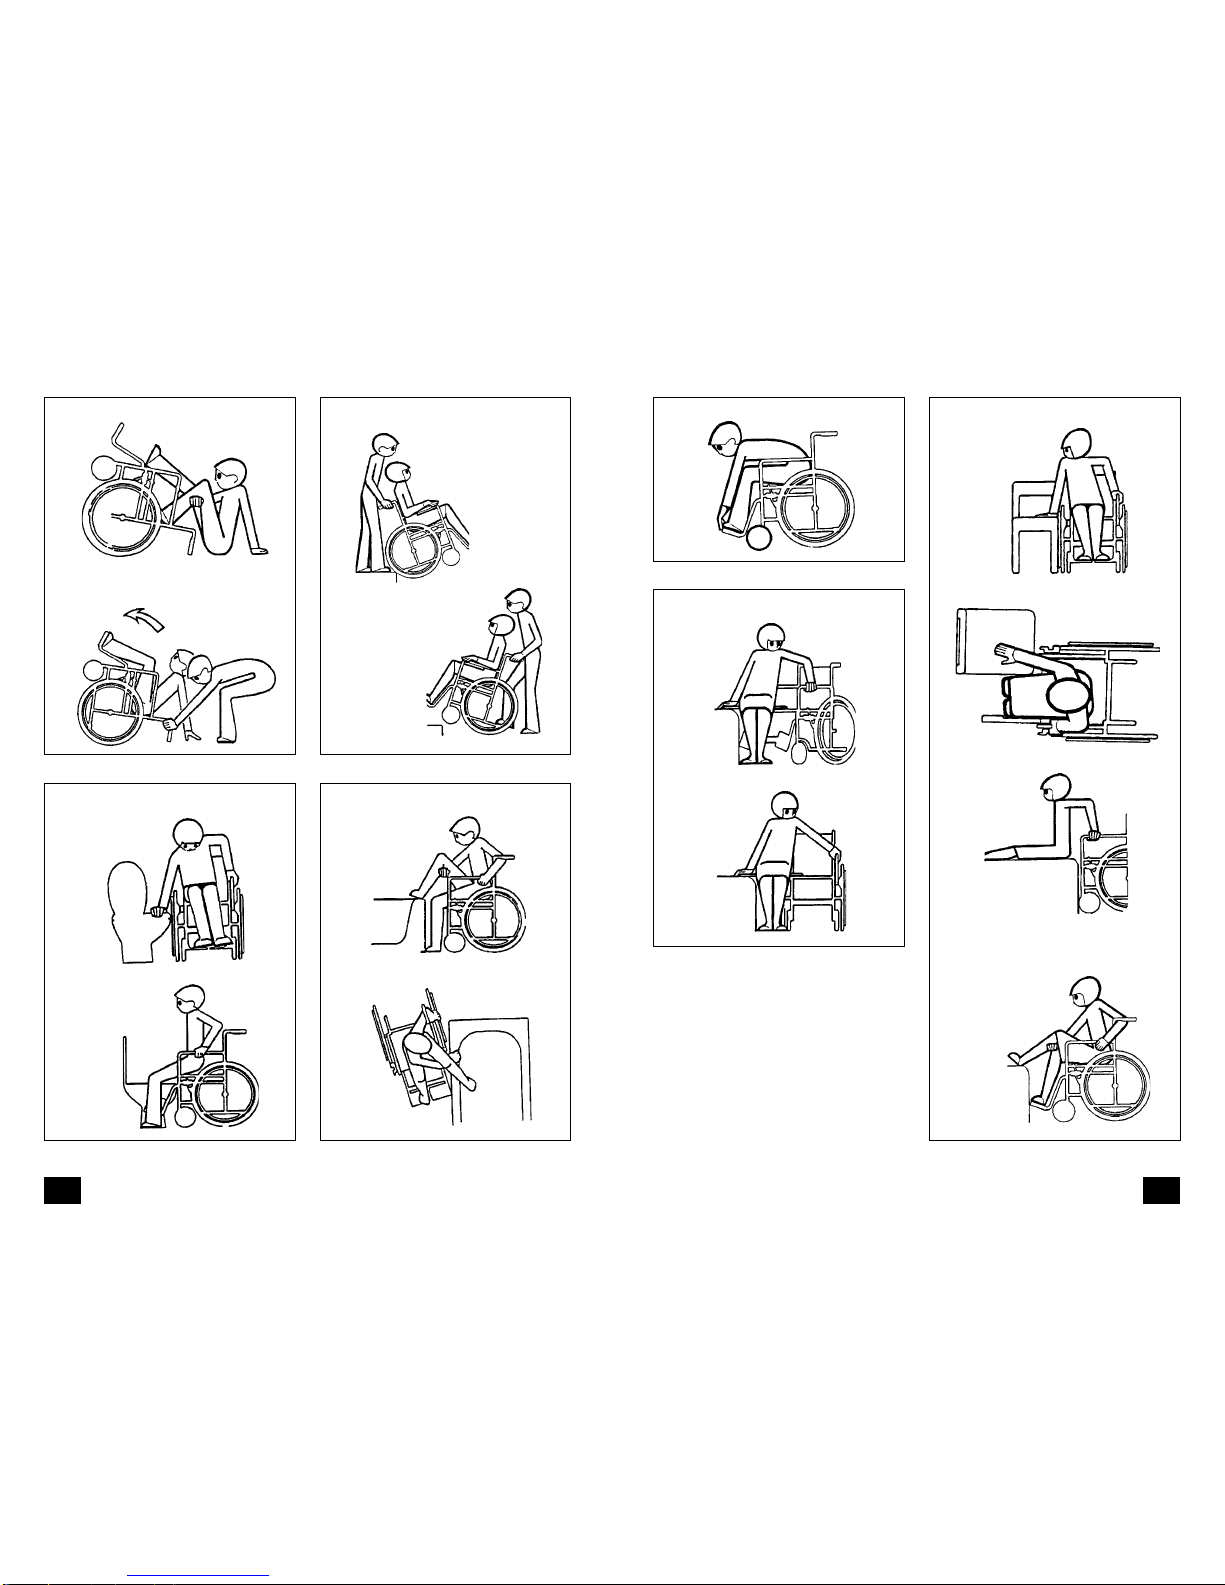
5.1 Lap belt ............................................................................................................................ 42
5.1.1 Fastening lap belt ................................................................................................ 42
5.1.2 Setting belt length .............................................................................................. 42
5.2 Stabilisers ......................................................................................................................... 43
5.2.1 Swivelling the stabilisers ..................................................................................... 43
5.2.2 Setting the height................................................................................................ 44
5.2.3 Correct stabiliser length ...................................................................................... 44
5.3 Tread cap ......................................................................................................................... 44
5.3.1 Setting the height................................................................................................ 44
5.4 Lateral supports................................................................................................................ 45
5.4.1 Setting the height................................................................................................ 45
5.4.2 Setting the depth ................................................................................................ 45
5.4.3 Swivelling the lateral supports to the rear .......................................................... 45
5.5 Spoke guard..................................................................................................................... 46
5.5.1 Removal ............................................................................................................... 46
5.5.2 Installation ........................................................................................................... 46
5.6 Brake lever extension ....................................................................................................... 46
5.7 Tray ................................................................................................................................... 47
5.7.1 8001 Tray .............................................................................................................. 47

76
2. Handling the wheelchair
2.1 Use
The
Impuls-ORTOform
wheelchair is a
therapywheelchair forthe domestic and
geriatric care.
The
Impuls-ORTOform
offers an uphol-
stered seat, an angle-adjustable, uphol-
stered backrest and a seat depth adjust-
ment with variable drive wheel position
for a comfortable, relaxed sitting.
The
Impuls-ORTOform
isdesignedfor the
daily use indoors and outdoors.
Before being used for the first time, the
wheelchair should be adjusted by your
ORTOPEDIA dealer. The adaptation will
take into account the driving experi-
ence, the physical limits of the user and
the main place of use of the wheelchair.
!
Attention:
Settingor adjustmentshould onlybe
carried out by an authorised ORTO-
PEDIA dealer.
1. Introduction
Thank you for choosing a wheelchair
from the IMPULS model range.
With its many design versions and acces-
sories,
Impuls-ORTOform
wheelchair sys-
tem can be adapted to suit your varying
clinical needs.
Like any other vehicle, a wheelchair is a
technical aid. It requires explanations for
use and a degree of maintenance. It also
has hidden dangers that may appear if it
is used incorrectly. The correct handling
must therefore be learned.
These instructions are intended for use in
conjunction with the booklet "Safety In-
formation for Mechanical Wheelchairs",
tohelpyou to familiariseyourself withthe
operation of the wheelchair and to pre-
ventaccidents.
Children should read these instructions
and the booklet "Safety Information for
Mechanical Wheelchairs" with their par-
ents, guardian or carer before venturing
out for the first time.
☞Note:
Please note that the equipment ver-
sions illustrated may differ from your
model.

98
2.4 Additional user/
safety information
▲A clean, passive illumination is re-
quiredfor thedriving onpublic high-
ways/pavements!
▲Do not throw or drop parts belong-
ing to the wheelchair!– Removable
parts such as armrests and leg sup-
ports should be handled correctly to
ensure lasting performance. To guar-
antee their function.
▲Removable parts, e.g. armrests and
legrests, must be checked for correct
lockingbefore thestart ofeach drive.
Drive wheels with defective linchpin
(quick-fit) axles can detach from the
wheelchair during the drive.
▲The fitting/removal of accessory
parts/components alters the dimen-
sions and weight of the wheelchair
and consequently the driving behav-
iour.
▲Never leave children/adolescents in
wheelchairs unsupervised.
▲Always drive up to small obstacles,
e.g.drops/steps, slowlyand at aright
angle (90°) until the swivel wheels
almosttouch the obstacle.Briefly stop
the wheelchair and then drive over
the obstacle.
▲Keep well clear of rail grooves, rails
and gully covers or similar sources of
danger. If not possible, cross such
obstacles at a right-angle (90°).
▲Maintain a sufficient safety distance
betweenthe vehicleand drops,steps
and obstacles. This distance must al-
lowenoughtime toreact andenough
distance to brake/turn.
▲Always reduce the speed before a
curve. A sharper curve requires a
lower speed. Never lean outwards in
a curve.
2.2 Performance
Optimisation of the performance char-
acteristics of the wheelchair to fit your
personal circumstances should be dis-
cussed with your ORTOPEDIA dealer or
physician.
The adaptability offers you an adequate
driving comfort and a high operational
safety.
2.3 Safety information
▲Please follow the safety information
for mechanical wheelchairs con-
tained in the relevant booklet.
▲A direct change of movement to the
opposite direction, e.g. from reverse
toforward movement withoutinvolv-
inga steeringaction, causes fullbrak-
ing if the swivel wheels are moving
inwards at the same time.
▲The use of a safety belt prevents the
user from falling out of the wheel-
chair.

1110
Curve driving
Turning on a slope
Driving uphill Obstacle crossing
Turning
Driving downhill Approaching an obstacle
2.4.1 User information
The following pages give general infor-
mation and suggestions for handling
and use of the wheelchair in everyday
situations.Make yourselfthoroughly and
carefully familiar with the wheelchair.
Newdriving situationsmustbe practised
with the support of a helper.
▲Always lock the brakes in order to
prevent the wheelchair from moving
before the transfer from/into the
wheelchair.
▲Before moving the upper part of the
body far forwards whilst in the
wheelchair, increase the stability of
the wheelchair by moving it rear-
wards until the steering wheels point
forwards.
s Tyres are made of a rubber mixture
and can leave permanent or difficult-
to-remove marks on some surfaces
(e.g. plastic, wooden or parquet
flooring, carpets, mats).
▲In order to prevent corrosion dam-
age, do not use the wheelchair in
damp rooms, do not drive it through
puddles or water and avoid a long-
term exposure to rain.
Recommendation for driving in
twilight or darkness.
▲Avoid as far as possible driving on
roads or bicycle paths during dark-
ness. Wear light-coloured clothing
that can be seen at a distance.

1312
Steering wheels forwards = safe stability Transfer
Lowering the legs
Transfer with sliding board
Bringing the wheelchair upright
Climbing in
Toilet use Climbing into the bath
Crossing drops/steps

1514
2.6 Transportation
For storage or transportation purposes,
the wheelchair can be dismantled into
portable elements without the need for
tools.
Firstly the dimensions of the wheelchair
can be reduced by removing all remov-
able parts. These include the leg sup-
ports, armrests (armrest pads are not
detachable), seat and backrest. Stabi-
lisers(if present)can befolded forwards.
The wheelchair can now be folded in
the normal way. In addition, driving
wheels equipped with full floating axles
can now also be removed.
During reassembly, ensure that each
part is correctly installed and securely
fastened. Check that components are
correctly positioned. Check the correct
seating of the components.
3. Overview
Theoverview showsthe mostimportant
components and operating elements of
the
Impuls-ORTOform
wheelchair.
The components shown in the follow-
ing illustrations may not be identical to
those on your wheelchair. The location
and handling of the parts are neverthe-
lessapplicable toyour
Impuls-ORTOform
wheelchair model. Each time the wheel-
chair is assembled, or each time a set-
ting is made, checks should be carried
out to ensure that the component in
question is fitted correctly and function-
ing properly.
1
2
2.5 Folding/unfolding
2.5.1 Folding the wheelchair
To fold the wheelchair (fig. 1) detach
the armrests, leg supports, seat and the
backrest (fig. 2). Pull the seat tubes to-
gether in an upward direction after hav-
ing separated the backrest stiffening
tube (fig. 3/ ➀).
2.5.2 Unfolding the wheelchair
To unfold the wheelchair, tilt it slightly
to one side. On the side which is stand-
ing firm on the ground, push the seat
tube downwards until it reaches its limit
(fig. 3/ ➁).
☞Note:
To do this, it may be necessary to
force both seat tubes into their final
position by hand.
Thebowden wire(fig. 4/ ➀)prevents
the side frames being pushed too far
apart.
4
1
3
12

1716
3.2 Components
3.2.1 30°-adjustable backrest
(gas spring adjustment)
For variable adjustment up to 30° (fig.
7) pull the release levers (fig. 8/ ➀).
☞Note:
Set both rear tubes to the same posi-
tion when the seat is occupied.
Pistons should be kept clean and
lightly greased with Vaseline (fig. 9)
for lasting performance.
!
Attention:
Adjusting the angle increases the
danger of tipping over and should
only be undertaken if stabilisers are
fitted!
7
8
1
1
9
5
3.1 Impuls-ORTOform
The model shown in fig. 5 and 6 is rep-
resentative of all
Impuls-ORTOform
wheelchairs.
1 Sliding handle
2 ORTOform-Backrest
3 Armrest
4 ORTOform-Seat
5 Lever for height-adjustment of the
legrest
6 Legrest 774-2 AL
7 Foot plates
8 Heel strap
9 Swivel wheel
10 Back stiffening bar
11 Drive wheel
12 Hand wheel
13 Full floating axle
14 Headrest
15 Plate with punched holes for set-
ting variable seat height and wheel
position
16 Calf pad
17 Clamping lever for backrest angle
adjustment
18 Sliding sleeve for dismantling back
stiffening bar
6
1
23
4
5
6
8
7
10
9
11
14
15
13
12
16
17
18

1918
13
14
1
3.2.3 Height-adjustable sliding
handles
The height of the sliding handles (fig.
13) can be variably adjusted. The han-
dles can also be secured against twist-
ing and pulling out of position
For variable height adjustment, loosen
the locking screw (fig. 14/ ➀). And re-
tighten when adjustment is complete.
3.2.4 Back stiffening bar
Before folding the wheelchair, the slid-
ing sleeve for locking the back stiffen-
ing bar should be pushed outwards to
the right (fig. 15/ ➀).
The halves of the stiffening bar are swiv-
elled down for the folding (fig. 16).
15
16
1
3.2.2 30°-mechanically-adjust-
able backrest
The backrest angle can be mechanically
adjusted by up to 30° (fig. 10). Both
clamping levers (fig. 11/ ➀) must be
slackened to adjust the angle.
☞Note:
Set both rear tubes to the same posi-
tion when the seat is occupied.
Clean clamping surfaces (fig. 12)
ensure a permanent functioning.
!
Attention:
Adjusting the angle increases the
danger of tipping over and should
only be undertaken if stabilisers are
fitted!
10
11
1
1
12

2120
19
1
3.2.5.2 Height-adjustable arm-
rest
To adjust the height, push in the ratchet
button (fig. 19/ ➀) and bring the arm-
rest pad in stages to the desired height.
17
1
3.2.5 Armrests
!
Attention:
Do not use wheelchair without arm-
rests guards fitted.
Donot usethearmrests toliftor carry
the wheelchair.
3.2.5.1 Armrest with double
locking
To install the armrest, push the diago-
nallypositioned rearpin(fig. 17/ ➀)into
the corresponding opening, then swivel
it forwards into the corresponding
opening until you hear the locking
button click into place.
☞Note:
When the armrest is swivelled for-
ward, the rear lock (fig. 17/ ➀) is
automatically engaged.
To remove the armrest, press the lock-
ing button (fig. 18/ ➁) swivel the front
of the armrest free and pull upwards.
!
Attention:
When supporting yourself on plastic
armrests, place your hands over the
central column (fig. 18).
18
2

2322
21
3.2.6.2 Leg support with angle
adjustment and length
compensation (774-2 AL)
When seated in the wheelchair, ask a
carer to raise the leg support to the de-
sired level. The length of the leg sup-
port is automatically adjusted by spring
force.
To lower the leg support, remove the
load momentarily from the support by
raising the lower thigh (ask a carer if
necessary), and push the clamping le-
ver (fig. 21/ ➀) forwards.
The leg support can now be moved
slowly downwards.
!
Attention:
When setting the height-adjustable
leg support, never touch the adjust-
ment mechanism with your free
hand.
1
3.2.6 Leg supports
!
Attention:
Do not use the leg supports to lift or
carry the wheelchair.
Locking the brakes prevents the
wheelchairfrom unintentionalmove-
ment.
3.2.6.1 Leg support with angle
adjustment (774-1)
When seated in the wheelchair, ask a
carer to raise the leg support to the de-
sired level.
To lower the leg support, remove the
load momentarily from the support by
raising the lower thigh (ask a carer if
necessary) and push the clamping le-
ver (fig. 20/ ➀) forwards.
The leg support can now be moved
slowly downwards.
!
Attention:
When setting the height-adjustable
leg support, never touch the adjust-
ment mechanism with your free
hand.
20
1

2524
24
1
3.2.6.4 Swivelling leg supports
aside
The leg supports can be swivelled in-
ward/outward(fig. 24)for an easytrans-
fer to/from the wheelchair or for driv-
ing closer to a cupboard, bed or bath.
To swivelaway thelegsupport, pressthe
respective lever for locking (fig. 25/ ➀)
to the rear and then swivel the respec-
tive leg support inward/outward.
!
Attention:
Legsupportswhich havebeen moved
asideare automaticallyunlocked and
can easily fall off. Note this when
handling (e.g. transport).
Do not forget to check the correct
functioning of the respective locking
device (fig. 25/ ➀) after having swiv-
elled in the leg supports again. 25
23
3.2.6.3 Folding up the foot
plates
The foot plates must be folded up and
thecalf padsswivelledoutwards (fig.22)
toobtain anunobstructed foot area,e.g.
for shuffling (forward movement of the
wheelchair with the feet) (fig. 23).
22

2726
31
3.2.6.7 Height-adjustment of
foot plates (774-1)
Thefoot platecan be telescopedin steps
to the desired height after the removal
of the locking screw (fig. 30/ ➀).
☞Note:
Fit the locking screw at the appro-
priate height and then tighten.
The tightening torque is 5 Nm.
3.2.6.8 Height-adjustment of
foot plates (774-2 AL)
Thefootplate can beinfinitely telescoped
to the desired height after the removal
of the locking screw (fig. 31/ ➀).
☞Note:
Observe markings indicating maxi-
mum extension.
Re-tighten screw.
The tightening torque is 5 Nm.
1
30
1
1
26
27
28
3.2.6.5 Removal of leg supports
The leg supports can be detached in an
upward direction (fig. 26/ ➀) by press-
ing the respective lever for locking the
leg support (fig. 27), and then swivel-
ling away the leg support (fig. 28).
3.2.6.6 Attachment of leg sup-
ports
Insert leg supports from above at an
angle into the leg support holders (fig.
29), and swivel supports forwards until
you hear them click into place.
!
Attention:
Do not forget to check the correct
functioning of the respective locking
device (fig. 26/ ➀) after having swiv-
elled in the legrests again.
29

2928
35
3.2.6.11 Depth-adjustment of calf
pads (774-1)
The depth of the calf pads can be al-
tered by assembly at two other screw-
on positions (fig. 35/ ➁). Tighten the
locking screws (fig. 37/ ➂) after the
adjustment.
3.2.6.12 Depth-adjustment of calf
pads (774-2 AL)
The depth of the calf pads can be al-
tered by assembly at two other screw-
on positions (fig. 36/ ➁). Then tighten
the clamping screw (fig. 37/ ➂).
36
3
37
2
2
1
33
32
3
2
3.2.6.9 Angle-adjustment of foot
plates (774-2 AL)
After removing the locking screw (fig.
32/ ➁), pull out the teeth and set the
angleof thefoot plate. Re-tightenscrew.
The tightening torque is 6 Nm.
The regulating screw (fig. 32/ ➂)is used
to correct the angle of the foot plate in
a crosswise direction.
3.2.6.10 Height-adjustment of
calf pads (774-1)
The height of the calf pad can be al-
tered after the locking screw (fig. 33/
➀) has been slackened.
Re-tighten screw.

3130
42
43
3.2.8 Upholstered seat
The upholstered seat must be detached
in an upward direction for folding (fig.
42).
To attach the upholstered seat, align it
accordingto theadjusted depthand the
clearance space of the upholstered seat
and the crossbrace (fig. 43).
☞Note:
The seat clips rest on the seat tubes.
The seat can be secured by screw-
ing an M5 x 30 mm cross-recessed
screw into each of the front seat clips
(fig. 43.1).
43.1
3.2.7 Upholstered backrest
The upholstered backrest must be de-
tached for folding (fig. 38).
3.2.7.1 Detaching the uphol-
stered backrest
Slacken the wing nut and then slide the
securing clip inward (fig. 39).
Then take off the upholstered backrest
ina forward direction bypressing lightly.
3.2.7.2 Attaching the uphol-
stered backrest
The upholstered backrest is attached by
pressing the clips of the upholstered
backrest onto the backrest tubes (fig. 40
and 41). The upholstered backrest is se-
cured by sliding the lower securing clips
outward and then tightening the wing
nuts (fig. 41).
38
39
40
41

3332
46
47
3.2.10 Driving wheels
The drive wheels are on a full floating
axle.
☞Note:
The tyre pressure is shown on both
sides of the tyre surface and can also
be found in the Technical data.
3.2.10.1 Full floating axle
The driving wheels can be installed or
removed without the need for tools (fig.
46).Unlock the fullfloatingaxle by press-
ing on the spring-loaded button and
then pull off the wheel in an outward
direction.
To attach the drive wheel, unlock the
respective full floating axle by pressing
on the spring-loaded button (fig. 46)
and then push it into the axle mount up
to the end stop.
!
Attention:
Each time the wheels are installed,
test the locking mechanism by pull-
ing/pushing the driving wheel from
the side (fig. 47).
– The full floating axle must be kept
clean. A functional fault may occur
in the case of contamination due to
sand or earth or in the event of freez-
ing of moist cold air.
– If the drive wheel has too much lat-
eral play or the full floating axle does
not lock, it should be repaired im-
mediatelyby anauthorised ORTOPE-
DIA dealer.
3.2.9 Headrest
The headrest (fig. 44) can be adjusted
to suit the respective user.
Slacken the locking screw (fig. 44/ ➀)
to adjust the height.
Slacken the locking screws (fig. 44/ ➁)
to position the headrest.
Slacken the clamping device (fig. 45) to
adjust the angle.
☞Note:
When adjustment is complete, re-
tighten the clamping device screws.
44
45
1
2

3534
3.2.12.1 Safety information
▲The wheelchair must not be pushed
when the brakes are locked on.
▲If the braking effect reduces, the
wheelchair should be repaired im-
mediately at an authorised repair
centre.
▲In order to prevent unwanted swerv-
ing when stopping the wheelchair
orwhen lockingthe brakesona slop-
ing surface, both brake levers should
be activated simultaneously.
▲Do not lean on the lateral brake le-
ver (fig. 49/ ➀).
!
Attention:
The braking effect is dependent on:
– the condition of the tyres,
– the condition and fixing of the
brakes,
– the brake lever setting,
– the quality of the road surface.
50
3.2.12.2 Toggle joint brake
Activationofthe toggle jointbrake causes
a brake bolt to press on the tyre (fig.
50).
3.2.12.3 Drum brake
Activation of the drum brake causes
brake pads to press against the wheel
hub from the inside.
3.2.12.4 Service brake function
For measured braking, the lateral brake
levers of the toggle joint brakes (fig. 49/
➀) should be pushed forward slightly
and equally.
49
48
3.2.11 Hand wheels
The distance between the hand wheels
and the driving wheels is adjustable. To
changethis distance,loosen thefour fix-
ingscrews (fig.48/ ➀)byapproximately
one turn. Move the hand wheel to the
required position parallel to the driving
wheel. Tighten the fixing screws cross-
wise.
3.2.12 Brakes
The wheelchair can be halted via the
hand wheels, the toggle joint brakes
(fig. 49) or the drum brakes (carers
only).
1
1

3736
53
123
3.2.12.8 Drum brake for carers
(Fig. 53)
You lock the drum brake by first pulling
up the brake lever (➀), and then press-
ing on the surface of the front toggle
lever (➂). The brake lever is released
by pulling up the brake lever (➀) until
thetoggle lever(➁)automatically jumps
out of the latch.
3.2.12.9 Adjustment of toggle
joint brake
☞Note:
After modifications/adjustments to
the chassis, the brakes must be re-
set.
Please observe the safety infor-
mation given in Section 3.2.12.1!
Before resetting the brakes, the tyre
pressure must be checked and, if
necessary, adjusted. The correct tyre
pressure is given in the Technical
data.
Loosen the screws of the clamping de-
vice (fig. 54/ ➀). Displace the toggle
joint brake (fig. 55). Dimension X = 21
mm. When adjustment is complete, re-
tighten the clamping device screws.
Check that the braking effect of the tog-
gle joint brakes is equal and that the
brakes are functioning correctly.
54
1
55
><
X
51
3.2.12.5 Locking the brake
To secure the wheelchair against unin-
tentional movement, both lateral brake
levers should be pushed forward until
they reach their limit stops (fig. 51).
3.2.12.6 Releasing the brake
To release the brake, both brake levers
should be pulled backwards until they
reach their limit stops (fig. 52).
3.2.12.7 Changing or replacing
driving wheels
After a change of driving wheels, checks
should be made to ensure that the
brakes are functioning correctly. The
brakes should then be reset if necessary
Driving wheels with PU tyres require a
special toggle joint brake.
Whenchanging to awheelwith PU tyres,
or from PU tyres to another type of tyre,
thetoggle jointbrakes mustbe changed
at the same time.
52

3938
57
4. Individual
customisation
This setting option offers:
– individual adaptation of the seat
depth to your thigh length,
– customised adjustment of the seat
heightto suit yourlower thighlength,
– customised adjustment of seat incli-
nation for user,
– increasedstability againsttipping up.
4.1 Seat depth
The seat depth can be altered with four
further positions. This requires the dis-
placement of the seat tube (fig. 57/
➀+➁) and armrest mounts and the rear
frame part (fig. 57.1/ ➂).
!
Attention:
– Customised adjustment or modifi-
cation should only be carried out
by an authorised dealer.
– Any new adjustment may have an
effect on performance.
12
57.1
3
3.2.13 Swivel wheels
The swivel wheels can be easily replaced
(fig. 56).
The screw axle (fig. 56 ➀) must be dis-
assembled to remove the wheel.
The correct tyre pressure can be found
in the Technical data or on the outer
surface of the tyre.
3.2.14 Tyres
Pneumatic tyres:
The appropriate tyre pressures are given
in the >Technical data<. The maximum
pressure is shown on the outer surface
of the tyre.
Solid tyres:
These can be distinguished by the ab-
sence of a compressed air valve.
56
1
Table of contents
Other Ortopedia Wheelchair manuals