Oster OEMP50 User manual

MODEL/MODÈLE
MODELO
MODEL/MODÈLE
MODELO
Instruction Manual
ESPRESSO & CAPPUCCINO MAKER
READ ALL INSTRUCTIONS BEFORE USING THIS APPLIANCE
Manuel d’Instructions
CAFETIÈRE POUR EXPRESSO ET CAPPUCCINO
LIRE TOUTES LES INSTRUCTIONS AVANT D ’ UTILISER CET APPAREIL
Manual de Instrucciones
CAFETERA PARA CAFE EXPRESO Y CAPUCHINO
LEA TODAS LAS INSTRUCCIONES ANTES DE USAR ESTE APARATO
Manual de Instruções
CAFETEIRA PARA CAFÉ EXPRESSO E CAPPUCCINO
LEIA TODAS AS INSTRUÇÕES ANTES DE USAR ESTE APARELHO
OEMP50
OEMP50

1
IMPORTANT SAFEGUARDS
When using electrical appliances, basic safety precautions should always be followed to
reduce the risk of fire, electric shock and/or injury to persons, including the following:
READ ALL INSTRUCTIONS BEFORE USING THE APPLIANCE.
• DONOTtouch hot surfaces “ ”. Use handles or knobs.
• Toprotectagainstelectricshock,DO NOT immerse cord, plugs or appliance in water or
other liquids.
• Closesupervisionisnecessarywhenanyapplianceisusedbyornearchildrento
ensure they do not play with the appliance.
• Thisapplianceisnotintendedforusebypersons(includingchildren)withreduced
physical, sensory or mental capabilities, or lack of experience and knowledge, unless
theyhavebeengivensupervisionorinstructionconcerningtheuseoftheapplianceby
a person responsible for their safety.
• Turnthesideknobtotheoffposition“”,presstheredswitchtotheoffposition“O”
and unplug unit from electrical outlet when not in use and before cleaning. Allow it to
cool before putting on or taking off parts and before cleaning it.
• DO NOT operate any appliance with a damaged cord or plug or after the appliance
malfunctions or has been damaged in any manner. Return this appliance only to the
nearestAuthorizedOster®ServiceCenterforexamination,repairoradjustment.
• TheuseofaccessoryattachmentsnotrecommendedforOster®productsmayresultin
fire, electric shock or injury to persons.
• DO NOT use outdoors or for commercial purposes.
• DO NOTletcordhangoveredgeoftableorcountertoportouchhotsurfaces.
• DO NOT place this appliance on or near a hot gas or electric burner or in a heated
oven.
• Todisconnect,turnanycontroltooffpositionthenremoveplugfromwalloutlet.
• DO NOT use appliance for anything other than its intended use.
• Useonahard,flatlevelsurfaceonly,toavoidinterruptionofairflowunderneaththe
appliance.
• Alwaysbesuretoplacethewaterreservoirtightlybackintheunitwithitslidclosed
andfillwithwateronorabovetheminimumbeforeturningapplianceon.
• DO NOTremovethebrewbasketwhilebrewingcoffee.Pleasemakesuretoturn
thesideknobtotheoffposition“”beforeyouremovethebrewbaskettomake
additionalcoffee.Cautionshouldalsobetakenwhileremovingthebrewbasketsince
themetalpartswillbehot.Pleasemakesuretoholditbythehandleandtouse
thefilterretentioncliptodisposethegrounds.Seesection“CAUTION”onpages2and
4foradditionalwarnings.Cautionshouldbetakenwhenmovingunitwithhotliquids.
• DO NOTremovethewaterreservoiruntilunitisturnedoff.Seesection“CAUTION”on
pages2and4foradditionalwarnings.
THIS UNIT IS FOR HOUSEHOLD USE ONLY.
SAVE THESE INSTRUCTIONS

2
(FOR 120 & 127 VOLTS ONLY)
Theappliancehasapolarizedplug(onebladeiswiderthantheother).Toreducetherisk
ofelectricshock,thisplugisintendedtofitintoapolarizedoutletonlyoneway.Iftheplug
doesnotfitfullyintotheoutlet,reversetheplug.Ifitstilldoesnotfit,contactaqualified
electrician. Do not attempt to modify the plug in any way.
SPECIAL CORD SET INSTRUCTIONS
1.Ashortpowersupplycordisprovidedtoreducethehazardsresultingfrom
becomingentangledinortrippingoveralongercord.
2.Anextensioncordmaybepurchasedandusedifcareisexercisedinitsuse.
3.Ifanextensioncordisusedthemarkedelectricalratingoftheextension
Cordmustbethesameastheproduct.Theextendedcordmustbearrangedso
thatitwillnotdrapeoverthecountertoportabletopwhereitcanbepulledon
bychildrenortrippedoveraccidentally.
CAUTION: PRESSURE
Inordertoavoidpossibleburnstobodypartsand/orotherinjuryfromhotsteamand
waterordamagestotheunit,neverremovethewaterreservoirorthebrew
BasketwhileyourOster®espresso/cappuccinomakerisbrewingcoffeeorfrothing.
Thesideknobshouldbeintheoffposition“”beforeyoucanremovethebrewbasket
tomakeadditionalcupsofcoffee.Ifyouneedtoaddmorewatertothereservoir,please
turn the side knob to the off position “ ” and to switch off the unit by pressing the red
buttononthesidetotheoffposition“O”.Seepage4formoreimportantdetails.
USE GROUND COFFEE FOR ESPRESSO MAKERS.
Do not use sugar roasted ground coffee or sugar roasted coffee beans as these will clog
thefilteranddamagetheappliance.Ifsugarroastedcoffeeisaccidentallyused,stop
usingtheunitandbringittotheclosestservicecenterformaintenance.
We recommend descaling the machine periodically to keep it in good working condition.
Contactourservicecenterstolearnaboutthisprocess.
(*)GroundwithSugar

3
1
2
3
4
8
5
6
1.ControlKnob
2.RemovableLarge/ClearWater
Reservoir
3.WaterReservoirLid
4.RemovableDripTrayandDripGrid
5.On/OffButton
6. Brew Head
7.FilterRetentionClip
8.Filters(for1&2demitasses)
9. Brew Basket/Filter Holder
10.FrothingTube
11.FrothingTubeCap
12.PowerIndicatorLight(Red)
13.BrewingButtonwithIndicator
Light(Green)
14.FrothingButtonwithIndicator
Light(Green)
15.ReadyIndicatorLight(Green)
16.MeasuringScoop
7
9
11
10
12 13 14 15
16
DESCRIPTION OF THE APPLIANCE

4
INTRODUCTION
Congratulations!YouhaveselectedaqualityOster®Espresso/CappuccinoMaker.This
uniqueappliancehasbeendesignedtoprovideyouwithdeliciousespresso/cappuccino
quicklyandconveniently.
Espressoisauniquemethodofcoffeebrewinginwhichhotwaterisforcedthroughfinely
groundcoffee.PopularinEurope,itisafarricherandmorefull-bodiedbrewthanregular
Americancoffee.Becauseofitsrichness,espressoisusuallyservedin44to59mL(1.5
to2oz.)portions,indemitassecups.
MostespressodrinkersoutsideofEuropeprefercappuccino,adrinkmadewithabout
onethirdespresso,onethirdsteamedmilk,andonethirdfrothedmilk.Preparing
espressoorcappuccinoisverydifferentfrombrewingregulardripcoffeesincethisappli-
ance under pressure and requires special attention.
PleasereadALLoftheinstructions,cautions,notesandwarningsincludedinthisInstruc-
tion Manual carefully before you begin to use this appliance. When this unit is used, some
partsandaccessoriesgethotandneedtocooldown.Propercareandmaintenancewill
ensurethelonglifeoftheOster®Espresso/CappuccinoMakeranditstrouble-freeopera-
tion.Savetheseinstructionsandrefertothemoftenforcleaningandcaretips.
CAUTION: PRESSURE
Pleasefollowtheseimportantsafetyinstructionswhileusingyourunit:
1. Beforeremovinganyofthepartsandaccessories,makesurethecontrolknobonthe
side of the unit is turned to the off position “ ”, press the on/off button to the off
position“O”andunplugtheappliance.
2. Donotremovethebrewbasketatanytimeduringthebrewingprocess.
3. Usecautionwhenremovingthebrewbasket.Themetalpartsmaystillbeveryhot.
Also, there may be hot water floating on the top of the filter. Hold it only by its handle
and dispose of the brewed coffee ground by using the filter retention clip.
4. Ifcoffeedoesnotdripfrombasket,thebrewbasketisblocked.Turnofftheappliance
andallowittocooldown.Theblockagemaybecausedbythecoffeebeingtoo
finelyground.See“PROBLEMSANDCAUSES”onPage9.
5. WHENCLEANINGTHEFROTHINGTUBE:Placeafrothingpitcherorlargecup
(withatleast11-ouncecapacity)halffullofwaterunderthefrothingtubecap.Make
sure the tip of the frothing tube is submerged in liquid before turning the control knob
to the steam “ ” position. Froth the water for approximately 15 seconds then wipe
clean the frothing tube and cap.
NOTE:Inorderforyourunittoworkproperlytimeaftertime,cleanthefrothingtipand
tube after each use.

5
HOW TO PREPARE QUALITY ESPRESSO
AND CAPPUCCINO AT HOME
THE COFFEE
Thecoffeeshouldbefreshlygroundanddarkroasted.YoumaywanttotryaFrench
orItalianroast.Pre-groundcoffeewillonlyretainitsflavorfor7–8days,provideditis
stored in an airtight container and in a cool, dark area. Do not store in a refrigerator or
freezer.Wholebeansarerecommendedtobegroundjustbeforeuse.Coffeebeans
stored in an airtight container will keep up to 4 weeks before they begin to lose their
flavor.
THE GRIND
Thisisavitalstepintheespressomakingprocessandtakespractice.Thecoffeemust
be of a fine grind.
• Thecorrectgrindshouldlooklikesalt.
• Ifthegrindistoofine,thewaterwillnotflowthroughthecoffeeevenunderpressure.
Thesegrindslooklikepowderandfeellikeflourwhenrubbedbetweenfingers.
• Ifthegrindistoocoarse,thewaterflowsthroughthecoffeetoofast,preventingafull-
flavoredextraction.
Besuretouseaqualitygrinderforuniformconsistency.Ovalshapedcoffeegrindersare
not recommended because the grind is not consistent.
BEFORE BREWING YOUR FIRST ESPRESSO
PleaserefertoPage3fortheDescriptionoftheAppliance.
1.Turnthesideknobtotheoffposition“”,switchtheunitoff“O”andmakesureitis
unplugged from the electrical outlet.
2.Firstremoveandthenwashthewaterreservoir,lid,brewbasketandfiltersinamixture
of mild detergent and water. Rinse each thoroughly and place them back into the unit.
Refertotheinstructionsbelowon“HowtoBrewEspresso”beforeremovingthefilter
and brew basket.
3.Tocleantheinsideoftheappliance,followstepslistedon“HowtoBrewEspresso”
using water only. Do not immerse the appliance in water or attempt to reach any of its
internal parts.
IMPORTANT
Toprimethepump,runsteamcyclefor30secondsfollowingthestepsbelow:
1.Ensurethattheredpowerswitchisintheonposition“I”.
2.Afterthereadylight“”becomessolidgreen,pressthesteambutton“”
(thereadylight“”willflash).
3. After the ready light “ ” becomes solid green again, place a cup under the frothing
tube and turn the side control knob clockwise to the steam position “ ”.
4.After30seconds,turnthesidecontrolknobcounter-clockwisetotheoffposition“”.
5. Begin the brew coffee process.
HOW TO BREW ESPRESSO
1.Makesuretheunitisswitchedoff“O”andthesideknobisintheoffposition“”.
2.Fillthereservoirwithwater,youmayeitheruseajartofillituporremoveitfromthe
unitandthenfillitupunderthetap.Ifyouhaveremoveditfromtheunittofillupwith
water,pleasemakesuretoplaceitbacktightlyinitsplace.Fillthereservoirwiththe
desiredamountofwaterensuringitrangeswithinthe“MIN”and“MAX”markingson
thetank.Neverusewarmorhotwatertofillthewaterreservoir.

6
3.Closethewaterreservoirlid.
PREPARING THE COFFEE
1.Placethefilterinthebrewbasket.Selectfromthetwofiltersthatcomewithyourunit
dependingontheamountofcupsyouwishtoprepare(1or2demitasses).
2.Filltheselectedfilterwithfresh,finegroundespressocoffee.Cleananyexcesscoffee
fromtherimofthefilterholder.Thiswillassureproperfitunderthebrewhead.
ATTENTION:Tamporcompresscoffeeusingthetamperasshownbelow.Donot
overfillthefilter.Thismightcausecloggingoroverflow.
3.Positionbrewbasketunderneaththebrewhead,attachbrewbasketbyfirstmoving
retainer clip back, position handle so that the handle lines up with the unlocked
icon“”onthebrewheadandfitsintothegroove.Then,slowlyturntorightuntilbrew
basketislocatedatlockedposition(indicatedbytheiconbelow).
(Thissymbolisonthebrewhead)
BREWING ESPRESSO
ATTENTION: IF YOU ARE PLANNING TO MAKE CAPPUCCINO, PLEASE REFER TO
THE NEXT SECTION “HOW TO MAKE CAPPUCCINO.”
1.Makesurethedripgridisinplaceonthedriptray.Placethedriptrayintheunit.
2.Makesurethecontrolknobisintheoffposition“”.
3.Placethecuportwocups(demitasses)underthebrewbasketorifyouprefer,place
asmalljarorcarafe.Ifyouwishtoprepareupto4cupsatatime,youshouldusea
smalljar,carafeorregularcupandthenpourtheespressointothedemitasses.Ifyou
will be brewing up to two demitasses at a time, you can place the two small cups
under the brew basket ensuring each one of them is directly under one of the two
spouts located under the brew basket.
4.Plugthepowercordintoanelectricaloutletandthenswitchtheunitonbypressingthe
redbuttononthesideoftheappliancetotheonposition“I”.Thepowerindicatorlight
willbecomesolidredwhiletheunitisonandthereadyindicatorlight(green)willstart
blinking.
5.Oncethereadylightbecomessolidgreen,pressthebrewbutton“”andthenrotate
thesideknobcounter-clockwisetothebrew“”position.Thiswillinitiatethebrewing
process and espresso will begin to flow in just seconds.
NOTE: IFTHEBUTTONSBEGINTOFLASH,THEUNITHASINFORMEDYOUTHATTHE
INSTRUCTIONSWERENOTFOLLOWEDCORRECTLY.SWITCHTHEPOWER
BUTTONTOTHEOFFPOSITION“”TORESET.RETURNTOSTEP#4TORESUME
BREWINGESPRESSO.
6.Whenthecup/carafeisfilledtothedesiredlevel,turnthesideknobclockwisetothe
off “ ” position.
CAUTION: DONOTLEAVEUNITUNATTENDEDWHILEBREWINGSINCETHEBREWING
PROCESSREQUIRESTOBEMANUALLYSTOPPED.THISWILLAVOID
OVERFLOW,SPILLAGEANDPOTENTIALHAZARDSANDDAMAGES.THEUNIT

7
REQUIRESTOBETURNEDOFFMANUALLY.
7.Onceyouhavepreparedthedesiredamountofespressoorcappuccino,switchthe
powerbuttontotheoffposition“O”andunplugtheunit.Allowtheunittocooldown
beforeremovingpartsandaccessoriespriortocleaning.
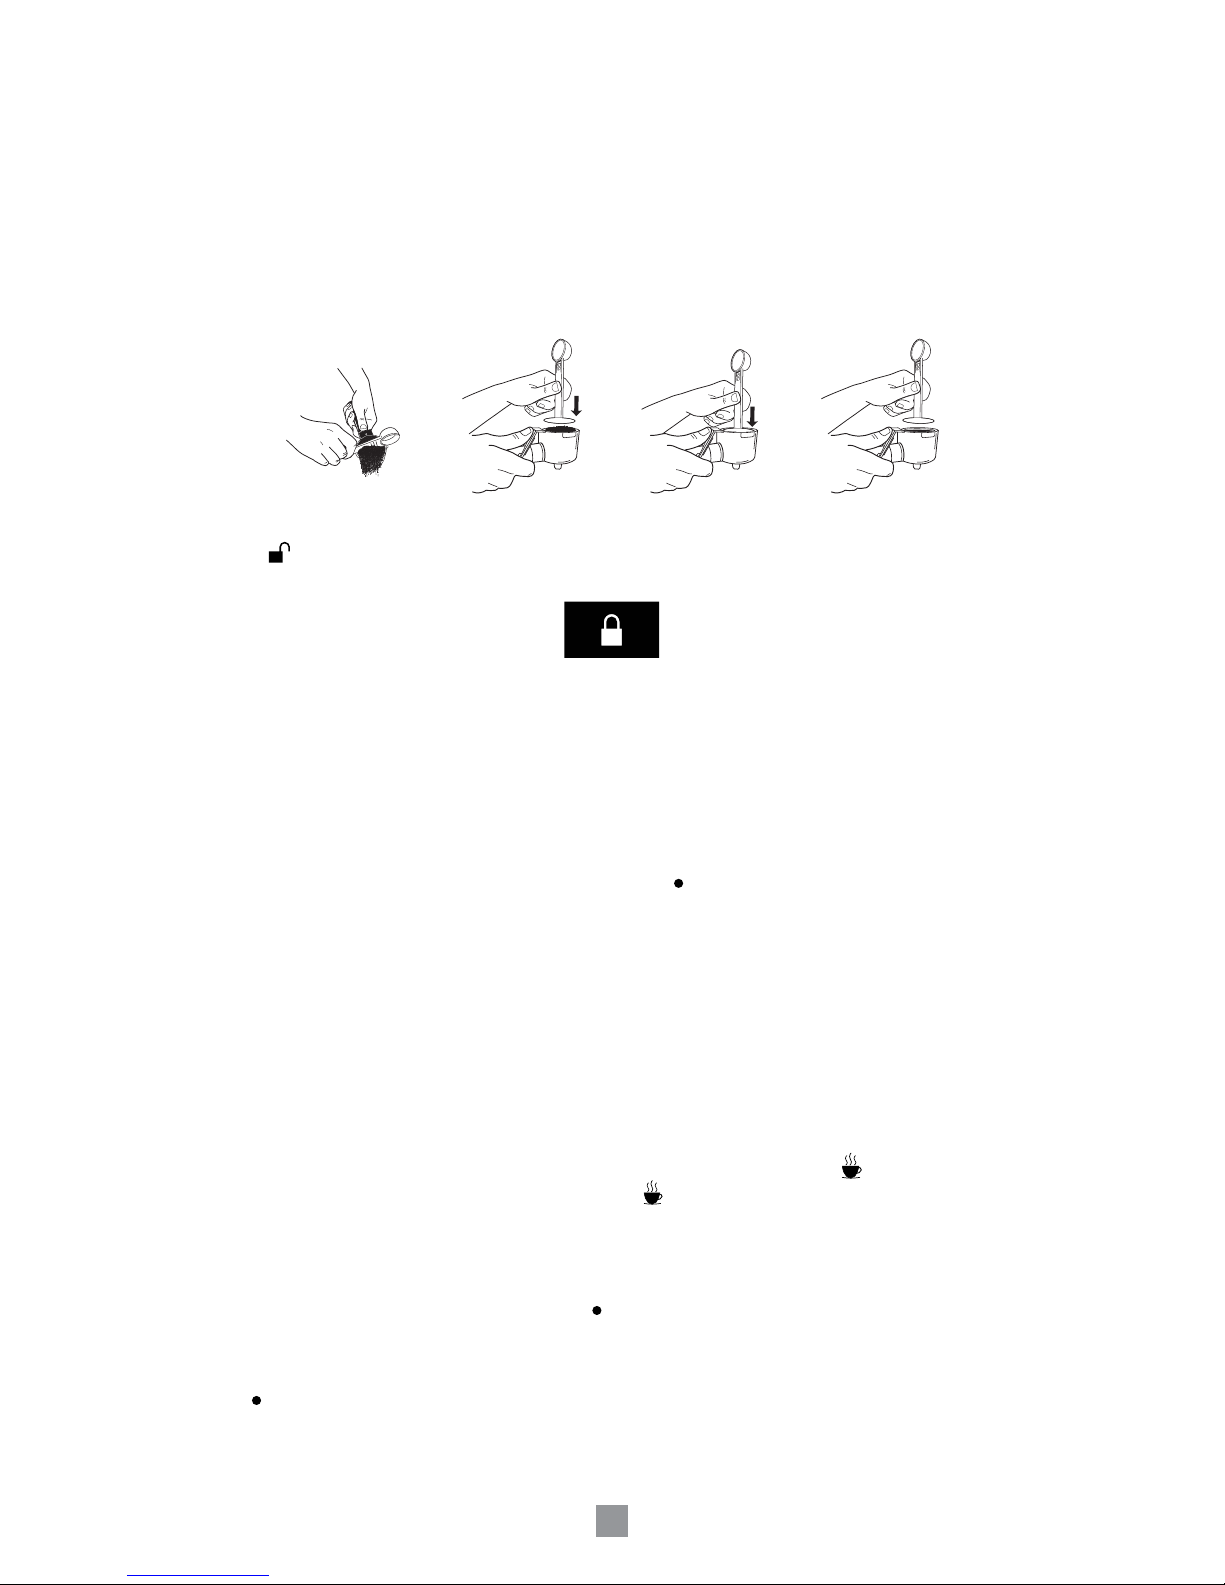
8.Aftertheunithascooleddown,removethebrewbasketfromthebrewhead.Usingthe
retainer clip to secure the filter in the filter holder, turn the brew basket upside down to
empty. Rinse the filter and brew basket with water.
9.Ifyouwishtobrewadditionalespresso,repeattheprocess.Turnthesideknobtothe
offposition“”,removethedemitassesorjarfromunderthebrewbasketandplace
newandemptyones.Carefullyremovethebrewbasketbyholdingitwiththehandle,
ensuringtousethefilterretentioncliptoholdthefilteranddisposeofthegrounds.Put
fresh coffee in the filter, place the brew basket back underneath the brew head and
followtheinstructionstobrewcoffeeagain(items3,5and6fromthissection).
CAUTION:Themetalpartsofthebrewbasketmightstillbeveryhot.Makesureto
usethefilterretainerclipwhendiscardingthegrounds.Cooltheseparts
by running under cold water.
10.Forcleaninginstructions,refertoPage8.
HOW TO MAKE CAPPUCCINO
Cappuccinoisespressotoppedwithsteamedandfrothedmilk.Frothingmilkforcap-
puccinotakespractice.Donotbediscouragedifitisnotperfectthefirsttime.Themilk
shouldbehalfsteamed(bottomofpitcher)andhalffroth(topofpitcher).Itmaytakea
few times before you perfect this process.
For best results, we recommend frothing the milk in a separate pitcher and pouring the
milkintoyourcoffee.Themilkandpitchershouldbecold.Donotuseapitcher,whichhas
just been washed in warm water. We also recommend a stainless steel frothing pitcher
andabeveragethermometer,ifyouownone,forpreparingthebestfrothandsteamed
milk.
1.Thefirststepinmakingcappuccinoistomakeespresso.Therefore,fillthewater
reservoirwithcoldwater.Neverusewarmorhotwatertofillthewaterreservoir.
2.Followsteps1–6inthe“BrewingEspresso”section.
3.Fillasmallstainlesssteelorceramicpitcher1/2fullwithcoldmilkandsetnextto
machine.Skimor2%milkwillbetheeasiesttofroth.
4.Youarenowreadytofrothandsteamyourmilk.Presstheredswitchtotheon
position“I”,waituntilthereadylight“”becomessolidgreen.Holdthepitcherunder
the frothing tube so that the tip of the frothing tube is slightly immersed in the milk,
pressthesteambutton“”.Thereadylight“”willstartblinkingandonceit
becomes solid green again turn the side knob clockwise to the steam position “ ”.
Gentlymovethepitcherinacircularmotionaroundthesteamnozzleforabout50
seconds(for4oz,ofmilk)orlongerifwarmermilkisdesired.REMEMBER:The
milkandthepitchershouldbeverycoldpriortofrothing.
5.Whenthemilkhasdoubledinvolume,or,ifyouareusingabeveragethermometer,
whenthemilkhasreached38°C(100°F),insertthefrothingaiddeeperintothemilk
tofurtherheatthemilk.Donotheatmilkabove65°C(150°F).Toavoidsplatteringof
hotmilk,donotletthetipofthefrothingtubegoabovethesurfaceofthemilk.After
frothingiscompleted,turnthecontrolknobbacktotheoffposition“”.Thesteam
“”andthebrew“”lightswillflash.Thepumpwillrunintermittentlyuntilthebrew

8
light and the steam light turn off.
6.Youarenowreadytomakecappuccino.REMEMBER:Itis1/3espresso,1/3steamed
milkand1/3frothedmilk.Pourtheespressointoacup,whichhasthecapacityofat
least150ml(5ounces).Thenaddthesteamedmilktotheespressoandspoononthe
frothed milk.
7.FollowtheinstructionsonPage4undersectionmarked“CAUTION”toflushoutany
residualmilkfromthefrothingtube.Itisimportanttoproperlycleanyourfrothingtube
and wash its cap after each use to ensure it continues to work properly.
(SeeStep2below)
8.Unplug the power cord and allow the machine to cool.
CLEANING YOUR ESPRESSO/CAPPUCCINO MAKER
1.Turnthesideknobtotheoffposition“”,switchtheredbuttononthesidetotheoff
position“O”andunplugthepowercordfromtheelectricaloutlet.
2.Thefrothingtubemaystillbehot.Donottouchitwithyourhandsuntilithascooled.
Removeandwashthefrothingtubecapandwipefrothingtubewithadampcloth.
Using the wrench built into the measuring spoon, unscrew the frothing tube tip and
cleanthefrothingtubevalvewithaneedleortoothpick.
3.Thewaterreservoir,filters,driptrayanddripgridcanbewashedwith
soapywaterorplacedinthetoprackofyourdishwasher(avoidwashingthebrew
basketinyourdishwasher).
CAUTION: Do not immerse appliance in water.
4.Discardtheremainingwaterbyremovingthereservoirandturningitupsidedownover
thesink.Itisrecommendedtoemptythewaterreservoirbetweenuses.
Do not immerse appliance in water.
5.Wipehousingwithasoftwetcloth.Donotuseabrasivecleanersorscouringpads,as
they will scratch the finish.
6.Donotstorethefilterholderinthebrewhead.Thiscanadverselyaffecttheseal
between the brew head and the filter holder while brewing espresso.
DELIMING
Mineraldepositsbuilt-upintheEspressoMakerwillaffecttheoperationoftheappliance.
YourEspressoMakermustbedelimedwhenyoubegintonoticeanincreaseinthetime
requiredtobrewespresso,orwhenthereisexcessivesteaming.Also,youmaynoticea
build-upofwhitedepositsonthesurfaceofthebrewhead.
Thefrequencyofcleaningdependsuponthehardnessofthewaterused.Thefollowing
tablegivesthesuggestedcleaningintervals.
SUGGESTED CLEANING INTERVAL
Type of Water Cleaning Frequency
SoftWater(FilteredWater) Every80BrewCycles
HardWater(TapWater) Every40BrewCycles

9
YOUR ESPRESSO/CAPPUCCINO MAKER MAY BE DELIMED
USING WHITE HOUSEHOLD VINEGAR, AS FOLLOWS:
TO DELIME WATER RESERVOIR:
1.Make sure the side control knob is in the off position “ ”, the red switch is in the off
position“O”andthatthepowercordisdisconnectedfromtheelectricaloutlet.
2.Fillthereservoirwithfresh,undilutedwhitehouseholdvinegar.
3.Allowappliancetositovernightwiththevinegarsolutioninthewaterreservoir.
4.Discardvinegarbyremovingthereservoirandturningitupsidedownoverthesink.
5.Rinsethewaterreservoirthoroughlywithtapwaterbyfillingtankhalffullwithwater
and then pouring the water back out into the sink, repeating this step twice.
TO DELIME INTERNAL PARTS:
1.Makesureyoudelimetheinsideofthewaterreservoirfirstbyfollowingthe“Deliming”
stepsabove.
2.Makesureallcontrolsareintheoffpositionandthepowercordisdisconnectedfrom
theelectricaloutletandtheapplianceis.(SeeSection“CAUTION”onPage4).Fillthe
reservoirwithwhitevinegarabovetheminimumlevelintoreservoir.
3.Insertthebrewbasket(withfilter)andplacejar/carafeorregularcupontopofthedrip
tray and under the brew basket.
4.Plugthepowercordintotheelectricaloutlet.
5.Presstheredbuttontoswitchtheuniton“I”,oncethereadylight“”becomessolid
green,pressthebrewbutton“”,turnthesidecontrolknobcounter-clockwisetothe
brewposition“”.Thevinegarwillstartflowingthroughtheunit.Onceyouaredone,
turn the side knob clockwise to the off position “ ”.
6.Tocleanthefrothingtubeinternally,placeacupwithcoldwaterunderthetipofthe
frothingtube.Waituntilthereadylight“”becomessolidgreen.Insertthefrothing
tubeintothewater,pressthesteambutton“”.Thereadylight“”willstartblinking
and once it becomes solid green again turn the side knob clockwise to the steam
position“”.Letthesteamcomeoutforabout10seconds.Thiswillcleanany
residue left in the frothing tube from frothing milk.
7.Turnthesideknobcounter-clockwisetotheoffposition“”andpresstheredswitchto
theoffposition“O”.
8.RepeatSteps1–7asnecessaryusingonlytapwatertorinseanyremainingtracesof
vinegaroutofthemachine.

10
Coffeedoes
not come out
Coffeecomes
out around
the edge of the
filter holder
Nosteamis
generated
Milk is not
foamy after
frothing
Coffeecomes
out too quickly
Coffeeistoo
weak
•Nowaterinreservoir.
•Coffeegrindistoofine.
•Toomuchcoffeeinthefilter.
•Appliancewasnotturnedon
or plugged in.
•Coffeehasbeentamped/
compressed too much.
•Filterholdernotrotated
to full lock position.
•Coffeegroundsaroundthefilter
basket rim.
•Toomuchcoffeeinthefilterbasket.
•Waterreservoirisempty.
•Applianceisnotturnedon.
•Frothingtubeisblocked.
•Ranoutofsteam.
•Milkisnotcoldenough.
•Groundcoffeeistoocoarse.
•Notenoughcoffeeinfilterbasket.
•Usingsmallfilterfortwodemitasses
•Toomuchwaterisused
•Groundcoffeeistoocoarse
•Addwater.
•Grindcoffeemediumground.
•Fillfilterwithlesscoffee.
•Plugunitintoelectricaloutlet.
Turniton.
•Refillfilterbasketwithcoffee
DONOTTAMP.
•Rotatefilterholdertofulllock
position.
•Wipeoffrim.
•Fillwithlesscoffee.
•Fillreservoirwithcorrect
amountofwater.SeePage5
and 6.
•Turnonunitandfollowthe
operating instructions.
•Followingfrothingstage,
operate frothing function for
1–2secondstoextract
excessmilk.Or,turnoffunit,
allow unit to cool, unplug
unit and clean out frothing
tube with a needle or
toothpick.
•Ensurethereisenoughwater
inthereservoir.
•Chillmilkandfrothingpitcher
prior to making cappuccino.
•Useafinergrind.
•Usemorecoffee.
•Uselargefilterfortwo
demitasses
•Manuallystopthebrewearlier
by turning the side knob
clockwise to the off “ ”
position.
•Useafinergrind
PROBLEM CAUSES SOLUTIONS
PROBLEMS AND CAUSES

11
RECIPE IDEAS THAT
YOU WILL LOVE TO TRY!
CAFÉ MOCHA
30ml(1oz.)ofchocolatesyrup,oneshot
ofespresso,237ml(1cup)frothedmilk
CAFÉ AMERICANO
1/2espressoand1/2hotwater
CAFÉ MACCHIATO
1/3espressoand2/3steamedmilk
(FOR ADULTS 21 YEARS AND OLDER)
SAN FRANCISCO CAPPUCCINO
Espresso,hotsteamedchocolate,Brandy,
topped with cream and cinnamon
CAFÉ IRISH
Espresso,Irishwhiskey,toppedwith
whipped cream
CAFÉ TUACA
Espresso,Tuacaliqueur,toppedwith
whipped cream
CAFÉ VIENNA
Espresso,Brandy,toppedwith
whipped cream
CAFÉ TIA MARIA
Espresso,TiaMarialiqueur,topped
with frothed milk
CAFÉ GRAND MARNIER
Espresso,GrandMarnierliqueur,topped
with whipped cream and grated orange peel
MEXICAN CAFÉ
Espresso,Kahlua,Tequila,
topped with whipped cream
CAFÉ ROMANO
Espresso,Brandyandlemontwist
CAFÉ LATTE
1/4 espresso and 3/4 steamed milk,
pour both in a mug at the same time
CAFÉ AU LAIT
1/2espresso,1/2steamedmilk
MOCHA HOT CHOCOLATE
Add60ml(2oz.)ofespressotoone
cup of hot chocolate

12
1 - YEAR LIMITED WARRANTY
SunbeamProducts,Inc.doingbusinessasJardenConsumerSolutions“JCS”warrants
thatforaperiodofONEyearfromthedateofpurchase,thisproductwillbefreefrom
defectsinmaterialandworkmanship.JCS,atitsoption,willrepairorreplacethisproduct
oranycomponentoftheproductfoundtobedefectiveduringthewarrantyperiod.
Replacementwillbemadewithaneworremanufacturedproductorcomponent.Ifthe
productisnolongeravailable,replacementmaybemadewithasimilarproductofequal
orgreatervalue.Thisisyourexclusivewarranty.
Thiswarrantyisvalidfortheoriginalretailpurchaserfromthedateofinitialretail
purchaseandisnottransferable.Keeptheoriginalsalesreceipt.Proofofpurchaseis
requiredtoobtainwarrantyperformance.OSTER®dealers,servicecenters,orretail
storessellingOSTER®productsdonothavetherighttoalter,modifyoranywaychange
the terms and conditions of this warranty.
Thiswarrantydoesnotcovernormalwearofpartsordamageresultingfromanyofthe
following:negligentuseormisuseoftheproduct,useonimpropervoltageorcurrent,use
contrary to the operating instructions, disassembly, repair or alteration by anyone other
thananOster®AuthorizedServiceCenter.Further,thewarrantydoesnotcover:Actsof
God,suchasfire,flood,hurricanesandtornadoes.
JCSshallnotbeliableforanyincidentalorconsequentialdamagescausedbythebreach
ofanyexpress,impliedorstatutorywarrantyorcondition.Excepttotheextentprohibited
by applicable law, any implied warranty or condition of merchantability or fitness for a
particularpurposeislimitedindurationtothedurationoftheabovewarranty.
HowToObtainWarrantyService:Pleaseseethecountryspecificwarrantyinsertor
contact your local authorized distributor.
PLEASE DO NOT RETURN THIS PRODUCT TO THE PLACE OF PURCHASE.

13
IMPORTANTES MESURES DE SÉCURITÉ
L’utilisationd’appareilsélectriquesnécessitecertainesprécautionsélémentairesd’emploiafin
deréduirelesrisquesd’incendie,dechocélectriqueouautresblessures,enparticulier:
Liresoigneusementtouteslesinstructionsavantd’utiliserl’appareil.
• NEPAStoucherlessurfaceschaudes“ ”.Seservirdespoignéesoudesboutons.
• Pouréviterl’électrocution,NEPASplongerlecordon,laficheélectriqueoul’appareildans
l’eauoutoutautreliquide.
• Lesenfantsdoiventtoujoursêtresurveilléspours’assurerqu’ilsnejouentpasavec
l’appareil.
• Cetappareiln’apasétéconçupourêtreutilisépardespersonnes(enfantsinclus)avecdes
handicapsphysiques,sensorielsoumentaux,oupardespersonnesavecpeud’expérience
ouconnaissance,àmoinsqu’unepersonneresponsabledeleursécuriténelessupervise
ouqu’elleleurenseignecommentutiliserl’appareil.
• Lorsquel’appareiln’estpasenserviceetavantdelenettoyer,tournerleboutonquise
trouvesurlecôtésurlaposition“”,appuyersurleboutonrougepourlemettresurla
position‘O’puisdébrancher.Laisserrefroidirl’appareilavantd’installerouderetirerun
élément,etavantdelenettoyer.
• NEPASutiliserunappareillorsquelecordonoulaficheélectriqueestendommagé,ni
lorsquecetappareilnefonctionnepasnormalementouqu’ilasubiquelquedommage
quecesoit.Encasderéparation,veuillezretournercetappareiluniquementauCentrede
ServiceautoriséOster®leplusprochedechezvous.
• L’utilisationd’accessoiresnonrecommandésparOsterpeutentraînerdesrisqueset
des blessures.
• NEPASutiliseràl’extérieur,nonconçupourusagecommercial.
• NEPASlaisserlecordonélectriquependresurlebordd’unetableoud’uncomptoir,nile
mettreencontactavecdessurfaceschaudes.
• NEPASplacerl’appareilsurouàproximitéd’unecuisinièreélectriqueouàgaz,nidans
un four chaud.
• Pourdébrancher,tournertouslesboutonsdemarche/arrêtsurarrêtetretirerlecordon
électriquedelaprisemurale.
• NEPASseservirdecetappareilpourd’autresusagesqueceuxpourlesquelsila
étéconçu.
• Utiliseruniquementsurunesurfaceplateafindemaintenirl’aérationsousl’appareil.
• Avantdemettrel’appareilenmarche,assurez-vousquelecouvercleduréservoird’eau
estbienfermé,queleréservoirestremplid’eauaumoinsjusqu’auniveauminimum.
• NEPASenleverlepanieràcafépendantquelecaféestentraindepasser.Veuilleztourner
leboutonquisetrouvesurlecôtésurlaposition“”avantdechangerlefiltrepourrefaire
ducafé.Faireattentionaumomentd’enleverlepaniercarlespartiesenmétalseronttrès
chaudes,assurez-vousdeletenirparlapoignéeetd’utiliserleclipd’attachepourjeterle
cafémoulu.Lireleparagraphe«ATTENTION»pages2et4pourplusdedétails.Ilest
recommandéd’êtreprudentlorsquevousdéplacezlacafetièreavecunliquidebrûlant
• Nepasenleverleréservoird’eauavantd’avoiréteintl’appareil.Lireleparagraphe
«ATTENTION»pages2et4pourplusdedétails.
CET APPAREIL EST UNIQUEMENT DESTINÉ À USAGE MÉNAGER
VEUILLEZ CONSERVER CES INSTRUCTIONS

14
(UNIQUEMENT POUR 120 & 127 VOLTS)
Cetappareilestmunid’uneficheélectriquepolarisée(l’unedeslamesestpluslargeque
l’autre).Afinderéduirelesrisquesd’électrocution,cetypedefichenepeuts’insérerdans
uneprisemuralepolariséequedansunseulsens.Silafichenerentrepasparfaitement
danslaprise,tournez-ladansl’autresens.Siellenerentretoujourspas,faitesappelà
unélectricienprofessionnel.Nepastenterdemodifierlaficheélectrique.
RECOMMANDATIONS D’USAGE DU
CORDON ELECTRIQUE
1.Lecordonélectriqueestcourtafinderéduirelesrisquesd’enchevêtrementetdechute
2.Sivousutilisezunerallonge,faitespreuvedeprudencelorsdel’utilisationdel’appareil
3.Sivousutilisezunerallonge,assurez-vousquelecordonaunepuissanceéquivalente
àcelledel’appareil.Nepaslaisserlecordonpendresurlebordd’uncomptoiroud’une
table,unenfantpourraittirerdessusous’yaccrocherinvolontairement.
ATTENTION: SOUS PRESSION
Afind’éviterdesbrûlureset/ouautresblessuresprovoquéesparlavapeuretl’eautrès
chaude,NEJAMAISretirerleréservoird’eauoulepanieràcafépendantquevotre
cafetièreOster®expresso/cappuccinoestentraindepasserlecaféoudefairemousser.
Leboutonquisetrouvesurlecôtédoitêtresurlaposition«O»avantderetirerle
panierpourrefaireducafé.Sivousavezbesoind’ajouterdel’eaudansleréservoir,
veuillezvousassurerqueleboutondecôtéestbiensurlaposition“”etassurez-vous
d’éteindrel’appareilenappuyantsurleboutonrougeenposition«O».Lirepage4pour
plusdedétails.
UTILISER DU CAFÉ MOULU DANS LA CAFETIÈRE EXPRESSO
Nepasutiliserdecafémoulutorréfié(*),outorréfiéavecdusucre,etpasnonplusde
caféengraintorréfiéavecdusucreparcequecelapourraitbloquerlefiltreetainsi
endommagerl’appareil.Aucasoùvousauriezdéjàutiliséducafétorréfiéavecdusucre,
arreterd’utiliserlacafetièreetlarapporteraucentredeserviceaprès-venteleplus
proche pour un nettoyage en profondeur.
Ilestrecommandéd’enleverlecalcairedevotreappareilregulièrementafindele
conserverenbonneétat.Veuillezconsulternoscentresdeserviceaprès-ventepour
efectuercetteopération.
(*)MouluavecduSucre
DESCRIPTION OF THE APPLIANCE

15
1.Boutondecontrôle
2.Réservoird’eaularge,transparent
etamovible
3.Couvercleduréservoird’eau
4.Petitplateauetgrilleamovibles
pourrecevoirl’excèdent
5.Boutondemarche/arrêt
6.Compartimentpourrecevoirle
panier à filtre
7.Clipd’attachedufiltre
8.Filtres(pour1&2demi-tasses)
9.Panieràcafé//Panieràfiltre
10. Moussoir
11.Capuchondumoussoir
12.Voyantlumineuxdefonctionnement
(rouge)
13.Boutondemiseenrouteducafé
avecvoyantlumineux(vert)
14.Boutondumoussoiravecvoyant
lumineux(vert)
15.Voyantlumineuxdepréparation
(vert)
16.Cuillèredemesure
DESCRIPTION DE L’APPAREIL
1
2
3
4
8
5
6
11
10
12 13 14 15
16
7
9

16
INTRODUCTION
Félicitations!Vousvenezd’acheterunecafetièreOster®expresso/cappuccinode
qualité.Cetappareiluniqueetpratiqueestconçupourvousdonnerundélicieuxcafé
expresso/cappuccino et ceci rapidement.
Expressoestuneméthodeutiliséepourfaireducaféquiutilisedel’eautrèschaudesous
pressionpasséeautraversdegrainsdecaféfinementmoulus.PopulaireenEurope,
c’estuncaféavecbeaucoupplusdesaveuretplusfortquelecaféstandardAméricain
Parcequ’ilestplusfort,l’expressoestengénéralservidansdespetitestassesde44mla
59ml(1.5a2onces)decontenance,oudemi-tasses.
LaplupartdeceuxquiboiventducaféexpressoenEuropelepréfèrentcappuccino,une
boissonpréparéeavecuntiersdecaféexpresso,untiersdelaitchaufféàlavapeuretun
tiersdemoussedelait.Préparerunexpressoouuncappuccinon’estpaslamêmechose
queprépareruncafénormal,cetappareilutilisedel’eausouspressionetnécessitedes
précautionsspéciales.
VeuillezliresoigneusementTOUTESlesinstructions,mesuresdeprécautions,re-
marquesetrecommandationsdecemanuelavantd’utiliserl’appareil.Apresusage,cer-
tainespartiesetaccessoiresdel’appareilsonttrèschaudsetontbesoind’êtrerefroidis.
Veuillezsuivrelesprécautionsd’usageetd’entretienafindegarantirunlongusagesans
problèmedevotrecafetièrepourexpresso/cappuccino.
Veuillezconservercesinstructionsetyfaireréférencepourinformationssurlenettoyage
etl’entretien.
CAUTION: PRESSURE
Veuillezsuivrecesimportantesmesuresdesécuritéquandvousutilisezvotreappareil
1.Avantdeprocéderàretirercertainespartiesetaccessoires,assurez-vousquele
boutondecontrôlesurlecôtéestbiensurlapositiond’arrêt“”,appuyezsur
leboutondemarche/arrêtetmettresurlaposition”o”,débrancherl’appareil
2.Nejamaisenleverlepanieràcafépendantlapréparation
3.Faitesattentionaumomentd’enleverlepanieràcafé.Ilestpossiblequelesparties
enmétalsoientencoretrèschaudes.Ilestaussipossiblequ’ilyaitdel’eaubrûlante
au-dessusdufiltre.Tenirseulementlespoignéesetjeterlecaféenutilisantleclip
d’attachedufiltre.
4.Silecafénegouttepasdupanieràcafé,celasignifiequ’ilestobstrué.Eteindre
l’appareiletattendrequ’ilrefroidisse.L’obstructionpourraitprovenirducafémoulutrop
fin.Vousreporterauparagrapheintitulé“problèmesetcauses”delapage9.
5.Nettoyagedumoussoiràlait:mettreunecarafeouunlargebol(d’aumoins11
oncesdecontenance)rempliàmoitiéd’eausouslemoussoiràlait.Assurez-vousque
l’extrémitéestbienplongéedansleliquideavantdetournerleboutondemarche/arrêt
surlapositionvapeur““.Faitesmousserl’eaupendantenviron15secondespuis
nettoyeretsécherletubeetlecapuchon
Remarque :Pourassurerunlongusagesansproblèmedevotreappareil,nettoyerle
moussoiràlaitaprèschaqueusage.

17
COMMENT PREPARER UN BON EXPRESSO OU UN
CAPPUCCINO CHEZ SOI !
Avantd’utiliservotrecafetièreExpresso/Capuccinopourlapremièrefois,enleverleplastiquequi
protégelesboutonsetindicateurslumineuxsituéssurledevantdel’appareil
LE CAFE
Lecafédoitêtrefraîchementmouluetlegrainbiengrillé.Sivousledésirez,vouspouvezessayer
uncaféfrançaisouitalien.Uncafémoulugardesasaveurjusqu’à7ou8jours,àconditionqu’ilsoit
rangédansunrécipientàvide,dansunendroitfraisetsombre.Nepasgarderauréfrigérateurou
aucongélateur.Ilestrecommandédemoulerlesgrainsjusteavantdefairelecafé.Lesgrainsde
caférangésdansunrécipientàvidegarderontleursaveurpendantenviron4semaines.
MOUDRE LE CAFÉ
C’estuneétapetrèsimportantedanslapréparationducaféetrequiertdelapratique.Lecafédoit
êtrefinementmoulu.
Legrainducafémouludoitêtredelatailledugraindesel.
• Silegrainesttropfin,l’eaunepasserapasàtraverslecafémêmesouspression.Un
cafémoulutropfinressembleàdelapoudreetalaconsistanceetletouchéde
la farine
• Silegrainn’estpasassezfin,l’eaupasseàtraversducafétroprapidementetne
permetpasl’extractioncomplètedelasaveur.
Assurez-vousd’utiliserunmoulinàcafédequalitépouruneconsistanceuniformedesgrains
moulus.Lesmoulinsàcaféenformed’ovalenesontpasrecommandéscarlecafémoulun’estpas
de consistance uniforme
AVANT DE PREPARER VOTRE PREMIER EXPRESSO
1.Tournerleboutondemarche/arrêtsurlapositionarrêt«»etassurez-vousque
l’appareilestbiendébranchédelaprisemurale.
2.Retirerd’abordlaverseuse,lecouvercle,lefiltreetlepanieretlaverles
soigneusementavecdusavondouxetdel’eau.Bienrinceretremettreenplace.
Lireleparagraphe“commentpréparerunexpresso”ci-dessousavantderetirerlefiltre
et le panier.
3.Pournettoyerl’intérieurdel’appareil,suivrelesinstructionssur“CommentPréparerUn
expresso”ci-dessous,enutilisantuniquementdel’eau.Nepasplongerl’appareildans
l’eauetnepasessayerd’atteindrelesélémentsinternesdel’appareil.
IMPORTANT
Pouramorcerlapompe,mettreenroutelecycledevapeurpendant30secondesensuivantles
indicationsci-dessous:
1.Vousassurerqueleboutonrougedemarche/arrêtestbiensurlaposition«I»
2.Unefoisquelevoyantdepréparation«»estvertcontinu,appuyersurleboutondevapeur
«»(levoyantdepréparation«»clignotera)
3.Unefoisquelevoyantdepréparation«»estredevenuvertcontinu,placerunetassesous
letubeàmoussoirettournerleboutondecontrôledanslesensdesaiguillesd’unemontre
jusqu’àlapositionvapeur«».
4.Attendre30secondes,puistournerleboutondecontrôlesurlecôtédanslesensinversedes
aiguillesd’unemontrejusqu’àlapositiond’arrêt«».
5.Commencerlapréparationducafé
COMMENT PREPARER UN EXPRESSO
1.Tournerleboutondemarche/arrêtsurlaposition«».
2.Remplirleréservoird’eau,vouspouvezutiliserunecarafepourverserl’eaudedans
oubienleretirerdel’appareiletleremplirenleplaçantsouslerobinet.Sivousavez
retiréleréservoirdel’appareil,assurez-vousdebienleremettreenplace.Remplirle
réservoirdelaquantitéd’eaudésirée,envousassurantqueleniveaudel’eauestbien
entre“MIN”et“MAX”.Nejamaisutiliserd’eautièdeouchaudepourremplirleréservoir.
3.Fermerlecouvercleduréservoird’eau.

18
PREPARER LE CAFE
1.Mettrelefiltredanslepanier.Choisirl’undesdeuxfiltresquisontinclusavecvotre
appareil,enfonctiondelaquantitédecaféquevousdésirez(1ou2demi-tasses)
2.Remplirlefiltrechoisiavecducaféexpressofinementmoulu.Nettoyerl’excèsdecafé
duborddupanier.Decettefaçon,lepaniers’ajusteraparfaitementsurlapartie
du haut.
ATTENTION: Tasserunpeulecafé.Nepasremplirlecaféjusqu’auborddufiltre,cela
pourraitprovoquerundébordementouuneobstruction.
3.Mettrelepanieràcaféjusteendessousdelapartiesupérieure,pourattacherlepanier
retirerd’abordlesystèmed’attachepuisplacerlapoignéedetellemanièrequ’ellese
trouvealignéeaveclesymbole« »jusqu’àcequelepanierrentredanslarainure.
Puistournerdoucementversladroitejusqu’àcequ’ilsoitbienenplaceenpositionde
verrouillage(vousreporteraudiagrammequisetrouvesurledevantdel’appareil,voir
ci-dessous)
Cesymbolesetrouvesurvotreappareil
PREPARATION DE L’EXPRESSO
ATTENTION: Si vous désirez faire un cappuccino, reportez-vous au chapitre
intitulé: “comment préparer un cappuccino”
1.Assurez-vousquelagrilleestbienenplacesurleplateau.Poserleplateausur
l’appareil.
2.Assurez-vousqueleboutondecontrôleestsurlaposition« ».
3.Placerlatasseoules2tasses(demi-tasses)souslepanieràcafé,ousivous
préférez,placerunpetitpotouunecarafe.Sivousdésirezpréparerjusqu’à4
tasses,vousdevriezutiliserunpetitpot,unecarafeouunetassenormaleetensuite
verserlecafédanslesdemi-tasses.Sivousfaitespasserlecafépourdeuxdemi-
tassesàlafois,alorsvouspouvezplacervosdeuxpetitestassessouslepanieren
vousassurantqu’ellessetrouventbienendessousdesouvertures.
4.Brancherlecordonélectriquesurlaprisemuraleetmettrel’appareilenmarcheen
appuyantsurleboutonrougequisetrouvesurlecôtéenposition«I».Levoyant
lumineuxestrougependantquel’appareilestenmarcheetlevoyantlumineuxde
préparationcommenceàclignoter.
5.Unefoisquelevoyantlumineuxestvertconstant,appuyersurleboutonde
préparationducafé«»ettournerleboutonquisetrouvesurlecôtédanslesens
inversedesaiguillesd’unemontresurlapositiondepréparation«».Ceciamorcera
leprocessusdepréparationetquelquessecondesplustardlecaféexpresso
commencera à passer.
REMARQUE:SILESBOUTONSSEMETTENTÀCLIGNOTER,L’APPAREILVOUSINDIQUEQUE
LESINSTRUCTIONSN’ONTPASÉTÉSUIVIESCORRECTEMENT.TOURNERLE
BOUTONDEMARCHE/ARRÊTSURLAPOSITIONARRÊT«».RÉPÉTER
L’OPÉRATIONDEPRÉPARATIONDUCAFÉESPRESSOENCOMMENÇANTPAR
L’ÉTAPE#4.
6.Unefoisquelatasseoulacarafeestrempliejusqu’auniveaudésiré,tournerlebouton
decôtédanslesensdesaiguillesd’unemontresurlaposition«».
ATTENTION:NEPASLAISSERL’APPAREILSANSSURVEILLANCEPENDANTQUELECAFÉ
PASSE.LEPROCESSUSDEPRÉPARATIONDUCAFÉDOITETRESTOPPÉEPAR
L’OPÉRATEURPOUREVITERDEBORDEMENT,ECLABOUSSURESETTOUT
RISQUEETDOMMAGEPOTENTIEL.L’APPAREILDOITETREETEINTÀLAMAIN.

19
7.Unefoispréparéelaquantitédésiréedecaféexpressooucappuccino,tournerle
boutonsurlaposition“o”etdébrancherl’appareil.Laisserl’appareilrefroidiravantde
retirer certaines parties ou accessoires pour les nettoyer.
8.Unefoisl’appareilrefroidi,retirerlepanieràcafédelapartiesupérieure.Touten
utilisantleclipd’attachepourmaintenirlefiltredanslepanier,retournerlepanierpour
levider.Rincerlefiltreellepanieravecdel’eau.
9.Sivousdésirezcontinuerdepréparerducaféexpresso,répétezlemêmeprocessus.
Tournerleboutondecôtésurlaposition«» , retirer les tasses ou la carafe du
dessousdupanieretplacezend’autres.Avecsoin,retirerlepanieràcaféenutilisant
lapoignée,utiliserleclipderétentionpourmaintenirlefiltreenplaceetjeterlesrestes
decafé.Remplirlefiltredecafémoulufraisetplacerlepanierdenouveaudansla
partiesupérieure,suivrelesinstructionsdepréparationducafé(sections3,5
et6deceparagraphe)
ATTENTION: Ilestpossiblequelespartiesenmétaldupaniersoientencoretrès
chaudes.Aumomentdejeterlecafé,assurez-vousd’utiliserleclip
d’attacheaumomentdejeterlesrestesdecafé.Refroidirceséléments
enlespassantsousl’eaufroide.
10.Vousreporteralapage8pourlesinstructionsd’entretien.
COMMENT PREPARER UN CAPPUCCINO
Uncappuccinoestunexpressoavecau-dessusdulaitchaufféàlavapeuretlamousse
delait.Fairemousserlelaitdemandeunecertainepratique.Nesoyezpasdécouragési
toutn’estpasparfaitlapremièrefois.Unemoitiédulaitdevraitêtrechaufféeàlavapeur
(lamoitiéinférieuredupichet)etl’autremoitiédestinéeàlamousse(moitiésupérieuredu
pichet).Ilestpossiblequevousayezbesoindepratiquerplusieursfoisavantdepouvoir
le faire parfaitement
Pourdemeilleursrésultats,nousrecommandonsquevousfassiezmousserlelaitdans
unpichetséparémentetensuiteleverserdansvotrecafé.Lelaitetlepichetdoiventêtre
froids.Nepasutiliserunpichetquivientjusted’êtrenettoyéàl’eauchaude.Nousrecom-
mandonsaussid’utiliserunpichetenacierinoxydableetunthermomètredecuisine,si
vousenavezun,pourunemeilleurepréparationdulait.
1.Lapremièreétapedanslapréparationducappuccino,c’estl’expresso.Parcon
séquent,remplirleréservoird’eaufroide.Nejamaisutiliserd’eauchaudeou
trèschaudepourremplirleréservoir.
2.Suivrelesinstructionsdesparagraphes1-6duchapitre“Commentpréparerun
Expresso”
3.Remplirdelaitfroidlamoitiédupetitpichetenacierinoxydableouencéramiqueetle
placeràcôtédel’appareil.Ilestplusfaciledefairemousserlelaitavecdulaitécrémé
ouà2%dematièregrasse
4.Maintenantvousêtesprêtàfairemousserlelait.Pousserleboutonrougesurla
position«I»etattendrequelevoyantlumineux«»deviennevertpermanent.
Placerlepichetsouslemoussoiràlaitdetellemanièrequel’extrémitésoitlégèrement
plongéedanslelait.Appuyersurleboutondelavapeur«».Levoyant
lumineux«»commenceraàclignoteretunefoisqu’ilestvertpermanent,tournerle
boutonquisetrouvesurlecôtédanslesensdesaiguillesd’unemontresurla
position«»Fairedoucementtournerlepichetautourdel’extrémitédu
moussoirpendantenviron45minutes.
RAPPELEZ-VOUS:Avantdefairemousser,lelaitetlepichetdoiventêtretrèsfroids
Table of contents
Languages:
Other Oster Coffee Maker manuals

Oster
Oster 7982-33 User manual

Oster
Oster BVSTEM7300 User manual

Oster
Oster BVSTDCSK12 User manual

Oster
Oster BVSTEM6601 User manual

Oster
Oster BVSTDC4411 User manual

Oster
Oster BVSTEM3299 User manual

Oster
Oster 3291 User manual

Oster
Oster BVSTEM3199 User manual

Oster
Oster BVSTDC4403 User manual

Oster
Oster BVSTEM6601 User manual

Oster
Oster BVSTEM7701 User manual

Oster
Oster Counterforms 4281 User manual

Oster
Oster Counterforms 4281 User manual

Oster
Oster 3262 User manual

Oster
Oster Counterforms 4281 User manual

Oster
Oster BVSTDCP12B User manual

Oster
Oster PSTX Series User manual

Oster
Oster BVSTEM6702B User manual

Oster
Oster BVSTDC12 User manual

Oster
Oster BVSTECMP55 User manual