– – – Fold – – – – – – Fold – – –
– – – Fold – – –– – – Fold – – –
– – – Fold – – – – – – Fold – – –
– – – Fold – – – – – – Fold – – –
Español-6
Español-2
Español-5
Español-1
Español-8
Español-4
Uso de la Tostadora
Insertando alimentos en las ranuras y la operación de tostadora
Ya está listo para insertar alimentos en las ranuras de pan. Tenga los siguientes
consejos en mente durante la inserción de sus alimentos.
• Lamayoríadelospanesyartículosdepasteleríapuedentostarse,tales
como bagels, bizcochos, rebanadas gruesas de pan, bollitos, waffles, etc.
Sinembargo,lasrebanadasnodebensertangruesasquequedenatascadas
en las ranuras.
• Cuandovayaatostardosrebanadasalamismavez,lasrebanadasdebenser
del mismo tamaño y frescura para asegurar una tostadora uniforme.
• Cuandovayaatostardosrebanadasdepan,coloqueunarebanada
en el centro de cada ranura.
• Cuandovayaatostarunasolarebanadadepan,coloquelaranura
enelcentrodecualquieradelasranuras.
Después de insertar los alimentos en las ranuras:
1. Elija entre las opciones de selección de comidas u otras funciones. Si no se
selecciona ninguna opción de comida o función, el modo de tostado es el
ajuste predeterminado.
2. Paraseleccionarelniveldeoscuridadquedesee,girelaperillaLighter
(Másclaro)/Darker(Másoscuro).
3. Presione el mando de resistencias del pan hasta engranarlo.
Laguíaautoajustableparapancentraráautomáticamenteelalimentopara
obtener un tostado parejo.
Consejo: Su tostadora ha sido diseñado para un equilibro óptimo de
tostadora. Algunos de los elementos dentro de la tostadora pueden brillar
con más intensidad que los otros cuando estén en uso. Esto es parte del
funcionamiento normal de la tostadora.
Despuésdequeelniveldeseadodelaoscuridadsehayaalcanzado,el
alimento hará estallar para arriba automáticamente. El mando de resistencias
del pan volverá a su posición original y las luces de indicador darán vuelta
apagado.
4. Quite los alimentos tostados cuidadosamente de las ranuras.
ADVERTENCIA: Los alimentos tostados pueden estar sumamente calientes.
Manéjelos con cuidado.
Consejo: Para extraer los alimentos atascados en las ranuras, desenchufe
la tostadora y quite los alimentos una vez que la tostadora se haya
enfriado.
ADVERTENCIA: Jamás inserte los dedos ni utensilios demetal en las ranuras.
Usando la Característica de Seleccionar deAlimento(Bagels)
Para tostar rosquillas de pan (bagel): (solo una de las mitades de la rosquilla)
1. Coloquelarosquillaenlasranurasconlapartedeadentrohaciaelcentrode
la tostadora.
2. Oprima el botón de Roscas (Bagel). La luz de Roscas se iluminará para
indicar su selección.
3. EmpujehaciaabajolaPalancaPortadoradePanhastaquesetrabeensusitio.
4. Luego de alcanzar el nivel de tostado escogido, las roscas se levantarán
automáticamente. La Palanca Portadora de Pan volverá a la posición superior
y la luces indicadoras se apagarán.
5. Retire con cuidado las roscas tostadas de las ranuras.
Uso de la Función para “Frozen” (Alimento Congelado)
Su tostadora puede deshelar sus alimentos congelados y tostarlos después. Ahora
puede tomar un bagel congelado del congelador, deshelarlo y tostarlo – todo esto
en su tostadora en un solo paso fácil.
Para deshelar y tostar sus alimentos:
1. Coloquelosalimentosenlasranuras.
2. Presione el botón de Congelado “Frozen” si la comida está congelada,
luego seleccione su tipo de comida presionando el botón apropiado. Si no se
selecciona un tipo de alimento, la tostadora funcionará en modo de tostado.
3. EmpujehaciaabajolaPalancaPortadoradePanhastaquesetrabeensu
sitio.
4. Luego de alcanzar el nivel de tostado escogido, los alimentos se levantarán
automáticamente. La Palanca Portadora de Pan volverá a la posición superior
y las luces indicadora se apagarán.
5. Retire con cuidado las tostadas de las ranuras.
Cancelando el Proceso de Tostadora
Para cancelar el proceso de tostadora:
Presione el botón de cancelación “Cancel”. La tostadora repicará. La tostadora
dejará de tostar inmediatamente y los alimentos saltarán de manera automática.
Cómo limpiar su tostadora
1. Desenchúfela y déjela enfriar.
2. Unavezqueestéfría,limpieelexteriordelatostadoraconunpañohúmedo.
Preparándose para Usar Su Tostadora por Primera Vez
Si va a utilizar su tostadora por primera vez, asegúrese de lo siguiente:
1. Quitecualquierpegatinadelasuperficiedelatostadoraylimpielacarcasa
de su tostadora con un paño húmedo.
2. Inserte la bandeja para migas desmontable en la ranura de la bandeja para
migas.
3. Asegúresedequeelmandoderesistenciasdelpanestéenlaposición
superior antes de enchufar el cordón de potencia de la tostadora.
4. Elija una ubicación para la tostadora. Dicha ubicación:
• Debeserunasuperficieplana,termorresistenteyantiinflamable.
• Debeestaraunmínimode3pulgadasdelasparedesodelaparte
posterior de los mostradores.
• Porlomenosdeunpiededistanciadecualquiergabinete
oestantequepuedenestarsobredelatostadora.
• Debeestaralejadadelosmaterialesinflamablestalescomolascortinas
o los tapizados.
• Debeestaralejadadelasestufasdegasodeelementoseléctricos.
5. Enchufe el cordón de potencia en un tomacorrientes de 120 voltios,
60 Hz CA.
6. Sin insertar alimento alguno en las ranuras, empuje el mando de pan
completamente hacia abajo hasta engranarlo (las resistencias no quedarán
engranadas si la tostadora no está enchufada a una fuente de potencia).
Elprimerprocesodetostadoprecalentarálosnuevoselementosyquemará
cualquierpolvoquesehayaacumuladoduranteelalmacenamientoo
fabricación.Esperfectamentenormalquedichoquemadoproduzcaunolor.
Su Tostadora OSTER®ya se encuentra lista para el uso.
Ajuste de la longitud del cordón de potencia
El área para guarduar el cordón retractable de su tostadora le permite ajustar la
longituddelcordóndepotenciadetalmaneraquetengalalongitudexactaque
usted desee, cuando los controles están apagados y la unidad está desenchufada
yfría.
1. Para retractar el cordón, sujete el enchufe con una mano y pulse el botón
para retractar el cordón.
2. El carrete del cordón es compacto y permite múltiples capas para retractar
elcordón.Encasodequeelcordónnoestétotalmenteenrollado,haleel
cordón y encarrilelo en una manera uniforme en el carrete.
3. Encasodequeelcordónnosepuedahalarfácilmente,háleloconfirmeza.
4. Nopermitaquelosniñosutilicenelcordónretractableyaqueelcordón
puede causar alguna lesión.
Español-7
Español-3
Garantía Limitada de 1 Año
Sunbeam Products, Inc. operando bajo el nombre de Jarden Consumer Solutions, o en Canadá,
Sunbeam Corporation (Canada) Limited operando bajo el nombre de Jarden Consumer Solutions,
(enformaconjunta,“JCS”),garantizaqueporunperíododeunañoapartirdelafechadecompra,
este producto estará libre de defectos de materiales y mano de obra. JCS, a su elección, reparará o
reemplazaráesteproductoocualquiercomponentedelmismoquepresentedefectosduranteelperíodo
degarantía.Elreemplazoserealizaráporunproductoocomponentenuevooreparado.Sielproducto
ya no estuviera disponible, se lo reemplazará por un producto similar de valor igual o superior. Ésta
essugarantíaexclusiva.Nointenterepararoajustarningunafuncióneléctricaomecánicadeeste
producto.Alhacerloelimínaráéstagarantía.
Lagarantíaesválidaparaelcompradorminoristaoriginalapartirdelafechadecomprainicialyla
mismanoestransferible.Conserveelrecibodecompraoriginal.Parasolicitarservicioengarantía
serequierepresentarunrecibodecompra.LosagentesycentrosdeserviciodeJCSolastiendas
minoristasquevendenproductosdeJCSnotienenderechoaalterar,modificarnicambiardeningún
otromodolostérminosylascondicionesdeestagarantía.
Estagarantíanocubreeldesgastenormaldelaspiezasnilosdañosqueseproduzcancomoresultado
de uso negligente o mal uso del producto, uso de voltaje incorrecto o corriente inapropiada, uso
contrario a las instrucciones operativas, y desarme, reparación o alteración por parte de un tercero
ajenoaJCSoaunCentrodeServicioautorizadoporJCS.Asimismo,lagarantíanocubreactos
fortuitos tales como incendios, inundaciones, huracanes y tornados.
¿Cuál es el límite de responsabilidad de JCS?
JCS no será responsable de daños incidentales o emergentes causados por el incumplimiento de alguna
garantíaocondiciónexpresa,implícitaolegal.
Exceptoenlamedidaenqueloprohíbalaleyaplicable,cualquiergarantíaocondiciónimplícitade
comerciabilidad o aptitud para un fin determinado se limita, en cuanto a su duración, al plazo de la
garantíaantesmencionada.
JCSquedaexentadetodaotragarantías,condicionesomanifestaciones,expresa,implícita,legalode
cualquierotranaturaleza.
JCSnoseráresponsabledeningúntipodedañoqueresultedelacompra,usoomalusodelproducto,
o por la imposibilidad de usar el producto, incluidos los daños incidentales, especiales, emergentes o
similares, o la pérdida de ganancias, ni de ningún incumplimiento contractual, sea de una obligación
esencial o de otra naturaleza, ni de ningún reclamo iniciado contra el comprador por un tercero.
Algunas provincias, estados o jurisdicciones no permiten la exclusión o limitación de los daños
incidentalesoemergentesnilaslimitacionesaladuracióndelasgarantíasimplícitas,demodoquees
posiblequelaexclusiónolaslimitacionesantesmencionadasnoseapliquenensucaso.
Estagarantíaleotorgaderechoslegalesespecíficosyesposiblequeustedtengaotrosderechosque
varíandeunestado,provinciaojurisdicciónaotro.
Cómo solicitar el servicio en garantía
En los Estados Unidos –
Sitienealgunapreguntasobreestagarantíaodesearecibirserviciodegarantía,llameal
1-800-334-0759
ypodráobtenerladireccióndelcentrodeservicioqueleresultemásconveniente.
En Canadá –
Sitienealgunapreguntasobreestagarantíaodesearecibirserviciodegarantía,llameal
1-800-667-8623ypodráobtenerladireccióndelcentrodeservicioqueleresultemásconveniente.
EnlosEstadosUnidos,estagarantíaesofrecidaporSunbeamProducts,Inc.operandobajoelnombre
deJardenConsumerSolutions,BocaRatón,Florida33431.EnCanadá,estagarantíaesofrecidapor
Sunbeam Corporation (Canada) Limited operando bajo el nombre de Jarden Consumer Solutions, 20 B
HerefordStreet,Brampton,OntarioL6Y0M1.Siustedtieneotroproblemaoreclamoenconexióncon
este producto, por favor escriba al Departamento de Servicio al Consumidor.
POR FAVOR NO DEVUELVA ESTE PRODUCTO A NINGUNA
DE ESTAS DIRECCIONES NI AL LUGAR DE COMPRA.
PRECAUCIONES IMPORTANTES
Obedezca siempre las precauciones elementales de seguridad cuando vaya a hacer
uso de su tostadora, incluyendo las siguientes:
LEA TODAS LAS INSTRUCCIONES ANTES DEL USO
• Desenchufelatostadoradeltomacorrientescuandonoseencuentreenservicioyantes
delimpiarla.Antesdeponeroquitaralgunapieza,esperahastaquelatostadoraseenfríe.
• Notoquelassuperficiescalientes.Laspiezasdemetalpuedenvolversecalientes.
Utilicelasasiderasolasperillas.
• Paraevitardescargaeléctrica,desenchufelatostadoraantesdelimpiarla.
• Paraevitardescargaseléctricas,nosumerjaelcable,elenchufeolatostadoraenaguanu
otroslíquidos.
• Nopermitaqueelcordóncuelguesobreelbordedelamesaodelmostrador,niqueentre
encontactoconlassuperficiescalientes.
• Jamáspermitaquelosenseresquedendesatendidosduranteeluso.
• Losniñosylaspersonasincapacitadasnoadebenhacerusodeestosenseres.
Supervisecuidadosamentealosniñosdemayoredad.
• Nooperenicoloquelatostadora:
– Sobresuperficiesquenoseantermorresistentesniinflamables.
– Enocercadeunahornallaeléctricaoagascaliente.
– Dentrodeunhornocalentadoomicroondas.
• Parareducirelriesgodelosincendiosoloschoqueseléctricos,noinserte:
– Utensiliosnialimentoscubiertosenpapelaluminio,nidegrandesdimensiones,enlatostadora.
– Losdedosniutensiliosdemetalenlatostadoracuandoelaparatoseencuentreenchufado.
• Nointentedesalojaralimentoscuandolatostadoraestéenchufada.
• Noutilicealimentoscuyascubiertasorellenospuedangotearaconsecuenciadel
calentamiento.Talesacumulacionesdentrodelatostadoracreancondicionespocosanitarias
asícomolaposibilidaddeincendiosomalfuncionamientosdelatostadora.Eliminecon
frecuencialasmigasacumuladasparaevitarelriesgodeincendiosoelmalfuncionamientodel
tostadora.
Nooperelatostadorasinhaberantesdevueltolabandejaparamigasasuposicióncorrecta.
• Noopereningúnaparatoquetengauncordónoenchufedañado,odespuésdequesehaya
producidounmalfuncionamientoenelaparatooquehayasidodañadoencualquierforma.
DevuelvalatostadoraalcentrodeservicioautorizadodeSunbeamparasuinspección,ajuste,
reparaciónocualquierajusteelectromecánico.
• Noutilicelatostadoraalaintemperieoparausoscomerciales:estatostadoraesparaeluso
domésticoexclusivamente.
• Sóloutiliceesteaparatoparasuusooriginalconformealodescritoenestemanual;noutilice
aditamentosquenohayansidorecomendadosporelfabricante,yaquepuedenproducir
lesionamientos.
• Puedeproducirseunincendiosisecubrelatostadoraosientraencontactoconmaterial
inflamable,incluyendocortinas,tapicería,paredesyafinesmientrasqueseencuentre
funcionando.
• Paraconectarodesconectarelaparato,aprieteelbotón“cancel”.Elmandoelevadorde
tostadasdebeestarenlaposiciónelevadaantesdeconectarodesconectarelenchufedela
pared.
GUARDE ESTAS INSTRUCCIONES
Instrucciones para el Cordón de Potencia
Obedezcalassiguientesinstruccionesparaasegurarelusocorrectodelcordóndepotencia.
• Estatostadoracuentaconunazonadecordóndepotenciaquelepermiteajustarloalalongitud
correctaparasusituación.Tratedecolocarlatostadoracercadeltomacorrientesapropiado
paradisminuirlosriesgosasociadosconloscordonesdepotencia(talescomoenredarseconun
cordóndepotenciadelongitudexcesivaotropezarsesobreél).
• Siresultanecesario,sepuedehacerusodeunaextensióneléctrica,peroasegúresedeseguir
estasdirecciones:
– Lanotacióneléctricadelaextensióneléctricadebeserdeunmínimode120/127voltios,
60Hz.
– Laextensióneléctricadebeestarcolocadadetalmaneraquenoseenvuelvasobreelmostrador
olasuperficiedelamesa,niquetampocoquedealalcancedelosniños,niquetampocopueda
tropezarsesobreella.
• ParalostostadoraescuyacompraseefectúaenEE.UU.yelCanadá:esteaparatocuentaconun
enchufepolarizado(unahojaesmásanchaquelaotra).Paradisminuirelriesgodeloschoques
eléctricos,dichoenchufeseadaptaráauntomacorrientespolarizadodeunamanerasolamente.
Sinopuedeinsertarelenchufeeneltomacorrientescompletamente,inviertaladirección
delenchufe.Siaúnnocabe,comuníqueseconunelectricistaexperto.Nomodifiqueelenchufe.
• Notire,tuerzaniabuseelcordóndepotencia.
• Noopereningúnaparatoeléctricoquetengauncordónoenchufedañado,nidespuésdequese
hayaproducidoelmalfuncionamientodelaunidad,niquesehayacaídoodañadoencualquier
manera.
• Desenchufelatostadoracuandoéstanoseencuentreenusoyantesdelimpiarla.
ESTA UNIDAD ES SÓLO PARA
USODOMÉSTICO
Uso de un Cable Eléctrico Corto
Seincluyeuncabledetensióncortoparaevitarqueseenredeoquecausetropiezos.Uncable
deextensiónpuedeusarseconcuidado.Siseusaunacabledeextensión,lapotenciaeléctrica
marcadaenelcabledeextensióndebeserporlomenosigualomayoralapotenciaeléctricadel
aparato.Elcabledeextensióndebecolocarsedemaneraquenocuelguedelmostradorodela
mesa,dondepuedacausartropiezosaccidentalmente.
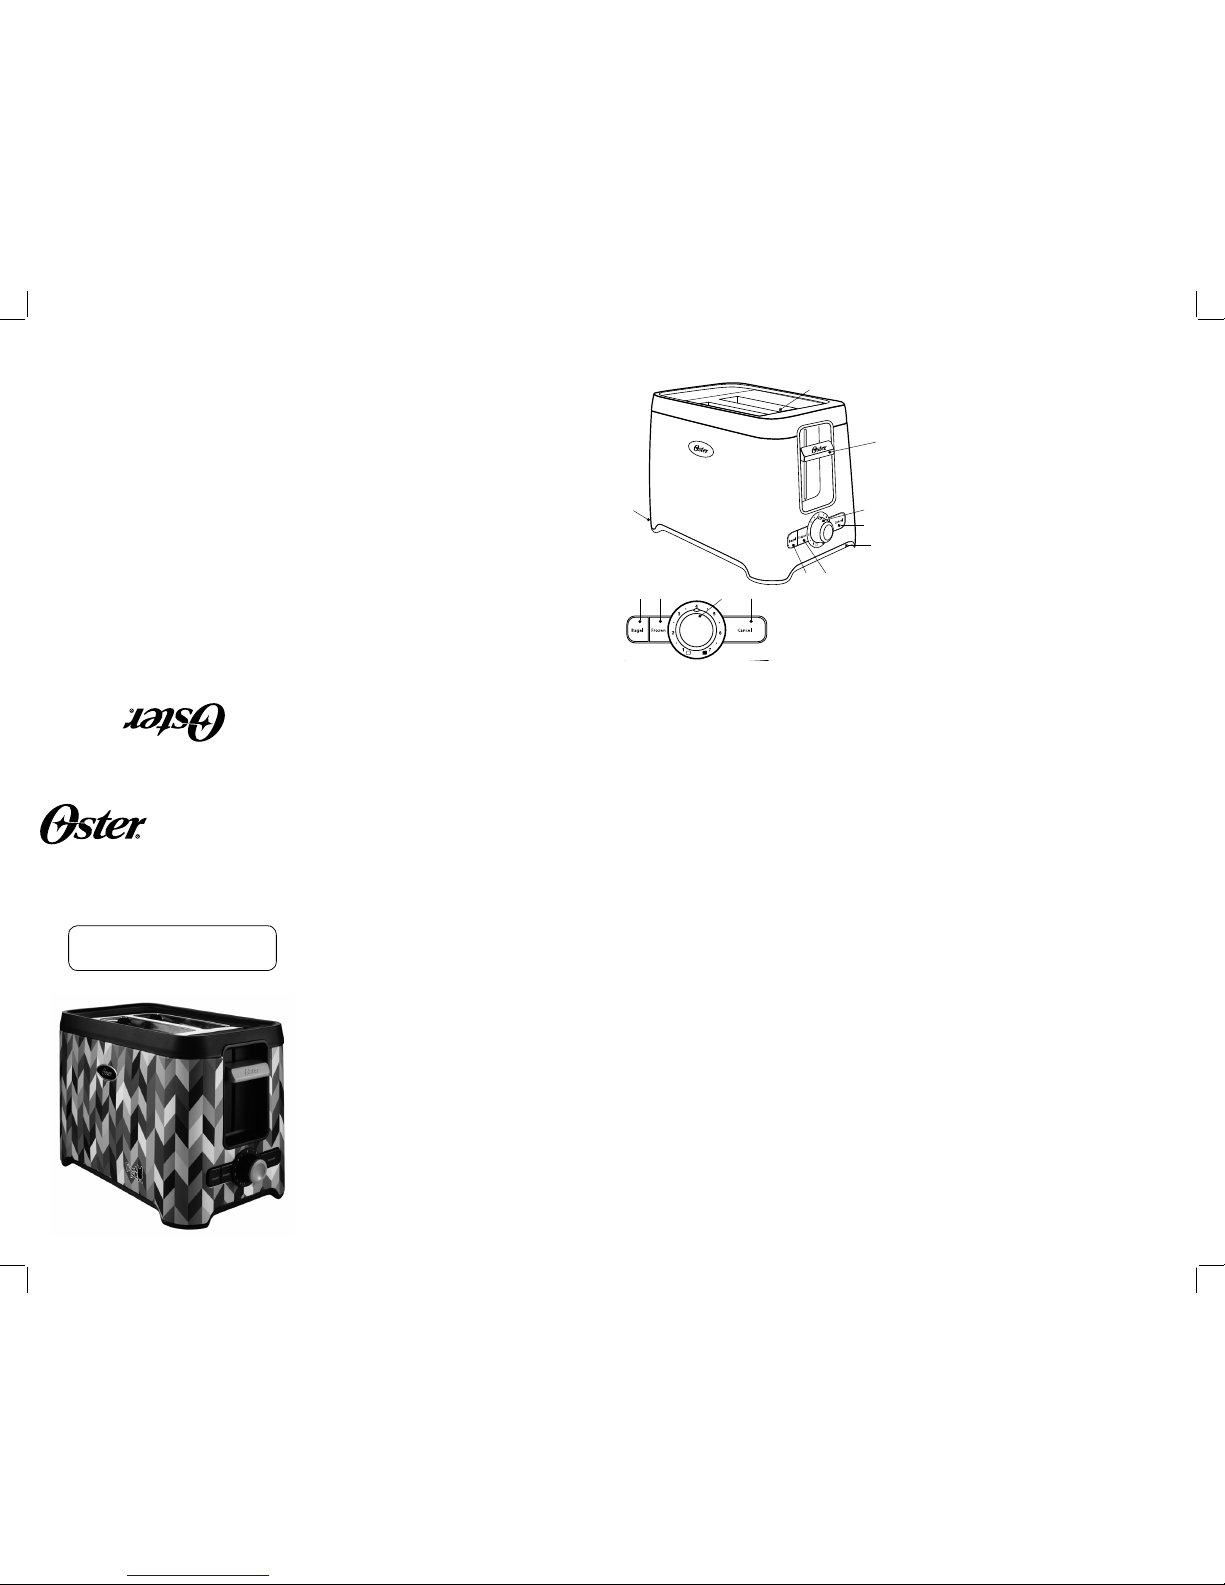
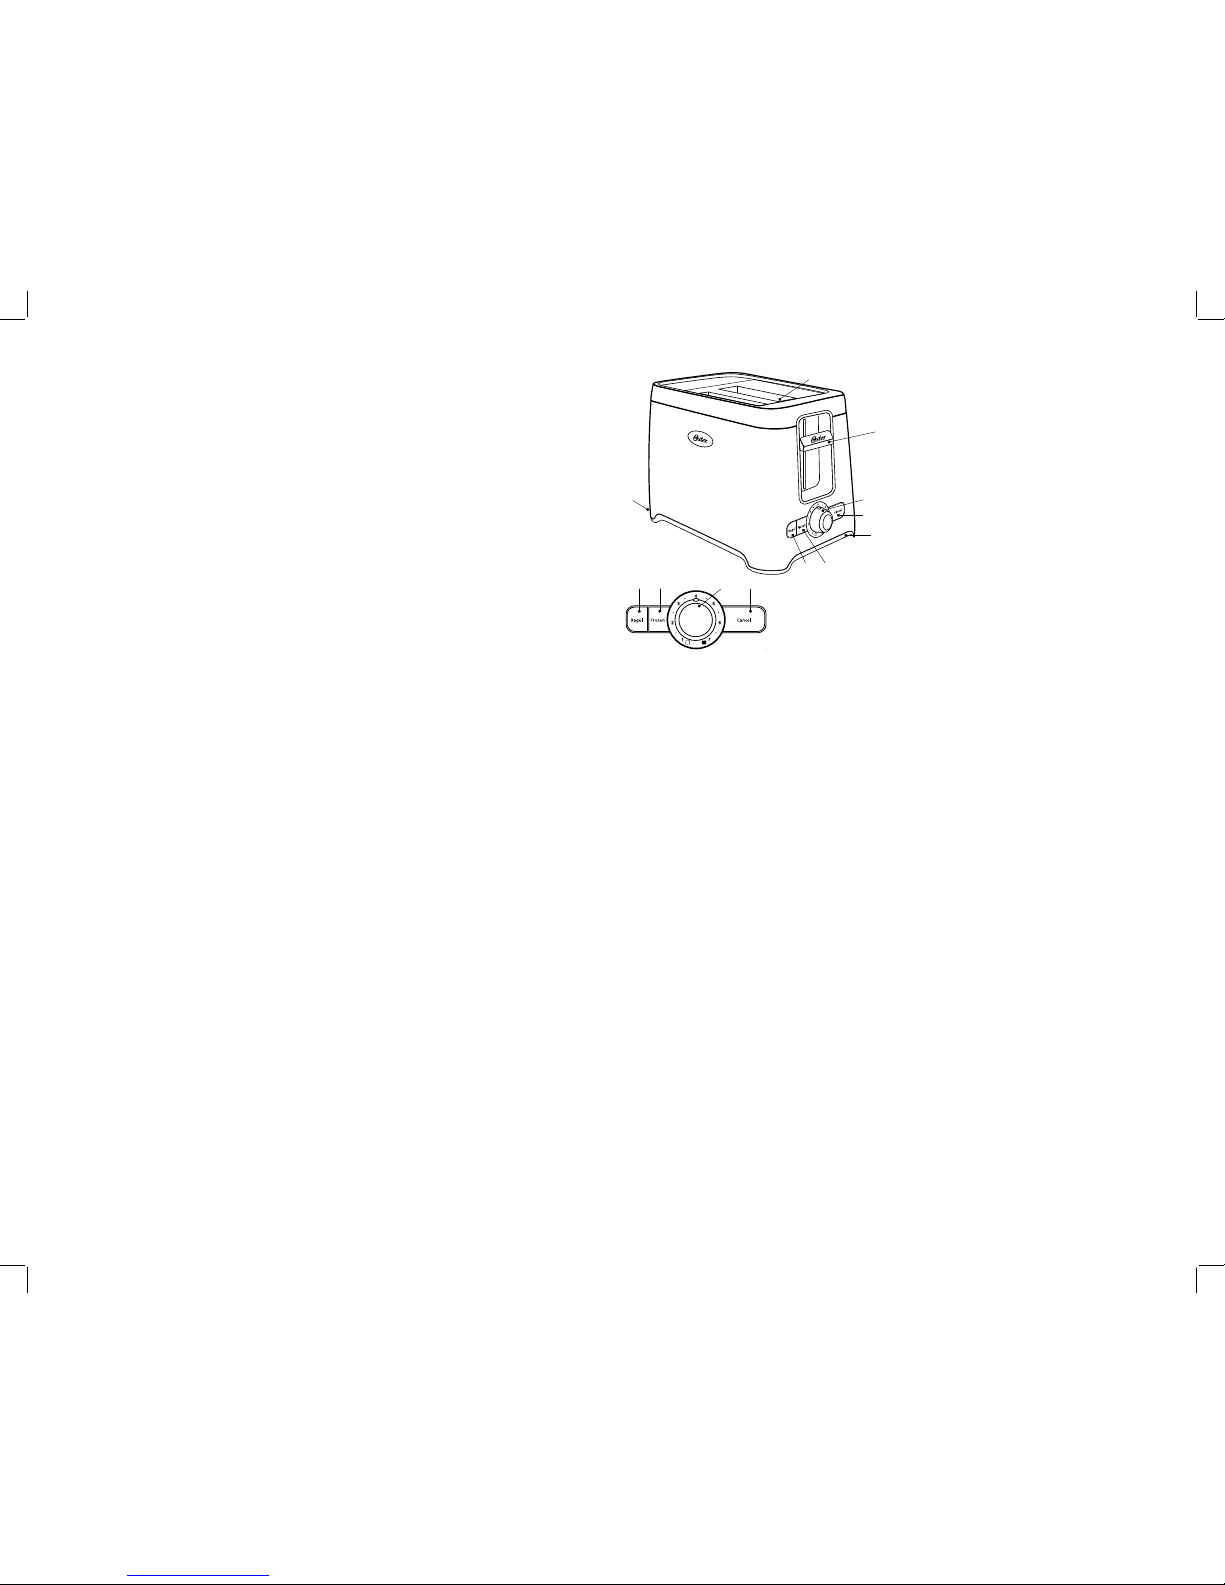
Conociendo Su Tostadora
Si no se selecciona ningún botón de función o alimento, el ajuste
predeterminado es “Toast” (Tostar).
1. Botón de “Bagel” (Rosca) con Luz Indicadora – Presione este botón si usted
deseatostarunbagel.Seencenderáelindicadorparaconfirmarqueseha
seleccionado “Bagel”.
2. Botón de “Frozen” (Congelados) con Luz Indicadora – Presione este botón si
sus alimentos están congelados. Utilice este botón conjuntamente con
los botones de “Bagel”, “Waffle” y “Toast”. La tostadora descongelará
automáticamente sus alimentos y luego los tostará fácilmente en un solo
paso. El botón se encenderá al presionarlo.
3. Selector y Piloto de Tostadora – Gire la perilla para seleccionar el grado al
cuallegustaríatostarsusalimentos:elnúmeroeselmásligero,yelnúmera
siete es el más oscuro.
4. Botón de Anulación – Presiónelo para hacer saltar los alimentos
de la tostadora y cancelar el proceso de tostado.
5. Ranuras Extra Anchas – Las ranuras anchas (1.3 pulgadas) le permiten tostar
“bagels”, pan casero y bollitos.
6. Guías para Rebanadas Dobles, Autonivelantes, Hechas de Acero Inoxidable –
Se ajustan automáticamente al grosor del pan.
7. Mando de Resistencias del Pan – Presiónelo para empezar a tostar sus
alimentos.
8. Elevador de Tostadas – Presione el mando de resistencias del pan para hacer
saltar los alimentos fuera de la tostadora.
9. Bandeja para migas, totalmente extraíble – Para una limpieza conveniente
y fácil.
10. Area para guardar el cordón retractable – Le permite guardar el cordón extra
enlatostadoraparaquenoestorbe.
11. Cordón de Potencia
Bienvenido
¡Felicitaciones por haber efectuado la compra de una Tostadora OSTER
®! Para
aprender más sobre los productos de OSTER®,visítenosporfavorenwww.oster.com.
1. Botón de Rosca “Bagel” con Luz Indicadora
2. Botón de “Frozen” (Congelados) con Luz
Indicadora
3. Selector y Piloto de Tostadora
4. Botón de Cancel (Anulación)
5. Ranuras Extra Anchas
6. Guías para Rebanadas,
HechasdeAceroInoxidable
7. Mando de Resistencias del Pan
8. Elevador de Tostadas
9. Bandeja para migas, totalmente extraíble
10. Area para guarder el cordón retractable
11. Cordón de Potencia
5/6
7/8
10/11
3
2
14
4
9
3
2
1