oticon Swim Kit User manual
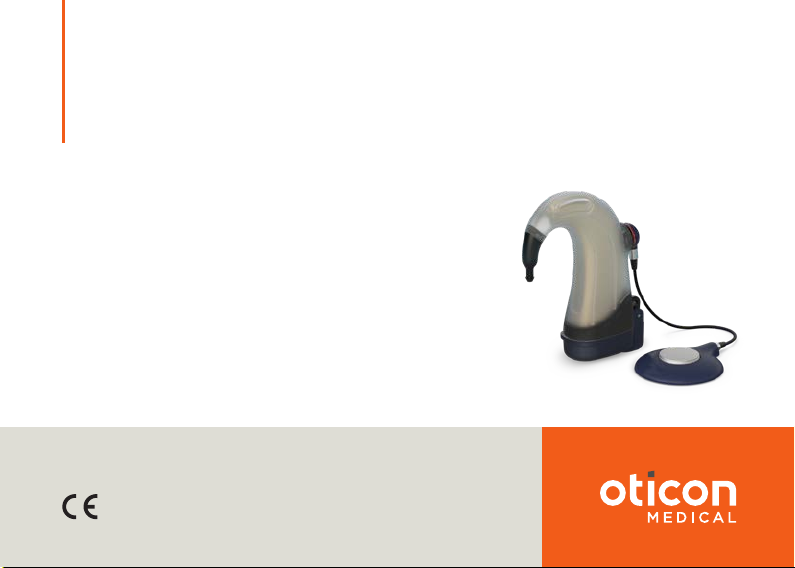
Neuro – Cochlear Implant System
Swim Kit
Instructions for Use
0459
(2020)

3
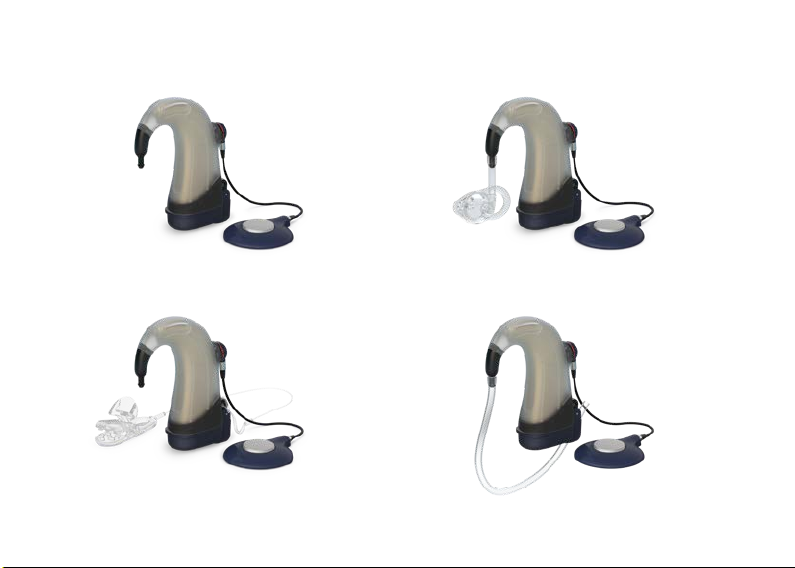
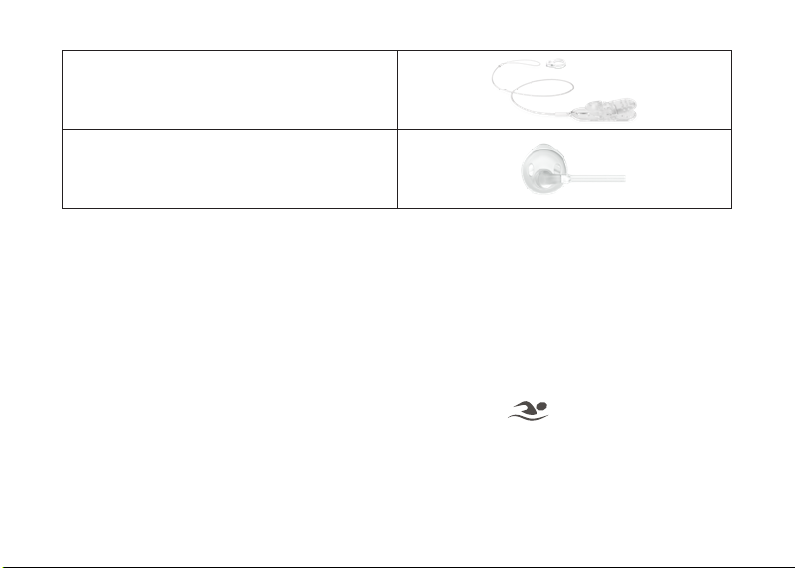
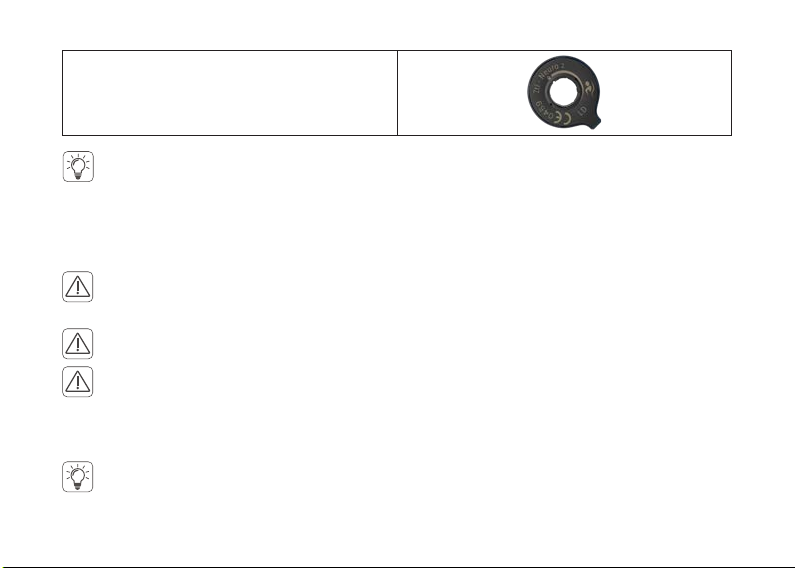
Thin Safety Line
Ear Plug RetentionNo retention
Retention Tubing
Swim Kit solutions

”Note”: Indicating a note/tip
”Caution”: Potential hazard that could result in patient/user temporary injury or
hospitalization if not avoided.
”Warning”: Potential hazard that could result in patient/user serious injury or
death if not avoided.
The statements of this instruction manual are believed to be true at the date of the
publication. The pictures are not contractually binding. Availability of the products
depends on the local registration.
Oticon Medical (NEURELEC)reserves the right to make changes to the design,
characteristics and models without prior notice. The only warranty Oticon Medical
(NEURELEC)makes, is the express written warranty extended on the sale or rental
of its products.

5
Table of Contents
Introduction................................................................................................... 6
Intended Use ................................................................................................. 6
Indications..................................................................................................... 7
Contraindications........................................................................................... 7
Undesirable Side Effects ................................................................................ 7
Intended User Profile ..................................................................................... 7
Packaging content.......................................................................................... 8
Items ordered specifically to match your Neuro2..........................................9
Using the Swim Kit........................................................................................10
Preparing the Swim Kit and the sound processor for use..............................11
Inserting the sound processor into the Swim Sleeve................................... 12
Removing the sound processor from the Swim Sleeve ................................ 15
Securing the Swim Kit to the ear or your clothes............................................16
Securing the Swim Kit with the retention tubing ......................................... 16
Securing the Swim Kit with the Ear Plug Retention Kit ................................. 18
Securing the Swim Kit with the Thin Safety Line..........................................24
Physical Characteristics ............................................................................... 26
Symbols .......................................................................................................27
Warranty duration ........................................................................................ 29
Swim Sleeve usage tracker........................................................................... 29

6
Introduction
The Swim Kit is a waterproof solution for Neuro 2 sound processor allowing water
immersion for 2 hours at depths up to 3 metres. This accessory keeps your processor
dry during water activities, such as swimming, boating or kayaking.
This is your guide on how to use the Swim Kit. We strongly recommend that you read
it carefully before using the Swim Kit for the first time.
This document provides additional information in relation to the instructions for use
of the Neuro2 sound processor. It should complement and be read in conjunction
with the instructions for use of the Neuro2 sound processor (including warnings,
cautions, disposal and environmental conditions), provided in the Neuro2 packaging
(in paper and electronic version) and available on the Oticon Medical website.
Intended Use
The Swim Kit is an accessory that provides extended protection to the Neuro 2 sound
processor when used in water or humid and dusty environments.

7
Indications
As an accessory, the Swim Kit has no specific indication. Indication of the Neuro
Cochlear Implant System applies.
Contraindications
As an accessory, the Swim Kit has no specific contraindication. Contraindications of
the Neuro Cochlear Implant System apply.
Undesirable Side Effects
No undesirable side effects were associated with the Swim Kit use.
Intended User Profile
The device is operated by the patient, the caregiver and the audiologist.
Patient: person implanted with a cochlear implant, non-healthcare professional,
without relevant specialized training.
Caregiver: adolescent or adult with a minimum of 8 years of education, non-
healthcare professional, without relevant specialized training
Audiologist: healthcare professional with at least 3 years of studies in audiology,
with specialized training in the use of the device.
8
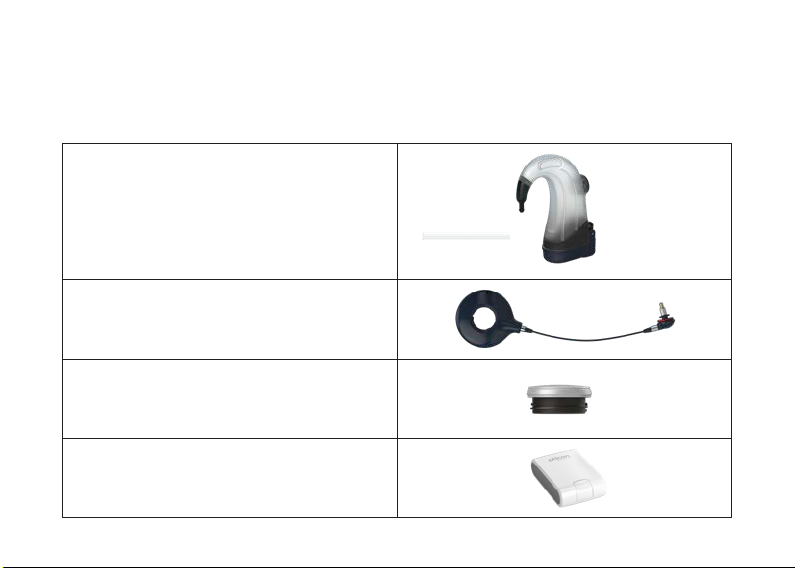
Swim Sleeves Kit
(including 2 protective sleeves for the
sound processor and Retention tubings)
Swim Antenna LD or SD
(with an integrated antenna cable)
Magnet
Protective case
Packaging content
The Swim Kit consists of the following main parts:
9
Thin Safety Line
Ear Plug Retention Kit
Items ordered specifically to match your Neuro2
When ordering a Swim Kit, make sure to select the variant that match your
current Neuro2 configuration:
• Magnet strength: The magnets for the Swim Kit are identical to those for the
regular Neuro2 antennas.
• Swim Antenna type: The Swim Antenna is marked with and it comes in
two variants like the regular Neuro2 antenna: Zti SD or Zti LD.
10
Markings on the Swim Antenna
Using the Swim Kit
Warning: The small parts may be a choking hazard if swallowed. In this case, immediately
seek medical assistance.
Warning: Check all the parts of the Swim Kit before use and do not use it in case of damage.
Warning: The Swim Sleeve is designed to be used for one year or 50 times depending on
which one is reached first. Always carefully inspect the Swim Sleeve before and after use. If
you observe any changes to the sleeve material or tightness, stop using the sleeve and order new
ones (Swim Sleeves Kit).
Caution : To avoid burns when using the Swim Kit in a bright sunlight, ensure that it has
not overheated before putting it on the ear. Do not expose the sound processor to the
temperatures outside the operating range (0°C to 50°C with Li-ion battery).
Caution: Make sure to use the same type of antenna (LD or SD) and magnet force as
those you use with your regular configuration.

11
Caution: The Swim Sleeve and its dedicated Swim Antenna must always be used together.
If used separately, your sound processor will not be kept dry.
Caution: Sound level can be slightly different when using the Swim Kit. This can typically be
managed by adjusting the Neuro 2 volume. If this does not provide the desired audibility,
please contact your hearing care professional.
Note: The retention tubing will gradually change its mechanical properties over time.
Make sure to replace it when it no longer provides sufficient retention.
Preparing the Swim Kit and the sound processor for use
Mount the magnet on the Swim Antenna. Refer to the “Placing and changing the
magnet in the antenna” section in the sound processor Instructions for Use.
Mount a rechargeable battery on the sound processor. Refer to the “Connecting and
changing the battery module” section in the sound processor Instructions for Use.
Activate the tamper-proof system to secure the battery module during the mounting
of the Swim Kit. Refer to the “Locking and unlocking the battery module” section in
the sound processor Instructions for Use.
12
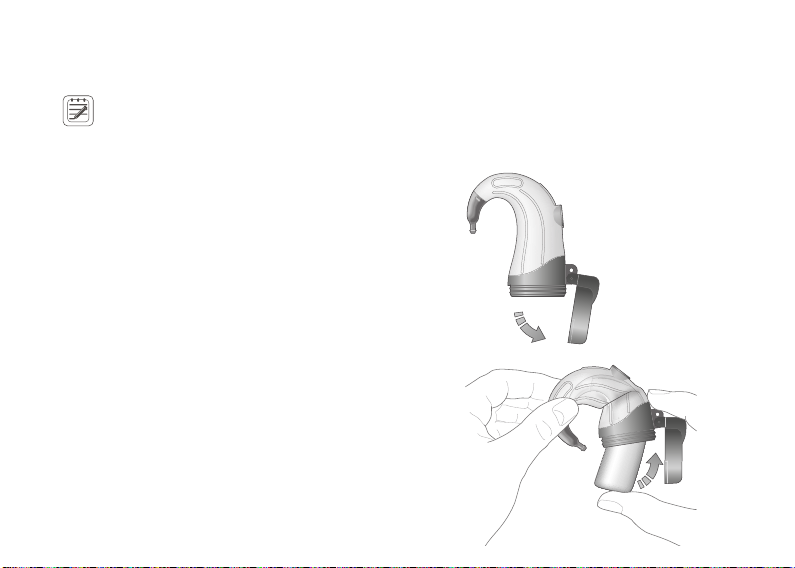
Inserting the sound processor into the Swim Sleeve
Note: Always use rechargeable batteries to power the sound processor when using the
Swim Kit. Zinc-Air batteries rely on fresh air supply to produce power and therefore can
not be used inside a Swim Sleeve.
Open the lid of the Swim Sleeve.
Inspect the Swim Sleeve to ensure
it is free from any dirt, dust and hair
fragments in the opening for the Swim
Antenna connector, and the opening
and lid for the processor insertion.
Insert the sound processor fully into
the Swim Sleeve. During the insertion,
bend the sleeve and carefully lead the
sound processor hook to its place to avoid
it is stocked to the sides.
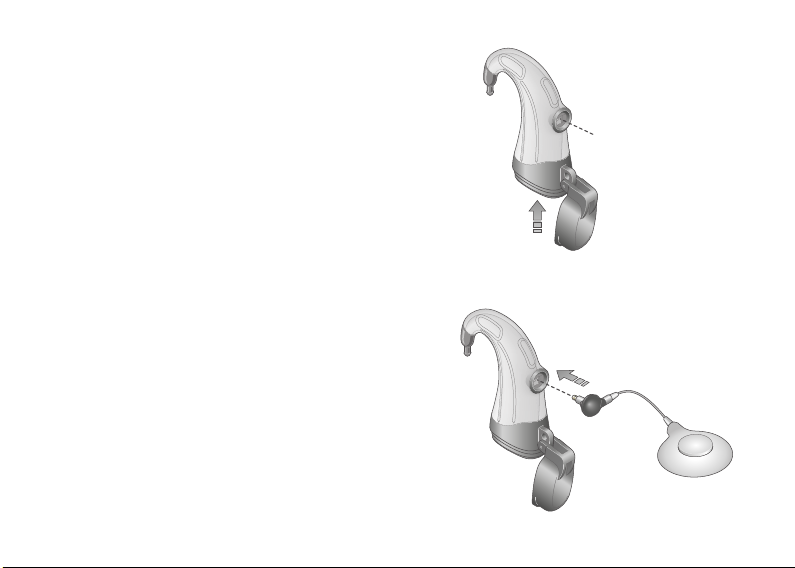
13
Hold the angled Swim Antenna plug with
the cable perpendicular to the Swim
Sleeve and insert the plug fully into the
sound processor and sleeve. The red seal
ring must touch the sleeve.
Ensure the sound processor is fully
inserted so that its antenna connector is
perfectly aligned with the opening in the
Swim Sleeve.
14
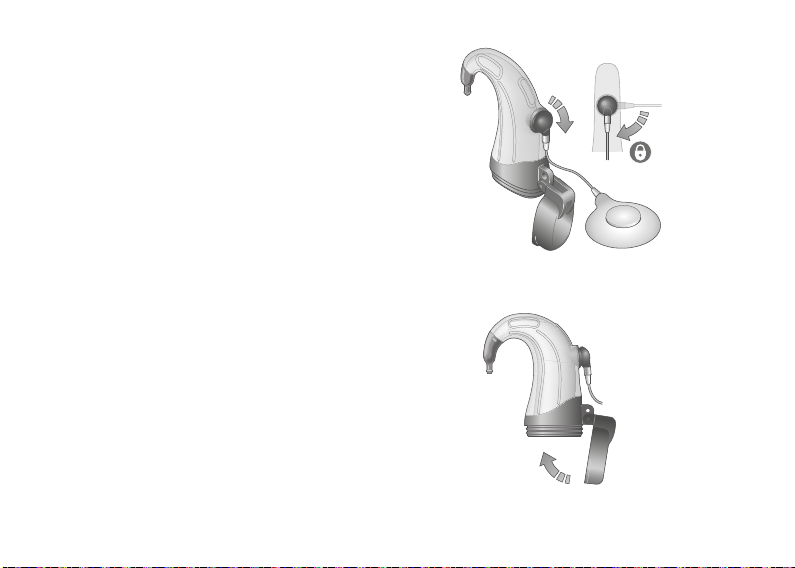
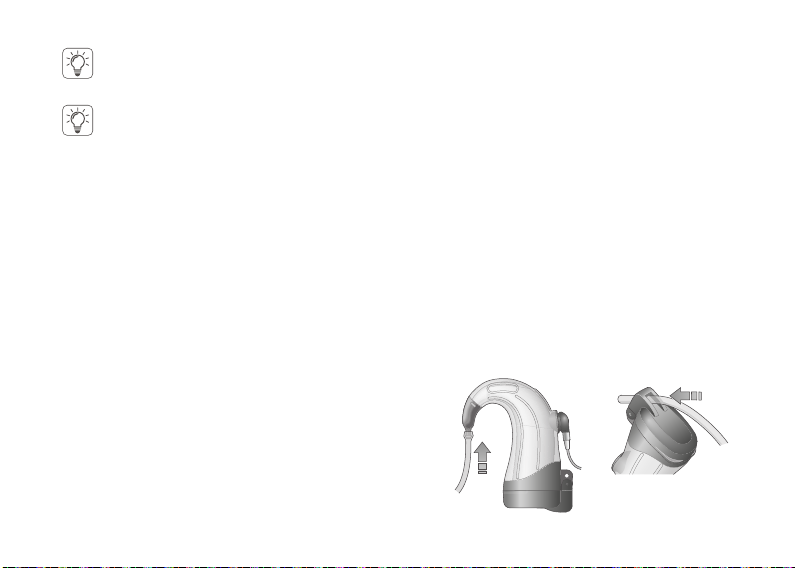
Close the lid of the Swim Sleeve.
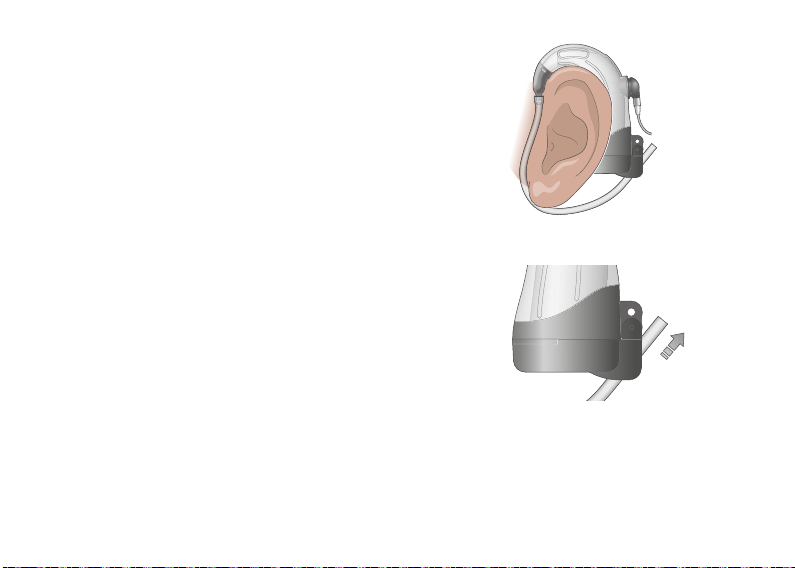
Place the system on your ear.
Rotate the plug 90 degrees clockwise
to lock it in place. The antenna cable
should end up being parallel to the sleeve.

15
Removing the sound processor from the Swim Sleeve
Remove the system from your ear.
Disconnect the dedicated Swim Antenna.
Open the Swim Sleeve.
Remove the sound processor.
Care and maintenance
Caution: After each use of the Swim Kit, ensure to rinse the parts under fresh running water
and shake off all water drops. Do not use any corrosive or abrasive substances to clean the
accessory. Do not wipe it dry using a cloth that could potentially leave remnants on the sleeve as
they may affect the tightness of the sleeve next time it is used. Let the parts dry fully and keep it
stored in the protective case until the next usage.
Caution: Do not use the desiccation drying system for drying the Swim Kit.
16
Securing the Swim Kit to the ear or your clothes
The Swim Kit provides three complementary ways of securing the Swim Kit
to your ear or your clothes. It is recommended to use them individually or in
combination.
Securing the Swim Kit with the retention tubing
To use:
Before placing the system on your ear,
mount a retention tube: push one end of
the tube onto the Swim Sleeve hook and
then push the other end of the tube
through the hole at the bottom of the lid.
Caution: Always remove the Swim Sleeve from the sound processor before drying and
storage of the sound processor.
Caution: The Swim Antenna cable is permanently fixed to the Swim Antenna and
cannot be disconnected.
17
Place the system on the ear.
Pull the free end of the tube to tighten the system
to the ear.
Place the antenna in the correct position.
If needed, cut the end of the tube with
a pair of scissors.
To remove:
Pull out the tube to remove it from the bottom of the lid and the Swim Sleeve hook.

18
Securing the Swim Kit with the Ear Plug Retention Kit
Warning: Small parts may be a choking hazard if swallowed. In this case, immediately
contact emergency medical services. The Ear Plug Retention Kit is not intended for use with
children under 3 years old.
Users seeking better retention of their Swim Kit when worn on the ear are advised to
use the Ear Plug Retention Kit. This is an instant fitting solution, and it could be
replaced by a custom ear mould. The Ear Plug Retention Kit is used to prevent the
sound processor from falling off the ear. It can be used during sports, lively activities
or for everyday use. It fits both right and left ears.
19
To fit the Ear Plug Retention Kit to your ear:
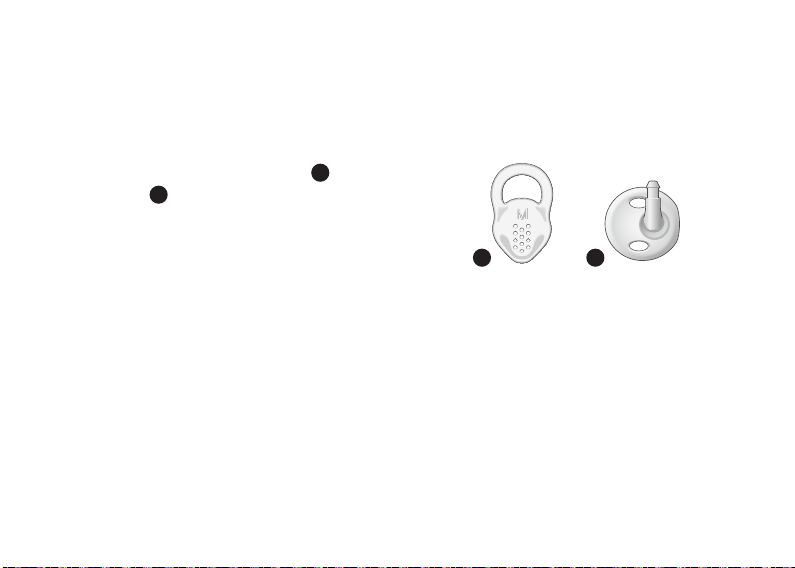
Select and mount an earpiece Aon the
adaptor Bby first placing the pointed end
of the earpiece over the rim of the adaptor
opposite the tube adaptor part and then by
pulling the other end (loop).
There are four earpiece sizes, recognisable
by the following markings on the ear
moulds: Very Small: “-”; Small: “S”;
Medium: “M” and Large: “L”.
The illustrations below are for left ear configuration. For right ear configuration illustrations
please see page 23.
BA
20
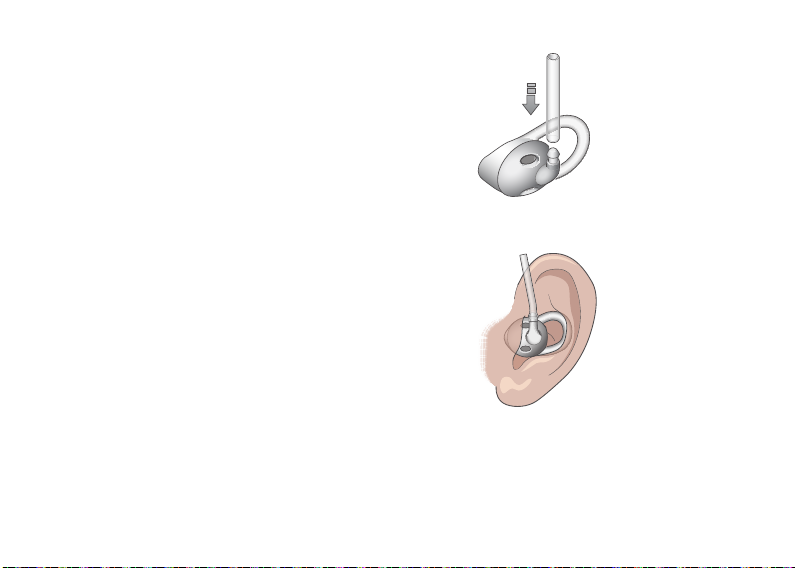
Push the tube firmly onto the adaptor.
Place the Ear Plug Retention Kit inside the
ear with the loop of the earpiece pointing
towards the back of the head.
Remove the Ear Plug Retention Kit and
change the earpiece if the selected one
does not fit well.
Table of contents
Other oticon Medical Equipment manuals


Popular Medical Equipment manuals by other brands


Getinge
Getinge Arjohuntleigh Nimbus 3 Professional Instructions for use

Mettler Electronics
Mettler Electronics Sonicator 730 Maintenance manual

Pressalit Care
Pressalit Care R1100 Mounting instruction

Denas MS
Denas MS DENAS-T operating manual

bort medical
bort medical ActiveColor quick guide

AccuVein
AccuVein AV400 user manual


