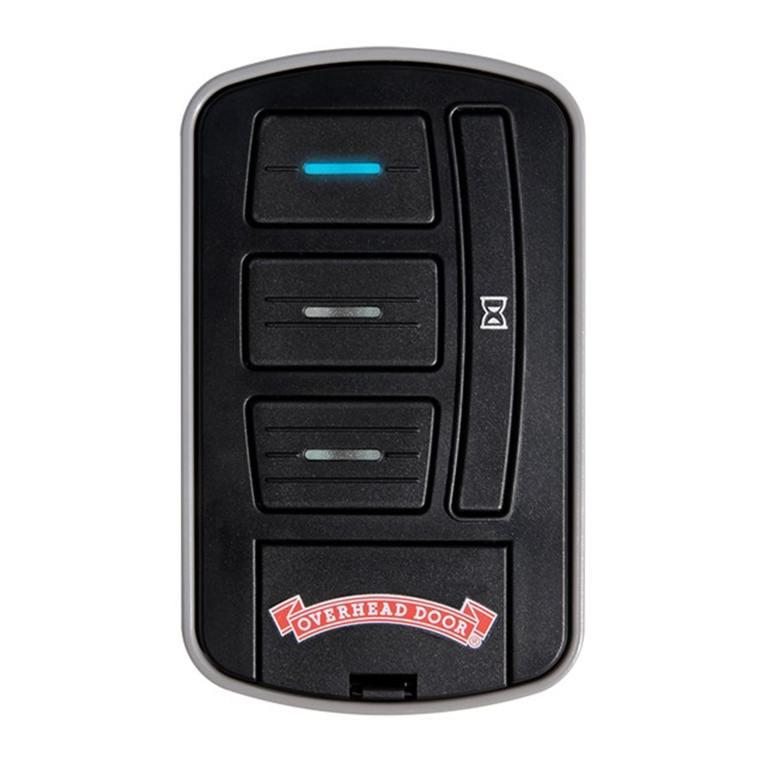
Para
obtener
ayuda 0
informaci6n
adicional,
comuniquese
canServicio alc1iente:L1ameal
1-800-929-DOOR
oescribanos a:Overhead Door Corporation,
22790 Lake ParkBlvd.,Alliance, Ohio 44601
NOTA: Sepuede programar un
maximo
de 3
abre puertas diferentes para un control
remoto
de 3botones.
lED
rojo LEDverde
PROGRAMACI6NALOS
ABRELATAS
DELA
PUERTA
DELGARAGEDE
CODEDODGER
ol
OVERHEADDOOR
Laccnfiquraclon predeterminada de
CodeDodger® 2 debe cambiarse a
CodeDodger"
1. (Sigaestos
mismos
pasos
para
cambiar
de
(odeDodger$
1 de nuevo
a
CodeDodger"
2).EI
color
del
LED
que
se
muestra
en el
control
remoto
indica
el
modo
de
CodeDodger<'.
Rojo=CodeDodger4'
1Nerde
=CodeDodger4' 2
1. Seleccione un
baton
en el control
remoto
que NO seha
programado
para la nueva
unidad motorizada.
2. Presione y
mantenga
presionado ese
bot6n
durante 10
{3j~
segundos.
Ambos
~
LED,raja y verde, 10SECS .:-
se Encienden y se ......
permanecen Encendidos.
f/lI...
.e. 3.Presione e\
mismo
bot6n
dos veces para
cambiar
la
,~=--
seleccion CodeDodger®
,de Code
Dodger·
2 a
.....
,
'CodeDodger®
1.
4. Presione el mismo
bot6n
~.
de nuevo para
coniirmar
el cambio. Laseleccion de ""
CodeDodger<' para este -
baton
seestablece en .
CodeDodger"
1.
5. Lleve el control
remoto
al abre puertas de
garaje Overhead
Door
mas
antiguo
y siga
las instrucciones del abre puertas para
programar
un
nuevo
control remoto.
Repita este procedimiento para otros
controles remotos de garaje Overhead
Door, segun seanecesario.
Control
remotode
tres
botones
CARACTERfSTlCAS
DE
CODEOOOGER$
Otros modelos de abre puertas de garaje,
controles remotos
ytedados
inalambrkos
Overhead Door,
utilizan
lassenatesde
CodeDodger®1 paracomunicarse. Loscontroles
remotos que vienencon esta unidad transmltiran
senalesCodeDodger<'10 CodeDodger"2.
Utilice
esta
Si
usted
tiene
••• proqramacion
de
CodeDodger$
Uno 0mas abre puertas
CodeDodger"
2 can Utilice
un
maximo
de 3abre
CodeDodger"
2
puertas diferentes
Combinaci6n de abre
puertas fabricados UtiJice
entre
1997 y 2010
CodeDodger·
(CodeDodger·
1)Ylos
nuevosabre puertas
261
CodeDodger"
2
Uno 0mas abrepuertas Utilice
fabricados entre 1997y CodeDodger$ 1
2010 (Codefjodqerw
l)
Pruebe el
funcionamiento
del control
remota.
El
control
remoto
no
deberia activarel abre
puertas.
s. Programe de nuevo el Abre puertas con
los demas controles remotos (Repita la
Seccion 2 para cada control remoto).
Siga estas instrucciones para
borrar
los
cOdigos del
control
remoto
paraTODOSlos
otros
abre
puertas
de Overhead
Door
openers.
1. Presione y MANTENGA PRESIONADOel
bot6n
learn
Code (C6dlgo de aprendizaje)
que seencuentra en la
unidad
motorizada
durante
10 segundos 0hasta
que
se
apagueel lED de la senal de radio.
2. Programe de nuevoel Abre puertas con el
resto de los Controles remotos,
siguiendo
las instrucciones de programacion de la
unidad
motorizada.
3. Programe de
nuevo
el Abre puertas
con cualquierTecJado
inalambrico
y
otro
dispositivo de acceso,
siguiendo
lasinstrucciones que vienen con esos
dispositivos.
S
REEMPLAZO
DELA
BATERfA
Reemplace la bateria del control
remoto
can
una bateria de celdas en forma de
moneda
CR2032.
1. Abra la caja
del
control
remotocon
una arandela
o una
moneda
que se ajuste a
la ranura en la
parte
superior
del
control
remoto.
2. Reemplace la bateria. Haga
que
la
polaridad de la bateria coincida con los
simbolos
que
seencuentran
dentro
de la
caja de la bateria.
3. Alinee los
componentes
y
tape
la
caja a presion.
4
PERDIDOOROBADODELCONTROLREMOTO
TaDOS
los
c6digos
del
control
remoto
se
borreran
de la
memoria
del Abre
puertas
(unidad
motorizada).
Estas
instrucciones
son para
abre
puertas
con la c1asede
teclado
que
se
muestra
a
continuaci6n.
~
\
1. Presione':-JY
mantenga,
._~~~
presionacfo hasta
,,~-
_
que ambas luces se "<, 'E:
;~~il~~1~;r::r'~~~~n.
J'0
2. Lasluces se apagan y la
luz
redonda
de
color
AZULse Enciende.
......
,1, __ 3. Presione,-:'de
nuevo
yvea
la
~~\c:::
luz mterrnitehteprolongada del
LED
color
purpura,
4. Presione
tanto
\ /
como
\
!~\simultilneamenteen
..'
~~_\:;;>
la
unidad
motorizada
,%0.
:
~
_
ymantenqalos "< \
presionados por 5
segundos.
,\
~.
'~d
~
'-'\'.~'~'
3 OPERACI6NDEL
CONTROL
REMOTO
•Apunte el control remote hacia la puerta
del garaje y presione el boton. La puerta se
rnovera,
• Presionenuevamente el boton del Control
remoto y la puerta se detendra.
• Presionede nuevo el boton del Control remoto
y la puerta se movere en direcci6n contraria.La
puerta sedetieneautomaticamente alfinal del
ciclo de abrir 0cerrar.
~
Una
puerta
m6vil
puede
ocasionar
lesiones
serias
0
incluso
lamuerte.
• Laconsola de la pared
debe
estar
instalada cerca de la puerta,
par
10
men os a 5pies sobre el suelo y lejos de
piezas m6viles de la puerta.
Mantenga
a las
personas
lejos
del area
de apertura,
mientras
la puerta estaen
movimiento.
No
permita
que los nines
jueguen
con el
control
remoto
0con el abre puertas.
Si la
reversa
de
seguridad
no funciona
adecuadamente:
Cierre
la
puerta,
luego
desconecte
el
abre
puertas
con la
manija
de Iiberaci6n
manual.
No
utilice
el
control
remoto
0el abre
puertas.
Consulte los Manuales del Propietario
de la
puerta
y el abre puertas antes de
intentar
realizar
cualquier
reparaci6n.
2 PROGRAMEELABRE
PUERTAS
<D
PRESlONE Y
MANTENGA
PRESIONADO
durante
5
segundos.
VEA QUE AMBOS
LED
color
azul
se
Enciendan
~
LIBERElos
botones
VEA
que....,.
""
1:3?'
el LED
redondo
.. ,
~_
color
azul
se Encienda."
~
..
~
0
~:
~
_
~?
-
@PRESIONEyLIBEREVEA
.....
~\:;;>
el LED
purpura
de
luz
"~D
'W-""-J~
\.-<
intermitente
prolongada
"'"
l"ffI=\
f4\PRESIONE el
control
remoto
y
L1BERE
(el
'::!J
boton
que
desea
programar).
f/1\
..,
0:~~.
, . VEA
que
el LED
purpura
de
"
luz
intermitente
prolongada
se
Encienda
de
forma
permanente
®PRESlONE y LIBERE
de
nuevo
el
boton
del
control
remoto
~~?
~o
VEA
que
ambos
LEO se
enciendan
de
forma
intermitente
en
color
azul
y
luego
se
Apaguen
@PRESIONEy
LIBERE
por
tercera
vez el
boton
del
control
remoto
la
programaci6n
estil completa.Este
bot6n
del
control
remote
se
puede
utilizar
ahara para
operar
el abre puertas.
Repita segun sea necesario para otros
controles remotos 0
botones
del
mismo
control
remoto.
~
Una
descarga
electrica
puede
W
fac:~~~::.lesione5
serias
0
incluso
•
EI
cable de energfa
debe
estar
desenchufado antes de
conectar
cualquier cable.
• Asegurese de que los extremos del cable no
hagan contaeto entre si u otras terminales.
Sitiene alguna pregunta 0necesita algun
manual,comunfquesecon el distribuidor 0
elfabricante del abre puertas.
TheGenuine.TheOriginal.
(bontrol
remoto
de
3
(~f~illH~.)
otones
'""v
~;'
INSTRUCCIONES DE FUNCIONAMIENTO
1INFORMACI6N IMPORTANTE
Estecontrol
remoto
sepreestablece para
utilizarlocon el Sistema de seguridad de
acceso
CodeDodge~
2. EIcontrol remote se
puede
configurar
para utilizarlo con el sistema
de seguridad de acceso
CodeDodger®
1.
Consulte "Programaci6n de abre puertas de
garaje de CodeDodger<' 1Overhead Door" para
obtener
instrucciones sobre
c6mo
cambiardel
sistema CodeDodger<> 2 a
CodeDodger"
1.
'!!,'·kU;Ui
H
3
f.i
Utiliser
cette
Si
vous
avez •.•
programmation
CodeDodger<'
Un,deux ou trois
dlfferents portiers Utiliser
eleetriques CodeDodger<' Code
Dodger.
2
2au
maximum
Une combinaison de
portierselectriques
fabriquesentre 1997 et Utiliser
2010 (CodeDodger<' 1)
CodeDodger·
et les nouveaux portiers
20u
1
electriques CodeDodger<'
2
Un ou plusieurs portiers
electriques fabriques Utiliser
entre
1997et2010
CodeDodger"
1
(CodeDodger<' 1)
Telecommande
I
it
trois
touches
I
Voyant aVoyanta
DELrouge DEL
vert
PROGRAMMATIONAUX
OUVREURS
DE
PORTEDEGARAGED'CODEDODGER" 1
OVERHEAD
DOOR
le
reglage par
d"faut
de
i'CodeDodger"
2
doit
etre change
pour
celui de I'CodeDodger® 1.
(Suivre les
memes
etapes
pour
modifier
Ie
reglage de I'CodeDodger® 1vers celui de
I'CodeDodger® 2.)La
couleur
du
voyant
a
DEL de la
telecommande
indique
Ie
mode
CodeDodgerO
•
Rouge=
CodeDodger<>
1IVert=CodeDodger<>2
1. Selectionner une
touche
de la
telecommande
qui n'a PASete
programmee
et I'assigner au nouveau
moteur
electrique.
2.
Appuyer
sur la
touche
pendant
10
secondes.
Les
deux
~~
voya~ts
aDELrouge et
'\..J
_
vert
sALLUMENTet restent
lOSECS·'
I
AllUMES.
,.
.•
~...
- 3.
Appuyer
sur la
meme
touche
. deux fois
pour
changer de
, ' selection
CodeDodger"
et
......
. passer de I'CodeDodger® 2 a
I'CodeDodger"
1.
4. Appuyer sur la meme
f'\
touche une nouvelle
fois pour
confirmer
Ie £:'
changement. Laselection
CodeDodger®
pour
......
. .
cette
touche
est reglee a
CodeDodger® 1.
S.
Apporter
la nouvelle
telecommande
a I'ancien
portier
electrique
de
porte
de garage Overhead Door et suivre les
memes instructions
pour
la programmer.
Refaire ces instructions
pour
toutes
lesautres
telecommandes
de
porte
de
garage Overhead Door.
Pour
obtenir
des
informations
supplementaires ou
obtenir
de I'aide,
contacter
ie service ala
clientele:
Appeler
ie
1-800-929-DOOR au ecrire au :Overhead
Door
Corporation,22790
lake
Park Blvd.,
Alliance, Ohio 44601
DISPOSlTlFS
D'CODEDODGER"
Les autres rnodeles de portiers electriques.
de
telecommandes
et de claviers
numeriques
sansfil Overhead
Door
utilisent
les signaux
Codefiodqerv 1
pour
communiquer.
Laou
les telecornmandes fournies aveccet appareil
transmettent
avec des signaux CodeDodger®
1ou
CodeDodger.
2.
-'REMARQUE: Un
maximum
de trois dlfferents
portiers electriques
peuvent
etreprogrammes
pour
une telecornrnande atrois touches.
3OPERATIONA TELECOMMANDE
Pointer la telecornmande en
direction
de la
porte
de garage et
appuyer
sur la
touche.La porte
entre
en
mouvement.
Appuyer
de
nouveau
sur la
touche
de la
telecornmande et la
porte
s'immobilise.
Appuyer
de
nouveau
sur la
touche
de la telecornrnande et la
porte
se
deplace
dans l'autre
direction.
La
porte
s'immobilise
automatiquement
ala fin
du cycle
d'ouverture
ou de fermeture.
Sl,lhnelesfnstrlletlonssurcetl:epage.Slnon,fllllreplIIsslllrla
tilKommandllld'CODEOOOGER-2 litCDDEDODGER-1 lilt sulvre
InlndIClltionsd"progrlllmnuttionduportlerileetrlque.
ATTENTION
Slllllportlllll'<!l.etrlquecomportel,lnlllutoe:olllllntlllvuun
num'rodeserlequl
rM,..."blelitcelukl
(I~dwx
pumlers
dllHres50nt'Oouundllffreplus"e",),lIertolqul~cI'un
'OD'OOOO',..,.
[~>'.
".'
"''''''I
,~rzr""
,
4
EXTERIEUR
PERDUOUVOLE
Taus
les
codes
de
telecommande
seront
effaces
de la memoire
du
portier
electrique
(moteur
electrlque).
Ces
instructions
~\
concernent
les
portiers"
~~_
electrlques
munis
d'un
~
0
~::'-_
clavier
du
meme
type
<,
-r
J~:s~~~.i
Hlustreci- "' ' 0
1.
Appuyer
surljusqu'a
ce que les
deux
voyants s'allujnent en bleu. Relacher la
touche.
2. Les
voyants
s'ETEIGNENT
et Ie
voyant
rond
BLUE
s'AllUME.
3. Appuyer sur .' de
nouveau
et
~
~O\-
Ie voyant long aDELc1ignote en
"0
pourpre
\
4.
Appuyer
sur lesdeux':..
,,~c~~-\:;;>
\
et (
simultanernent
sur
"'"
- - -
Ie
~oteur
eleetrrque
pendant
5secondes.
\ Tester Ie
fonctionnement
~~l(0~
,0'
de la
telecommande
..La
""
" "\
't";"'w.
telecommande
ne dOlt pas
.
'""
activer Ie
portier
electrique.
5.
Reprogrammer
Ie
portier
electrique
avec la
au les autres
telecommandes
(Refaire la
section 2
pour
chaque telecommande).
Suivre
les
instructions
pour
effacer
les
codes
de
telecommande
de TOUSles
aut
res
portiers
electriques
Overhead
Door
openers.
1.
Appuyer
et MAINTENIRla
touche
de code
d'apprentissage du
moteur
electrique
pendant
10 secondes jusqu'a ce que
I'indicateur
aDELdu signal radio s'eteigne.
2.
Reprogrammer
Ie
portier
electrique avec
les autres
telecommandes
en suivant les
instructions
de
programmation
du
moteur
electrique.
3. Reprogrammer Ie
portier
electrique
avec Ie clavier
numerique
sansfil au
un autre d·ISpositifd'acces en
utilisant
les instructionsqui
accompagnent
ces
appareils.
5REMPLACEMENTDE
BATTERIE
Remplacer la pile de la
telecommande
par une
pile
bouton
CR
2032.
1.
Ouvrirle
bOttier de la
telecommande
aI'aide
d'une
rondelleou
d'une
piece de
monnaie
inseree
dans la
fente
situee sur Ie
dessus de la
telecommande.
2. Changer la pile. Placer la pile de maniere
a ce que sa polarite corresponde a celie
iIIustreeaI'interieur
compartiment
apiles.
3.
Aligner
lescomposants et refermer Ie
boitier.
~
Une
porte
en
rnouvement
peut
provoquerdes blessures graves
au la mort.
• La console murale
doit
etre fixee
aun
endroit
visible de la porte, au
mains
1,5 m (5 pi) au-dessus du sol et a
bonne
distance de
toutes
les parties mobiles.
•S'assurerque
toutes
les
personnes
sont
a
bonne
distance
de l'ouverture de la
porte
lorsque 1a
porte
est activee,
• Ne
JAMAIS
permettre
aun
enfant
de
jouer
avecla tetecomrnanoe ou Ie
portier
electrique.
Si
I'inverseur
de securite ne
fonctionne
pas
correctement:
•
Fermer
la
porte,
puis
debrancher
Ie
portier
electrique
a I'aide de la
poiqnee
de
deverrouillaqe
manuel.
• Ne PAS utiliser la telecornrnande ou Ie
portier
electrlque.
•Consulter Ie
Manuel
de
I'utilisateur
de
la
porte
de garage et celui du
portier
electrique avant de
tenter
d'effectuer
une
reparation.
2 PROGRAMMATIONDU PORTIER
ELECTRON/QUE
<D
APPUYERPENDANTSsecondesVOIR - Les
1DEUX
voyants
aDEL
bleus
s'ALLUMENT
~
RELAcHERVOIR - Le .
.-~_
'G>
\
voyant
ronda
DEL
"'-
~Oo
--
bleu
s'ALLUME
~O:
-.......
< -
-\-
@APPUYERetRELACHER
--:<II»
VOIR - Le
voyant
long
aDEL
~
'pf~
pourpre
c1ignotant
~\\\\
@APPUYER
sur
la
touche
de la
tel"commande
et
RELACHER (Ia
touche
a
progr~:~er.)
"Z::~?
~
,
/
- I
VOIR-
Le
voyant
long
, , aDEL
pourpre
reste
ALLUME
®APPUYER
et
RELAcHER
de
nouveau
la
touche
de la
telecommande
'!j.w9iiiHHid'
¥f
ii
'Z::.~'&'
~
0
VOIR - Les
deux
voyants
a DEL
clignotent
en
bleu
puis
s'ETEIGNENT
@ APPUYER et RELACHERla
touche
de la
telecommande
une
troisieme
fois
La
programmation
estterminee.Cette
touche
de la
telecommande
peut
maintenant
etre utilisee
pour
faire
fonctionner
Ie portierelectrique.
Refaire
cette
etape avec
toutes
les autres
telecommandes
ou toutes les autres
touches
de la meme telecommande.
~
Une
decharge
electrique
peut
Ii
:~~:c:~~
des
blessures
graves
• Le
cordon
d'alimentation
do;t
etre
debranche
avantde
tenter
de fixer les fils.
• S'assurer que les
extremites
des fils ne se
touchent
pas et ne
touchent
pas aux bornes.
Sivous avez des questions ou si vous avez
besoin
d'un
nouveau manuel,contacter
Ie
distributeur
ou Ie
fabricant
du
portier
electrique.
TheGenuine.TheOriginal.
Teh!tommande
a3
~m~touches
INSTRUCTIONS D'UTILISATION
1INFORMATIONSIMPORTANTES
Cettetelecomrnandeest
prereqlee
pouretre
utllisee
avecIesysterne
d'acces
desecurite
CodeDodger"
2. Latelecornmands peut etre
configureepouretre
utilisee
avec
Ie
systerne
d'acces
desecuriteCodeDodger®1.Voirlasection
"Programmerlesportiers
electriques
pourporte
de garage CodeDodger"1deOverhead Door"
pourobtenirlesinstructionspouraltemerentre
I'CodeDodger<' 2 et I'CodeDodger<' 1.
