Ozito OCBA-1000 User manual

BATTERY
TESTER
CLAMPS CRANKING CHARGING
LOW VOLTAGE
BATTERY
TESTER
CLAMPS CRANKING CHARGING
LOW VOLTAGE
BATTERY &
ALTERNATOR
TESTER
12V 2000CCA
INSTRUCTION MANUAL
SPECIFICATIONS
Input Max.: 12V DC
Capacity: 100-2000 CCA
Suitable for: Lead Acid, AGM, EFB & GEL batteries
Operating Temp.: 0°C~50°C
Storage Temp.: –20°C~70°C
Display: 4 Character Digital
Weight: 0.15kg
OCBA-1000
STANDARD EQUIPMENT
3 YEAR REPLACEMENT WARRANTY*
Your product is guaranteed for a period of 36 months from the original date of purchase. If
a product is defective it will be replaced in accordance with the terms of this warranty. Warranty
excludes consumable parts, for example: .
*This product is intended for DIY use only and replacement warranty covers domestic use.
WARNING
The following actions will result in the warranty being void.
• If the tool has been operated on a supply voltage other than that specified on the tool.
• If the tool shows signs of damage or defects caused by or resulting from abuse, accidents
or alterations.
• Failure to perform maintenance as set out within the instruction manual.
• If the tool is disassembled or tampered with in any way.
• Professional, industrial or high frequency use.
WARRANTY
OZITO Australia/New Zealand (Head Office) 25 Fox Drive Dandenong South, Victoria, Australia 3175.
ozito.com.au
12V Battery & Alternator Tester
0422
IN ORDER TO MAKE A CLAIM UNDER THIS WARRANTY
YOU MUST RETURN THE PRODUCT TO YOUR NEAREST
BUNNINGS WAREHOUSE WITH YOUR BUNNINGS
REGISTER RECEIPT. PRIOR TO RETURNING YOUR
PRODUCT FOR WARRANTY PLEASE TELEPHONE OUR
CUSTOMER SERVICE HELPLINE:
Australia: 1800 069 486
New Zealand: 0508 069 486
The benefits provided under this warranty are in addition to other rights and remedies which
are available to you at law.
Our goods come with guarantees that cannot be excluded at law. You are entitled to a
replacement or refund for a major failure and for compensation for any other reasonably
foreseeable loss or damage. You are also entitled to have the goods repaired or replaced if the
goods fail to be of acceptable quality and the failure does not amount to a major failure.
Generally you will be responsible for all costs associated with a claim under this warranty,
however, where you have suffered any additional direct loss as a result of a defective product
you may be able to claim such expenses by contacting our customer service helpline above.
TO ENSURE A SPEEDY RESPONSE PLEASE HAVE
THE MODEL NUMBER AND DATE OF PURCHASE
AVAILABLE. A CUSTOMER SERVICE REPRESENTATIVE
WILL TAKE YOUR CALL AND ANSWER ANY QUESTIONS
YOU MAY HAVE RELATING TO THE WARRANTY POLICY
OR PROCEDURE.

BATTERY
TESTER
CLAMPS CRANKING CHARGING
LOW VOLTAGE
12V BATTERY & ALTERNATOR TESTER
KNOW YOUR PRODUCT
1. KNOW YOUR PRODUCT OVERVIEW
ONLINE MANUAL
Scan this QR Code with your mobile
device to take you to the online manual.
1. Digital Display
2. Error LED’s
3. Test Result Red LED
4. Test Result Yellow LED
5. Test Result Green LED
6. Red Positive (+) Terminal Clamp
7. Black Negative (-) Terminal Clamp
8. Up Button
9. Back Button
10.Down Button
11.Enter Button
4
5
1
2
9
6
7
8 10
1. Digital Display
Indicates voltage, CCA, general battery condition and test results.
2. Error LED’s
– Low Voltage: Indicates that the battery has a low voltage and should be
charged.
– Clamps: Indicates the terminal clamps of the battery & alternator tester
are not properly engaged with the vehicle battery. Ensure that the
vehicle battery terminals and the terminal clamps are clean of grease
and dust. Ensure the clamps are well engaged with the battery.
– Cranking: The starting system is abnormal and difficult to start.
– Charging: The charging system is abnormal, generator output voltage
may be higher, lower or no output.
3. Test Result Red LED
–Battery Test: Battery is bad and should be replaced.
4. Test Result Yellow LED
– Battery Test: Battery is weak.
5. Test Result Green LED
– Battery Test: Battery is ok.
– Charging Test: Charging system is ok.
– Cranking Test: Starting system is ok.
6. Red Positive (+) Terminal Clamp
Connects to the positive (+) pole on your vehicle 12V battery.
7. Black Negative (–) Terminal Clamp
Connects to the negative (–) pole on your vehicle 12V battery.
8. Up Button
Scrolls up through menu items.
9. Back Button
Returns to previous menu.
10. Down Button
Scrolls down through menu items.
11. Enter Button
Confirms a selection (or action) from a menu item.
SETUP & PREPARATION
11
3

+ -
+ -
+ -
a.
b.
2. BATTERY CONNECTION
Connecting to a Vehicle Battery
Before testing make sure the battery terminals are really clean as grease
and dust could lead to errors in the test results. The battery MUST be
disconnected prior to cleaning. Check the battery and connections for any
cracks or damage before proceeding with cleaning and testing. To help
ensure a good connection of the battery terminal clamps, clean the battery
terminals with a solution of baking soda and water, and wipe the battery
terminals with a cloth to remove any dirt and grease.
If the battery is still fitted to a motor vehicle, make sure that all the
electronics are turned OFF, and that the ignition is turned OFF.
1. With the vehicle engine not
running, connect the red positive
terminal clamp to the positive
( + ) pole on your vehicle 12V
battery.
2. Connect the black negative
terminal clamp to the negative
( – ) pole on your vehicle 12V
battery.
Disconnecting from a Vehicle Battery
1. Remove the black negative
terminal clamp from the negative
( – ) pole of your vehicle battery.
2. Remove the red positive terminal
clamp from the positive ( + ) pole
of the vehicle battery.
WARNING! ONLY FOR 12 VOLT LEAD ACID BATTERY.
WARNING! ENSURE THE POWER CORD IS UNCOILED
AND FULLY EXTENDED TO AVOID OVERHEATING
THE POWER CORD. ENSURE THAT IT DOES NOT GET
TANGLED OR CAUGHT IN ANY ROTATING PARTS
WITHIN THE ENGINE COMPARTMENT OF THE VEHICLE.
WARNING! READ AND UNDERSTAND THE WARNINGS
BEFORE SETUP AND TESTING.
WARNING! CHECK CORD AND CLAMP FOR DAMAGE
BEFORE EVERY USE. DO NOT USE IF CORD OR CLAMP
INSULATION IS MISSING OR DAMAGED AND WIRE IS
EXPOSED.
Battery Test
Standard Flooded Battery
AGM Flat, AGM Spiral, GEL, EFB, VRLA Battery
Cranking System Test
Charging System Test
Wait for the engine to start
Battery System Standard Description
CCA: Cold Cranking Amps.
BCI: Battery Council International standard.
CA: Cranking Amps standard, effective starting current value
at 0°C.
MCA: Marine Cranking Amps standard, effective starting
current value at 0°C.
JIS: Japan Industrial Standard.
DIN: German Auto Industry Committee Standard
IEC: International Electro Technical Commission standard.
EN: European Automobile Industry Association standard.
SAE: Society of Automotive Engineers.
GB: China National Standard.
Measuring Range
SAE: 100~2000 CCA
EN: 100~2000 CCA
CA: 100~2000 CA
DIN: 100~1400 CCA
IEC: 100~1400 CCA
MCA: 100~2000 MCA
CCA: 100~2000 CCA
BCI: 100~2000 CCA
GB: 30~220 Ah
JIS: 26A17--245H52
Digital Display Meaning

BATTERY
TESTER
CLAMPS CRANKING CHARGING
LOW VOLTAGE
•
BATTERY
CLAMPS CRANKING CHARGING
LOW VOLTAGE
BATTERY
TESTER
CLAMPS CRANKING CHARGING
LOW VOLTAGE
CLAMPS CRANKING CHARGING
LOW VOLTAGE
BATTERY
CLAMPS CRANKING CHARGING
LOW VOLTAGE
CLAMPS CRANKING CHARGING
LOW VOLTAGE
•
CLAMPS CRANKING CHARGING
LOW VOLTAGE
•
3. BATTERY ANALYSIS
OPERATION
OCBA-1000
Battery Test
Before testing battery, if it is in a vehicle, turn off all vehicle accessory
loads such as lights, air conditioning, radio etc. Ensure battery is fully
charged before testing.
Only test a single battery at a time with the Battery Test Function. If the
battery requires repeat testing using the battery test function, after
1 minute of testing, allow the battery tester to rest for 10 minutes before
proceeding.
Note: If the vehicle has been running before testing, the battery holds
a surface charge. Turn on headlights for 30 seconds to remove surface
charge. Let battery rest for one minute before starting to test.
1. Connect the battery tester to the battery,
following the instructions specified in
the "Battery Connection" section.
2. The digital display will show the battery
voltage, press the "Enter" button to the
next step.
Note: If the Low Voltage LED lights up,
disconnect the battery tester and charge
the battery before attempting the "Battery
Test" again.
3. Press the "Up" and "Down" to select "batt" battery and press "Enter"
button.
4. Press the "Up" and "Down" to select
the battery type REGU or AGM (REGU -
standard wet battery / AGM - VRLA, GEL,
AGM, EFB etc sealed battery).
5. Press "Enter" button to confirm
selection.
6. Press the "Up and "Down" buttons to
select the desired battery rating SAE ,
DIN, IEC , EN, CA, MCA, JIS, BCI, CCA,
GB. For general testing select CCA.
7. Press "Enter" button to confirm selection.
8 Press the "Up" and "Down" buttons to
input the battery cold cranking amps
(CCA). Refer to the battery rating label of
the battery being tested.
9. Press "Enter" button to confirm
selection and start the test.
10.Battery analysis will begin.
11. When the test is complete, the digital
display will show the CCA value. The
test result LED will also illuminate.
– Green LED = battery is ok.
– Yellow LED = battery is weak.
– Red LED = battery is bad. Need to
change the battery immediately.
12.Turn engine off before disconnecting
from the vehicle battery.
Check the battery terminal clamps are correctly connected to the lead acid
battery. Twist the terminal clamps slightly to ensure a good connection. It
is recommended that an assistant be present to assist with all tests.
Cranking Test
With the battery terminal clamps correctly connected and before having
your assistant start the engine, turn off all vehicle accessory loads such as
lights, air conditioning, radio etc.
1. Press the "Down" button to select the
system test CRAN.
2. With CRAN on the digital display, press
"Enter" button.
3. Have your assistant start the engine.
4. When the test is complete, the digital
display will show the cranking voltage.
The test result LED will also illuminate.
–Green LED = When starting system is ok.
–Cranking Error LED= When starting
system is abnormal and difficult to start.
5. Turn engine off before disconnecting
from the vehicle battery.

CLAMPS CRANKING CHARGING
LOW VOLTAGE
CLAMPS CRANKING CHARGING
LOW VOLTAGE
•
CLAMPS CRANKING CHARGING
LOW VOLTAGE
•
Cleaning
• We recommend that you clean the device immediately each time
you have finished using it.
• Keep the battery & alternator tester dry, clean and free from oil,
water and grease.
• Clean the appliance regularly with a cloth. Do not use cleaning
agents or solvents; these may be aggressive to the plastic parts
in the appliance. Ensure that no water can get into the interior of
the appliance.
Storage
•The battery & alternator tester should be placed in a dry room
for storage.
Note: Ozito Industries will not be responsible for any damage or
injuries caused by the repair of the tool by an unauthorised person
or by mishandling of the tool.
WARNING! BEFORE CLEANING THE APPLIANCE MAKE
SURE THAT IT IS DISCONNECTED FROM THE VEHICLE.
Power tools that are no longer usable should not
be disposed of with household waste but in an
environmentally friendly way. Please recycle where
facilities exist. Check with your local council authority for
recycling advice.
Recycling packaging reduces the need for landfill and
raw materials. Reuse of recycled material decreases
pollution in the environment. Please recycle packaging
where facilities exist. Check with your local council
authority for recycling advice.
CARING FOR THE ENVIRONMENT
SPARE PARTS
Spare parts can be ordered from the Special Orders Desk at your
local Bunnings Warehouse.
For further information visit
www.ozito.com.au or contact Ozito Customer Service:
Australia 1800 069 486
New Zealand 0508 069 486
E-mail: [email protected]
MAINTENANCE
3. BATTERY ANALYSIS (cont.)
OPERATION (cont.)
Testing the Charging System
With the battery terminal clamps correctly connected and before having
your assistant start the engine, turn off all vehicle accessory loads such as
lights, air conditioning, radio etc.
1. Have your assistant start the engine.
2. Press the "DOWN" button to select the
system test CHAR.
3. With CHAR on the digital display, press
"enter" button to read the voltage of the
battery.
4. When the test is complete, the digital
display will show the lowest and highest
charging voltage during test. The test
result LED will also illuminate.
–Green LED = When charging system is ok
–Charging Error LED = When charging
system is abnormal, generator output
voltage may be higher, lower or no output.
5. Turn engine off before disconnecting from the vehicle battery.

Regulatory Compliance Mark
(RCM) Warning
VVolts AAmperes
Read Instruction Manual
A
CCA Cold Cranking Amps
DC Direct current
DESCRIPTION OF SYMBOLS
BATTERY TESTER SAFETY WARNINGS
WARNING! Save all warnings and instructions for future reference
WARNING! Read all safety warnings and all instructions. Failure to follow the warnings and
instructions may result in electric shock, fire and/or serious injury.
- This appliance is only intended for lead acid batteries
- This appliance is not intended for use by young or infirm persons unless supervised by a
responsible person to ensure that they can use the appliance safely.
- The warnings, cautions and instructions discussed in this instruction manual cannot cover all
possible conditions and situations that may occur.
- Common sense and caution are factors that cannot be built into this product but must be supplied
by the operator.
- It is recommended to work with someone who can come to your aid when working near a lead
acid battery.
- Do not come in contact with leaking battery.
- Have plenty of fresh water and soap nearby in case battery acid contacts skin, clothing or eyes.
- If battery acid contacts skin or clothing, wash immediately with soap and water. If acid enters eye,
immediately flood eye with running cold water for at least ten minutes and get medical attention
immediately.
- Be extra cautious to reduce risk of dropping a metal tool onto the battery. It could spark or short-
circuit the battery or other electrical parts and could cause an explosion.
- Remove personal metal items such as rings, bracelets, necklaces and watches when working with
a lead acid battery. It can produce a short circuit current high enough to weld a ring or the like to
metal causing a severe burn.
- Clean battery terminals. Be careful to keep corrosion from coming in contact with eyes.
- Before testing inspect the battery for cracks or broken case or cover. Of the battery is damaged,
do not use tester
Work Area
- Operate in a safe work environment. Keep your work area clean and well lit.
- Keep anyone not wearing the appropriate safety equipment away from the work area.
Note: Minimize distractions in the work environment.
- Distractions can cause you to lose control of the tool.
- When connecting the battery tester cables to the battery, avoid creating sparks; especially when
the battery is being charged. Explosive gases are created during charging. Sparking could also
damage the vehicle electrical system.
- Always lock up tools and keep them out of the reach of children
- Do not expose battery tester to rain, snow or wet conditions.
- Stay clear of hot engine and car parts.
Personal Safety
- Wear ANSI-approved safety goggles and protective gloves during set up and use of the Battery
Tester.
- Test in a well ventilated area. Explosive gases may be produced during testing. Do not smoke,
cause sparks, or strike matches near the battery when testing.
- Protective, electrically non-conductive clothes and non-skid footwear are recommended when
working. Wear steel-toed boots to prevent injury from falling objects.
- Refer to the user manual of the battery being tested for testing instructions and precautions prior
to using the battery tester.
- Do not connect in reverse polarity.
- Use this product in accordance with these instructions, taking into account the working conditions
and the work to be performed. Use of this product for operations different from those intended could
result in a hazardous situation.
- This product is not a toy. Keep it out of reach of children.
- Maintain labels and nameplates on the unit. These carry important safety information.
- People with pacemakers should consult their physician(s) before use. Electromagnetic fields in
close proximity to heart pacemaker could cause pacemaker interference or pacemaker failure.
Caution is necessary when near coil, spark plug cables, or distributor of running engine. Engine
should be off during distributor adjustment.
- Undercharged lead-acid batteries will freeze during cold weather. Do not test or charge a frozen
battery.
- Do not smoke or have open flames near the battery.
- Never remove battery load tester clamps while testing.
- Ensure automatic vehicles are in park with the handbrake engaged before starting the engine.
- Ensure manual vehicles are in neutral with the handbrake engaged before starting the engine.
- Put blocks on drive wheels and never leave car unattended while running tests.
- Road Safety Road Rules 2009 penalty code 2135, it is illegal to leave “motor vehicle unattended
with keys in ignition, motor running, brakes not secured or doors unlocked.
Risk of Electric Shock
- Never touch the clamps and the terminals with wet hands.
- Do not pull the clamps from the terminals by pulling on the clamp cables.
- Check the clamp leads for damage before every use.
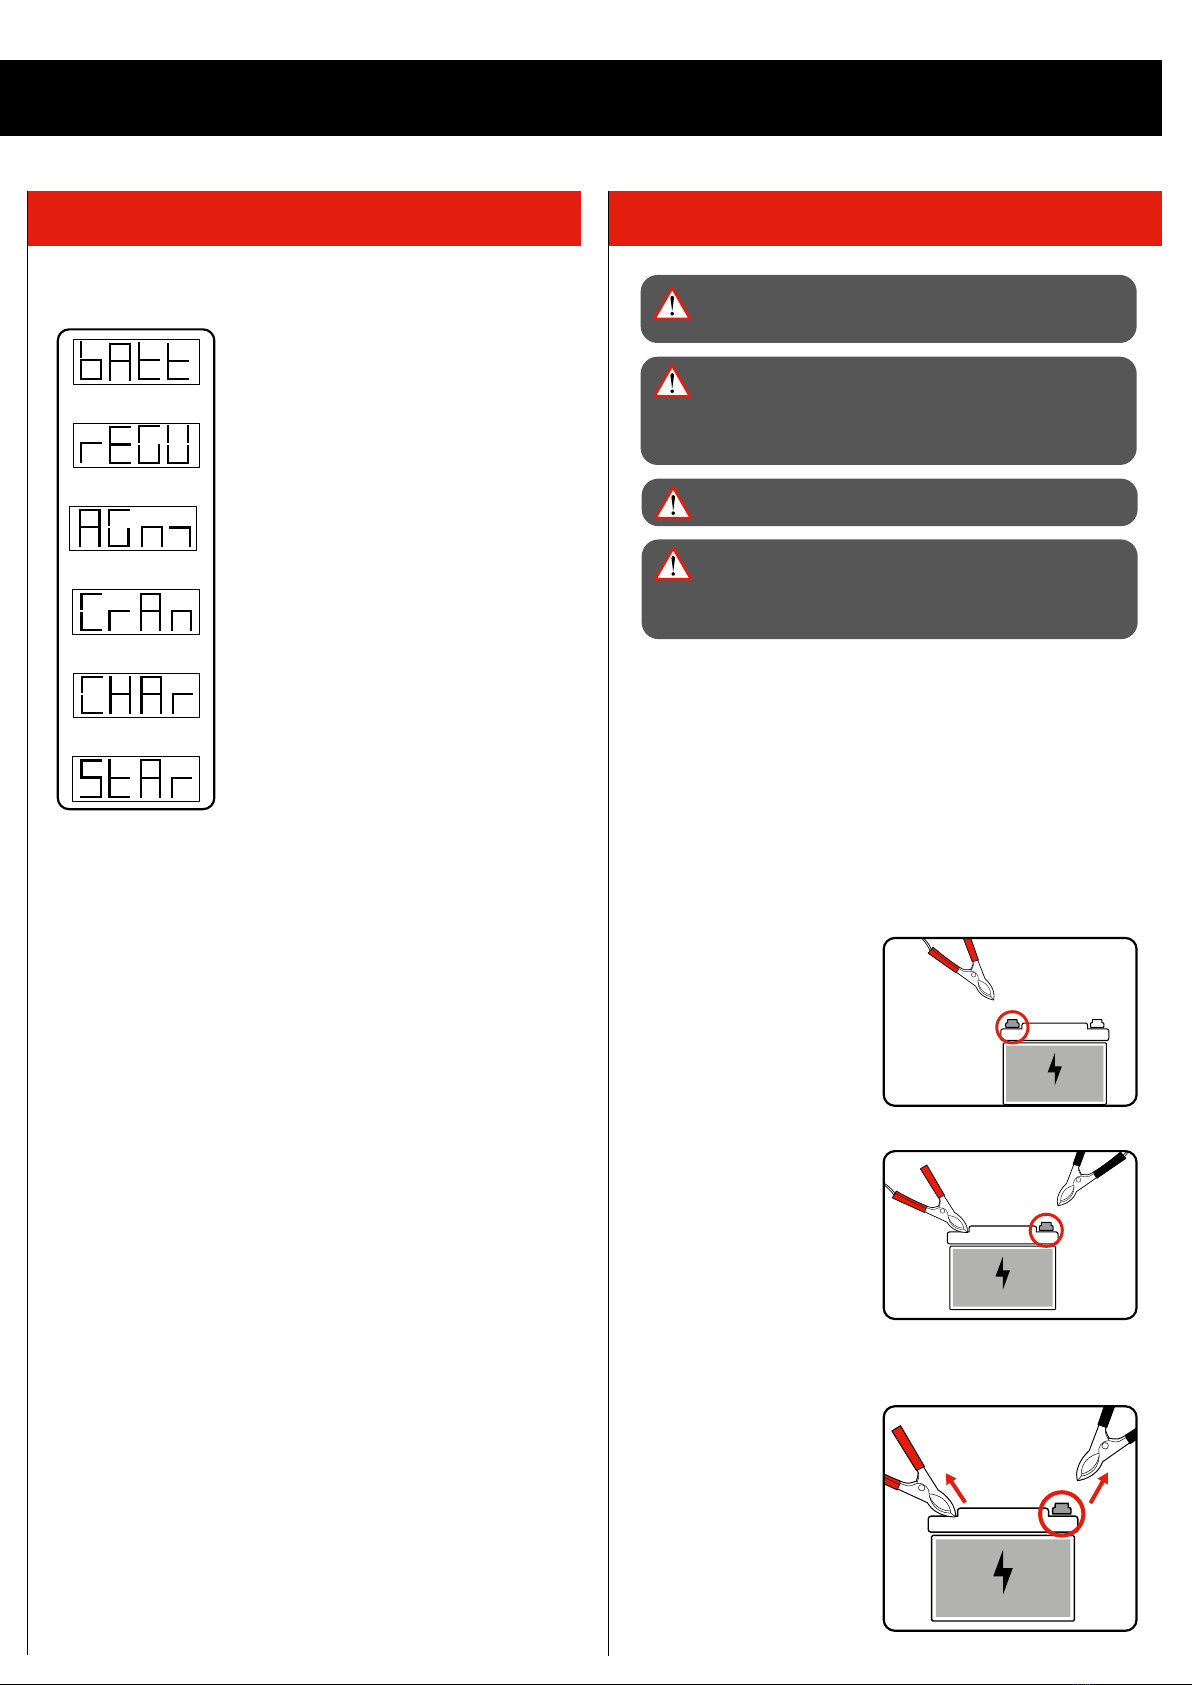
- Be certain of the test battery polarity before connecting the battery tester clamps. The RED (+)
positive battery clamp goes to the positive terminal of the battery. The BLACK (-) negative battery
clamp goes to the negative terminal of the battery. Reversing the battery tester battery clamps on
the battery may damage the battery tester.
- Do not drop the battery tester as it may affect proper operation.
- Do not smoke or have open flames near the battery.
- The warnings and precautions discussed in this manual cannot cover all possible conditions and
situations that may occur. It must be understood by the operator that common sense and caution
are factors which cannot be built into this product, but must be supplied by the operator.
- Use extreme caution when working around the ignition coil, distributor cap, ignition wires and
spark plugs. These components create hazardous voltages when the engine is running.
Tester Use and Care Instructions
- This battery tester was designed for specific functions. Do not modify, disassemble or alter the
battery tester, all parts and accessories are designed with built-in safety features that may be
compromised if altered.
- Do not use the battery tester in a way for which it was not designed.
Table of contents
Other Ozito Test Equipment manuals
Popular Test Equipment manuals by other brands

Teledyne Lecroy
Teledyne Lecroy AP034 Operator's manual

Keysight
Keysight N443xD quick start guide

Kestrel
Kestrel Relative Humidity Calibration Kit user manual

Elation
Elation IP TESTER user manual

HIPOTRONICS
HIPOTRONICS OC-DI Series operating instructions

PCB Piezotronics
PCB Piezotronics 8159-0011A Installation and operating manual