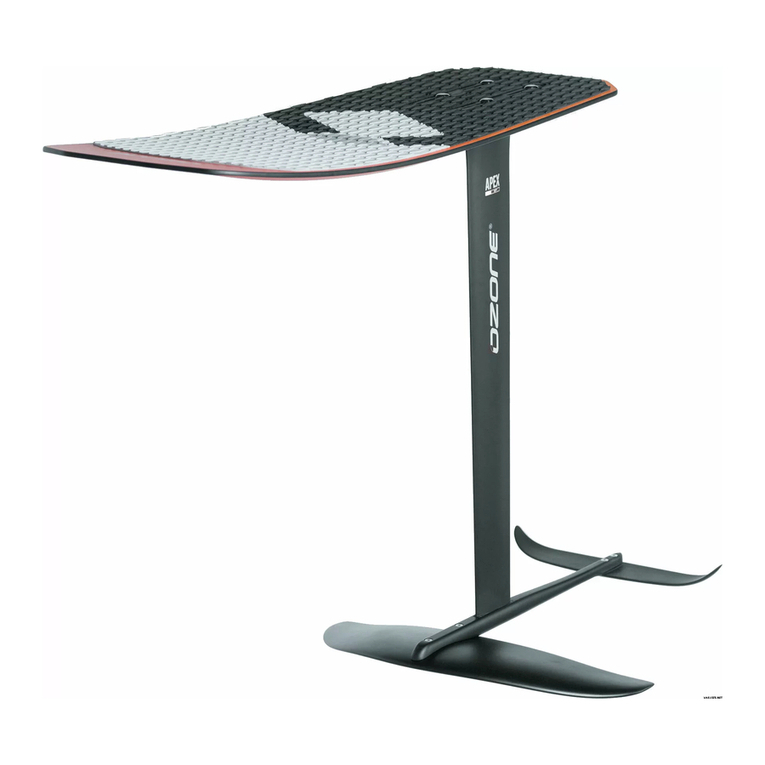
Ozone Apex V1 Foil User manual

Apex V1 Foil Manual

2apex v1 foil Manual
thanks
At Ozone we are passionate about sports, and it is this passion that drives our design team to
perfect and develop products that we love to ride with. We are proud of the quality of our products,
and are constantly searching for the best components and materials to use in our designs. We
manufacture in our own high-quality production facility in Vietnam, which guarantees a build quality
that we are proud to put the Ozone name on.
A close look at one of our products reveals that same superior quality and construction that
ensures that every Ozone product will enjoy a long life, with consistent performance and aesthetics.
To view the factory video visit our website www.yozone.com.
Many dynamic action sports carry inherent risks but with common sense and education from
qualied instructors means you can easily enjoy these incredible sports. Accidents generally
happen due to a lack of experience, changing weather conditions or from using equipment not
suited to the riders’ ability and/or conditions. Always take the time to learn safely with qualied
instruction and you will progress far quicker.
Ride safe
Team Ozone
release
of liability
OZONE KITESURF LTD OZONE KITES LTD RELEASE OF LIABILITY, CLAIM
WAVIER, ASSUMPTION OF RISK
By assembling and/or using this Ozone product, you agree that you have read and understood the entire Ozone
product owners manual, including all instructions and warnings contained in that manual, prior to using the Ozone
product in any way. You additionally agree that you will ensure any additional or subsequent user of your Ozone
product will read and understand the entire Ozone product owners manual, including all instructions and warnings
contained in that manual, prior to allowing that person to use your Ozone product.
ASSUMPTION OF RISK
Use of the Ozone product and any of its components involve certain risks, dangers, and hazards which can result in
serious personal injury and death to both the user and to non-user third parties. In using this Ozone product, you freely
agree to assume and accept any and all known and unknown risks of injury to you and third parties while using this
equipment. The risks inherent in this sport can be greatly reduced by abiding by the warning guidelines listed in this
owner manual and by using common sense.
RELEASE AND WAIVER OF CLAIMS
In consideration of the sale of the Ozone product to you, you herby agree to the fullest extent permitted by law, as
follows;
TO WAIVE ANY AND ALL CLAIMS that you have or may in the future have against Ozone Kitesurf LTD or Ozone Kites
LTD and all related parties resulting from use of the Ozone product and any of its components.
TO RELEASE Ozone Kitesurf LTD or Ozone Kites LTD and all related parties from any and all liability for any loss,
damage, injury or expense that you or any users of you Ozone product may suer, or that your next of kin may suer,
as a result of the use of the Ozone product, due to any cause whatsoever, including negligence or breach of contract
on the part of Ozone Kitesurf LTD or Ozone Kites LTD and all related parties in the design or manufacture of the Ozone
product and any of its components.
In the event of your death or incapacity, all provisions contained herein shall be eective and binding upon your heirs,
next of kin, executors, administrators, assigns, and representatives. Ozone Kitesurf LTD or Ozone Kites LTD related
parties have not made and expressly deny and oral or written representations other than what is set forth herein and
the Ozone product owners manual.
POUR TÉLÉCHARGER CE MANUEL DANS VOTRE
LANGUE, ALLEZ SUR LE PAGE DU PRODUIT ET
CHOISISSEZ VOTRE KITE >> WWW.FLYOZONE.COM
FRA
PARA DESCARGAR ESTE MANUAL EN SU IDIOMA
DIRÍJASE A LA PÁGINA DEL PRODUCTO DEL
MODELO DE SU COMETA >> WWW.FLYOZONE.COM
espitA
PER SCARICARE QUESTO MANUALE NELLA VOSTRA
LINGUA, ANDATE ALLA PAGINA PRODOTTI DEL KITE IN
VOSTRO POSSESSO >> WWW.FLYOZONE.COM
De
UM DIESE ANLEITUNG IN DEINER SPRACHE HERUNTER
ZU LADEN, GEHE AUF DIE PRODUKTSEITE DES KITES,
WELCHEN DU BESITZT >> WWW.FLYOZONE.COM
THANK YOU FOR PURCHASING THIS OZONE PRODUCT. OUR
MISSION IS TO DESIGN AND BUILD QUALITY PRODUCTS
WITH CUTTING EDGE PERFORMANCE THAT ARE EASY, FUN
AND SAFE TO USE.
3
warranty
OZONE WARRANTS THIS PRODUCT ACCORDING TO THE LAWS
IN FORCE AGAINST ANY MAJOR MANUFACTURING DEFECT. THIS
WARRANTY IS SUBJECT TO THE FOLLOWING LIMITATIONS:
• The warranty is valid only when the product is used for its intended use, and does not cover products used in
rental or teaching operations.
• Ozone will make the nal warranty determination, which may require inspection and/or photos of the equipment,
which clearly show the defect(s). If necessary, this information must be sent to the Ozone dealer, postage prepaid.
• If a product is deemed to be defective by Ozone, the warranty covers the repair or replacement of the defective
product only.
• Ozone will not be responsible for any costs, losses, or damages incurred as a result of loss of use of this product.
The warranty does not cover damage caused by misuse, abuse, neglect or normal wear and tear including but
not limited to; assembling with other than Ozone components, damage due to excessive sun exposure, damage
caused by improper handling or storage, and damage caused by anything other than defects in material and
workmanship.
• This warranty is voided if any unauthorized repair, change or modication has been made to any part of the
equipment. The warranty for any repaired or replaced equipment is good from the date of the original purchase
only. The original purchase receipt must accompany all warranty claims.
• The name of the retailer and date of purchase must be clear and legible.
• There are no warranties that extend beyond the warranty specied herein.
WARRANTY CLAIMS
• Warranty claims must be sent to Ozone by an ocial Ozone dealer or country distributor.
• Warranty claims must be processed and be issued a return authorization prior to shipping to the Ozone dealer the
product was purchased from.
warninGs & safety
PreCaUtions
GENERAL WARNINGS:
• Before using this product you must take lessons from a certied instructor/school.
• Always wear a Coast Guard approved Personal Flotation Device when using this product near or on the
water.
• Always carefully inspect all of your equipment before using it.
• The use of this product exposes the user to many unavoidable and unexpected risks, dangers and
hazards.
• Always use extreme caution when using this product.
• Misuse of this product can cause serious injury or death.
• Only use this product if you are in good physical health.
• Never act in a careless manner when using this product.
• You are responsible for your own safety and the safety of others around you when using this product.
• If you are under the age of 18 you should have your parents or legal guardian read all warnings and
instructions. You should not use this product unless you are under proper guidance and supervision.
• Do not use this product if you are under the inuence of alcohol, drugs or medications.
HYDROFOIL WARNINGS:
• The use of a hydrofoil is a high risk activity and can be extremely dangerous if used incorrectly. This can
result in serious injury or even death for the user or other individuals.
• Only use this product in unobstructed areas of water. Do not use the foil in shallow waters. This could
result in injury and damage to your foil.
• Be aware of the danger of collision with obstacles. Be aware of your surroundings and familiarise yourself
with them. Do not endanger others by riding close to swimmers, boats, jetties and other objects that
could be damaged by you or the foil.
• You can hurt yourself through uncontrolled water starts or lack of skill. Do not exceed your capabilities
and maintain control over the hydrofoil at all times.
• There is an increased risk of injury due to inability to control the hydrofoil in gusty conditions or waves.
• There is an increased risk of injury through uncontrolled falls caused by gusts, waves etc.
• Be aware of all other associated risks. These include loss of control, collision with the board, collision with
the hydrofoil and even drowning.
• Some of the hydrofoil components are sharp and therefore pose a potential risk.
• To protect the rider and others from injury, the foil must be handled with special care from the point at
which it is set up, during use and until it is safely packed away.
• We recommend using a certied helmet and protective vest at all times when using this product.
• When not in use this product must be stored in the protective covers to avoid possible injuries.
• Be aware that individual components on this product are exposed to natural forces and may be subject
to wear.
• Never store this product near or let it touch electrical components as carbon can conduct electricity.
ReAD the Following points beFoRe Assembling AnD/oR using this pRoDuct:

4apex v1 foil Manual
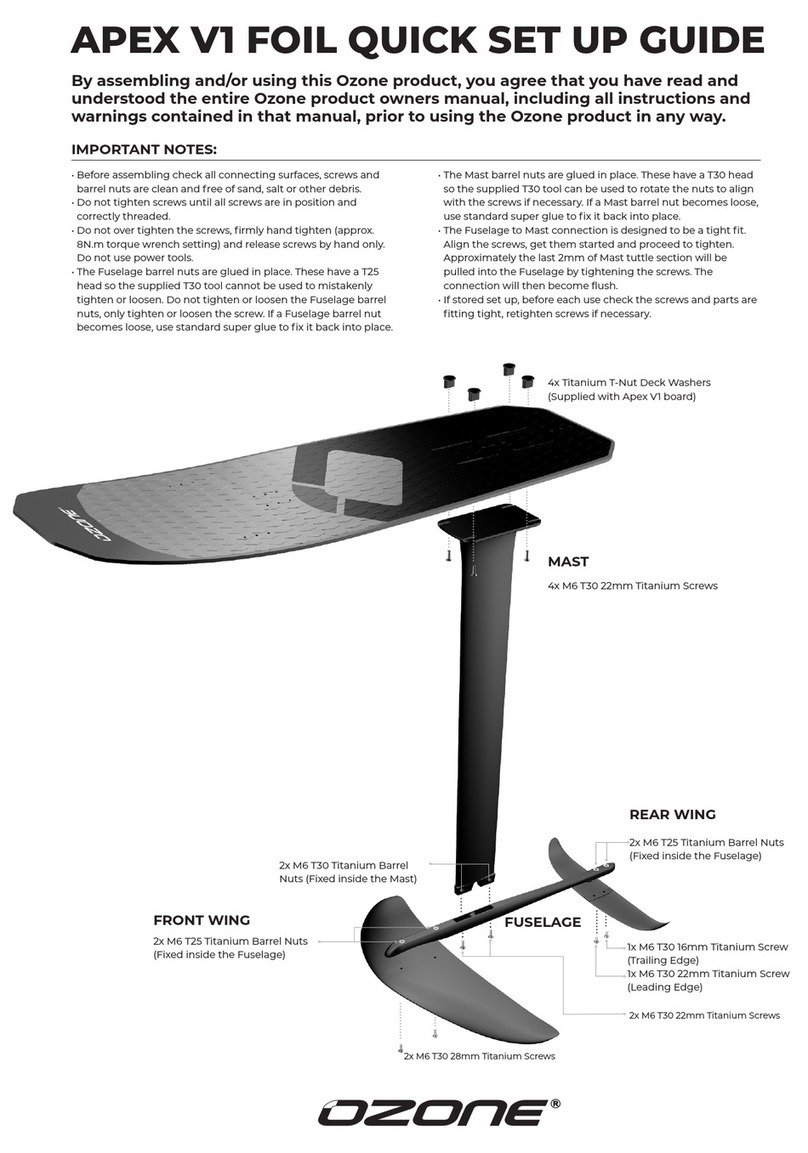
IMPORTANT NOTES:
• Before assembling check all connecting surfaces, screws and
barrel nuts are clean and free of sand, salt or other debris.
• Do not tighten screws until all screws are in position and
correctly threaded.
• Do not over tighten the screws, rmly hand tighten (approx.
8N.m torque wrench setting) and release screws by hand only.
Do not use power tools.
• The Fuselage barrel nuts are glued in place. These have a T25
head so the supplied T30 tool cannot be used to mistakenly
tighten or loosen. Do not tighten or loosen the Fuselage barrel
nuts, only tighten or loosen the screw. If a Fuselage barrel nut
becomes loose, use standard super glue to x it back into place.
• The Mast barrel nuts are glued in place. These have a T30 head
so the supplied T30 tool can be used to rotate the nuts to align
with the screws if necessary. If a Mast barrel nut becomes loose,
use standard super glue to x it back into place.
• The Fuselage to Mast connection is designed to be a tight t.
Align the screws, get them started and proceed to tighten.
Approximately the last 2mm of Mast tuttle section will be
pulled into the Fuselage by tightening the screws. The
connection will then become ush.
• If stored set up, before each use check the screws and parts are
tting tight, retighten screws if necessary.
set-UP
MAST
FRONT WING
REAR WING
FUSELAGE
4x M6 T30 22mm Titanium Screws
4x Titanium T-Nut Deck Washers
(Supplied with Apex V1 board)
2x M6 T30 28mm Titanium Screws
1x M6 T30 16mm Titanium Screw
(Trailing Edge)
1x M6 T30 22mm Titanium Screw
(Leading Edge)
2x M6 T30 22mm Titanium Screws
2x M6 T25 Titanium Barrel Nuts
(Fixed inside the Fuselage)
2x M6 T30 Titanium Barrel Nuts
(Fixed inside the Mast)
2x M6 T25 Titanium Barrel Nuts
(Fixed inside the Fuselage)

5
set-UP
MAST TO BOARD:
THE APEX V1 FOIL IS SUPPLIED WITH 4X M6 T30 22MM TITANIUM SCREWS. THESE CAN BE USED
WITH THE APEX V1 BOARD USING OUR CUSTOM TITANIUM TNUT DECK WASHERS 4X SUPPLIED
WITH APEX V1 BOARD, OR WITH OTHER BOARDS USING A US BOX AND M6 TNUTS NOT SUPPLIED.
APEX V1 BOARD USING TITANIUM TNUT DECK WASHERS:
1: Fit the 4x T-Nut Deck Washers into the board slots.
2: Fit the 4x M6 T30 22mm screws into the T-Nut Deck Washers. Turn each screw one full rotation to get
the thread started.
3: Slide the screws and washers to the ends of the board slots.
4: Place the mast on the board and align the slots.
5: Slide each screw into the slot on the mast, ensuring the T-Nut Deck Washers remain connected.
6: Slide the screws until they t at the countersunk section of each slot on the mast.
7: Firmly hand tighten each screw (approx. 8N.m torque wrench setting)
OTHER BOARDS WITH US BOX USING M6 TNUTS:
1: Assemble the 4x M6 T30 22mm Titanium screws with the T-Nuts. Turn each screw one full rotation to
get the thread started.
2: Fit the screw and T-Nuts into the US box.
3: Slide the screws and T-nuts to the ends of the tracks.
4: Place the mast on the board and align with the tracks.
5: Slide each screw into the slot on the mast, ensuring the T-Nuts remain connected.
6: Slide the screws until they t at the countersunk section of each slot on the mast.
7: Firmly hand tighten each screw (approx. 8N.m torque wrench setting)
1 2
1 2
3 4
5 6
7

6apex v1 foil Manual
3 4
5 6
FUSELAGE TO MAST:
The Fuselage to Mast tuttle connection is designed to be a tight fit. Align the screws, get them
started and proceed to tighten. Approximately the last 2mm of Mast tuttle section will be pulled
into the Fuselage by tightening the screws. The connection will then become flush.
1: Fit the Fuselage onto the Mast tuttle.
2: Push the Fuselage down until the t feels snug and it can not be pushed further.
3: Align the 2x M6 T30 22mm screws with the Barrel Nuts inside the Mast and begin to tighten. Ensure
the screws are threaded correctly.
4: Tighten each screw a few turns at a time so they tighten evenly and slowly pull the Mast tuttle
into the Fuselage.
5: Firmly hand tighten each screw (approx. 8N.m torque wrench setting)
FRONT WING TO FUSELAGE:
Do not tighten or loosen the Barrel Nuts as these are glued in place. Only tighten or loosen the
screw. If a Barrel Nut becomes loose, use standard super glue to fix back into place.
1: Fit the Front Wing onto the Fuselage.
2: Align the 2x M6 T30 28mm screws with the Barrel Nuts inside the Fuselage and begin to tighten.
Ensure the screws are threaded correctly.
3: Tighten each screw a few turns at a time so they tighten evenly.
4: Firmly hand tighten each screw (approx. 8N.m torque wrench setting)
1 2
7 5
3 4
OTHER BOARDS Continued...

7
1 2
3 4
REAR WING TO FUSELAGE:
Do not tighten or loosen the Barrel Nuts as these are glued in place. Only tighten or loosen the
screw. If a Barrel Nut becomes loose, use standard super glue to fix back into place.
1: Fit the Rear Wing onto the Fuselage.
2: Align 1x M6 T30 22mm screw (Leading Edge) and 1x M6 T30 16mm Titanium Screw (Trailing Edge) with
the Barrel Nuts inside the Fuselage and begin to tighten. Ensure the screws are threaded correctly.
3: Tighten each screw a few turns at a time so they tighten evenly.
4: Firmly hand tighten each screw (approx. 8N.m torque wrench setting)
1 2
3 4
PaCkinG
To disassemble the foil simply reverse steps shown in SET UP.
Alternatively the foil can be kept set up, ready to go again for your next session. Refer to the Care &
Maintenance section.
The Mast tuttle to Fuselage connection is designed to be a tight t. After removing the screws it may
be necessary to use light force to work the Fuselage off the Mast tuttle. A rubber mallet can be used if
necessary to tap the Fuselage.
Rear Wing Shims are for experienced riders looking to adapt the speed, stability and maneuverability
to their personal preference. These fit between the Rear Wing and Fuselage to adjust the AOA (angle
of attack) of the Rear Wing.
REAR WING SHIMS:

Care and
MaintenanCe
rePairs
This is a technical product used in harsh marine environments.
Use common sense and care for your equipment.
• Always use the foil covers for protection.
• Never leave in direct sunlight or in a hot area such as inside a car.
• Always rinse with fresh water after use. Wipe dry with a clean cloth to avoid watermarks.
• Wash and dry before long-term storage.
• If stored set up, before each use check the screws and parts are tting tight, retighten screws if necessary.
• Always tighten screws slowly, ensuring they are threaded correctly.
Any repair work is done at your own risk. We strongly advise using a professional.
• Light surface scratches can be buffed out using 400 or 800 grit sandpaper.
• Chips or dings can be repaired using berglass or carbon ber with epoxy resin. It is also possible to use
pre-mixed products such as Solarez.
• If a Barrel Nut becomes loose, use standard super glue to x it back into place.
• Spare parts and replacements can be ordered from your shop/dealer.
Table of contents
Other Ozone Windsurfing Equipment manuals