PACIFIC CYCLE Hello Kitty KT1037WM User manual

Please read this Owner’s Manual completely before assembling or operating this product.
Assembly of this product should be carried out by an adult. Do not return this product to the
store. If any parts are missing or damaged, please contact one of our customer service
representatives by phone at 8--, or by e-mail at cXVWRPHUVHUYLFH#NLGWUD[WR\VFRP
©3DFLILF&\FOH,QF
+DPPHUVOH\5G DGLVRQ:,
8QLWHG6WDWHVRI$PHULFD
3KRQH)
ZZZNLGWUD[WR\VFRP
6W\OHV&RORUVPD\YDU\
$'(,1&+,1$
8VHU*XLGH
46+,32;>4
7SLHZLYL[HPU[OLZLPUZ[Y\J[PVUZMVYM\[\YLYLMLYLUJL

;HISLVM*VU[LU[Z
About your new 6 volt quad .................................................................................................... 1
Parts List ................................................................................................................................... 2
Parts Diagram .......................................................................................................................... 3
Assembly.................................................................................................................................. 4
Assembling the Handlebar ............................................................................................... 4-5
Assembling the Front Wheels.............................................................................................. 5
Connecting the Vehicle Battery ........................................................................................... 5
Attaching the Seat ............................................................................................................... 6
Use............................................................................................................................................. 7
Charging the Battery..........................................................................................................7-9
Using the Controls............................................................................................................. 10
Rules of Safe Riding...........................................................................................................11
Maintenance............................................................................................................................ 12
General.............................................................................................................................. 12
Battery .......................................................................................................................... 12-13
Re-charge Interval and Time.............................................................................................13
Battery Disposal and Replacement................................................................................... 14
Battery Fuse ...................................................................................................................... 14
Troubleshooting Guide..................................................................................................... 15-17
Replaceable Parts & Contact Information............................................................................ 17
Warranty .................................................................................................................................. 18

:LY PJLHUK9LWHPYZ
description of the part.
1
(IV\[@V\Y5L^ VS[X\HK
;OPZ VS[X\HKYPKLVUPZYLJVTTLUKLKMVYJOPSKYLUHNLZTVU[OZHUK\W
4H_PT\TJVTIPULK^LPNO[PZRNZSIZ
(+<3;:<7,9=0:0659,8<09,+
(+<3;:653@!Recharge battery according to directions (see pages 7-9) and maintain
battery (see pages 12-14).
-69;/,:(-,;@6-@6<9*/03+73,(:,9,(+(33>(9505.:(5+
(::,4)3@<:,05:;9<*;065:2,,7;/0:.<0+,-69-<;<9,9,-,9,5*,
A
>(9505.
leave vehicle in sun for long periods of time or fading may occur. Store in shade or cover
-
*(<;065
>(9505.

2
7HY[Z3PZ[
Vehicle Body x1
Wheels x2
Inner Bushings x2 Washers x6
(2SFV for replacement)
Handlebar x1
Outer Bushings x2
Charger x1
Nut wrench x1
Seat x1
Wheel covers x2
6[OLY[VVSZULLKLK
MVYHZZLTIS`!
• Phillips screwdriver
• Adjustable wrench
/HYK^HYL)HN

3
7HY[Z+PHNYHT
1
2
3
4
5
6
7
8
9

4
(ZZLTISPUN[OL/HUKSLIHY
1. Fit the steering column and the
handlebar connector on the handle
opening in the vehicle.
2. Fit the end of the steering
column through the hole in the
3.
it snaps into place on the vehicle
body.
PUSH DOWN

5
4. Plug the handlebar connector
into the motor connector.
1. Remove the locknut with the nut
wrench from the front axle.
2. Slide a washer onto the front
axle. Place an inner bushing (tab
wheel on the axle and slide the inner
bushing inside the wheel. Place the
outer bushing onto the axle and
slide inside the wheel. Then place
another washer onto the axle.
4. Align the 3 tabs on the wheel
cover with the slots in the outer
bushing and snap into place.
5. Repeat for the other side.
1. Plug the wire connector into the
battery connector.
(ZZLTISPUN[OL/HUKSLIHY*VU[PU\LK
(ZZLTISPUN[OL-YVU[>OLLSZ
*VUULJ[PUN[OL=LOPJSL)H[[LY`
MOTOR CONNECTOR
WHEEL COVER
WHEEL
INNER BUSHING
WASHER
WASHER
LOCK NUT
OUTER BUSHING
HANDLEBAR CONNECTOR
3. Attach a locknut onto the axle and
tighten snugly with the nut wrench.
DO NOT OVERTIGHTEN.

6
1. Insert the tabs on the front
of the seat into the slots in the
vehicle.
SEAT TABS
SEAT
SLOTS
SCREW
WASHER
WASHER
NUT
2. Remove the seat.
3. Unplug the battery connectors.
4. Plug the charger connector into
the battery as shown.
5. Re-attach the seat.
SCREW
WASHER
WASHER
NUT
2. Use a Philips screwdriver and
an Adjustable wrench to secure
the seat to the vehicle body.
1. Use a philips screwdriver and
an Adjustable wrench to remove
the screw at the rear of the seat.
NOTE: The polybaJwith
washers, screw and nut
included was attached on
the seat.

7
<ZL!*OHYNPUN[OL)H[[LY`JVU[PU\LK
Charging the battery should only be done by an adult.
CAUTION: You must charge the 6-volt battery for a "FULL" 8-10 hours prior to use.
NEVER charge the battery longer than 20 hours.
the battery longer than 20 hours. Never completely discharge the battery.

8
*OHYNL VS[)H[[LY`7YPVY[V-PYZ[<ZL
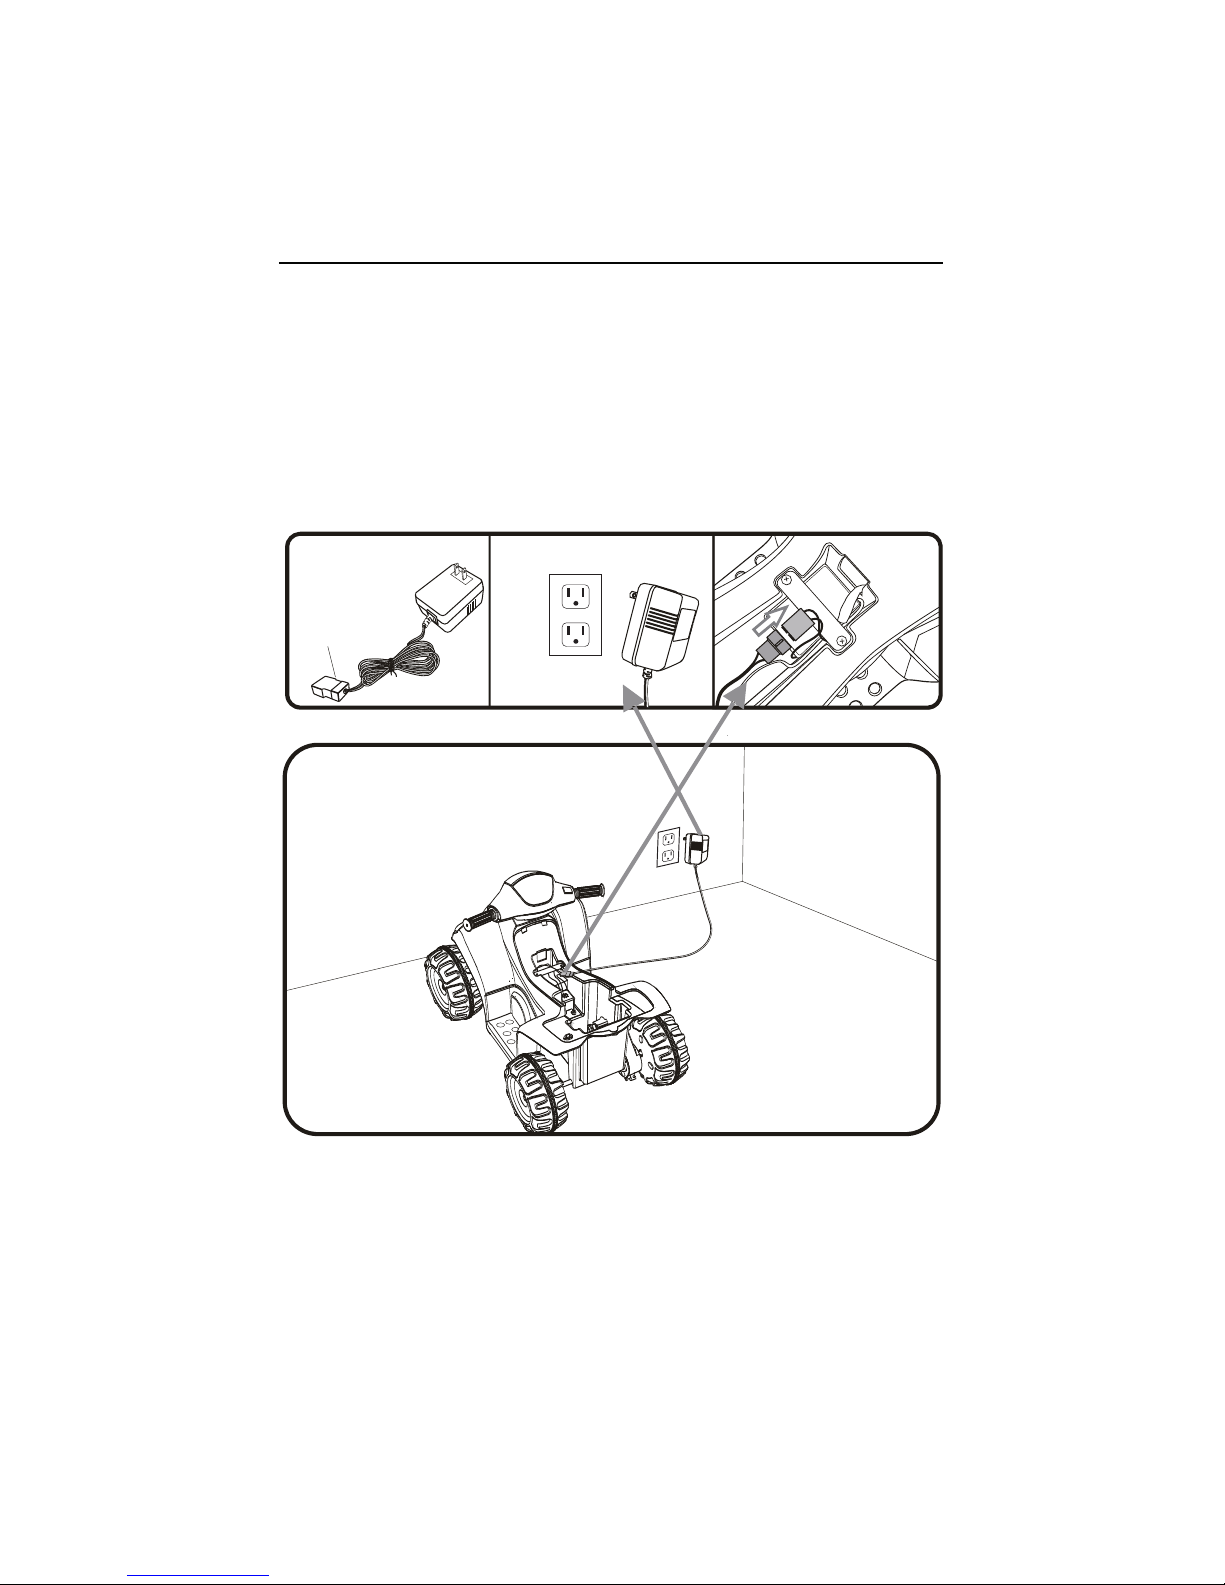
@6<4<:;*/(9.,;/,=63;)(;;,9@-69(-<33/6<9:79069;6-09:;
<:,-(03<9,;6*/(9.,;/,)(;;,9@(:+09,*;,+>033*(<:,7,94(5,5;
+(4(.,;6;/,)(;;,9@(5+=60+@6<9>(99(5;@
79,=,5;-09,(5+,3,*;90*:/6*2!
occur.
>HZOOHUKZHM[LYOHUKSPUN
shock.
battery. 6-volt battery is heavy and contains lead acid (electrolyte).
cause serious injury.
supply cord and the connectors. DO NOT charge the 6-volt battery.
or once a month if not used regularly.
vehicle tips over.
>(9505.

;OL VS[X\HKPZMVYJOPSKYLUHNLKTVU[OZHUK\W
4(?04<4>,0./;0:2.3):
page 14).
*OHYNL VS[)H[[LY`7YPVY[V-PYZ[<ZL*VU[PU\LK
653@(5(+<3;*(5*/(9.,(5+9,*/(9.,;/,)(;;,9@See page 12-13 for battery
maintenance.
<ZPUN[OL VS[X\HK
79,=,5;051<90,:(5++,(;/:!
5,=,93,(=,*/03+<5(;;,5+,++09,*;(+<3;:<7,9=0:0650:
9,8<09,+
>(9505.
9

10
<ZPUN[OL*VU[YVSZ
1. Power Switch:
button to stop.
POWER SWITCH

11
9\SLZMVY:HML9PKPUN
9,(+;/,:,9<3,:(36<+;6@6<9*/03+(5+;/,0973(@4(;,:(5+4(2,:<9,
;/,@<5+,9:;(5+;/,4
(S^H`ZKYP L[OL VS[X\HK^P[OHUHK\S[^H[JOPUN
9PKLYZT\Z[ILTVU[OZVMHNLVYVSKLY
(S^H`ZZP[PU[OLZLH[
(S^H`Z^LHYZOVLZ
6US`VULYPKLYVU[OL VS[X\HK
+VUV[KYP LULHYM\SSZPaLKTV[VYPaLK LOPJSLZIt is dangerous to drive the 6 volt
+90=,653@653,=,3.96<5+
5L LYKYP LULHY^H[LY
+VUV[KYP LKV^UHZ[LLWZSVWL
or slip.
+VUV[KYP L\WHZ[LLWZSVWL
+VUV[KYP LULHYKYVWVMMZZ\JOHZZ[LWZVYKLJRZ
could tip over.
2LLWOHUKZOHPYHUKJSV[OLZH^H`MYVTTV PUNWHY[Z
motor. Serious injury could occur.
+VUV[KYP LULHYÅHTTHISL HWVYZZ\JOHZNHZVSPULWHPU[[OPUULYVYSPX\PK
^H_[OH[HYL\Z\HSS`Z[VYLKPU[OLNHYHNL
+VUV[KYP L[OL VS[X\HKPUYHPU`VYZUV^`^LH[OLY
+VUV[KYP L[OL VS[X\HKPUSVVZLKPY[T\KZHUKVYÄULNYH LS^OPJOJHU
KHTHNLTV PUNWHY[ZTV[VYZVY[OLLSLJ[YPJZ`Z[LT

12
4HPU[LUHUJL!.LULYHS
4HPU[LUHUJL!)H[[LY`
Note:locknuts
serious injury or death.
or handles.
battery and keep the battery dry.
>(9505.

13
and corrosive. Never open the battery.
>(9505.
9LJOHYNL0U[LY HSHUK;PTL
04769;(5;9,(+(5+<5+,9:;(5+;/,>(9505.:()6<;;/, VS[)(;;,9@65
7(.,653@(+<3;:4(@/(5+3,;/,)(;;,9@
the battery on the charger for more than 20 hours. See pages 7-9 for charging instructions.
could occur.
temperatures are over 24° C (75° F) or under -24° C (-10° F). Do not place the battery
It is best to leave the battery in the battery compartment of the vehicle for long storage
long storage periods to ensure battery life.
according to the instructions on page 14 and place it in a plastic bag. See page 14 for
parts.

The 6-volt battery will eventually lose the ability to hold a charge. Depending on the amount of
use, and varying conditions, the battery should operate for one to three years. If the battery will
not recharge, you must obtain a new 6-volt battery.
Follow these steps to replace and dispose the battery:
1. Remove the seat.
2. Remove the battery bracket.
3. Disconnect the battery connectors.
4. Carefully lift out the battery.
Depending on the condition of the battery (i.e.: leakage) you may want to wear protective
gloves before removal. Do not lift the battery by its connectors or cables.
5. Place the dead battery in a plastic bag.
Important! Recycle the dead battery responsibly. The battery contains lead acid (electrolyte)
and must be disposed of properly and legally. It is illegal in most areas to incinerate lead acid
battery recycler.
6. Replace the battery with a 6 volt quad battery and reconnect the connectors.
7. Replace the battery bracket.
8. Replace the seat.
•
Do not overload the vehicle.
•
Do not tow anything behind the vehicle.
•
Do not drive up steep slopes.
•
to overheat.
•
Do not drive in very hot weather; components may overheat.
•
Do not allow water or other liquids to come in contact with the battery or other
electric components.
•
Do not tamper with the electric system. Doing so may create a short, causing the fuse to trip.
14
)H[[LY`+PZWVZHSHUK9LWSHJLTLU[
)H[[LY`-\ZL
The 6 volt quad battery features a thermal fuse with a reset fuse that will automatically trip and cut all
power to the vehicle if the motor, electric system or battery is overloaded. Turn unit over to access
the button of the fuse(see belowed pic). Push the button back into reset the fuse after more than 60
seconds. If the thermal fuse trips repeatedly during normal use, the vehicle may need repair. Call Kid
Trax Customer Service at (877) 741-6154. To avoid losing power, follow these guidelines:

;YV\ISLZOVV[PUN.\PKL
Q796)3,4!;OL VS[X\HKKVLZUV[Y\U
76::0)3,*(<:,!;OLIH[[LY`TH`ILSV^VUWV^LY
and instructions.
76::0)3,*(<:,!;OLYTHSM\ZLOHZ[YPWWLK
Reset fuse (see page 14).
76::0)3,*(<:,!)H[[LY`JVUULJ[VYVY^PYLZHYLSVVZL
76::0)3,*(<:,!)H[[LY`PZKLHK
76::0)3,*(<:,!,SLJ[YPJZ`Z[LTPZKHTHNLK
76::0)3,*(<:,!4V[VYPZKHTHNLK
76::0)3,*(<:,!>OLLSU\[ZHYLSVVZL
Q796)3,4!;OL VS[X\HKKVLZUV[Y\U LY`SVUN
76::0)3,*(<:,!)H[[LY`TH`IL\UKLYJOHYNLK
76::0)3,*(<:,!*OHYNLYPZUV[WS\NNLKPU
charge the battery for 8-10 hours. Do not leave the battery on the charger for more than 20
76::0)3,*(<:,!)H[[LY`PZVSK
15

;YV\ISLZOVV[PUN.\PKL
Q796)3,4!;OL VS[X\HKY\UZZS\NNPZOS`VYILLWPUNVJJ\YZ
76::0)3,*(<:,!)H[[LY`ULLKZYLJOHYNPUN
76::0)3,*(<:,!)H[[LY`PZVSK
76::0)3,*(<:,! VS[X\HKPZV LYSVHKLK
76::0)3,*(<:,!+YP PUNPUOHYZOJVUKP[PVUZ
Q796)3,4! VS[X\HKULLKZHW\ZO[VNVMVY^HYK
76::0)3,*(<:,!7VVYJVU[HJ[VM^PYLZVYJVUULJ[VYZ
around the motor and reconnect if necessary.
76::0)3,*(<:,!¸+LHKZWV[¹VUTV[VY
Q796)3,4!3V\KNYPUKPUNVYJSPJRPUNUVPZLZJVTPUNMYVTTV[VY
VYNLHYIV_
76::0)3,*(<:,!4V[VYVY.LHYZHYLZ[YPWWLKVYIYVRLU
Call
16

17
;YV\ISLZOVV[PUN.\PKL
Q796)3,4!;OL VS[IH[[LY`^PSSUV[YLJOHYNL
76::0)3,*(<:,!)H[[LY`JVUULJ[VYVYHKHW[LYJVUULJ[VYPZSVVZL
76::0)3,*(<:,!*OHYNLYPZUV[WS\NNLKPU
76::0)3,*(<:,!*OHYNLYPZUV[^VYRPUN
Q796)3,4!)H[[LY`I\aaLZVYN\YNSLZ^OLUJOHYNPUN
also normal.
Q796)3,4!*OHYNLYMLLSZ^HYT^OLUYLJOHYNPUNIH[[LY`
This is normal and not a cause for concern.
9LWSHJLHISL7HY[Z
seat and a brief description of the part.

18
6UL@LHY3PTP[LK>HYYHU[`
:P_4VU[O3PTP[LK>HYYHU[`VU)H[[LY`
>HYYHU[`3PTP[H[PVUZ!
3PTP[H[PVUVM+HTHNLZ!
3PTP[H[PVUVM>HYYHU[PLZHUKV[OLY>HYYHU[`;LYTZ!
Table of contents
Other PACIFIC CYCLE Toy manuals

PACIFIC CYCLE
PACIFIC CYCLE KID Trax KT1555WM User manual

PACIFIC CYCLE
PACIFIC CYCLE MBSL300 User manual

PACIFIC CYCLE
PACIFIC CYCLE Mossy Oak TODDLER QUAD KT1210WMA User manual

PACIFIC CYCLE
PACIFIC CYCLE Frozen Toddler Quad KT1168 User manual

PACIFIC CYCLE
PACIFIC CYCLE AVIGO QUAD KT1042TR User manual

PACIFIC CYCLE
PACIFIC CYCLE KID TRAX RIDEAMALS JOSIE User manual
Popular Toy manuals by other brands

marklin
marklin 37041 user manual

Radica Games
Radica Games 72046 instruction manual

Mattel
Mattel Barbie J0558-0520 instructions

Agora Models
Agora Models Mitsubishi A6M ZERO Fighter Build instructions

Eduard
Eduard Zoom Wellington Mk.III S.A. quick start guide

Flyzone
Flyzone Cessna 182 Skylane quick start guide