Pacific PWD 600 Installation and operation manual

READ THIS BOOK
This operator’s book has important information for the use
and safe operation of this machine. Read this book care-
fully before starting the machine. Keep this book and tell
all operators to read the book. If you do not follow the
instructions, you can cause an injury or damage equipment,
furniture or buildings.
For new books write to:
Pacific
2259 S. Sheridan
Muskegon, MI 49442-6252
Carefully inspect all components to ensure that there is no
concealed freight damage. If such damage is discovered,
file a “CONCEALED DAMAGE REPORT” immediately
with the delivering carrier.
The contents of this manual are based on the latest product
information available at the time of publication. Pacific
Steamex reserves the right to make changes or improve-
ments to its machines without notice.
FOR YOUR CONVENIENCE, RECORD THE
FOLLOWING IMPORTANT INFORMATION:
MODEL_______________________________
SERIAL NUMBER_______________________
PART NUMBER ________________________
DATE PURCHASED _____________________
OPERATING & MAINTENANCE
INTRODUCTION INSTRUCTIONS
WET/DRY VACUUMS
PWD 600
PWD 609
PWD 612
PWD 615
Gulper 600S
Gulper 609S
Gulper 612S
Gulper 615S

IMPORTANT SAFETY INSTRUCTIONS
READ AND UNDERSTAND ALL WARNINGS AND INSTRUCTIONS
BEFORE USING THIS MACHINE!
WARNING! To reduce the risk of fire, electric shock, or injury:
1. You must be trained to operate this machine. This machine is to be operated for its intended use
only.
2. Do not operate this machine unless it is completely assembled.
3. Always use a three-wire electrical system connected to the electrical ground. For maximum protec-
tion against electrical shock, use a circuit that is protected by a ground fault circuit interrupter. Con-
sult your electrical contractor.
4. To prevent electrical shock: Always remove the electrical plug from the electrical outlet before per-
forming any repairs, maintenance or cleanup and when leaving the machine unattended.
5. To prevent electrical shock: Keep the machine surface dry; Do not subject to rain; Store the machine
in a dry building area; Clean the machine with a dry cloth only.
6. Machines can cause an explosion when near flammable materials and vapors. Do not use or store
this machine with or near fuels, grain dust, solvents, thinners, or other flammable materials. Do not
use flammables to clean this machine.
7. Maintenance and repairs must be done by a qualified or authorized person.
8. If the machine is not working as it should, has been dropped, damaged, left outdoors, or dropped into
water, return it to a service center.
9. To avoid damage to the machine’s electrical cord, always lift the machine over the cord. Do not run
the machine over the electircal cord.
10. Make sure all labels, decals, warnings, cautions and instructions are fastened to the machine.
This machine must be grounded. If it should malfunction or break
down, grounding provides a path of least resistance for electric cur-
rent to reduce the risk of electric shock. This machine is equipped
with a cord having an equipment-grounding conductor and grounding
plug. The plug must be inserted into an appropriate outlet that is
properly installed and grounded in accordance with all local codes and
ordinances.
WARNING - Improper connection of the equipment-grounding con-
ductor can result in a risk of electric shock. Check with a qualified
electrician or service person if you are in doubt as to whether the
outlet is properly grounded. Do not modify the plug provided with
the machine - if it will not fit the outlet, have a proper outlet installed
by a qualified electrician.
This machine is for use on a nominal 120-volt circuit, and has a
grounded plug that looks like the plug illustrated in figure A. A
temporary adapter that looks like the adapter illustrated in figures B
and C may be used to connect this plug to a 2-pole receptacle as
shown in figure B if a properly grounded outlet is not available. The
temporary adapter should be used only until a properly grounded
outlet (figure A) can be installed by a qualified electrician. The green
colored rigid ear, lug, or the like extending from the adapter must be
connected to a permanent ground such as a properly grounded outlet
box cover. Whenever the adapter is used, it must be held in place by
a metal screw.
NOTE: In Canada, the use of a temporary adapter is not permitted by
the Canadian Electrical Code
EXTENSION CORDS
Use only three-wire 16/3 or larger gauge approved extension cords that have
three-prong grounding type plugs and three-pole receptacles that accept the
appliance’s plug. Replace or repair any damaged cords or plugs.
When servicing, refer to authorized person only. Use only identical replace-
ment parts.
Grounding Instructions
NOTE: Do not use adapters shown in figures B & C in Canada
2

3
MAINTENANCE
Good maintenance procedures assure better operation,
fewer repairs and longer life to your machine.
DISCONNECT THE ELECTRICAL PLUG OF THE MA-
CHINE FROM THE ELECTRICAL OUTLET BEFORE
DOING ANY CLEANUP, REPAIRS OR MAINTENANCE
OFTHEMACHINEANDWHENLEAVINGTHEMACHINE
UNATTENDED.
CLEAN THE MACHINE AFTER EACH USE:
1. Wipe the outside with a clean cloth.
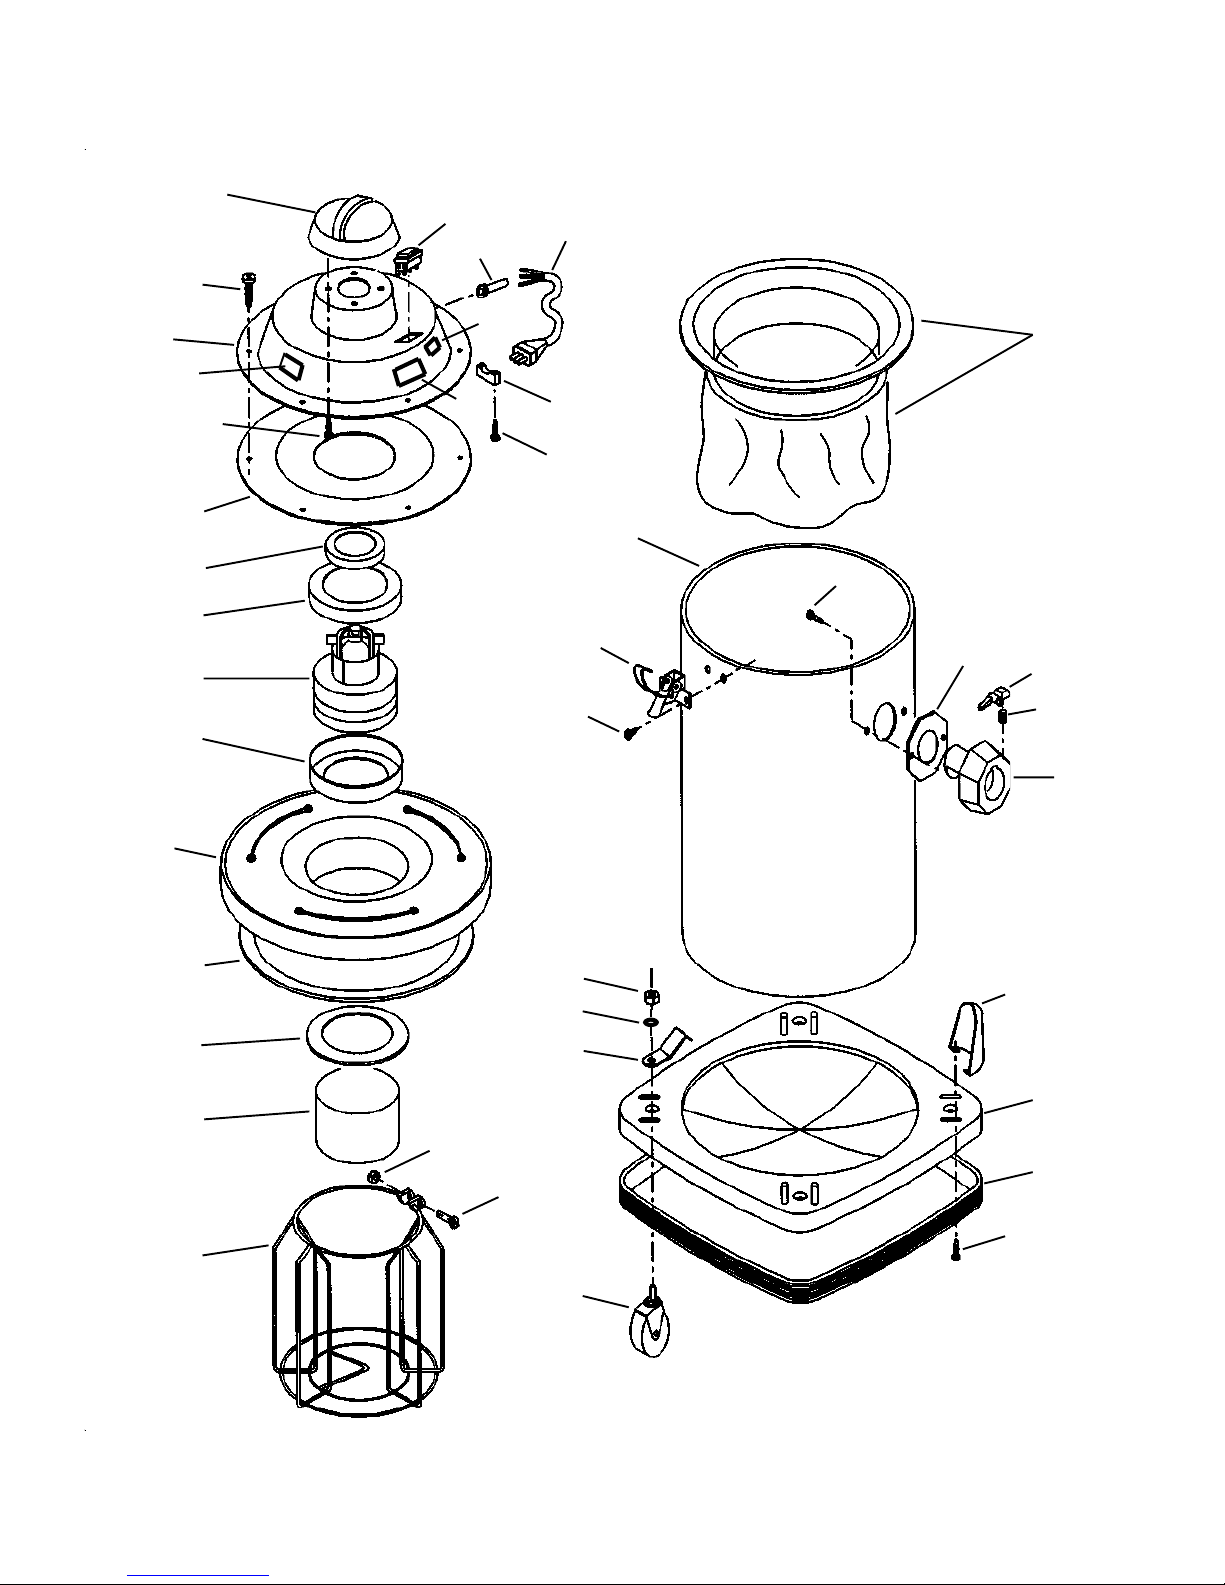
2. Clean the collector tank: Release the clamps on each side
of the tank and head assembly. Lift the head assembly off
and set aside. Lift the filter assembly out of the collector
tank and set aside. Then wipe the inside of the collector tank
with a clean cloth.
3. Empty and check the filter assembly: Empty the recovered
soilage into a suitable container and shake to remove clinging
dirt. Brush the outside of the filter bag to remove embedded
dirt. Check the filter assembly for tears or holes; repair or
replace if necessary. Install the clean filter assembly into the
clean collector tank.
ELECTRICAL CABLE:
Check the cord for any nicks, cuts or damage. Report these to
your supervisor for correction.
VACUUM HEAD ASSEMBLY:
1. Gaskets: Clean the vacuum head gasket and the float shut-off
gasket.
2. Float Shut-Off Device: This should move freely. Remove
any debris or strings from the float cage.
3. Head Assembly: Replace and leave ajar if the collector tank is
damp to prevent mildew.
WHEELS AND CASTERS:
Check these for cuts and nicks. Remove any strings or debris that
may restrict the free movement of the wheels. Wipe the treads
clean.
CARBON BRUSH INSPECTION:
Check for wear at six month intervals or every 600 hours of
operation. The carbon brushes must be replaced if worn shorter
than 3/8 inch.
OPERATING PROCEDURES
WARNING! For the safe operation of this machine follow
the instructions given in this booklet and the training given
by your supervisor. Failure to do so can result in personal
injury and/or damage to machine and property!
DO NOT OPERATE MACHINE IN AN EXPLOSIVE
ENVIRONMENT!
To prepare the machine for operation, make sure it is of the correct
voltage and properly assembled. If in doubt, ask your supervisor.
FOR DRY PICK-UP:
“Dry” refers to material such as dust, dirt, debris and dry foam
shampoo.
1. Release the clamp on each side of the tank and head assembly.
Lift the head assembly off and set it aside.
2. Then lift the cloth filter assembly out of the collector tank.
Clean the cloth filter if needed (reference the “Maintenance”
section).
3. Empty the collector tank of all dust and debris. If the debris
is wet, empty and dry the inside of the tank thoroughly.
4. Place the cloth filter assembly back into the collector tank.
Check for a good seal around the outer filter lip and tank rim.
5. Replace the head assembly and fasten both clamps. Attach
the hose, wand and floor tool of choice (reference page 5).
6. Plug the power cord into a 115-volt, 60 cycle grounded outlet.
7. Turn the machine’s motor on by pressing the rocker switch
which is located on the head assembly.
WARNING! NEVER USE THIS MACHINE TO PICK UP
VOLATILE OR EXPLOSIVE MATERIALS.
FOR WET PICK-UP:
“Wet” refers to liquids such as water, scrub solutions and deter-
gents; NOT VOLATILE OR EXPLOSIVE MATERIALS.
1. Release the clamp on each side of the tank and head assembly.
Lift the head assembly off and set it aside.
2. Then lift the cloth filter assembly out of the collector tank.
Store the filter assembly for future, dry pick-up use. DO
NOT REINSTALL.
3. Empty the collector tank of all dust and debris. Also wipe
the inside of the collector tank to remove clinging dust.
4. Check the float shut-off device on the lower portion of the
head assembly. The float should have free movement. When
the recovered liquid soilage reaches the collector tank capac-
ity, the float will rise to shut off the air flow, stopping the
liquid recovery. This prevents damaging overflow and signals
the operator when to empty the collector tank.
5. Replace the head assembly and fasten both clamps. Attach
the hose, wand and floor tool of choice (reference page 5).
6. Plug the power cord into a 115-volt, 60 cycle grounded outlet.
7. Turn the machine’s motor on by pressing the rocker switch
which is located on the head assembly.

PWD 600 & 609
Gulper 600S & 609S
1
2
3
4
56
7
8
9
10
11
12
13
14
15
16
17
18
19
20
21
22
23
15
24
25
26
27
28 29
30
31
33
34
35
36
37
38
39
40
32
4

PWD 600 & 609
Gulper 600S & 609S
5
ITEM PART NO. DESCRIPTION QTY.
1 601510 Cap, Dome 1
2 602310 Cover, Motor 1
3 964020 Screw, Cap 4
4 608010 Switch 1
5 608530 Strain Relief 1
6 908010 Cord Assembly 1
7 607210 Retainer, Cord 1
8 964021 Screw, Cord Retainer 2
9 606310 Lab- Watts/Voltage 1
10 515150 Label - Warning 1
11 606314 Label - Serial Number 1
12 964022 Screw, Motor Cover 6
13 600211 Adapter, Upper Motor 1
14 602771 Duct, Air Vent 1
15 603410 Gasket, Vac Motor 2
16 605210 Motor, Vacuum 115V 1
605211 Motor, Vacuum 230V 1
600903 Carbon Brush, Vac Mtr. (2 req'd/mtr) 2
17 600212 Adapter, Lower Motor 1
18 603411 Gasket, Lower Adapter 1
19 603412 Gasket, Float Shut-Off 1
20 603312 Float, Shut-Off 1
21 W106D Nut, Float Cage 1
22 962120 Screw, Float Cage 1
23 602411 Cage, Float Shut-Off 1
24 600520 Adapter and Bag Assembly 1
25 608630 Tank, PWD-600 1
608640 Tank, PWD-609 1
26 602010 Clamp, Lid 2
27 930001 Rivet, Clamp Lid 4
28 603415 Gasket, Plastic Coupler 1
603425 Gasket, Foam Adaptor 1
29 607001 Pawl 1
30 608303 Spring 1
31 602415 Coupler, Tank 1
32 962112 Screw 2
33 924022 Nut, Caster 4
34 980008 Washer, Lock 4
35 607211 Retainer, Tank 4
36 609710 Caster 4
37 602311 Cover, Caster 4
38 601310 Base, Caster 1
39 601210 Bumper, Caster Base 1
40 964025 Screw, Caster Cover 8

6
PWD 612
Gulper 612S
1
2
3
9
12
13
4
56
7
8
10
11
14
15
16
19
20
17
18
21
22 24
25
23
33 34
35
36
32
26
27
28
29
39
38
37
40
42
41
43
44
45
30
31

7
PWD 612
Gulper 612S
ITEM PART NO. DESCRIPTION QTY.
1 601540 Cap, Dome 1
2 602340 Cover, Motor 1
3 964020 Screw, Cap 4
4 608010 Switch 1
5 608530 Strain Relief 1
6 908010 Cord Assembly 1
7 607210 Retainer, Cord 1
8 964021 Screw, Cord Retainer 2
9 606310 Lab- Watts/Voltage 1
10 515150 Label - Warning 1
11 606340 Label - Serial Number 1
12 964022 Screw, Motor Cover 8
13 600214 Adapter, Upper Motor 1
14 600216 Adapter, Middle Motor 1
15 603420 Gasket, Vac Motor 1
16 605210 Motor, Vacuum 115V 1
605211 Motor, Vacuum 230V 1
600903 Carbon Brush, Vac Mtr. (2 req'd/mtr) 2
17 603410 Gasket, Vac Motor 1
18 Gasket, Reduction 1
19 600215 Adapter, Lower Motor 1
20 603442 Gasket, Lower Adapter 1
21 603412 Gasket, Float Shut-Off 1
22 603312 Float, Shut-Off 1
23 602413 Cage, Float Shut-Off 1
24 W106D Nut, Float Cage 1
25 962120 Screw, Float Cage 1
26 600530 Adapter and Bag Assembly 1
27 608650 Tank, PWD-612 1
28 602010 Clamp, Lid 2
29 930001 Rivet, Clamp Lid 4
30 603910 Handle 2
31 964026 Screw, Handle 4
32 962112 Screw 2
33 603415 Gasket, Plastic Coupler 1
603425 Gasket, Foam Adaptor 1
34 607001 Pawl 1
35 608303 Spring 1
36 602415 Coupler, Tank 1
37 924022 Nut, Caster 4
38 980008 Washer, Lock 4
39 607211 Retainer, Tank 4
40 609720 Caster 4
41 602311 Cover, Caster 4
42 601320 Base, Caster 1
43 601220 Bumper, Caster Base 1
44 964025 Screw, Caster Cover 8

8
PWD 615
Gulper 615S
1
2
3
4
5
7
8
10
11
12
13 14
9
6
15
16
17
18
19
20
21
22
23
24
25
26
27
28
29
30
31
32
33
34
35
36
37 38
39
40
41 42
43
44
45 46
48 47
49
50
51
52
53
54
55
56
57
58
59
33

PWD 615 and Gulper 615S
ITEM PART NO. DESCRIPTION QTY.
1 601550 Cap, Dome 1
2 964022 Screw, Cap 4
3 964021 Screw, Strain Relief 1
4 607210 Retainer, Cord 1
5 608530 Strain Relief 1
6 908020 Cord Assembly 1
7 604610 Insert, Blank Switch 1
8 608010 Switch 2
9 604611 Insert, Blank Motor Cover 1
10 602350 Cover, Motor 1
11 964029 Screw, Motor Cover 8
12 606360 Label - Serial Number 1
13 606310 Lab- W atts/Voltage 1
14 515150 Label - Warning 1
15 964028 Screw, Upper Motor Adapter 4
16 600220 Adapter, Upper Motor 1
17 603410 Gasket, Vac Motor 1
18 605210 Motor, Vacuum 115V 2
605211 Motor, Vacuum 230V 2
600903 Carbon Brush, Vac Mtr. (2 req'd/mtr) 4
605212 Motor, Vac.Acustek-UC-115V 2
600904 Carbon Brush, 605212 Vac Mtr. (2 req'd/mtr) 4
19 604612 Spacer, Vac. Motor Intake 2
20 604613 Insert, Intake Blank 1
21 964020 Screw, Motor Adapter 6
22 600221 Adapter, Middle Motor 1
23 600222 Adapter, Lower Motor 1
24 603421 Gasket, Lower Adapter 1
25 603422 Gasket, Float Shut-Off 1
26 603312 Float Shut-Off 1
27 W106D Nut, Float Cage 1
28 962120 Screw, Float Cage 1
29 602420 Cage, Float Shut-Off 1
30 600540 Adapter and Bag Assembly 1
31 608660 Tank, PW D-615 1
32 964026 Screw, Handle 4
33 603910 Handle 3
34 602010 Clamp, Lid 2
35 930001 Rivet, Clamp Lid 4
36 962112 Screw 2
37 603415 Gasket, Plastic Coupler 1
38 607001 Pawl 1
39 608303 Spring 1
40 602415 Coupler, Tank 1
41 920004 Nut 2
42 600810 Bracket, Tilt 1
43 Gasket, Bracket 1
44 980009 Washer 4
45 W156D Screw, Tilt Bracket 2
46 964026 Screw, Handle 2
47 980010 Washer, Rubber-Handle 2
48 603920 Handle, Carriage 1
49 964031 Screw, Carriage Handle 2
50 924023 Nut-Wing 2
51 607710 Shaft, W heel Axle 1
52 924022 Nut 2
53 507320 Snap Ring 2
54 609730 Wheel, Carriage 2
55 964032 Screw, Tank Support 2
56 608540 Support, Tank 2
57 601330 Base, Carriage 1
58 924022 Nut, Caster 2
59 609720 Wheel, Caster 2

10
2
3
1
4
5
6
7
8
9
10
11
12
8
13
14
15
16
17
12
18
19
20
OPTIONAL ACCESSORY
CARPET TOOL- ITEM 21
8
9
12
22
23
DELUXE TOOL KIT
PART #608510
TOOL KIT ASSEMBLY:
1. Connect the hose to the collector tank by inserting the
large, grooved hose adapter end into the tank adapter.
Pull the locking pin up to allow the hose adapter to slide
further in. Release the locking pin to engage the large
groove.
2. Insert the upper wand half firmly into the lower wand
assembly. The dimple on the lower wand aligns with the
groove of the upper half to assure a rigid fit.
3. Insert the wand end into the free end of the vacuum hose.
Then fasten the proper floor tool to the to the wand by
inserting the mating end of the floor tool into the adapter
collar of the wand assembly. Pull the tool locking pin to
allow total engagement of the adapter and tool. Release
the pin to lock the tool to the wand.
4. The hand tools may also be used by inserting their adapter
directly into the free end of the vacuum hose.
5. Tool Selection: Choosing the proper tool will give the
best results. To vacuum dust and debris from floors or
walls-select the bristle floor tool. To remove water, liquid
waste, strip solution, etc. from hard surfaced floors-use
the squeegee floor tool. When vacuuming carpets or
rugs-choose the carpet tool.
ITEM PART NO. DESCRIPTION QTY.
1 604110 Hose Asm, w/Adapters 1
2 600206 Adapter, 1-1/2 Hose, Vac End 1
3 600205 Adaptor, 1-1/2 Hose, Wand End 1
4 609810 Wand Asm., with Adapter & Pin 1
609813 Wand Half w/out Adapter (top half)
609809 Wand Half w/Adapter&Pin (bottom half)
5 606710 Disconnect Pin Assembly 1
6 600204 Adapter, Wand 1
7 608810 16" Bristle Floor Tool Asm. 1
8 601803 Top Casting with Adapter 1
9 601804 Base Casting, Bristle Tool 1
10 600901 Brush, Bristle Tool 1
11 602011 Clamp, Brush 2
12 964022 Screw 2
13 608812 16" Squeegee Floor Tool Asm. 1
14 601802 Base Casting-Squeegee Tool 1
15 600701 Blade, Squeegee Pickup 2
16 607212 Retainer 2
17 962115 10-24x3/8 Self-Tapping Screw 5
18 600210 Tool Adapter, 1-1/4 to 1-1/2 1
19 608816 1-1/2" Crevice Tool 1
20 608820 3" Round Dusting Tool 1
OPTIONAL:
21 608811 16" Carpet Tool Asm. 1
22 600902 Brush Strip 1
23 607901 Carpet Shoe 1

11
OPTIONAL SQUEEGEE ASSEMBLY
PART #608519
ITEM PART NO. DESCRIPTION QTY.
1 600206 Adapter, Hose 1
2 604112 Hose, without Cuffs 1
3 600205 Adapter, Hose 1
4 607213 Retainer, Squeegee Blade 2
5 600703 Blade, Squeegee 2
6 601805 Casting, Squeegee 1
7 605001 Knob, Adjusting Lower 1
8 605002 Knob, Adjusting Upper 1
9 600802 Bracket, Support 1
ITEM PART NO. DESCRIPTION QTY.
10 601101 Bushing 1
11 602101 Clip, Seeger 1
12 608302 Spring, Squeegee Tension 1
13 962128 Screw 14
14 605003 Knob, Caster Adjusting 2
15 W155D Screw 4
16 600803 Bracket, Caster 2
17 608301 Spring, Caster 2
18 609701 Caster 2
1
2
3456
7
8
9
10
11
12
13
14
15
16
17
4
5
18

63002010/01
WARRANTY POLICY
WET/DRY VACUUMS
The Pacific Steamex Inc. Wet/Dry Vacuum has been manufactured, tested and inspected in accordance with specific engi-
neering requirements and is WARRANTED to be free from defects in workmanship and materials as follows:
One (1) year parts & labor - All components unless excluded below.
This warranty extends to the original user/purchaser and only when used, operated and maintained in accordance with
Pacific Steamex Inc. Operating and Maintenance instructions.
This warranty does not apply to certain wear parts and accessories of the machine such as electrical cords, carbon motor
brushes, floor brushes, hoses, tools, filters, casters, wheels, etc. Nor does it apply to damage or failure caused by improper
use, abuse or neglect. Warranty credit or replacement of return parts including motors, etc., is subject to incoming inspection
of those items.
To secure repair under this warranty, the following procedure should be taken:
•The inoperative machine or warranted parts must be delivered to the authorized dealer with shipping and delivery
charges prepaid. If unable to locate the Dealer, you may contact Pacific Steamex Inc. at the address listed herein for the
location of the nearest Pacific Steamex Inc. repair center or agent or for other instructions pertaining to your warranty
difficulty.
•Upon compliance with the above warranty procedure, all warranted repairs would be completed at no additional charge
or cost to the user.
•Only Pacific Steamex Inc. or its authorized dealers and agents may make no charge warranty repairs on this product. All
others do so at their own risk.
This warranty limits Pacific Steamex Inc. liability to the repair of the product and/or warranted parts replacement and does not
include incidental or consequential damages arising from the use of a Pacific Steamex Inc. machine whether defective or not.
This warranty is in lieu of all other expressed or implied warranties and is extended to the original purchaser/user.
2259 Sheridan
Muskegon, Michigan 49442
Ph: (800) 968-1332 Fax: (231) 773-1642
www.nextwaveofclean.com
This manual suits for next models
7
Table of contents
Other Pacific Vacuum Cleaner manuals

Pacific
Pacific Performance 127G User manual

Pacific
Pacific PV-12 Installation and operation manual

Pacific
Pacific WAV-30 User manual

Pacific
Pacific WAV-26 User manual

Pacific
Pacific GULPER 12SS Installation and operation manual

Pacific
Pacific RAPID VAC Installation and operation manual

Pacific
Pacific GENIUS 14 Installation and operation manual

Pacific
Pacific TopVac User manual

Pacific
Pacific Aura Installation and operation manual

Pacific
Pacific WIZ Installation and operation manual