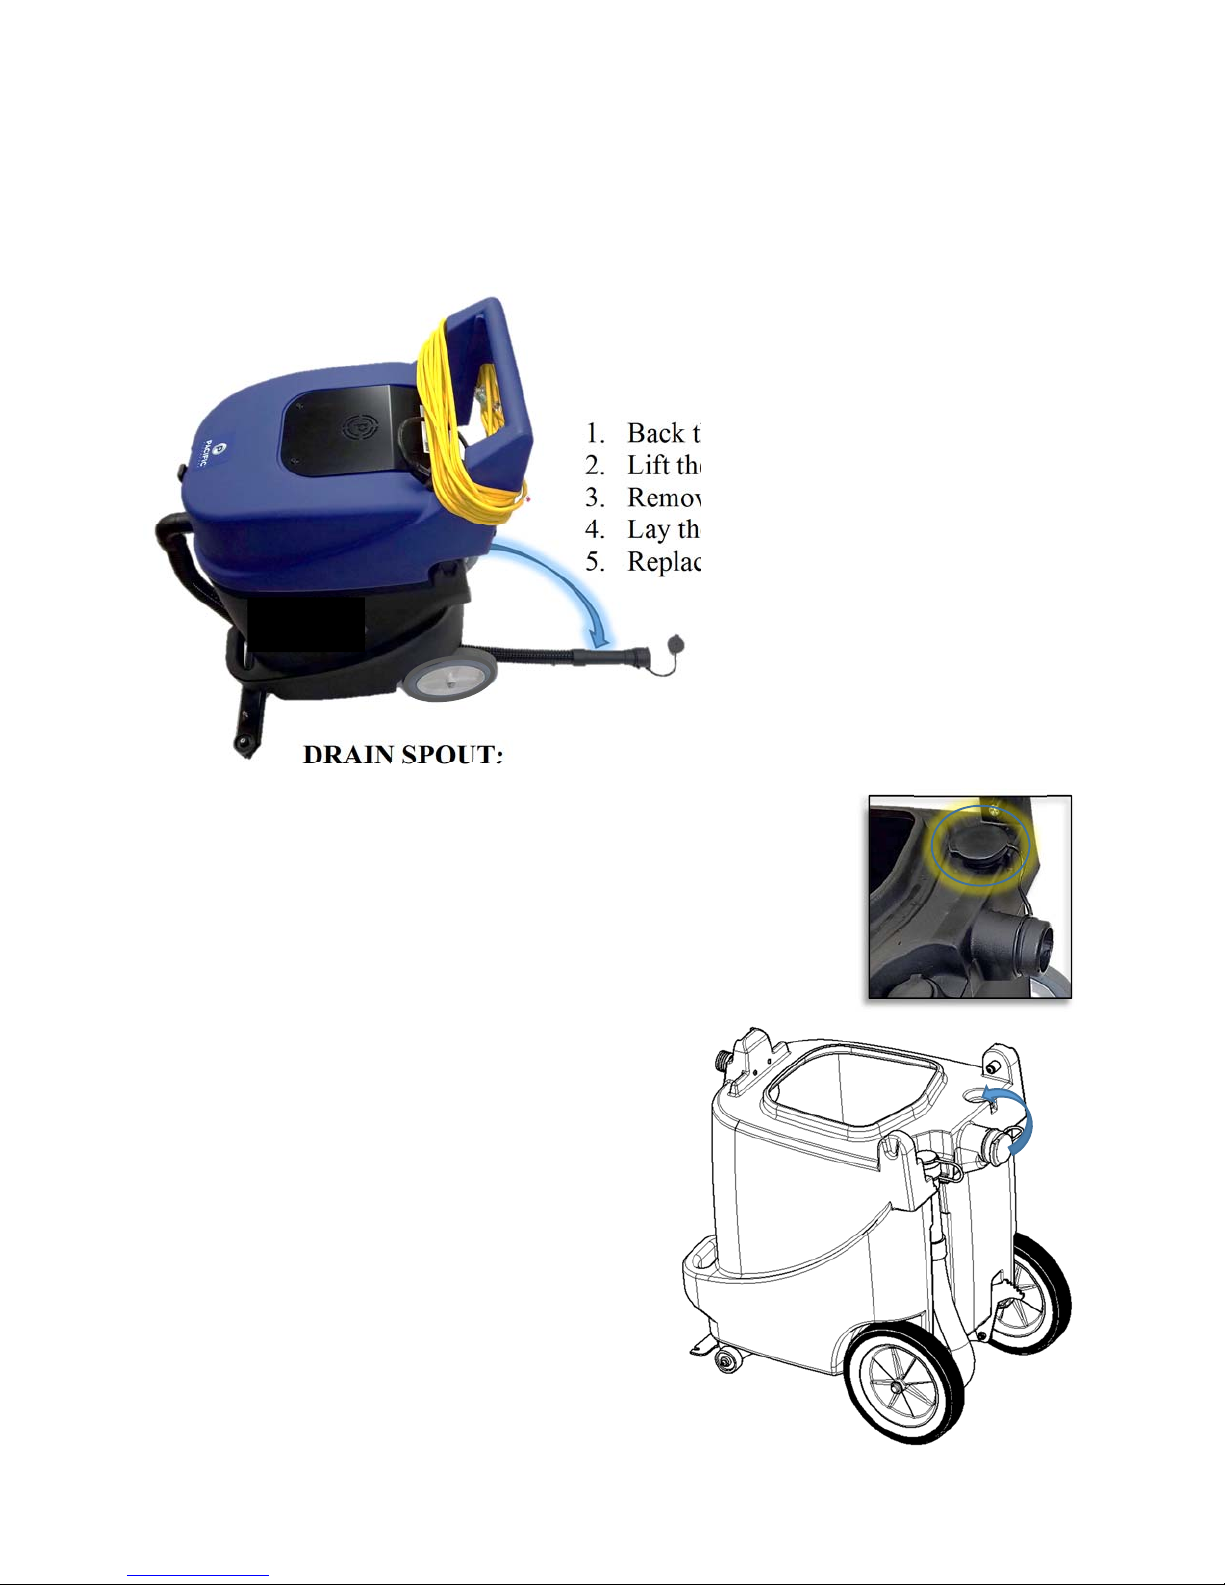
Pacific WDV-18 User manual

WET/DRY VACUUM WDV-18
OPERATING MANUAL
Read this manual carefully and keep it near the machine, protected from liquids and other damaging substances.
Failure to follow the instructions may result in injury or damage to equipment and property.
Carefully inspect all components for freight damage. If such damage is discovered, file a “CONCEALED
DAMAGE REPORT” immediately with the delivering carrier.
The contents of this manual are based on the latest product information available at the time of publication. Pacific
Floorcare reserves the right to make changes or improvements without being obliged to apply changes to the
machines previously sold. Thank you for purchasing a Pacific Floorcare product.
New manuals can be downloaded from: www.pacificfloorcare.com/manuals

2
12/1/2017
SPECIFICATIONS
1. Overall Machine Units
Weight 69 lbs
Dimensions Width at body 18 inches
Width at squeegee 24 inches
Length 28 inches
Height 38 inches
Noise 79 dBA
2. Wheels
Type and Dimensions Rear wheels 10 inches
Front caster 3.5 inches
3. Recovery Tank
Capacity 18 gal
Draining Drain hose 1.5" inches
4. Vacuum
Vacuum Air flow 94 cfm
Vacuum lift 90 inches H2O
Horse Power 1.24 HP
5. Squeegee
Edges (2) usable edges per blade
Blade change with no tools
Break-away Break-away with impact
6. Operator Controls
Handle Height off the floor 38 inches
Diameter 1.5 inches
QR codes Machine manual
7. Power
Voltage 120 VAC
Cord Yellow 16/3 cord 50 feet
Molded in cord retainer
8. Accessory Kit
Includes Dry filter, 10' hose, 2 cuffs, 2-piece aluminum S-
wand, crevice tool, dusting brush, upholstery tool,
squeegee tool, floor brush and hard floor tool.

3
12/1/2017
TABLE OF CONTENTS
SECTION PAGE #
1. SAFETY INSTRUCTIONS 4
o GROUNDING 5
o EXTENSION CORDS 6
o LIFTING AND TRANSPORTATION 7
o PREPARATION 7
2. SQUEEGEE 8
3. DRAINING THE MACHINE 10
4. COVER ASSEMBLY 11
5. OPTIONAL DRY FILTER 12
6. WIRING DIAGRAM 12
7. MAINTENANCE 13
8. TROUBLESHOOTING 13
9. PARTS DIAGRAMS
o COVER ASSEMBLY 14
o TANK ASSEMBLY 15
o SQUEEGEE ASSEMBLY 16
o SQUEEGEE LINK ASSEMBLY 17
o OPTIONAL ACCESSORIES KIT 18
10. WARRANTY POLICY 19

4
12/1/2017
1. IMPORTANT SAFETY INSTRUCTIONS
When using an electrical appliance, basic precautions should always be
followed, including the following:
READ ALL INSTRUCTIONS BEFORE USING VACUUM CLEANER
WARNING: To reduce the risk of fire, electric shock, or injury:
Do not leave appliance when plugged in. Unplug from outlet when not in use and before
servicing.
Do not use outdoors.
Do not allow to be used as a toy. Close attention is necessary when used by or near children.
Use only as described in this manual. Use only manufacturer’s recommended attachments.
Do not use with damaged cord or plug. If appliance is not working as it should, has been
dropped, damaged, left outdoors, or dropped into water, return it to a service center.
Do not pull or carry by cord, use cord as a handle, close a door on cord, or pull cord around
sharp edges or corners. Do not run appliance over cord. Keep cord away from heated surfaces.
Do not unplug by pulling on cord. To unplug, grasp the plug, not the cord.
Do not handle plug or appliance with wet hands.
Do not put any object into openings. Do not use with any opening blocked; keep free of dust,
lint, hair, and anything that may reduce airflow.
Keep hair, loose clothing, fingers, and all parts of body away from openings and moving parts.
Turn off all controls before unplugging.
Use extra care when cleaning stairs.
Do not use to pick up flammable or combustible liquids, such as gasoline, or use in areas
where they may be present.
Do not use without dust bag and/or filters in place.
Do not pick up anything that is burning or smoking, such as cigarettes, matches, or hot ashes.
Connect to a properly grounded outlet only. See Grounding Instructions.
SAVE THESE INSTRUCTIONS
For Commercial Use

5
12/1/2017
GROUNDING INSTRUCTIONS
This appliance must be grounded. If it should malfunction or break down,
grounding provides a path of least resistance for electric current to reduce
the risk of electric shock. This appliance is equipped with a cord having an
equipment-grounding conductor and grounding plug. The plug must be
inserted into an appropriate outlet that is properly installed and grounded in
accordance with all local codes and ordinances.
WARNING: Improper connection of the
equipment-grounding conductor
can result in a risk of electric
shock. Check with a qualified
electrician or service person if
you are in doubt as to whether the
outlet is properly grounded. Do
not modify the plug provided
with the appliance. If it will not
fit into the outlet, have a proper
outlet installed by a qualified
electrician.
This appliance is for use on a nominal 120-volt circuit and has a grounding
attachment plug that looks like the plug illustrated. Make sure that the appliance
is connected to an outlet having the same configuration as the plug. No adapter
should be used with this appliance.

6
12/1/2017
USING EXTENSION CORDS
The machine comes standard with a 50 foot, 16 gauge, 3 conductor cord (50’
16/3 AWG). Do not use an extension cord in conjunction with the cord
provided with the machine. Replacement cords must meet or exceed the
specification of the original cord.
WARNING: Do not use an extension cord that provides a loose connection.
A loose connection may result in overheating, fire, and
increases the risk of a burning.
Maintain Appliance With Care – Inspect extension cords periodically and
replace if damaged. Wrap the cord carefully around the handle as shown
below when not in use.

7
12/1/2017
LIFTING AND TRANSPORTATION
CAUTION: Two person lift. Never attempt to lift the machine alone.
Unplug the cord and wrap it securely around the handle
Secure the machine with straps during transport in a vehicle or trailer to
prevent damage
PREPARATION
Verify the facility and the machine have compatible voltage prior to use (see
Safety Instructions)
Inspect the machine for loose or damaged components

8
12/1/2017
2. SQUEEGEE
Remove and install the Squeegee Head:
Use the two black center knobs to remove
and install the squeegee assembly from the
machine.
Remove and Install the Squeegee Blades:
NOTE: The Squeegee Blades can be used twice by flipping them over to the other
edge. Installation is the reverse of removal.
Loosen all four knobs until they stop
Slide the outer Squeegee Assembly housing up the posts
Remove the Squeegee Blades

9
12/1/2017
Raise and lower the Squeegee Assembly:
Move the foot lever forward and allow the Squeegee Assembly to lower
to the working position
Press the foot lever down and back to lock the Squeegee Assembly to the
up position
RAISE
LOWER

10
12/1/2017
3. DRAINING THE MACHINE
NOTE: The vacuum must be turned off prior to draining the machine.
DRAIN HOSE:
1. Back the machine up to the drain
2. Lift the drain hose from the holster
3. Remove the drain cap
4. Lay the hose into the drain
5. Replace the cap when finished
DRAIN SPOUT:
1. Remove the cover assembly
2. Back the tank up to the drain location
3. Remove the Drain Spout Cap and
secure it in the recessed area to the
right of the spout to prevent it from
interfering with the drain area
4. Using the two-person lift method,
grab the handle at the base of the tank
and tilt backward to begin draining
the tank
5. Follow all of your company policies
and standards when lifting and moving
the machine

11
12/1/2017
4. COVER ASSEMBLY
Open
To open the cover assembly release the
latch on the front of the machine and
rotate the cover backwards until it stops.
Close
Rotate the cover forward, verify it is
properly seated on the tank, and secure
the latch to the catch on the tank.
Removal
1. Secure the electrical cord
2. Release the latch on the front of the
cover and rotate the cover backwards
3. Lift the cover off of the tank
Installation
NOTE: Make sure the drain spout cap is not stored in the recession on top of
the tank. It will prevent the cover from seating to the tank.
1. With the cover angled backwards, align the slots on the handle with the
mounting pins on the tank
2. Slide the cover onto the pins and rotate it forward until it rests on the tank
3. Secure the latch on the front of the cover to the catch on the base
Ball Float
The ball float threads on to the cover assembly and is reinforced by a clamp.
The clamp may remain on the ball float during removal and installation.
Remove and clean the ball float frequently to prevent buildup.

12
12/1/2017
5. DRY FILTER
The optional dry filter is installed over the
ball float. The dry filter must be removed
for wet recovery.
NOTE: Once the mount bracket is
installed it does not need
to be removed again.
1. Use the 2 screws and lock
washers and install the
bracket as shown
2. Slide the filter element over
the bracket
3. Install the filter retaining cap,
and wing nut
6. WIRING DIAGRAM

13
12/1/2017
7. MAINTENANCE
* Read all safety instructions prior to performing maintenance
WARNING: Always unplug the cord from the power outlet before performing
any service, maintenance, or inspection of the machine.
1. After each usage:
Inspect cords, switches, caster and wheels for wear
Clean vacuum motor ventilation louvers
2. After each wet usage:
Remove the squeegee assembly, clean the blade retainer and opening
Inspect the squeegee blades for damage and wear
Verify the float shut off moves freely. If the tank overfills or shows signs
of foaming, use a de-foaming additive
Inspect hoses, caps, and recovery tank gasket for leaks and cuts
Rinse the recovery tank and clean any residue or heavy solids left behind
3. When using the dry filter, remove and blow out the filter element weekly
8. TROUBLESHOOTING
PROBLEM POSSIBLE CAUSE REMEDY
Faulty power outlet Conta c t fa c ility custodian
Faulty power cord Replace Cord
Wiring problem Contact service technician
Faulty ON/OFF switch Contact service technician
Faulty vacuum motor Contact service technician
Ball float is stuck Manually reset ball float
Cover gasket is cut or dirty Clean & inspect / replace gasket
Drain cap is removed Install drain cap
Hose obstruction Clear all debris from hoses
Squeegee assembly is dirty Clean squeegee assembly
Squeegee blades are worn Replace squeegee blades
Vacuum will not turn on
Poor vacuum pickup

14
12/1/2017
9. PARTS DIAGRAMS
COVERASSEMBLY
ITEM QTY PARTNUMBER DESCRIPTION
11 692301 COVERTANKWDV
2 1 692302 COVERMOTORVACUUM
3 4 962263 SCREW,BUTT,SOCK,.25‐20X.62,SSBO
4 1 695201 MOTORVACUUM120VAC
5 1 603473 GASKET198395
6 1 696101 PLATEMTGMOTORV ACUUM
7 1 911089 SWITCH,ROCKER,20A125VAC
8 1 693301 FOAMNOISEMOTORCOOLING
9 1 693302 FOAMNOISEREAR
10 2 962063 SCREW,PAN,#8‐32X.38
11 2 980026 WASHER,LOCK,#8INTTOOTH
12 1 223370 FLOAT,SHUTOFF
13 1 693303 FITTINGCOUPLING1.25NPT
14 1 698501 STRIPFOAMGASKET
15 1 505187 LABEL,SERIALNUMBER
16 1 853401 GASKET,COVER,PRESS‐IN
17 1 908136 CORDEXTENSION50'YELLOW
18 8 964224 SCREW,PAN,#10X.5,SELFTAPPING
19 1 694501 HARNESS2‐WIREWDV
20 1 908137 CORDPIGTAILWDV
21 1 695101 LABELWARNINGTRI‐LINGUAL
22 2 W124D WASHERLOCKINT#10
23 2 920013 NUT,#10‐32,ZINC
24 1 962363 SCREW,PAN,#10‐32X.50,SS
25 1 691102 BUSHINGSTRAINRELIEFCORD
26 1 692002 CLAMPHOSEPLASTIC1.69‐1.81DIA
27 1 695102 CLAMPOVER‐CENTERRUBBER
28 1 505197 LABEL,PACIFIC,3INCH
29 1 693305 FILTERKNOCKDOWNFOAM

15
12/1/2017
ITEM QTY PARTNUMBER DESCRIPTION
1 1 698601 TANKRECOVERYWDV
2 1 694101 HOSEDRAINWDVWITHCAP
3 1 692002 CLAMPHOSEPLASTIC1.69‐1.81DIA
4 1 696801 PLUGDRAINHOLE2INCH
5 4 W189D SCREW,HEX,1/4‐20X.75,SS,PATCH
6 4 980002 WASHER,LOCK,SPLIT,.25
7 4 W104D WASHER,FLAT,.25
8 1 853308 FITTING,MODIFIED
9 1 695102 CLAMPOVER‐CENTERRUBBERKEEPERONLY
10 2 962063 SCREW,PAN,#8‐32X.38
11 2 980026 WASHER,LOCK,#8INTTOOTH
12 2 698201 SPACERNYLON
13 2 962464 SCREW,BUTTON,.31‐18X1.25,ZINC
14 2 980094 WASHER,SPLITLOCK,.31,SS
15 2 229750 WHEEL‐10X1.75GREY
16 1 697701 SHAFTWHEELWDV
17 4 509820 WASHERFIBER.50INCH
18 2 S482P SNAPAXLECAP.50INCH
19 2 542402 COLLAR,CLAMP,.50INCH
20 2 692001 CLAMPAXLE.50INCH
21 4 962363 SCREW,PAN,#10‐32X.50,SS
22 4 980022 WASHER,LOCK,SPLIT,#10
23 1 692701 DEFLECTORWATERWDV
24 2 W401D WASHER,FLAT,#10
25 2 930023 RIVET.188DIA,.50‐.62GRIP
26 1 699701 CASTER3.5INCHTOPPLATE
TANKASSEMBLY

16
12/1/2017
ITEM QTY PARTNUMBER DESCRIPTION
1 1 693202 FRAMESQUEEGEEWDV
2 1 697201 RETAINERBLADESQUEEGEE
3 2 690701 BLADESQUEEGEE2‐EDGEWDV
4 1 694102 HOSESQUEEGEEWDV
5 2 695001 KNOBRETENTIONSQUEEGEE
6 2 695005 KNOBRETENTIONBLADEBLUE
7 4 920701 NUTACORN.25‐201‐PIECEBLK
8 4 962478 SCREW14‐20X2.25HEXZINCFULLTHRD
9 6 920011 NUT,NYLOCK,1/4‐20,ZINC
10 4 W104D WASHER,FLAT,.25
11 2 699702 WHEEL2INCHDIA.31ID
12 2 962290 SCREWSHLDR.31”DIA.X1.0”LX.25‐20
SQUEEGEEASSEMBLY

17
12/1/2017
ITEM QTY PARTNUMBER DESCRIPTION
1 1 693201 FRAMELIFTSQUEEGEE
2 1 690802 BRACKETLIFTSQUEEGEE
3 3 962238 SCREWSHLDR.38”DIA.X.25”LX.31‐18
4 3 691101 BUSHINGSPLIT.38INCH
5 1 920036 NUT,NYLOCK,5/16‐18,SS
6 2 699702 WHEEL2INCHDIA.31ID
7 2 920011 NUT,NYLOCK,1/4‐20,ZINC
8 2 962290 SCREWSHLDR.31”DIA.X1.0”LX.25‐20
SQUEEGEELINKASSEMBLY

18
12/1/2017
OPTIONALACCESSORIESKIT
ITEM QTY PARTNUMBER DESCRIPTION
1 695004 KIT,ACCESSORIES
1 1 693305 FOAM,FILTERKNOCKDOWN
2 2 980002 LOCKWASHER
32 W169D 1/4‐20HEXCAPSCREW
4 1 690801 BRACKET,FILTERRETAINER
5 1 693304 FILTERELEMENT(W/UPPER&LWRSEALS)
6 1 691501 CAP,FILTERRETAINER
7 1 920700 NUT,WING.38‐16
8 1 TOOL,HARDFLOOR
91 TOOL,UPHOLSTERY
10 1 TOOLSQUEEGEE
11 1 BRUSHFLOOR
12 1 TOOL,CREVICE
13 1 BRUSH,DUST
14 1 HOSE,10FT
15 2 CUFF,HOSE
16 1 WAND,S‐SHAPED(2PIECE)
695002

19
12/1/2017
10. WARRANTY POLICY
The Pacific Wet/Dry Vacuum WDV-18 has been manufactured, tested and inspected in
accordance with specific engineering requirements and is WARRANTED to be free from defects
in workmanship and materials as follows:
Ten (10) Years Parts, One (1) Year Labor - Polyethylene Components
One (1) Year Parts and Labor - All other components unless excluded below
This warranty extends to the original user/purchaser and only when used, operated and maintained
in accordance with Pacific Operating and Maintenance instructions.
This warranty does not apply to certain wear parts and accessories of the machine such as electrical
cords, carbon motor brushes, floor brushes, squeegee blades, hoses, tools, filters, casters, wheels,
etc. Nor does it apply to damage or failure caused by improper use, abuse or neglect.
Warranty credit or replacement of return parts including motors, etc., is subject to incoming
inspection of those items.
To secure repair under this warranty, the following procedure should be taken:
The inoperative machine or warranted parts must be delivered to the authorized dealer
with shipping and delivery charges prepaid. If unable to locate the Dealer, you may
contact Pacific at the address listed herein for the location of the nearest Pacific repair
center or agent or for other instructions pertaining to your warranty difficulty.
Upon compliance with the above warranty procedure, all warranted repairs would be
completed at no additional charge or cost to the user.
Only Pacific or its authorized dealers and agents may make no charge warranty repairs
on this product. All others do so at their own risk.
This warranty limits Pacific’s liability to the repair of the product and/or warranted
parts replacement and does not include incidental or consequential damages arising
from the use of a Pacific machine whether defective or not.
This warranty is in lieu of all other expressed or implied warranties and is extended to
the original purchaser/user.

20
12/1/2017
http://www.pacificfloorcare.com/
Other manuals for WDV-18
1
Table of contents
Other Pacific Vacuum Cleaner manuals

Pacific
Pacific WIZ Installation and operation manual

Pacific
Pacific GULPER 16SV Installation and operation manual

Pacific
Pacific Performance 127G User manual

Pacific
Pacific PV-12 Installation and operation manual

Pacific
Pacific Upright Vacuum Cleaner User manual

Pacific
Pacific WAV-26 User manual

Pacific
Pacific Aura Installation and operation manual

Pacific
Pacific PWD 600 Installation and operation manual

Pacific
Pacific GULPER 12SS Installation and operation manual

Pacific
Pacific GENIUS 14 Installation and operation manual