PACOM PC809 User manual

Medical Infrared ThermometerPC809 / PC809EV / PC809VVersion 2.02019.09.01
User’s Manual


Contents1.Introduction ..................................................................................12.Packing list .....................................................................................13.Product description........................................................................1 3.1 Overview...................................................................................1 3.2 Intended use............................................................................2 3.3 Principle.......................................................................................2 3.4 Features....................................................................................3 3.5 Components...............................................................................3 3.6 Product structure......................................................................4 3.7 LED display description..............................................................4.Warnings and precautions.............................................................55.Directions for use...........................................................................7 5.1 Take your forehead temperature.............................................7 5.2 Take your ear temperature........................................................8 5.3 Recall saved readings................................................................10 5.4 ℃ and ℉ conversion...................................................................0 5.5 Turn on/off buzzer/speaker/vibration........................................11 5.6 Set threshold for low fever..........................................................11 5.7 Set threshold for high fever......................................................2 5.8 Shut down..................................................................................12 5.9 Replace batteries........................................................................126.Temperature-taking tips..................................................................37.Cleaning and disinfection..............................................................14 7.1 Cleaning.....................................................................................14 7.2 Disinfection................................................................................58.Troubleshooting..............................................................................169.Specifications..................................................................................1710.Symbol descriptions.......................................................................711.Maintenance...................................................................................812.After-sales service .........................................................................1813.Declaration ....................................................................................1814.Appendix A: EMC Information - Guidance and Manufacturer’s Declaration....................................................1915.Manufacturer information..............................................................23
1222334445688910101111121212131414151617181819191923

1. IntroductionDear customer, thank you for purchasing our Medical Infrared Thermometer. This device can be used to measure human body temperature by detecting infrared energy emitted from the forehead or eardrum.In order to obtain accurate readings, please read this manual before use.Keep this manual so that you may read it whenever necessary.Models covered for this manual and their differences are as follows: Aside from the above differences, the expected use of the three models is exactly the same. Note: Ear temperature measurement can only be applied to people over the age of 3 months. ModelPC809At the end of temperature measurement, the buzzer gives a ‘beep’ cue.PC809EVAt the end of temperature measurement, the speaker broadcasts the temperature in English.PC809VAt the end of temperature measurement, the instrument emits vibration feedback.Difference
- 1 -

3.1 OverviewThe Medical Infrared Thermometer measures body temperature based on detecting infrared energy emitted from the eardrum or forehead. Users can quickly obtain measurement results after properly positioning the temperature probe in the ear canal or on the forehead.Normal body temperature has a range. The following table shows that this range also varies by measuring temperature at different sites. Therefore, readings from different sites should not be directly compared. It is very important to tell your doctor which type of thermometer you used and which part of the body you measured. Also keep this in mind if you are diagnosing yourself.Medical infrared thermometer 1 pcStorage bag 1 pcUser’s manual 1 pcAAA dry cell battery (optional) 2 pcs2. Packing list3. Product descriptionMeasuring siteNormal temperature rangeForehead36.1‒37.5℃ (97.0‒99.5℉)Ear35.8‒38.0℃ (96.4‒100.4℉)Mouth35.5‒37.5℃ (95.9‒99.5℉)Anus36.6‒38.0℃ (97.9‒100.4℉)Axilla34.7‒37.3℃ (94.5‒99.1℉)
- 2 -

Version 2.02019.09.01Fig. 1Fig. 2
3.2 Intended useThe multifunctional infrared thermometer is intended for measuring human body temperature. It has two measurement modes: the forehead mode for people of all ages and the ear mode for people above the age of three months.3.3 PrincipleThe infrared temperature sensor collects infrared energy emitted by the eardrum in the ear canal or the skin of the forehead. After being focused by a lens, the infrared energy is converted into a temperature reading by the thermopiles and measurement circuits.
- 3 -

Fig. 3Fig. 4
3.5 ComponentsThe infrared thermometer consists of a shell, LED display screen, button, buzzer/speaker/vibration motor, probe with infrared sensor inside, microprocessor, circuit board and measuring software.Quick measurement in just 1 secondAccurate and reliableOne button design, making it easy to operateBoth forehead and ear measurement modes32 memory slots, making it easy to save and recall temperaturesSwitch between Celsius (℃) and Fahrenheit (℉)Turn on/off the buzzer/speaker/vibration functionOrange LED indicates an intelligent low fever alarmRed LED indicates an intelligent high fever alarmAutomatic shutdown for energy conservation3.4 Features3.6 Product structure
- 4 -
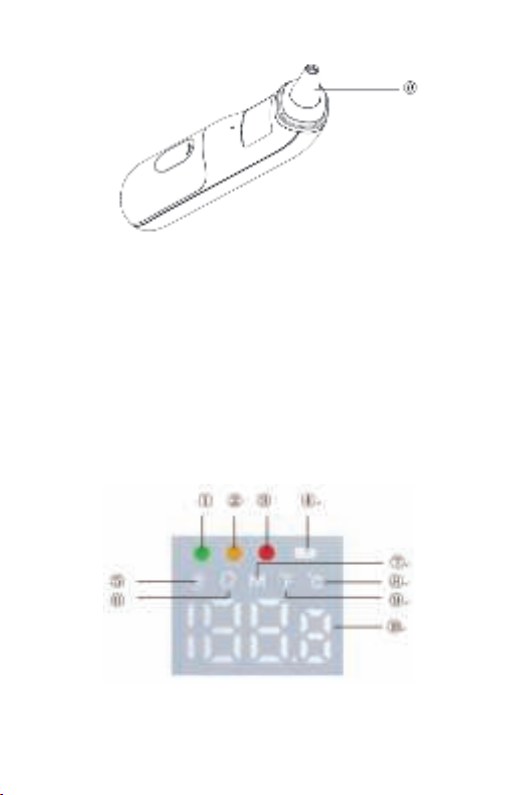
Fig. 6
3.7 LED display description
Fig. 5 (remove probe cover)
① Probe cover (remove it when measuring ear temperature)② LED display screen④ Top Cover⑥ Label⑧ Battery cover③ Power/Measure/Set button⑤ Infrared sensor⑦ Buzzer/Speaker outlet⑨ Probe
- 5 -

4.Warnings and precautions1) Keep out of reach of children under 12 years of age.2) Never immerse the thermometer in water or other liquid (it is not waterproof). For cleaning and disinfection, please follow the instructions in the ‘Cleaning and disinfection’ section.3) Never use the thermometer for purposes other than its intended use. Please follow the general safety precautions when using it on children.4) Keep the thermometer out of direct sunlight in a dry, dust-free, well-ventilated area at a temperature between 10.0‒40.0℃ (50.0‒104.0℉). Do not use the thermometer in a high humidity environment (>85% RH).5) Do not use the thermometer if there are signs of damage on the infrared sensor lens or elsewhere on the instrument. If damaged, never attempt to repair the instrument! Please contact the dealer or manufacturer.6) This thermometer consists of high precision parts. Do not drop or twist the instrument or infrared sensor. Protect it from severe impact and shock.7) Please consult your doctor if you see such symptoms as unexplained irritability, vomiting, diarrhea, dehydration, changes in appetite or activity, seizure, muscle pain, shivering, stiff neck, pain when urinating, etc., even in the absence of fever.8) Those who exhibit a normal temperature may still need to receive medical attention. When determining the severity of illness of people on antibiotics, analgesics or antipyretics, temperature readings should not be solely relied upon.① Green status light③ Red status light⑤ Ear temperature mode⑦ Memory mode⑨ Fahrenheit② Orange status light④ Low battery indicator⑥ Forehead temperature mode⑧ Celsius⑩ Temperature value
- 6 -

9) Temperature elevation may signal a serious illness, especially in adults who are elderly, frail or have a weakened immune system, or neonates and infants. Please seek professional advice immediately when there is a temperature elevation in a person who meets any of the following criteria:10) This thermometer is not intended for premature babies or small for gestational age babies. It is not intended to measure hypother-mic temperatures. Do not allow children to take their temperatures unattended.11) Use of this thermometer is not intended as a substitute for consultation with your physician or pediatrician. It is for household use only.12) Clean the thermometer probe after each use.13) Do not use the thermometer on newborns or for continuous temperature monitoring purposes.14) Do not take a measurement while or immediately after nursing a baby.15) Patients should not drink, eat, bathe or engage in physical activity for 30 minutes before using the thermometer. After eating, some organs have to work, such as the stomach, intestinal tract, etc., generating extra heat which affects temperature accuracy.Over 60 years of age (fever may be dulled or even absent in elderly patients)Diagnosed with diabetes mellitus or a weakened immune system (e.g. HIV positive, cancer, chemotherapy, chronic steroid treatment, splenectomy)Bedridden (e.g. nursing home patient, stroke, chronic illness)A transplant patient (e.g. liver, heart, lung, kidney)
- 7 -
This manual suits for next models
2
Table of contents
Other PACOM Thermometer manuals


