Paitec ES2500 User manual

Paitec USA-UM-ES2500_201221_EN_Rev.01
ES2500
User Manual

Ver. 01
User Manual ES2500
1
Introduction
Installation
Operation
Specifications 3
Name of Each Parts 4
Contents
How to Install the Fold Cassettes 5
Fold Cassette Guide 6
Maintenance
Paper Loading 9
Operation Panel 11
Jam Removal 13
Cleaning 14
Introduction 2
Feature 12

Ver. 01
User Manual ES2500
2
Welcome!
Thank you very much for selecting Paitec product!
This manual is prepared to provide you with guidelines on how to properly operate and
maintain the ES2500. Please read this user manual before operating in order to prevent
unexpected malfunction or damage. Please refer to the manual carefully and follow the
instruction.
Copyright
Any of the contents should not be copied, re-printed or translated into other languages
without Paitec approval.
Safety Precautions
Caution: Serious bodily injury or mechanical damage may result from
insufficient attention to or incorrect compliance with warning
messages with this symbol.
●Do not attempt to disassemble or reassemble the machine. It may cause an electric
shock or mechanical problem.
●Disconnect the power immediately if liquid or a foreign object enter the inside of the
machine.
●Do not input metal or inflammable material into the inlet.
●This manual is subject to be revised without notice.
●Do not install the machine on the place as below.
- Near window or places exposed to direct sunlight.
- Where vibration is detected.
- Where temperature changes suddenly or poorly ventilated.
- Places exposed to hot or cold air directly. (not office circumstance)
- Not solid enough or weak floor.
Introduction
Introduction

Ver. 01
User Manual ES2500
3
Specification
Introduction
The ES2500 offers a real office-friendly Pressure Sealer with perfect sealing
quality and extremely low noise level. It is capable of processing 3,000 forms
per hour.
Contents Specifications Remark
Form Size A4 / Letter / Legal size
Speed 3,000 forms / hour
Input Tray up to 150 forms Based on 80gsm
Form Weight 80~105gsm
Fold Setting Z, C, V & Double, 14” uneven Z
Noise Level less than 45db
Weight 49 Lbs (without
packaging)
Dimension 13" X 16" X 11" (WxLxH)
* Specification is subject to be revised without notice.
Ver. 01
User Manual ES2500
4
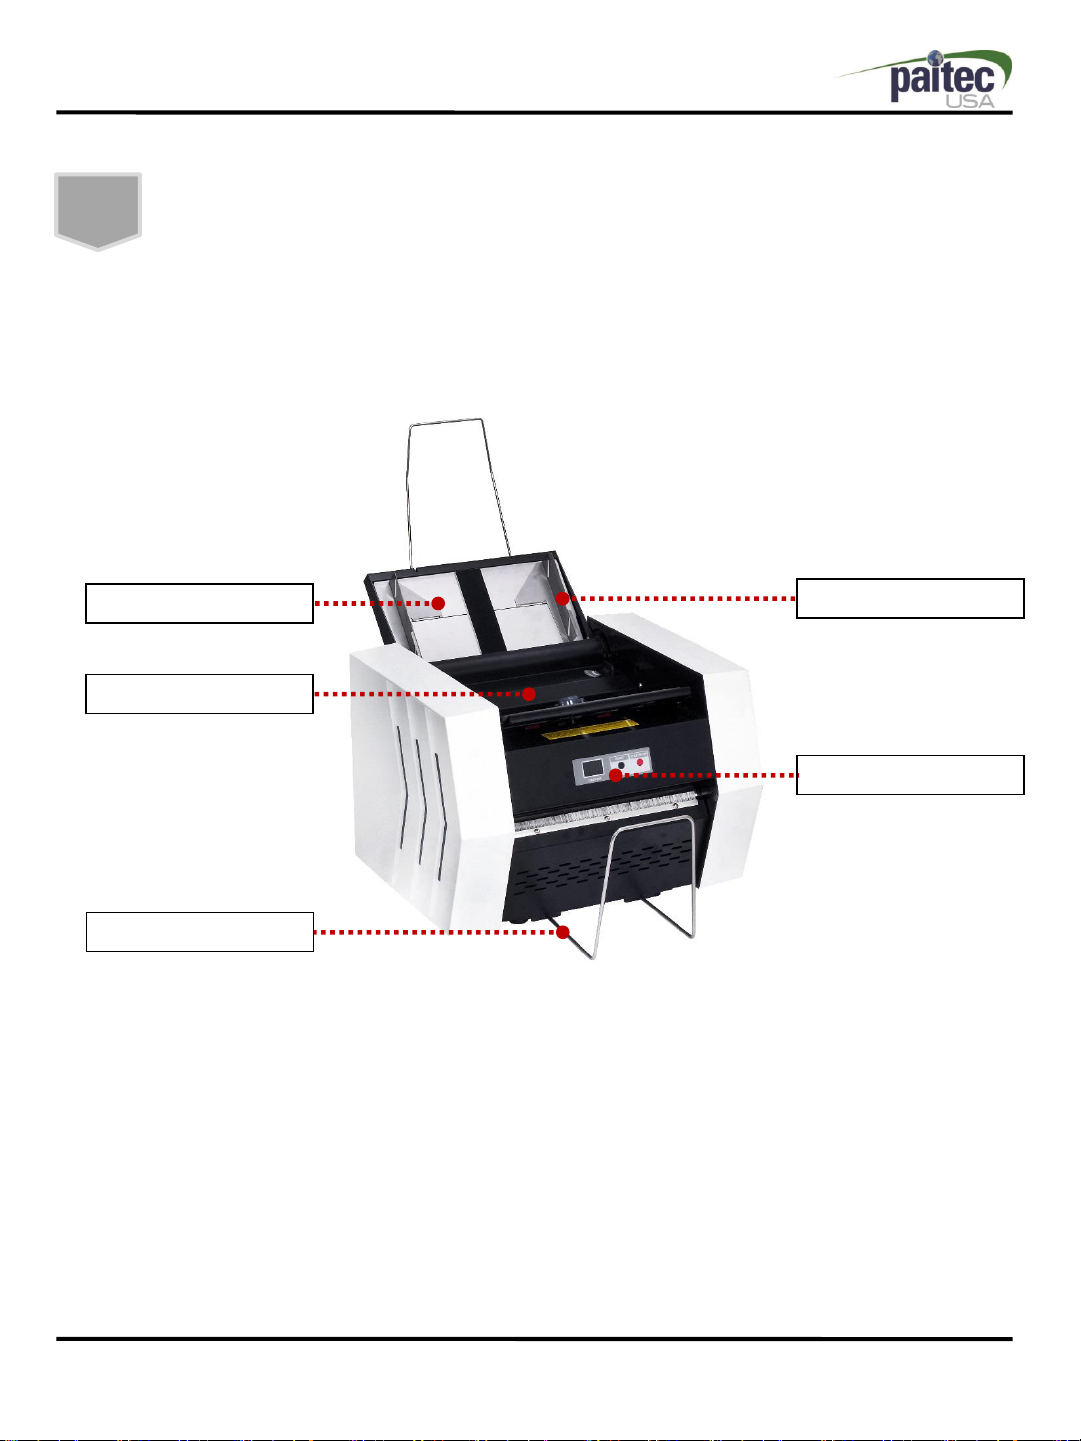
Name of Each Parts
Paper Guide
Fold Roller Cover
Output Tray
Control Panel
①Paper Tray: Load the paper on the Tray. (Prepare paper by making edges neat before loading)
②Paper Guide: Guide to paper feeding on the Tray.
③Fold Roller Cover: Open fold roller cover when jam occurs.
④Start / Stop Button: Start & Stop the machine operation.
⑤Output Tray: Stacking the paper after folding & sealing.
Paper Tray
Introduction
Open the box and place the Main Body on a table. Set up Wire Tray and Fold
Cassette to the Main Body as below pictures.

Ver. 01
User Manual ES2500
5
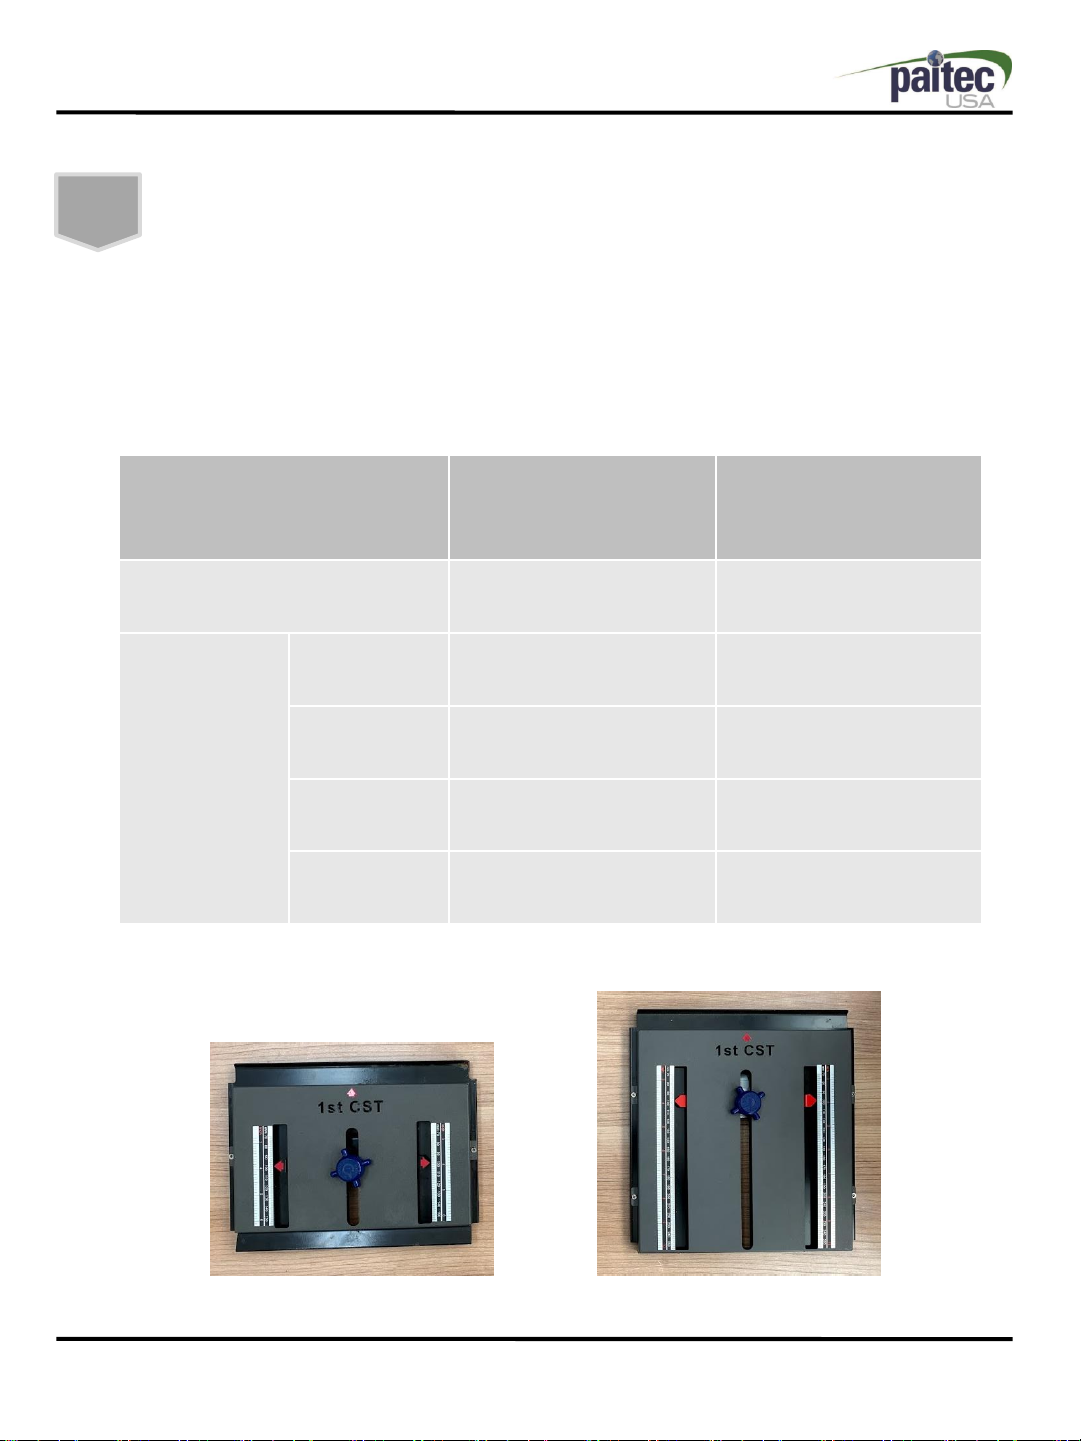
How to Install the Fold Cassettes
Please follow the these instructions to adjust the fold 1st and 2nd Fold
Cassettes.
①the 1st cassette is inserted
on the front of the machine.
②Insert the 2nd cassette on
the back of the machine.
Adjusting the Fold Cassette
Turn the Knob to adjust the fold
cassette to the desired paper size
(Refer to fold assist label on top
of the in-feed tray.)
Installation
2nd Cassette
1st Cassette
Ver. 01
User Manual ES2500
6
148mm plate
(Standard) 240mm plate
Option Basic Option
Fold Type
ZLetter, A4, Legal Letter, A4, Legal
VLetter, A4 Letter, A4, Legal
CN/A Letter, A4, Legal
Uneven C N/A Letter, A4, Legal
The ES2500 has a 2 different kind of 1st folding plate based on the folding
type required.
Standard 148mm 240mm Fold Cassette
Operation
Folding Cassette Guide
Ver. 01
User Manual ES2500
7
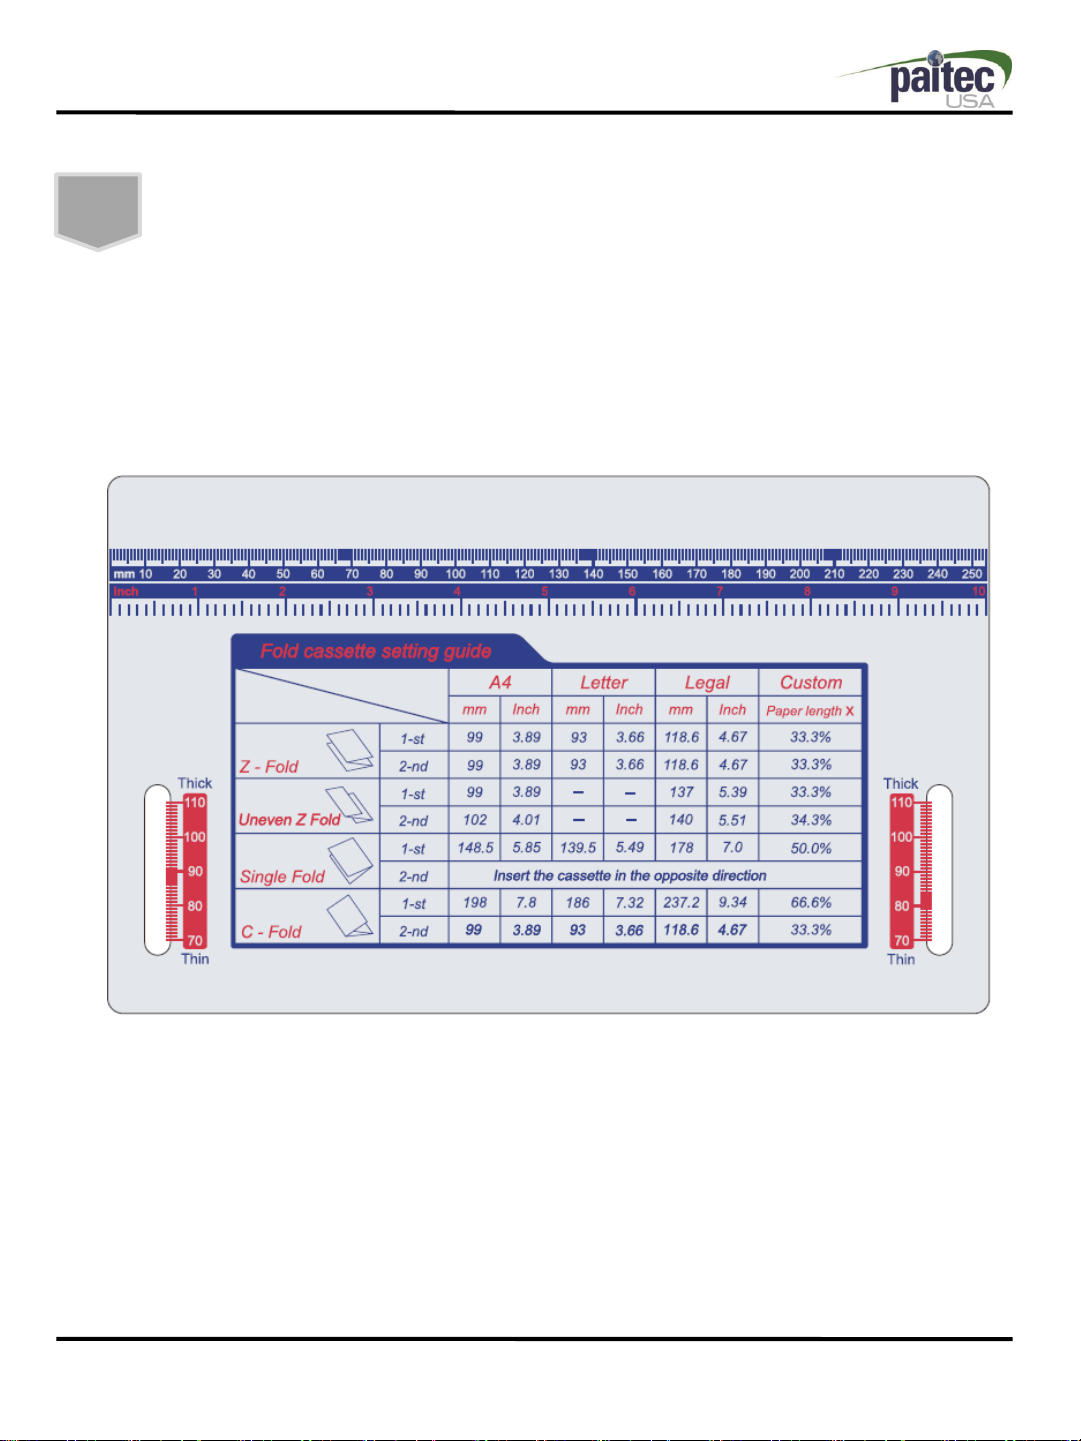
Folding Cassette Guide
A fold cassette setting guide with ruler is attached on the front of the hopper.
Please select the folding type you require and adjust the 1st and 2nd cassette
location based on this information.
※ If you want to process V-Fold documents (single fold) please remove the 2nd
fold cassette, rotate and replace.
Operation

Ver. 01
User Manual ES2500
1. Z Fold Setting (A4)
a. Move 1st cassette stopper to 99mm.
b. Move 2nd cassette stopper to 99mm.
Tip1. If A side of paper is shorter, adjust the position of 1st
cassette stopper to more longer.
Tip2. If B side of paper is shorter, adjust the position of 2nd
cassette stopper to more longer.
2. V(Single) Fold Setting (A4)
a. Move 1st cassette stopper to 148.5mm.
b. Remove 2nd cassette and put it back with opposite
direction.
Tip1. If A side of paper is longer than B, adjust the position of 1st
cassette stopper to more short.
Tip2. If A side of paper is shorter than B, adjust the position of
1st cassette stopper to more long.
3. C Fold Setting (A4) –<Required 240mm 1st Cassette >
a. Move 1st cassette stopper to 198mm.
b. Move 2nd cassette stopper to 99mm.
Tip1. If B side of paper is longer than C, adjust the position of 1st
cassette stopper to more short.
Tip2. If C side of paper is shorter, adjust the position of 2nd
cassette stopper to more longer.
Z Fold
Direction
A
B
V(Single) Fold
Direction
A
B
C Fold
Direction
A
B
C
Folding Cassette Guide

Ver. 01
User Manual ES2500
Paper Loading
9
If you unpack the new paper before
loading, please follow the below steps to
make air enter into each paper.
1. Bend the center of the whole batch of
paper.
2. Hold the ends of paper and push and
pull a few times.
3. Lift the paper left and right to allow the
air might go into each paper.
4. Jog the paper on the flat table.
Do not expose new paper to high temperature and humidity. The paper
can be deformed by moisture. It may cause a paper jam.
Keep the rest of paper after loading in the package to avoid deformation
or damage by moisture.
If the paper is curled or folded, Please straighten the paper well before
loading. Curled or folded paper will cause paper jams.
Operation
Before Loading

Ver. 01
User Manual ES2500
10
It is important that you load the Paper Guide correctly to minimize the risk of
paper jams occurring.
Fan the pressure seal forms to separate and eliminate any static that may have
been caused by the laser printer.
※ Adjusting the paper guides to the correct location
Too much gap!
Good
The Paper Tray will take up to 150
printed forms. However please do
not overload the hopper. This will
result in miss-feeding
Insure that the side guides are
right up against the edge of the
form but not compressing the
form
Operation
Paper Loading
After Paper Loading, press Start / Stop button to run & stop the operation.

Ver. 01
User Manual ES2500
11
Operation Panel
①Counter
- Shows working counter on the panel with 3 digits.
- Shows error codes.
②Reset Button
- Reset the working counter.
③Start/Stop Button
- Press [Start/Stop] to run the machine.
- Press [Start/Stop] again to stop the machine.
888
Operation
Ver. 01
User Manual ES2500
12
Features
•Paper Jam Detection : This sensor
will detect a paper jam and stop the
machine.
•Please note you will have to remove
the jammed form before restarting
the machine.
•Limit sensor for fold roller cover.
The machine will not run with this
cover missing or if this cover is
removed w hile the machine is
running.
•Paper Alignment Paddle.
Please do not remove this item. Your
machine will not function properly
without it
Operation

Ver. 01
User Manual ES2500
13
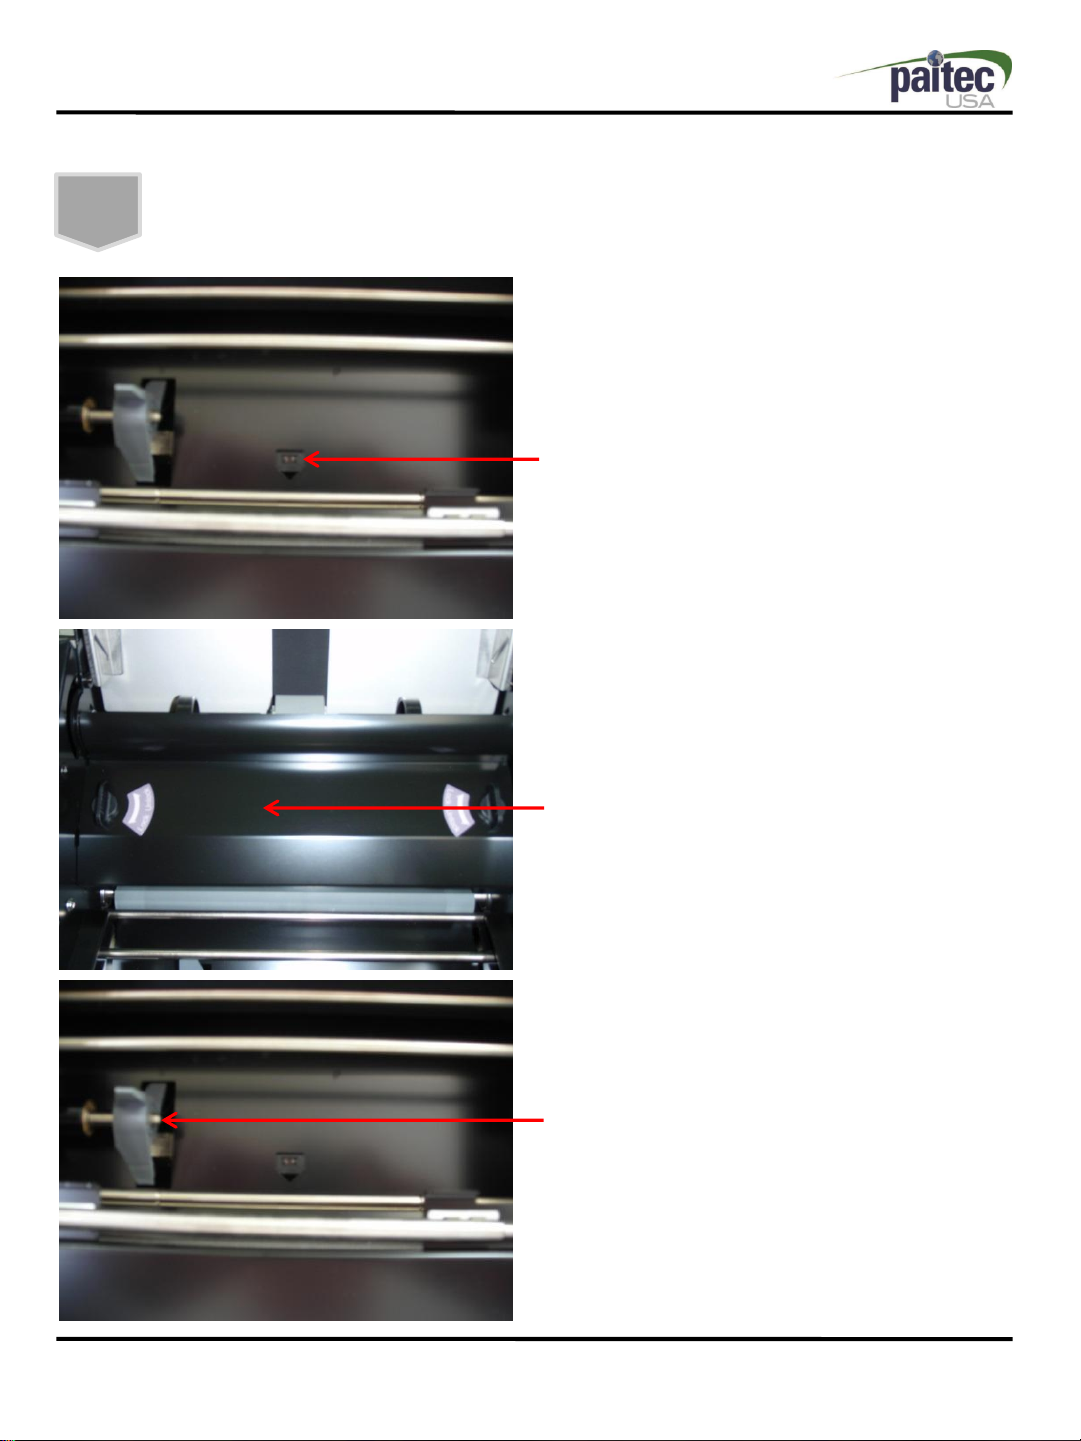
Jam Removal
You can easily remove a paper jam as illustrated below. If a paper jam has
occurred, the machines will automatically stop after a few seconds. After
removing the paper jam, press the “start” button for the machine to re-start.
[Pull off the 1st cassette] [Remove the fold roller cover]
[Locate the jam removal tool] [Insert the jam removal onto the
hole of roller and pull it down ]
Please remember to remove replace the jam removal tool back into its
holder once the paper jam has been cleared.
Maintenance

Ver. 01
User Manual ES2500
14
Cleaning
Maintenance
Paper Dust
1
Use small air cleaner or dust remover
Pick-up and Fold rollers
2
Sealing Rollers
3
Do not use any other substance to clean the surface of the fold rollers as
it may damage the rubber.
Clean the feed roller as well as the aluminum and rubber rollers inside the folding unit
with roller cleaning fluid. Do not use oil as this will damage the surface of the rubber.
With general use, toner will build up on the pressure rollers. Check the rollers for build
up of toner and clean on a regular basis using a suitable roller cleaning fluid. The
degree of build up will vary according to the type of printer, toner & fuser used.
Please contact your service tech for further details on suitable cleaning
solutions to be used.
Since pressure seal forms leave paper dust as well as ink and toner residues, it
is very important to occasionally clean the surface of the each roller to ensure
optimum performance.

Ver. 01
User Manual ES2500
http://www.paitec.com
Table of contents
Other Paitec Food Saver manuals

Paitec
Paitec ES3000 User manual

Paitec
Paitec IM8100 User manual

Paitec
Paitec MX11000 User manual

Paitec
Paitec ES5500 User manual

Paitec
Paitec MX-9000 User manual

Paitec
Paitec MX11500 User manual

Paitec
Paitec MX-6000 User manual

Paitec
Paitec MX-13000 User manual

Paitec
Paitec MX17000 User manual

Paitec
Paitec ES8500 User manual


