Paitec ES8500 User manual
Paitec USA-UM-ES8500_191206_EN_Rev.01
ES8500
User Manual

User Manual ES8500
Ver. 01
Introduction
Installation
1
Operation
OP Panel
8
Maintenance
Paper Jam
24
Introduction
2
Specifications
3
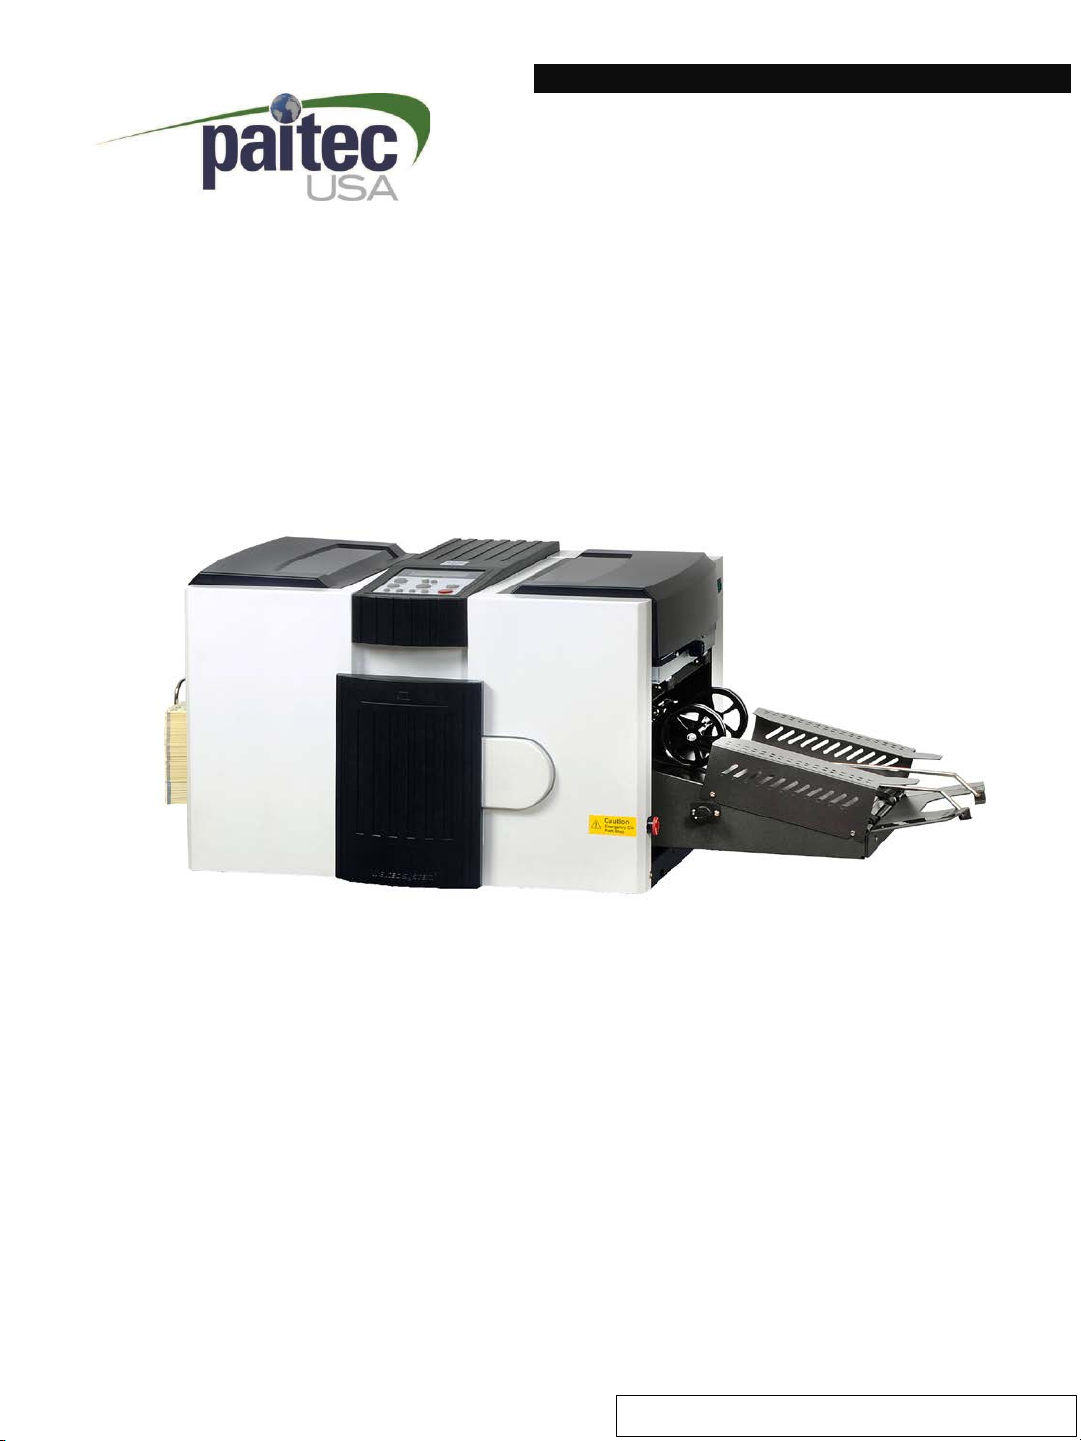
Identifying Parts
4
Contents
Installation
7
Paper Loading
10
Trouble Shooting
25
Understanding Folding Mechanism
13
Fold Type Setting
12
Operation
20
Cleaning
26
Functions
21
User Manual ES8500
Ver. 01
Introduction
Welcome!
Thank you very much for selecting our product!
This manual is prepared to provide you with guidelines on how to properly operate and
maintain the ES8500. Please read this user manual before operating in order to prevent
unexpected malfunction or damage. Please refer to the manual carefully and follow the
instruction.
Copyright
Any of the contents should not be copied, re-printed or translated by other languages
without Paitec USA approval.
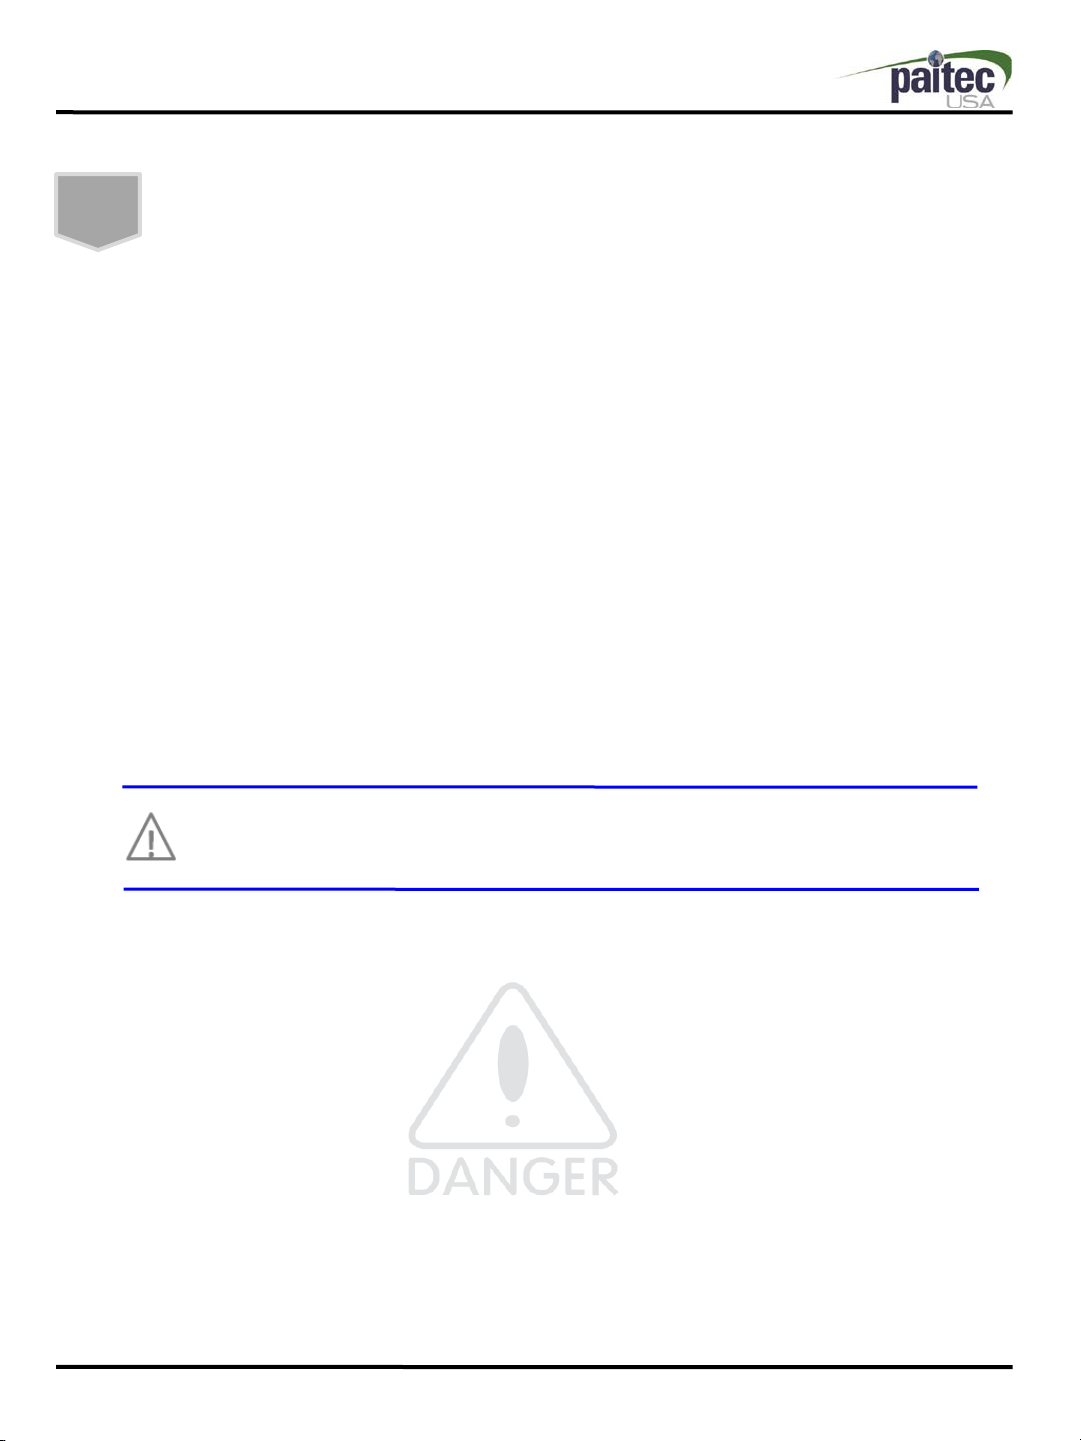
Safety Precautions
Caution: Serious bodily injury or mechanical damage may result from
insufficient attention to or incorrect compliance with warning
messages using this symbol.
●Do not attempt to disassemble or reorganize the machine. It may cause an electric
shock or mechanical problem.
●Quickly disconnect the power if liquid or a foreign object enter the inside of the
machine.
●Do not enter metal or inflammable material into AC Inlet.
●Please contact local dealer when you relocate the machine.
●This manual is subject to be revised without notice for product improvement.
●Do not install the machine on the place as below.
- Near window or places exposed to direct sunlight.
- Where vibration is detected.
- Sudden temperature changes or poorly ventilated areas.
- Places exposed to hot or cold air directly. (not office circumstance)
- Not solid enough or weak floor.
2
Introduction

User Manual ES8500
Ver. 01
Specifications
Features
●ES8500 is a mid-volume pressure sealer. It features processing speed up to 9,000
forms per hour, perfect sealing quality with 2 metal seal rollers, with a monthly
duty cycle of up to 130,000 forms per month.
●ES8500 is Dual-Purpose(Stand alone or Optional In-Line kit), works equally well
as a stand-alone or in-line with laser printers a rear-exit paper path.
3
Specifications
Form Size A4 / Legal / Letter
Paper Weight 22#-28#
Speed Max 9,000 forms per hour
Fold Setting Manual
Fold Type Z, C, V, EZ
Double Feeding Detect Available by DFD sensor
Stacker Built-in 150 forms catch tray or Optional Conveyor
Duty 130,000 / month
Specifications
Introduction

User Manual ES8500
Ver. 01
Identifying Parts
4
Introduction
①Feeding Unit Safety Cover
②Upper Fold Cassette Safety Cover
③Lower Fold Cassette Door
④OP Panel
⑤Conveyor (optional)
Main Body
①②
③
④
⑤

User Manual ES8500
Ver. 01
5
Identifying Parts
Large Capacity Feed Table
Lower Fold Cassette
Upper Fold Cassette
①Feed Assist Hanger
②Feed Guide (Left)
③Feed Guide (Right)
④Locking Knob
⑤In-feed Roller
⑥Paper Detection Sensor
①Lower Cassette
②Stopper
③Stopper Adjustment Knob
④Stopper Locking Knob
①Stopper Adjustment Knob
②Stopper Locking Knob
③Fold Position Marker
④Fold Position Information
Introduction
④
①
②
③
⑤
④
①
②
③
①
③
②
④
⑥

User Manual ES8500
Ver. 01
6
Exit Side
①Power Switch
②Main Power Socket
③Conveyor Power Socket
④110~230V Switching Switch
⑤Emergency Switch
Identifying Parts
Introduction
①
②
③
⑤
④
Be careful when you change the 110~230V Switching Switch. If the
voltage selection is not correct, it may cause a damage on the machine.

User Manual ES8500
Ver. 01
Installation
7
Installation
Installation Environment
1. Input power : 100V / 230V (selected by 110~230V Switching Switch)
2. Machine size(mm) : 24” x 18” x 16” (without conveyor)
3. Machine weight : 115 Lbs.
- Weight of a product is heavy, please use appropriate table to support it.
- Please use grounded power cable.
Unpacking
Please check if all of the following parts are included in the box.
- Main body, Power Cord, User’s Manual, Jam Removal tool.
Removing Safety Tape and Styrofoam Location
Please remove all safety tapes and Styrofoam before operation.
Power Connection
Please refer to the label for electric information which is located at the back side
of the machine. When the power cable is properly connected, please switch the
machine on and check whether ‘Ready’ sign is shown on the display panel.
If not, please contact your local dealer for service.
User Manual ES8500
Ver. 01
8
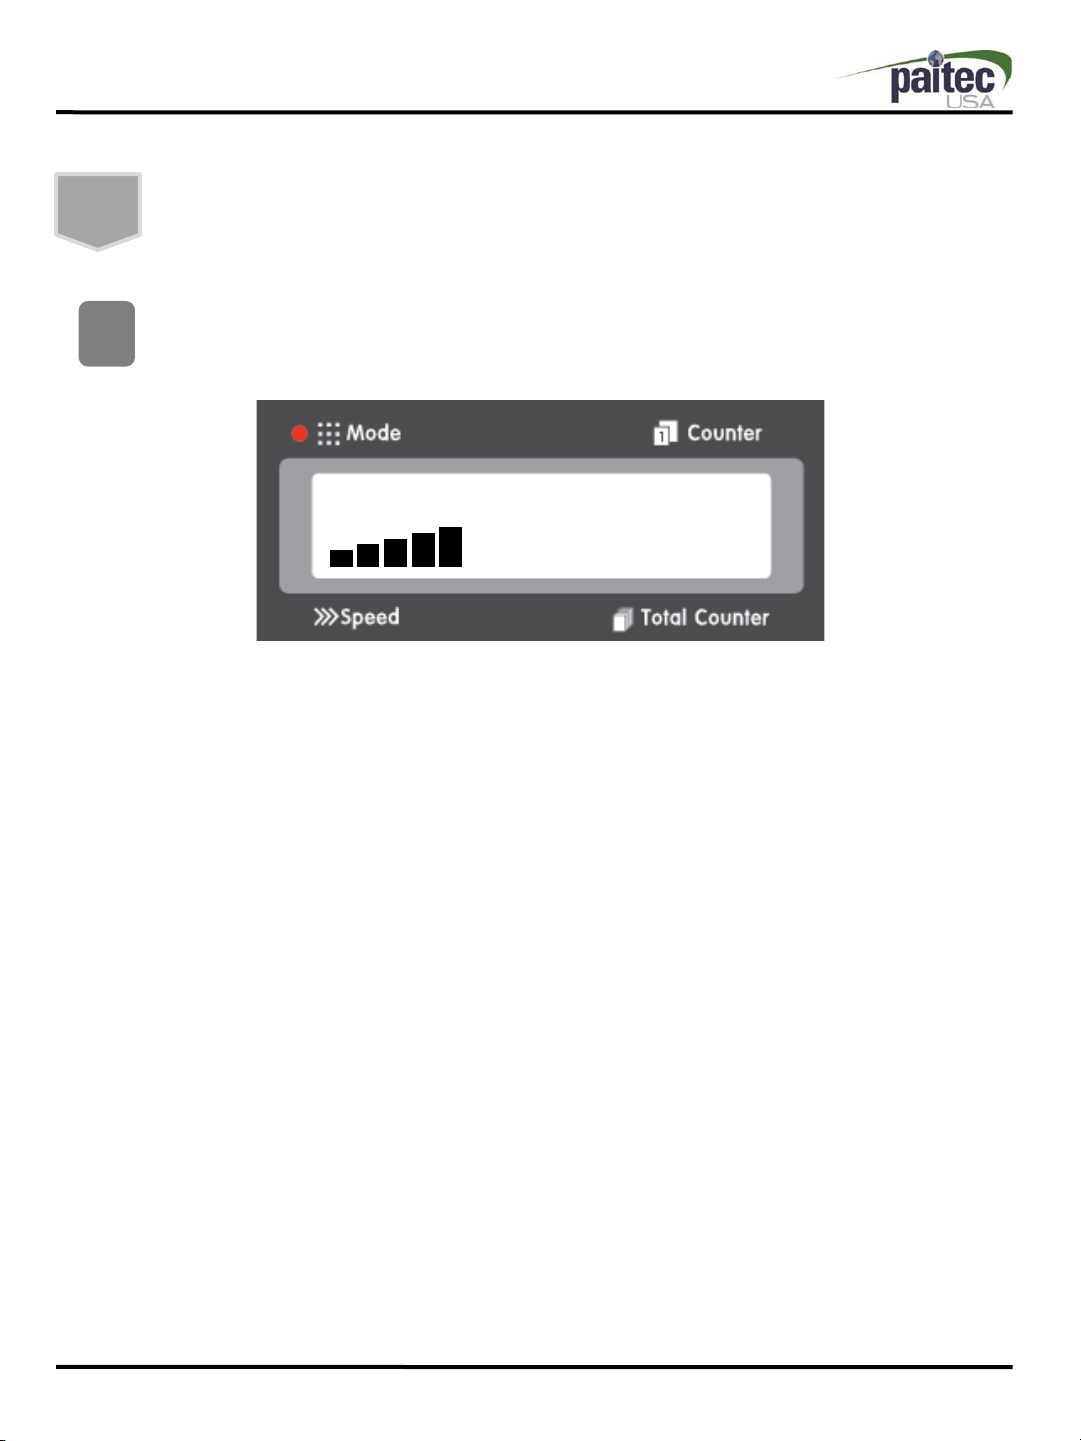
Operation
OP Panel
Ready 10
9K 1240
①Mode: Machine setting and working condition.
②Speed: Variable speed (adjustable, 6K / 7K / 8K / 9K)
③Counter: Counter of current job.
④Total Counter: Counter of total operation.
OP Panel Display
1

User Manual ES8500
Ver. 01
9
①Start / Stop: Start & stop the machine. If you press during setting, it returns to the prior condition
*Press the button while Feed Table is moving up & down, the Feed Table stops at current position.
②Set: Sets and stores the selected function.
③Printer Inline: Activate / deactivate Inline function.
*To use Inline operation, you need inline kit (optional) & compatible printer.
④Batch Counter: Enables you to set the number of forms that you wish to process.
⑤Speed (◀▶): Selects yes/no or increase/decrease numerical value when you set.
⑥Reset Counter: Clears the count on the display.
⑦Thickness: Protects the double or multiple feeding.
⑧Jam Free: Reverse rollers for manually remove of paper jam at folding roller or press roller.
*Also aggregates conveyor output
⑨Auto Start: Re-starts the process after selected time when the job reaches preset count.
⑩Manual Feed: Use for single-sheet operation manually.
Operation
OP Panel
OP Panel Functions
2
User Manual ES8500
Ver. 01
Paper Loading
10
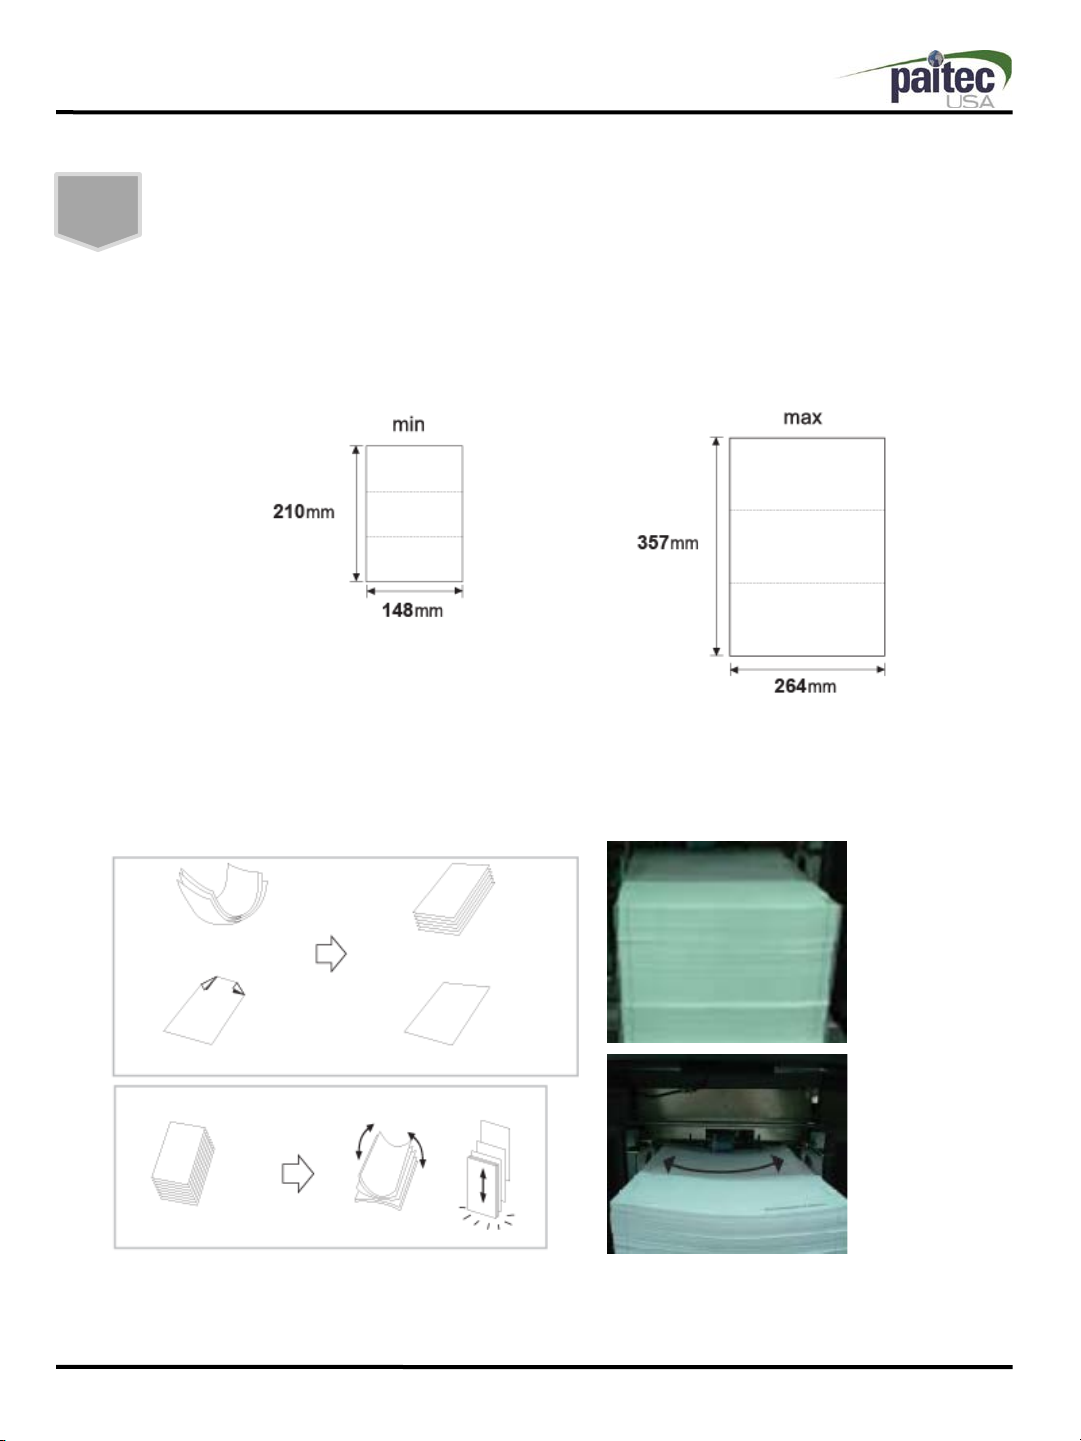
Paper Size
ES8500 handles any form that is larger or smaller than the following forms.
Paper Feeding
1. Before loading the forms onto the machine, please make sure all forms are
aligned and fanned. Please refer to the images below.
If the condition of forms are not good as the picture above (Bad), place
appropriate quantity of forms, unless forms will be jammed.
Good
Bad
Operation

User Manual ES8500
Ver. 01
11
2. Open the safety cover of the feeding unit. The tray will go down.
3. When the feed tray is down to the bottom, loosen the green knobs on both
paper guides.
4. Load the aligned forms onto the feed tray and adjust the paper guides so they
are gently covering the sides of the stacked forms.
5. Tighten back the green knobs on both paper guides.
6. Once loading is complete, please close the safety cover. The feed tray will go up.
Paper Loading
Operation
Make sure the paper guides are not set narrower or wider than the
width of the paper.
Poor quality forms may cause frequent paper jams.
User Manual ES8500
Ver. 01
12
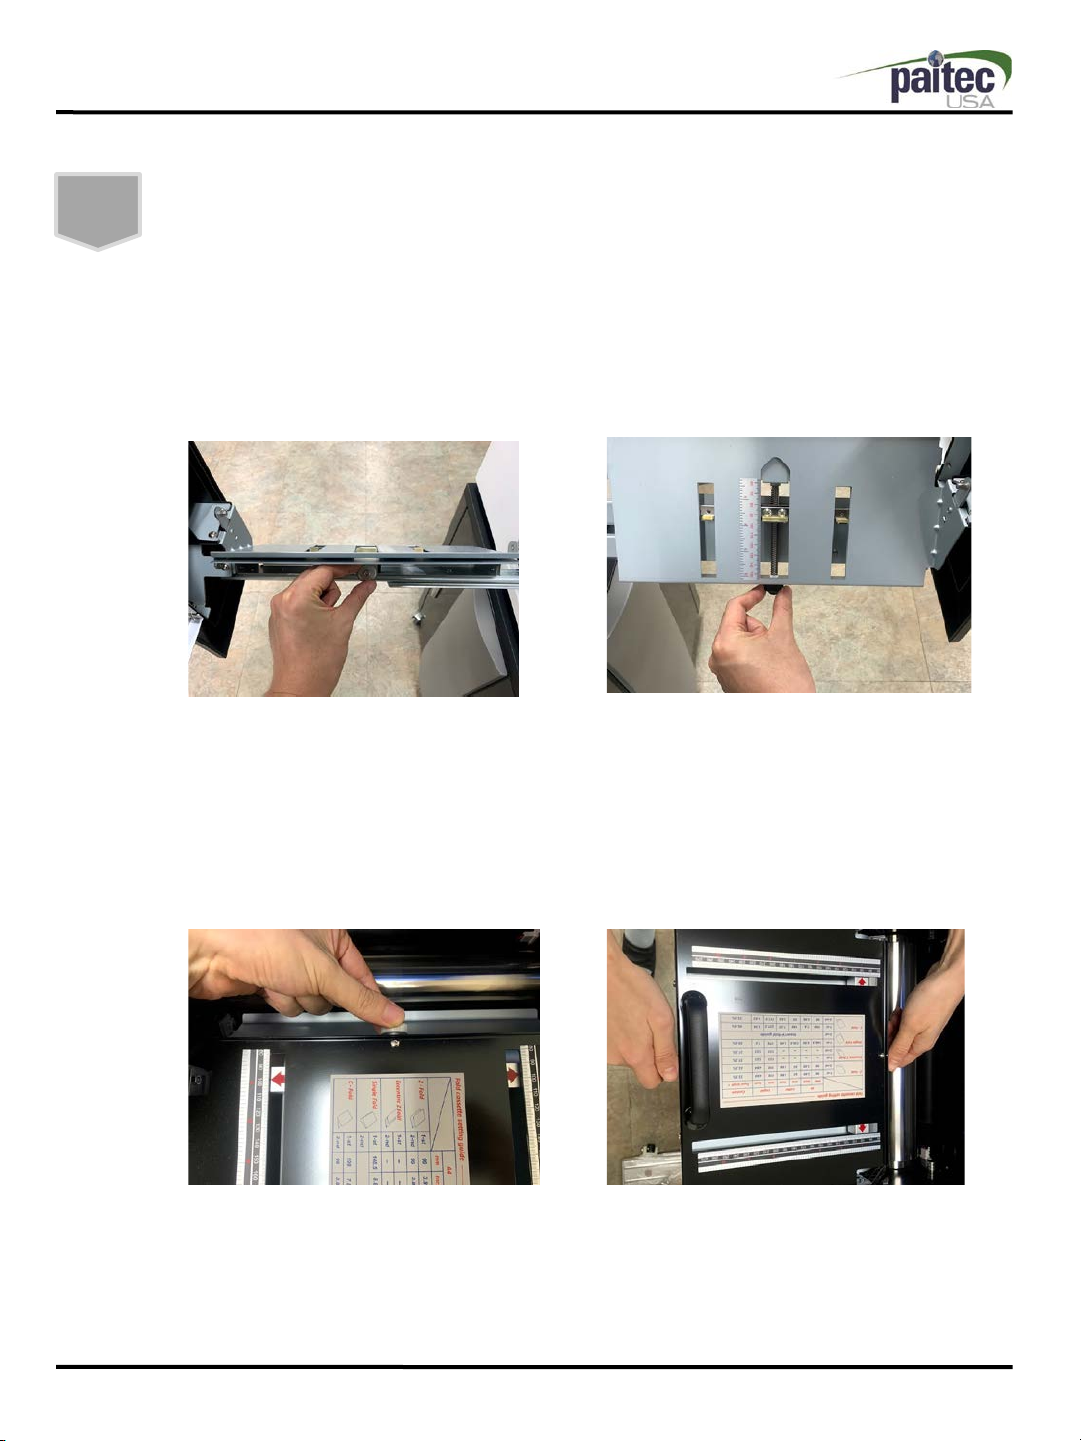
Setting of Paper and Folding Type
The following instruction shows how to set 8 ½” x 11” size Z-Fold.
(Note: Please be noted that the position marker doesn’t guarantee 100% positioning)
1. Lower Cassette Fold Setting - 93mm
1) Unlock the fold position of the lower cassette by turning the stopper locking
knob counter clockwise.
2) Adjust the stopper so the surface of the rubber is lined up at 93mm.
3) Lock the stopper by holding the stopper adjustment knob and turning the
stopper locking knob clockwise.
2. Upper Cassette Fold Setting - 93mm
1) Unlock the fold position of the upper cassette by turning the stopper locking
knob counter clockwise.
2) Adjust the stopper so the red marker is lined up at 93mm..
3) Lock the stopper by holding the stopper adjustment knob and turning the
stopper locking knob clockwise.
Fold Type Setting
Operation
User Manual ES8500
Ver. 01
13
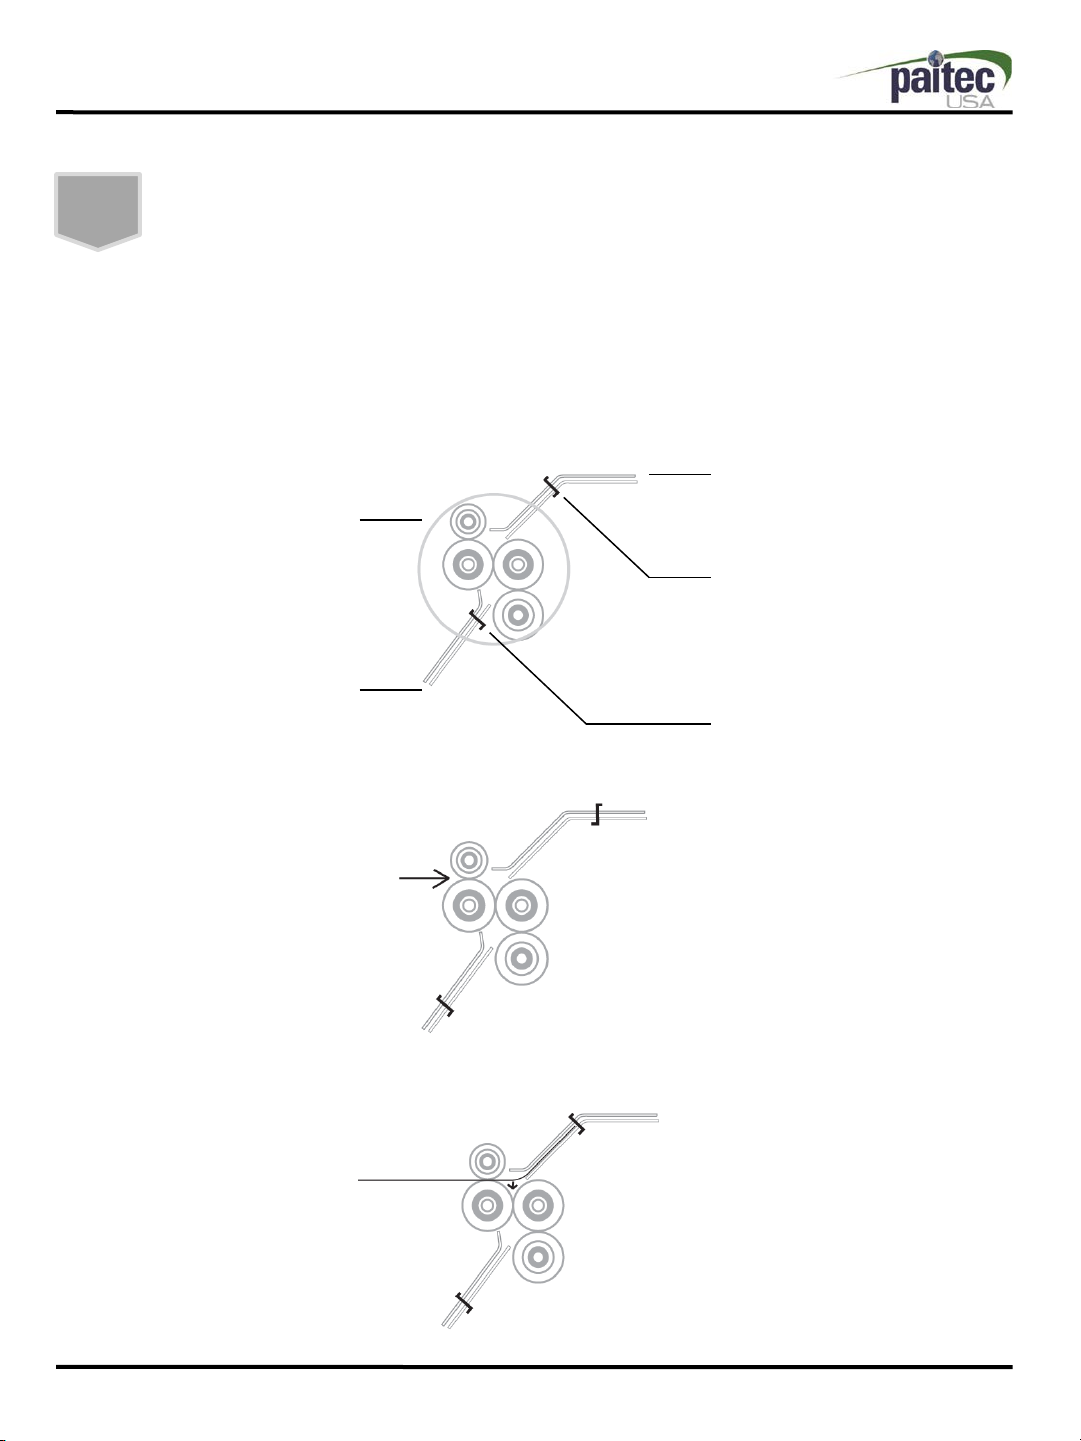
It is important to understand how ES8500 folds paper in order to accurately set
the fold setting. Please read the following information carefully to fully
understand the folding mechanism of ES8500.
1. The folding unit is composed of rollers, cassettes and stoppers.
2. The form enters in between the two front fold rollers.
3. The form hits the upper cassette stopper and buckles in the middle. Then the
folded portion enters in between the middle two rollers.
Upper Cassette Stopper
Upper Cassette
Lower Cassette Stopper
Fold Rollers
Lower Cassette
Understanding Folding Mechanism
Operation
User Manual ES8500
Ver. 01
14
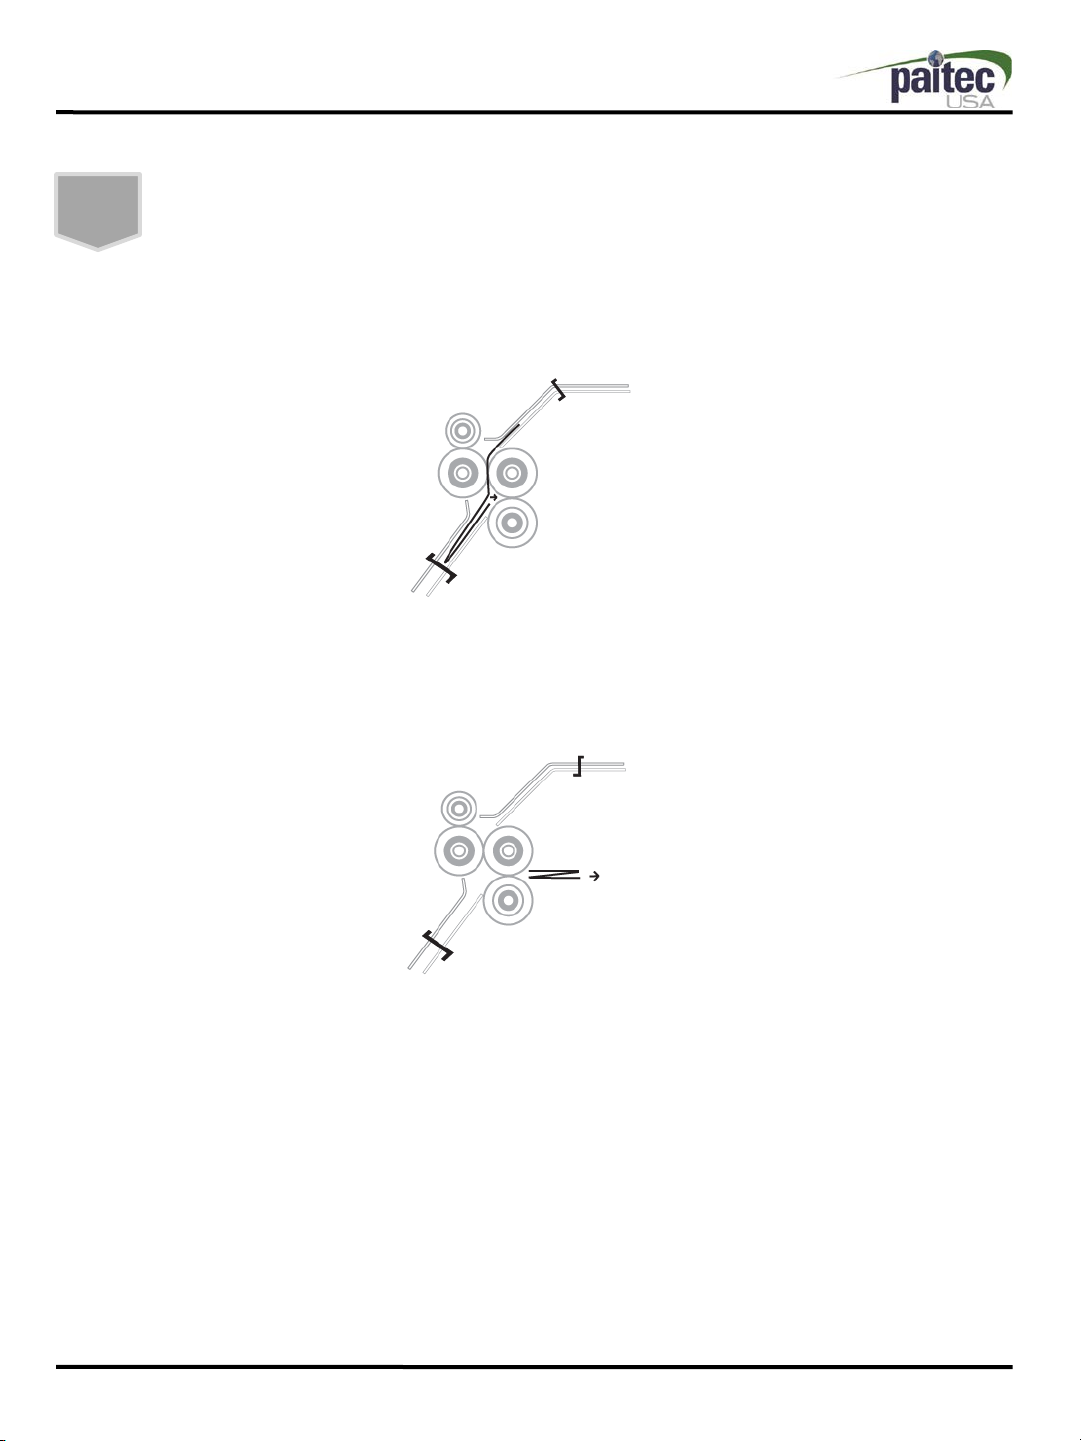
4. The form hits the lower cassette stopper and forms a buckle. The folded form then
enters in between the two outer rollers.
5. The folded form then exits the fold rollers and then are sent to the press unit.
Operation
Understanding Folding Mechanism

User Manual ES8500
Ver. 01
15
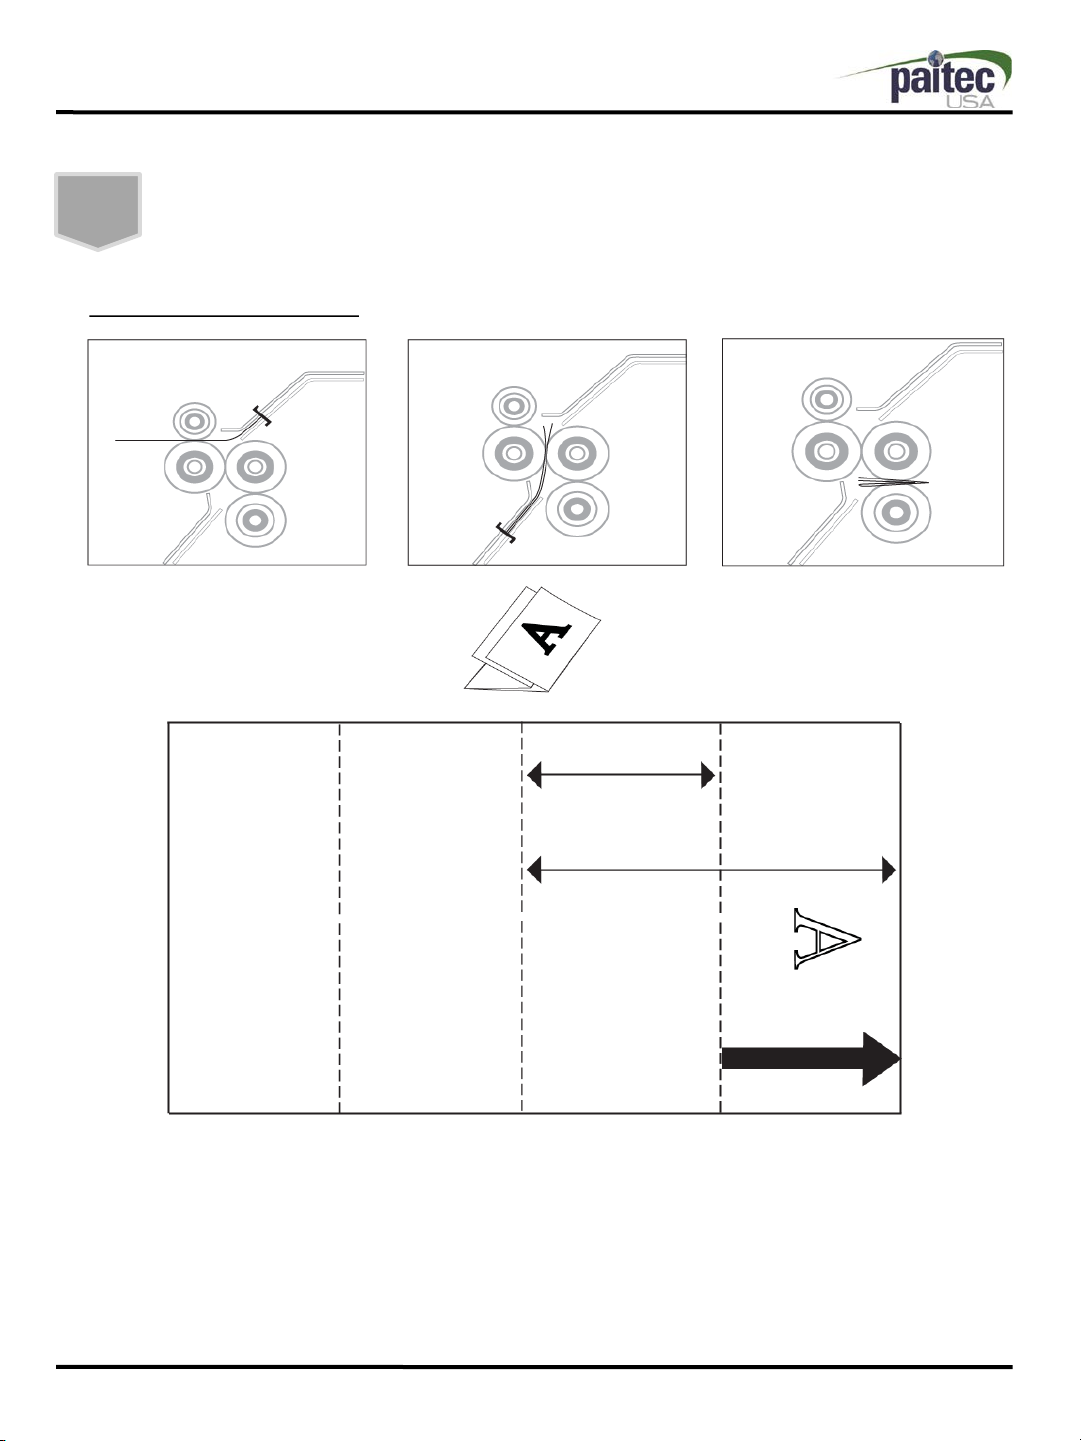
Z-Fold Setting
StopperLower Cassette
In-feed
Direction
Paper
Upper Cassette
①②③
Second Fold
(Lower Cassette)
First Fold
(Upper Cassette)
In-feed Direction
When setting a Z-Fold, please read the following steps.
1. Measure the length from line 1 to line 2 of the form as indicated in the image above.
That measurement is the fold setting for the first (upper fold cassette) fold.
2. Measure the length from line 2 to line 3 of the form as indicated in the image above.
That measurement is the fold setting for the second (lower fold cassette) fold.
Operation
Understanding Folding Mechanism

User Manual ES8500
Ver. 01
16
V-Fold Setting
V-fold Guide
①②
First Fold
(Upper Cassette)
In-feed Direction
When setting a V-Fold, please read the following steps.
1. Measure the length from line 1 to line 2 of the form as indicated in the image above.
That measurement is the fold setting for the first (upper cassette) fold.
2. Make sure the V-fold guide is placed at the entrance of the lower cassette.
Operation
Understanding Folding Mechanism

User Manual ES8500
Ver. 01
17
C-Fold Setting
①
In-feed Direction
When setting a C-Fold, please read the following steps.
1. Measure the length from line 1 to line 3 of the form as indicated in the image above.
That measurement is the fold setting for the first (upper cassette) fold.
2. Measure the length from line 3 to line 2 of the form as indicated in the image above.
That measurement is the fold setting for the second (lower cassette) fold.
②③
Second Fold
(Lower Cassette)
First Fold
(Upper Cassette)
Operation
Understanding Folding Mechanism
User Manual ES8500
Ver. 01
18
Double-Fold Setting
①
In-feed Direction
When setting a Double-Fold, please read the following steps.
1. Measure the length from line 1 to line 3 of the form as indicated in the image above.
That measurement is the fold setting for the first (upper cassette) fold.
2. Measure the length from line 3 to line 2 of the form as indicated in the image above.
That measurement is the fold setting for the second (lower cassette) fold.
②③
Second Fold
(Lower Cassette)
First Fold
(Upper Cassette)
Operation
Understanding Folding Mechanism

User Manual ES8500
Ver. 01
19
Window-Fold Setting
①
In-feed Direction
When setting a Window-Fold, please read the following steps.
1. Measure the length from line 1 to line 4 of the form as indicated in the image above.
That measurement is the fold setting for the first (upper cassette) fold.
2. Measure the length from line 4 to line 2 of the form as indicated in the image above.
That measurement is the fold setting for the second (lower cassette) fold.
②③
Second Fold
(Lower Cassette)
First Fold
(Upper Cassette)
④
Operation
Understanding Folding Mechanism
Table of contents
Other Paitec Food Saver manuals

Paitec
Paitec MX11500 User manual

Paitec
Paitec ES5500 User manual

Paitec
Paitec MX11000 User manual

Paitec
Paitec MX17000 User manual

Paitec
Paitec IM8100 User manual

Paitec
Paitec ES3000 User manual

Paitec
Paitec MX-9000 User manual

Paitec
Paitec MX-13000 User manual

Paitec
Paitec MX-6000 User manual

Paitec
Paitec ES2500 User manual


