manuals.online logo
Brands
  1. Home
  2. •
  3. Brands
  4. •
  5. Panasonic
  6. •
  7. Accessories
  8. •
  9. Panasonic HL-G1 Series User manual

Panasonic HL-G1 Series User manual

1
INSTRUCTION MANUAL
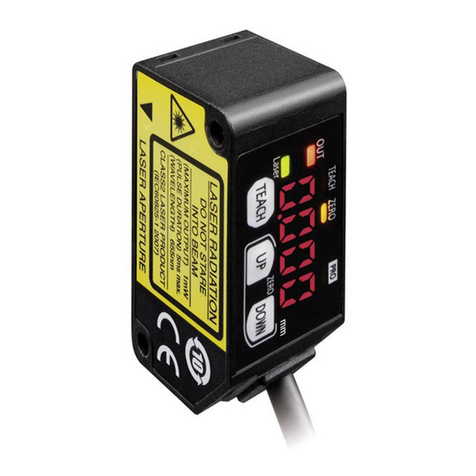
Compact Laser Displacement Sensor
HL-G1 Series
Thank you for purchasing products from Panasonic Electric Works SUNX
Co., Ltd. Please read this Instruction Manual carefully and thoroughly for
the correct and optimum use of this product. Kindly keep this manual in a
convenient place for quick reference.
WARNING
●This product is intended to detect objects. Do not use it to carry out
safety control functions to prevent accidents.
●Never use this product as a sensing device for personnel protection.
●In case of using sensing devices for personnel protection, use prod-
ucts which meet laws and standards, such as OSHA, ANSI or IEC
etc., for personnel protection applicable in each region or country.
●Install a fail-safe device in case the product is being used for pur-
poses that can lead to physical injury or serious damage.
● This product cannot be used in an environment containing inam-
mable or explosive gases.
Before Use
Check the sensor head model and package contents before use.
●Sensor head model
Check the model number on the top of
sensor head.
●Package contents
Check that all of the following items
are included in the package.
- 1 sensor head
- 1 Instruction Manual
- 1 set of laser warning labels
1Overview
This product is a compact laser displacement sensor, incorporating a digital
display and controller functions.
●The standard type has three digital outputs and 1 analog output for
current or voltage.
●The multifunction type additionally incorporates serial communication
functions and can be easily controlled by host devices.
●One out of four measurement distances can be selected for each type
that support both NPN and PNP outputs.
2Cautions for Handling Laser Light
In order to prevent accidents caused by laser products and to protect the
users, IEC, JIS and FDA established the following standards: These stan-
dards classify laser products according to their level of hazard and provide
safety measures for the respective classes.
●IEC: IEC 60825-1-2007 (EN 60825-1-2007)
●JIS: JIS C 6802-2005
●FDA: PART 1040 (PERFORMANCE STANDARDS FOR LIGHT-EMIT-
TING PRODUCTS)
Laser hazard class
Classication according to IEC 60825-1-2007 (JIS C 6802-2005)
Class Model Description of hazardous evaluation
Class 2 HL-G1qq-A-C5
HL-G1qq-S-J
Visible beam, low power. Blink response of
eye affords protection.
Warning label and label position
Installation and operation
●Install the product so that the laser beam is above or below eye level.
●Do not look into the beam directly during operation. A safe distance
from the laser (Nominal Ocular Hazard Distance: NOHD) is approx.
0.4m.
●The laser beam must be terminated at the end of its path by a diffuse
reector or an absorber.
●Please contact Panasonic Electric Works SUNX Co., Ltd. if the system
breaks down. It is not equipped with a function that stops laser radia-
tion automatically when the sensor head is being disassembled.
● Do not use the system in any other manner than specied in this
instruction manual.
3Wiring instructions
WARNING
Turn OFF the power supply before connecting or disconnecting the con-
nectors or performing wiring.
Connections
●When connecting or disconnecting the connectors, hold the connector
area so that no extra force is applied to the cable.
●Do not touch the terminals or to let foreign objects get into the connec-
tors after disconnecting them.
●Do not apply force around the connector of the sensor head cable
or the extension cable. Do not bend the cables near the connectors
because the cables will be disconnected.
●When moving the sensor head during operation, install the cables in
such a way that they do not bend while the sensor head is moving.
Use the multifunction type if bending the cables is inevitable as there
are replaceable extension cables available for this type.
Wiring
●Do not roll up the sensor cable (bundle in parallel) with other wiring.
Keep it at least 100mm away from other wires.
Cables should be separated from high voltage and power circuit lines.
If this is not possible, shield the cable by running it through conductive
material such as grounded electrical conduit.
●Install the product as far away as possible from noise sources such as
high-voltage lines, high-voltage devices, power lines, power device,
machines which generate a large high-voltage ON/OFF surge, welding
machines and inverter motors.
●Do not pull the cable with a force more than 29.4N when wiring the
cable when the sensor head is xed. The cable may be bent with a
radius of 30mm or more. However, do not bend the cable within 20mm
of the sensor head.
20mm min.
R 30mm min.
2
●Make sure that the length of signal and power lines connected to the
product is less than 30m in order to meet the CE marking require-
ments.
●Attach a ferrite core to the head cable as shown.
30mm max.
Warming Up
●Allow the product to warm up for at least 30 minutes after turning on
the power to ensure good performance.
Environment
●Mount the sensor head on an aluminum or steel plate with a minimum
surface area of 200cm2if the ambient temperature is 40°C or higher.
When installing two or more sensor heads in parallel, mount each
sensor head on an aluminum or steel plate with a minimum surface
area of 200cm2and make sure that the ambient temperature does not
exceed 40°C.
●The life of the semiconductor laser depends on the ambient tempera-
ture during use. When using the product near a heat source, take
measures to keep the ambient temperature of the sensor head as low
as possible.
Mount the sensor on a device that allows heat to dissipate because
the sensor itself also generates heat.
●Keep the emitter surface and the receiver surface clean. Prevent light
refractors such as water, oil and ngerprints, and light blockers such
as dust and dirt from contaminating the surface. When cleaning these
parts, wipe them off using a soft lint-free cloth or lens cleaning paper.
●Install the sensor head at a location where external light (such as
sunlight or light which has the same wavelength as the laser beam) do
not enter the receiver. If high accuracy is required, install a light shield
plate or something similar around the sensor head.
●Do not use the product underwater or in the rain. Although the sensor
head has an IP67 degree of protection, the connectors are not dust-
proof, waterproof, or corrosion-resistant.
●Do not use the product in dusty places or in places that are exposed to
ammable or corrosive gases, droplets, direct sunlight, severe vibra-
tion or impacts.
4Part Description
12
3
4
5
6
7
8
9
10
11
12
1. Laser Indicator (LASER)
2. Alarm Indicator (ALARM)
3. OUT1 Indicator (OUT1)
4. OUT2 Indicator (OUT2)
5. OUT3 Indicator (OUT3)
6. [ENTER] Key
7. Digital Display
8. [UP] Key
9. [DOWN] Key
10. Emitter
11. Receiver
12. Warning Label
5Wires
Analog output wires
Name Function Wire color
A (V) Analog voltage output Shielded single conductor Black
AGND Analog ground Shielded single conductor Gray
A (I) Analog current output Black
AGND Analog ground White
I/O terminal wires
Name Function Wire color
OUT1 Judgment output 1 Gray
OUT2 Judgment output 2 Pink
OUT3 Judgment output 3 or alarm output Gray
TM Timing input Pink
MI Multifunction input: Zero set, zero set
OFF, reset, change memory, teach,
save, and laser control
Violet
NP NPN/PNP type switching input Pink/ Violet
+SD Transmission data Twisted-pair
wire
Green*
+SD Transmission data Sky blue*
+RD Reception data Twisted-pair
wire
Orange
−RD Reception data Yellow*
SGND RS422/RS485 shield
+V 24V DC input for power supply Brown
0V Power supply ground Blue
*Wire color as of V1.12
3
6I/O Circuit Diagrams
NPN Type
*1
IN
0V
*1
3.3V
3.3V
OUT1:
TM:
MI:
OUT2:
OUT3:
Non-voltage contact
External connection example
(Brown) +V
(Black)
Load
Load
Load
(Pink/Purple)
NPN/PNP type switching input
(Pink)
(Purple)
(Blue) 0V
Main power supply
24V DC ± 10%
Ripple 0.5 V
(peak-to-peak) included
50mA max.
50mA max.
50mA max.
Lead wire color
(White)
(Gray)
Main circuit
External
power
supply 3 to
24V DC
Sensor head
internal circuit
Output 1
Timing Input
Multiple input
Output 2
Output 3
* Refer to the HL-G1 Series User’s Manual for RS422/RS485 wiring.
PNP Type
*1
*1
IN
0V
IN
0V
External connection example
Lead wire color
Load
Main power supply
24V DC ± 10%
Ripple 0.5V
(peak-to-peak) included
50mA max.
Load
Load
50mA max.
50mA max.
(Pink/Purple) NPN/PNP
type switching input
(Blue) 0V
(Brown) +V
(Black)
(Pink)
(Purple)
(White)
(Gray)
Main circuit
High [5V to 30V DC (inrush current of 0.04mA max.)]: Enabled
Low [0 to 0.6V DC or open]: Disabled
Non-voltage contact or PNP transistor open collector output
or
Output 1
Timing Input
Multiple input
Output 2
Output 3
External
power
supply
5 to 30V DC
Sensor head
internal circuit
OUT1:
TM:
MI:
OUT2:
OUT3:
* Refer to the HL-G1 Series User’s Manual for RS422/RS485 wiring.
4
URL : http://panasonic-electric-works.net/sunx
Overseas Sales Division (Head Office)
2431-1 Ushiyama-cho, Kasugai-shi, Aichi, 486-0901, Japan
Phone: +81-568-33-7861 FAX: +81-568-33-8591
Europe Headquarter: Panasonic Electric Works Europe AG
Rudolf-Diesel-Ring 2, D-83607 Holzkirchen, Germany
Phone: +49-8024-648-0
7Specications
The following measurement conditions apply unless otherwise specied:
●Power voltage: 24V DC
●Ambient temperature: 20°C
● Sampling cycle: 500μs
●Average number of sampling times: 1024 times
●Measurement object: white ceramic
Model No. Standard type HL-G103-A-C5 HL-G105-A-C5 HL-G108-A-C5 HL-G112-A-C5
Multifunction type HL-G103-S-J HL-G105-S-J HL-G108-S-J HL-G112-S-J
Measurement method Diffuse reection
Measurement center distance 30mm 50mm 85mm 120mm
Measuring range ±4mm ±10mm ±20mm ±60mm
Beam source Red semiconductor laser class 2 (JIS/IEC/FDA laser notice No. 50)
Max output: 1mW, Emission peak wavelength: 655nm
Beam dimensions 1 0.1×0.1mm 0.5×1mm 0.75×1.25mm 1.0×1.5mm
Beam receiving element CMOS image sensor
Resolution 0.5μm 1.5μm 2.5μm 8μm
Linearity ±0.1% F.S.
Temperature characteristics ±0.08% F.S./°C
Supply voltage 24V DC ±10% including ripple 0.5V (P-P)
Current consumption 100mA max.
Sampling cycle 200μs, 500μs, 1ms, 2ms
Analog output voltage Output range: 0 to 10.5V (normal), 11V (at alarm)
Output impedance: 100Ω
Analog output current Output range: 3.2 to 20.8mA (normal), 21.6mA (at alarm)
Load impedance: 300Ω max.
OUT1
OUT2
OUT3
Judgment output or alarm output (switchable)
NPN open-collector transistor/PNP open-collector transistor (switchable)
Settings for NPN
●Maximum sink current: 50mA
●Applied voltage: 3 to 24V DC (between output and 0V)
●Residual voltage: 2V max. (at sink current of 50mA)
Settings for PNP
●Maximum source current: 50mA
●Residual voltage: 2.8V max. (at source current of 50mA)
Output operation Open when the output is ON.
Short-circuit protection Incorporated (Auto-reset)
NPN/PNP type switching input At 0V: NPN open-collector output
At supply voltage of 24V DC: PNP open-collector output
Timing input NPN type operation: ON when connecting or connected to 0V (depending on settings)
PNP type operation: ON when connecting or connected to positive terminal of external power supply (depending on settings)
Multifunction input Zero set, Reset, Memory change, Teaching, Save, or Laser control depending on input time.
NPN type operation: Depending on time to connect 0V
PNP type operation: Depending on time to connect positive terminal of external power supply
Communications interface
(multifunction type)
RS422 or RS485
Baud rate: 9,600/19,200/38,400/115,200/230,400/460,800/921,600bps
Data length: 8 bits; stop bit length: 1 bit; parity check: none; BCC: yes; end code: CR
Laser radiation indicator Green LED: ON when laser radiation is being emitted
Alarm indicator Orange LED: ON when measurement is disabled due to insufcient amount of light
Output indicator Yellow LED (No. of indicators: 3): ON during output
Digital display Red LED for sign and 5-digit display
Degree of protection IP67 (except connector)
Pollution degree 2
Insulation resistance 20MΩ min. at 250V DC megger (between charged parts and casing)
Dielectric withstand Endurance: 10 to 55Hz (at 1-minute cycle), 1.5mm double-amplitude
Vibration resistance 1000V AC for 1 min. (between charged parts and casing)
Shock resistance 500m/s2three times each in X, Y, and Z directions
Ambient illumination 2 3,000lx max. (illumination level of light receiving surface under incandescent light)
Ambient temperature -10°C to 45°C (No dew condensation or icing allowed);
At storage: -20°C to 60°C
Ambient humidity 35% to 85%RH, At storage: 35% to 85%RH
Altitude 2000m or less above sea level
Material Casing: PBT, front cover: acrylic, cable: PVC
Cable length Standard type: 5m; multifunction type: 0.5m
Cable extension Multifunction type: extendable to 20m with an optional extension cable (sold separately)
Weight (standard type) Approx. 70g (without cable), approx. 320g (including cable), and approx. 380g (with packing)
Weight (multifunction type) Approx. 70g (without cable), approx. 110g (including cable), and approx. 160g (with packing)
Accessory Laser warning label: 1 set
Applicable standards Conforming to EMC Directive
1. Inhomogeneous surfaces may reect the laser beam such that the receiver perceives an erroneous shift in light intensity. For more details on beam dimensions, please refer
to the HL-G1 User’s Manual.
2. Variance is ±0.1% F.S. or less depending on the ambient illuminance.

Other manuals for HL-G1 Series

4

This manual suits for next models

8

Other Panasonic Accessories manuals

Panasonic MA3S781D User manual

Panasonic

Panasonic MA3S781D User manual

Panasonic MA2J7290G User manual

Panasonic

Panasonic MA2J7290G User manual

Panasonic MA24F70 User manual

Panasonic

Panasonic MA24F70 User manual

Panasonic MA3J702 User manual

Panasonic

Panasonic MA3J702 User manual

Panasonic ADP5100 User manual

Panasonic

Panasonic ADP5100 User manual

Panasonic Light Emitting Diodes LNJ253W82RA User manual

Panasonic

Panasonic Light Emitting Diodes LNJ253W82RA User manual

Panasonic DP-100 series User manual

Panasonic

Panasonic DP-100 series User manual

Panasonic HG-T Series User manual

Panasonic

Panasonic HG-T Series User manual

Panasonic ET-PNT100 User manual

Panasonic

Panasonic ET-PNT100 User manual

Panasonic MA4ZD03 User manual

Panasonic

Panasonic MA4ZD03 User manual

Panasonic MA2J7280G User manual

Panasonic

Panasonic MA2J7280G User manual

Panasonic MA3X715 (MA715) User manual

Panasonic

Panasonic MA3X715 (MA715) User manual

Panasonic Light Emitting Diodes LNJ414K8YRA User manual

Panasonic

Panasonic Light Emitting Diodes LNJ414K8YRA User manual

Panasonic AK-HCU931 User manual

Panasonic

Panasonic AK-HCU931 User manual

Panasonic MA3S132AG User manual

Panasonic

Panasonic MA3S132AG User manual

Panasonic MIR-H163-PA User manual

Panasonic

Panasonic MIR-H163-PA User manual

Panasonic EF-S1HS User manual

Panasonic

Panasonic EF-S1HS User manual

Panasonic MA2J7040G User manual

Panasonic

Panasonic MA2J7040G User manual

Panasonic MA3X789 (MA789) User manual

Panasonic

Panasonic MA3X789 (MA789) User manual

Panasonic KX-HNS103EX User manual

Panasonic

Panasonic KX-HNS103EX User manual

Panasonic HFQ EE26 User manual

Panasonic

Panasonic HFQ EE26 User manual

Panasonic KX-HNS101 User manual

Panasonic

Panasonic KX-HNS101 User manual

Panasonic WX-LA20 User manual

Panasonic

Panasonic WX-LA20 User manual

Panasonic AY-PB2003 User manual

Panasonic

Panasonic AY-PB2003 User manual

Popular Accessories manuals by other brands

Honeywell FIRE-LITE ALARMS AD365-IV Installation and maintenance instructions

Honeywell

Honeywell FIRE-LITE ALARMS AD365-IV Installation and maintenance instructions

Azbil AUD100 Series user manual

Azbil

Azbil AUD100 Series user manual

Tunstall Fall Detector Instructions for use

Tunstall

Tunstall Fall Detector Instructions for use

Radio Bridge RBS301-AL-US user guide

Radio Bridge

Radio Bridge RBS301-AL-US user guide

Vega VEGAFLEX 81 Quick setup guide

Vega

Vega VEGAFLEX 81 Quick setup guide

Seifert SlimLine Pro KG 8503 instruction manual

Seifert

Seifert SlimLine Pro KG 8503 instruction manual

PCB Piezotronics 138A01 Installation and operating manual

PCB Piezotronics

PCB Piezotronics 138A01 Installation and operating manual

Di-soric LVHT 51 M 400 G3-B4 manual

Di-soric

Di-soric LVHT 51 M 400 G3-B4 manual

AT&T PBC10-SLV user manual

AT&T

AT&T PBC10-SLV user manual

PI D-510 user manual

PI

PI D-510 user manual

PCB Piezotronics IMI SENSORS 640A10 Installation and operating manual

PCB Piezotronics

PCB Piezotronics IMI SENSORS 640A10 Installation and operating manual

Lafferty 976260-24V Installation & operation instructions

Lafferty

Lafferty 976260-24V Installation & operation instructions

Aquaglide Rockit JR owner's manual

Aquaglide

Aquaglide Rockit JR owner's manual

APG RPM Series Operator's manual

APG

APG RPM Series Operator's manual

Rebel URZ3454 quick start guide

Rebel

Rebel URZ3454 quick start guide

SICK PL240DG-H Mounting instructions

SICK

SICK PL240DG-H Mounting instructions

Leuze BPS 8 SM 102 Original operating instructions

Leuze

Leuze BPS 8 SM 102 Original operating instructions

Cole Parmer SI-200 Series instruction manual

Cole Parmer

Cole Parmer SI-200 Series instruction manual

manuals.online logo
manuals.online logoBrands
  • About & Mission
  • Contact us
  • Privacy Policy
  • Terms and Conditions

Copyright 2025 Manuals.Online. All Rights Reserved.