Panda Vending AS1840 User manual

TABLE OF CONTENTS
Version: 1.25 Time: 2014-9-29
SAFTTY INSTRUCTIONS.................................................................................................................. 1
INTRODUCTION.................................................................................................................................. 2
PACKAGING................................................................................................................................... 2
ACCERSSORIES ............................................................................................................................ 2
TECHNICAL PARAMETERS ........................................................................................................ 2
LOCATION REQUIREMENTS...................................................................................................... 2
PLAYING INSTRUCTIONS................................................................................................................ 3
METERS................................................................................................................................................ 3
COIN MECH METER..................................................................................................................... 3
PRIZE METER................................................................................................................................ 3
OPERATION......................................................................................................................................... 4
TURN ON THE POWER ................................................................................................................ 4
GAME PLAY MODE ...................................................................................................................... 4
ATTRACT MODE........................................................................................................................... 4
TEST MODE ................................................................................................................................... 4
ERROR MODE................................................................................................................................ 5
PRIZE OUT MODE......................................................................................................................... 5
Parameter Setting ................................................................................................................................ 8
Errors and Solutions .......................................................................................................................... 10

32″Gets Extra
1
SAFTTY INSTRUCTIONS
* WARNING! *
BEFORE SETTING UP THE GAME, PLEASE READ THE FOLLOWING INSTRUCTIONS.
* WARNING! *
FAILURE TO FOLLOW THESE DIRECTIONS COULD CAUSE DAMAGE TO THE GAME.
NOTICE FOR INSTALLATION
This machine is for indoor use, is not suitable for outdoor use.
After the machine was completely set up, please make sure that the machine is securely and
safely placed on the floor.
Do not assemble or disassemble the game. or move the game without careful instructions.
Switch off the power and pull out the plug before moving the machine.
Place the game on flat floor. Do not put it on unsteady or vibrating location.
Do not place the game near equipment or areas that are humid, inflammable or of high
temperature.
Do not place any heavy equipment on the top of the machine, or on top of the power cord.
Do not expose the circuit part in the machine to the air for a long time.
NOTICE FOR OPERATION
Before plugging in or turning on the machine, please check if the power plug and power
cord are in good conditions, and check if the voltage is set to the proper voltage that is
suitable for your country.
Turn off the power before you check or inspect the machine.
Only qualified technicians are allowed to perform checking or maintenance of the game.
Suitable accessories and technical parts should be used for parts replacement
Hold the plug (not the wire) to remove the power cord from the wall outlet.
Do not plug or unplug the game with wet hand.
Do not pull or twist the power wire and fuses.

32″Gets Extra
2
INTRODUCTION
32″Gets Extra is a new version of indoor prize machine. This machine is simple to play, with brilliant
cabinet design built of high quality materials. Gets Extra is a game that Every Family Entertainment
Center should not miss!
PACKAGING
During delivery, the machine should be handled with care. Use a Forklift to deliver the packaged machine.
Be careful not to hit the machine by heavy equipment. This may cause damage to the machine.
ACCERSSORIES
Check whether the machine is packed with the following Accessories:
TECHNICAL PARAMETERS
Mode: LP.LLXDZ05
Dimension: 770*880*1840mm
Weight: 130KG
Power supply: see the back cover of the machine.
Maximum power: 130W/220V
Location requirements
LOCATION REQUIREMENTS
Indoor temperature: between from 5℃and 40℃.
Indoor humidity: low
U.V. radiation: Very low
Vibrations level: low
Accessories Quantity Remarks
Operation Manual 1
Keys 5
2*1888
1*1866 Glass Door Key*2
Power Cord 1
String for the Claw Carriage 2*1.1m

32″Gets Extra
3
PLAYING INSTRUCTIONS
1. Insert coin. After the proper number of credits is achieved, the game will enter into play mode (eg.
Default setting is 1 coin/token for every game. So, if 1 coin/token is inserted, then the game will start. If
the setting is 2 coins/tokens for each game, then the player needs to insert 2 coins / tokens to start the
game.) . The LCD on the console will show the credits and the playtime.
2. Normal mode: Within the play time limit, move the joystick to control the position of the claw. Move the
claw to your target. Press the Catch button to catch the prize. If the claw catches the prize, the prize will
come out through the prize door. Game over when the crane returns the original position.
3. Vending mode ***: within the play time limit, move the joystick to control the position of the claw. Move
the claw to your target. Press the Catch button to catch the prize. Game will end only when the player
wins a toy/prize successfully. Otherwise, when the number of games played is equal to the max number
of game play.
Note: The setting of payout ratio of the game does not work in vending mode***. And the voltage of claw
always be at the Strong state so that the player can finally win a prize in vending mode***, so please
attention to the claw and prize sensor.
METERS
COIN MECH METER
The no. shown on theCoin Mech will increase by one for every coin inserted in this electronic coin
mechanism. This coin Mech has the function of “Continuous Play”. When the number of coins inserted
reaches a certain level (Please see the details in the “SETTING” section), then the player is awarded a
FREE game play. The LCD will show”+1” and there will also be a BONUS sound.
ATTENTION: The Time Interval between inserting the second coin after the first coin should be within 3
seconds. If the second coin inserted is more than 3 seconds after the first coin is inserted, then it will not
be regarded as continuous play.
PRIZE METER
The no. shown on the Prize Meter will increase by one when a prize is given out.

32″Gets Extra
4
OPERATION
This game has two adjustable play modes. One is the free play mode, and the other one is coin play
mode. When the machine is in free play mode, after pressing the reset button, no coin is required to start
the game. The machine will be in play mode continuously. When the machine is in coin play mode, it can
be in one of the following six modes: 1) Attract Mode, 2) Test Mode , 3) Claw Carriage Test Mode, 4)
Game Play Mode, 5) Error state, 6) Prize-Out Mode. Please refer to the Flow Chart below for details:
TURN ON THE POWER
Before turning on the power, please check the plug and cord, and make sure that the game is set to the
proper voltage.
GAME PLAY MODE
When the Game is started, the LCD on the console display the time and credit the player has. There is
also MUSIC going with this.
ATTRACT MODE
In ATTRACT MODE, Press the “MENU” button on the KEYPAD and the game will enter into TEST MODE.
Insert Coin, and the machine will enter into GAME PLAY MODE.
TEST MODE
Test whether whether the lights, claw carriage and music are normal. When machine is in ATTRACT
MODE, press the “MENU” button, music will stop and the game will enter into “TEST MODE”.
Test completed
System Error
Game ends
Insert coin
Press Menu button to
starttesting
PressRese
t
butto
n
o
n
mai
n
boardafterclearing the error
System Error
Play Mode
Turn on Power
Attract Mode
Test Mode Error Mode

32″Gets Extra
5
ERROR MODE
During the game play, whenever there is ERROR, the system will enter into ERROR MODE.
PRIZE OUT MODE
If a prize is given out, music “PRIZE-OUT” will be activiated. The NO. displayed on the Prize meter will
also increase by one.
CPU Wiring Pin Out
Plug NO Pin NO Wire color Function I/O
CODE Function of I/O
J1
PIN 1 0.3-Brown Speaker + -----
PIN 2 0.3-White Speaker - -----
PIN 3 0.3-Blue +12V Input -----
PIN 4 0.3-Blue +12V Input -----
PIN 5 0.3-Yellow +12V Input -----
PIN 6 0.3-Yellow +12V Output -----
PIN 7
PIN 8 0.3-Yellow +12V Output -----
PIN 9
PIN 10 0.3-Yellow +12V Output -----
PIN 11 0.3-Green RED LED DRIVE -----
PIN 12 0.3-Yellow +12V Output -----
PIN 13 0.3-White GREEN LED DRIVE -----
PIN 14 0.3-Yellow +12V Output -----
PIN 15 0.3-Brown BLUE LED DRIVE -----
PIN 16 0.3-Yellow +12V Output -----
PIN 17 0.3-Pink RED LED DRIVE ----- LED Stripe (Red)
PIN 18 0.3-Yellow +12V Output -----
PIN 19 0.3-Green GREEN LED DRIVE ----- LED Stripe (Green)
PIN 20 0.3-Yellow +12V Output -----
PIN 21 0.3-Blue BLUE LED DRIVE ----- LED Stripe (Blue)
PIN 22 0.3-Black GND -----
PIN 23 0.3-Black GND -----
PIN 24 0.3-Black GND -----
PIN 25 0.3-Black CLAW GND ----- GND
PIN 26 0.3-Black GND -----
PIN 27 0.3-Brown Output OUT0 Coin Counter

32″Gets Extra
6
PIN 28 0.3-Pink Output OUT1 Prize Counter
PIN 29 0.3-Orange Output OUT2
PIN 30 0.3-SkyBlue Output OUT3 Catch Button Indicator
PIN 31 0.3-Green Output OUT4 Joystick Indicator
PIN 32 0.3-Blue Output OUT5
PIN 33 0.3-Purple Output OUT6 GSM Control
PIN 34 0.3-Gray Output OUT7
PIN 35 0.3-Brown Output Forward & Backward
Motor+
PIN 36 0.3-Pink Output Forward & Backward
Motor -
PIN 37 0.3-Orange Output Leftward & Rightward
Motor+
PIN 38 0.3-SkyBlue Output Leftward & Rightward
Motor-
PIN 39 0.3-Green Output Upward & Downward
Motor+
PIN 40 0.3-Blue Output Upward & Downward
Motor-
PIN 41
PIN 42
PIN 43 0.3-Blue Claw Output+ ----- Claw Strength Output+
PIN 44 0.3-Pink Claw Output- ----- Claw Strength Output-
PIN 45 0.3-Black Claw GND -----
PIN 46
PIN 47 0.3-Blue +48V Input ----- +48V
PIN 48 0.3-Blue +48V Input -----
PIN 49
PIN 50
J2
PIN 1 0.3-Brown TTL output ----- Keyboard clock output
PIN 2 0.3-Pink TTL output ----- LCD command/data select
output
PIN 3 0.3-Orange TTL output ----- LCD chip select output
PIN 4 0.3-SkyBlue TTL output ----- LCD reset output control
PIN 5 0.3-Purple TTL input SPI_MISO (0---+5V) ----- keyboard input
PIN 6 0.3-Brown TTL output SPI_LATCH (0---+5V) ----- Keyboard latch output
PIN 7 0.3-White TTL output SPI_MOSI (0---+5V) ----- LCD data output
PIN 8 0.3-Green TTL output SPI_CLK (0---+5V) ----- LCD clock output
PIN 9 0.3-Purple RS232 TX(PIN3) ----- GSM RX
PIN 10 0.3-Green TTL (TXD) -----
PIN 11 0.3-Gray RS232 RX(PIN2) ----- GSM TX
PIN 12 0.3-Blue TTL (RXD) -----
PIN 13 0.3-Brown/white Input IN0 Coin sensor

32″Gets Extra
7
PIN 14 0.3-Red/white Input IN1 Prize Sensor
PIN 15 0.3-Orange/white Input IN2
PIN 16 0.3-Yellow/white Input IN3
PIN 17 0.3-Green/white Input IN4
PIN 18 0.3-Blue/white Input IN5
PIN 19 0.3-Purple/white Input IN6
PIN 20 0.3-Gray/white Input IN7
PIN 21 0.3-Brown/white Input IN8 JoyStick Move Front
PIN 22 0.3-Red/white Input IN9 JoyStick Move Rear
PIN 23 0.3-Orange/white Input IN10 JoyStick Move Left
PIN 24 0.3-Yellow/white Input IN11 JoyStick Move Right
PIN 25 0.3-Green/white Input IN12 Front Limit Switch
PIN 26 0.3-Blue/white Input IN13 RearLimit Switch
PIN 27 0.3-Purple/white Input IN14 Left Limit Switch
PIN 28 0.3-Gray/white Input IN15 Right Limit Switch
PIN 29 0.3-Brown/white Input IN16 Top Limit Switch
PIN 30 0.3-Red/white Input IN17 Bottom Limit Switch
PIN 31 0.3-Orange/white Input IN18
PIN 32 0.3-Yellow/white Input IN19
PIN 33 0.3-Green/white Input IN20
PIN 34 0.3-Blue/white Input IN21
PIN 35 0.3-Purple/white Input IN22
PIN 36 0.3-Gray/white Input IN23
PIN 37 0.3-Brown Output OUT8
PIN 38 0.3-Pink Output OUT9
PIN 39 0.3-Orange Output OUT10
PIN 40 0.3-SkyBlue Output OUT11
PIN 41 0.3-Green Output OUT12
PIN 42 0.3-Blue Output OUT13
PIN 43 0.3-Purple Output OUT14
PIN 44 0.3-Gray Output OUT15
PIN 45 0.3-White +3.3V Output ----- LCD POWER INPUT
PIN 46 0.3-Black GND -----
PIN 47 0.3-Red +5V Output ----- KEYPAD POWER INPUT
PIN 48 0.3-Black GND -----
PIN 49 0.3-Red +5V Output -----
PIN 50 0.3-Black GND -----

32″Gets Extra
8
6. Parameter Setting:
Use the Keypad, press CLEAR, clear parameter (only clear the current coins and Balls. but
Total Coins QTY, Toatal prize out QTY,Total Balls and other parameters not change) and alarm
fault information.
Remarks: If the actual fault has not been solved out, the alarm will ring again.
Remarks: if DATA ERROR is occur,System is locked.User must send the board to
Manufacturer for check or press CLEAR,if press CLEAR,System will restore default
Setting,Total Coins QTY, Toatal prize out QTY,Total Balls will be Clear.
In attract state, press MODE and enter password(press UP or DOWN to change Value,press
VOL+ or VOL- to change position) will enter test state, press MODE again will exit;Enter
Enquire Password(Default Value is 000000),user can enquire system information.
Enter Super Password(Default Value is 123456),user can enquire or modify system setting
and change password. If Enter incorrect password over 3 times,System will be locked and
display error message.
In test state, press ENTER enter next menu, press EXIT return to previous menu.
When choose the menu press DOWN to choose next menu and press UP choose previous
menu, during the parameter setting, press DOWN reduce the option value, press UP increase
the option value.
In attract state, press EXIT Once,User can get a free play. No Prize out and on ball out for free
play mode.
In attract state,Press ENTER display current volume, press VOL+ increase volume, press
VOL- decrease VOL-.
In attract state,Press DOWN increase LCD Screen contrast, press UP decrease LCD Screen
Contrast.
Menu display:
(1). System info (can not be changed)
At current menu, press ENTER into the next menu, display screen shows as below.
Serial Number
Software Vers
Date of MFG
GameAudits
Selected the first three menu item, press ENTER button, then display shows the
corresponding information.
Selected Game Audits, then enter the next menu, as shown below
Coins QTY: XXXXX
PrizeQTY:XXXXX
BallOut:XXXXX
(1). Coins QTY means the total quantity of coin
(2). Prize QTY means the quantity of prize out
(3). Prize QTY means the quantity of Ball out
.........
Statistical information can’t be clear by CLEAR button, and can only clear by restore factory

32″Gets Extra
9
setting ( from main menu items).
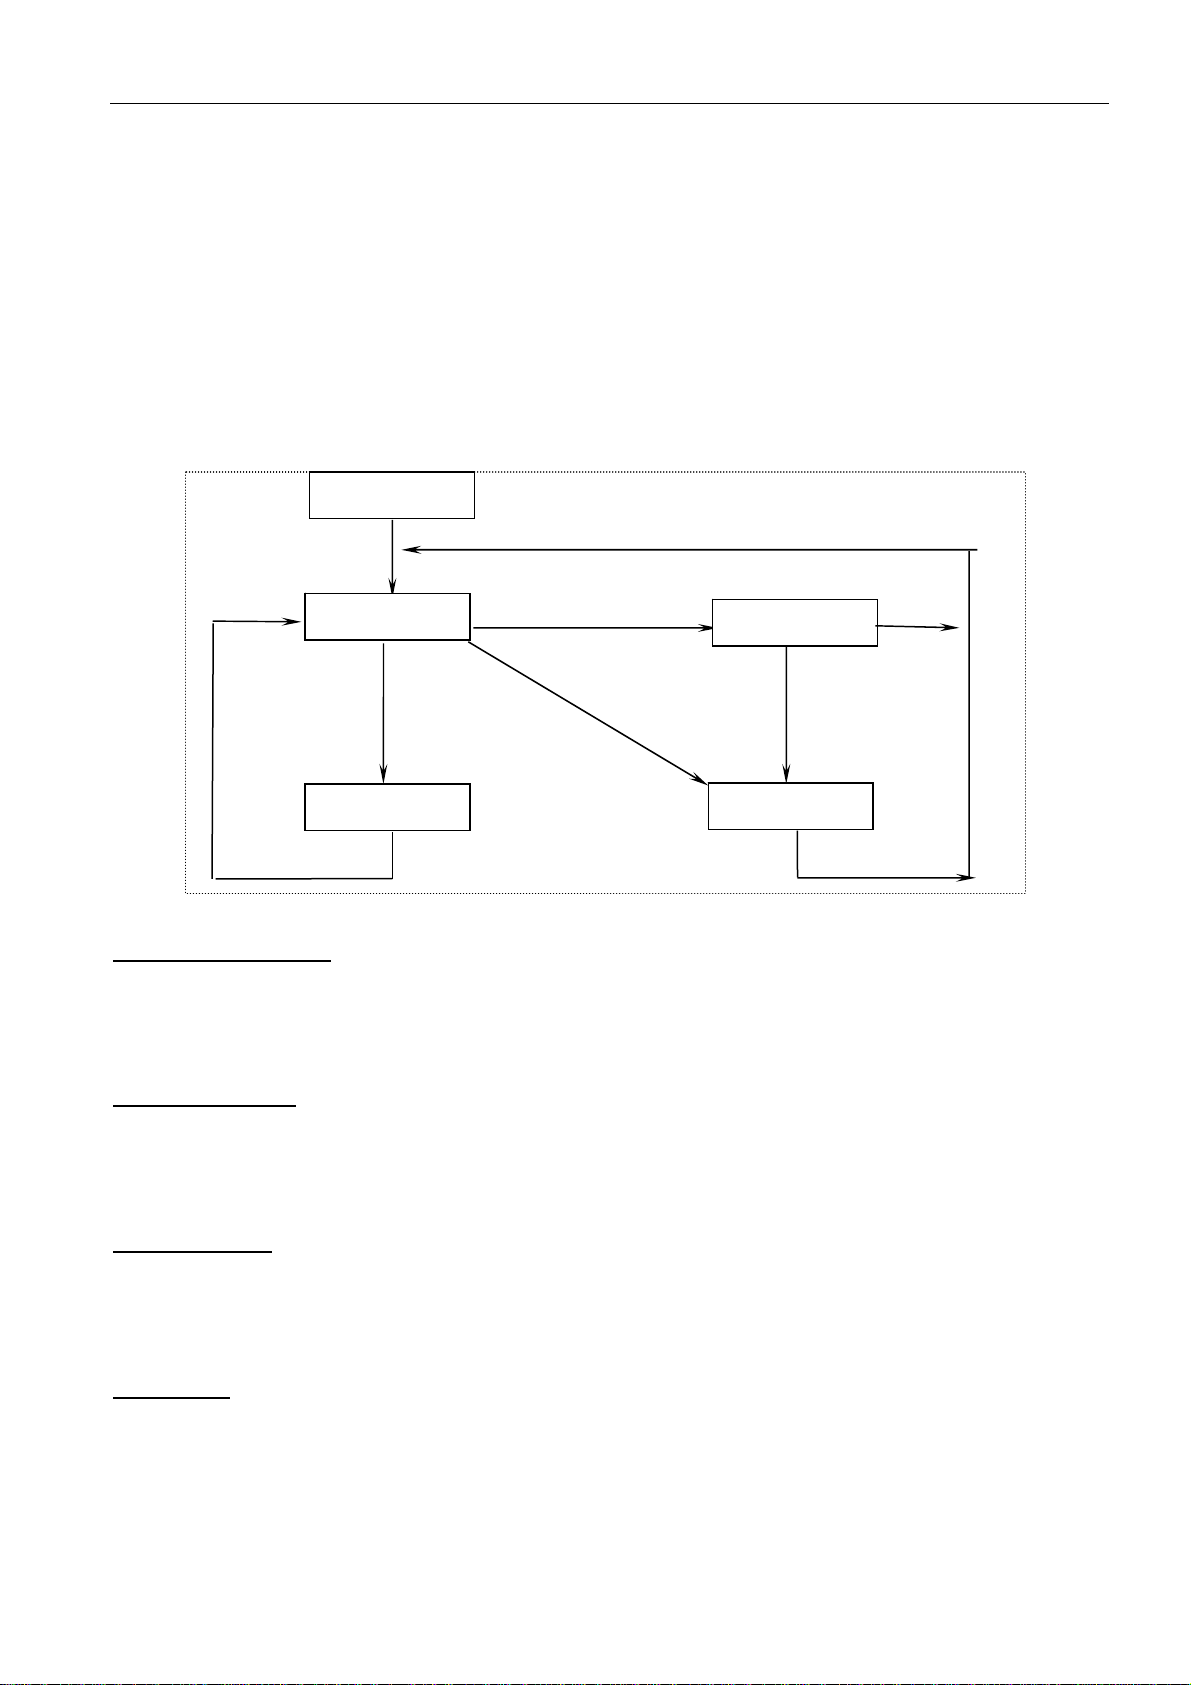
(2). Game Setting
At current menu, press ENTER into the next menu, display screen shows as below.
CoinsPerCredit
AttractMode
Alarm Sound
GameTime
Use the UP or DOWN button to change the data of the menu items.
For example, at attract state, press ENTER into next menu, the first line of display screen
shows Coins Per Credit, and second line shows 2 Coin/Credit, it means insert 2 pcs coin can
play one game. Press Down, then the second line shows 3 Coin/Credit; and shows 1
Coin/Credit by press UP. Press EXIT button to quit, then it will automatically save the
parameters. All parameters can set up in this way.
The following is the description of each menu item:
1. Coin Per Credit (XX Coin/Credit,from 1 to 10)
Machine set 1coin/game, then screen shows 1Coin/Game, it means insert 1 Coin player can
play 1 game. Machine set 10coin/Game, then shows 10Coin/Game, it means play insert 10
Coin can play 1 game.
2. Attract Mode (music sound once each X Minute(from 0 to 10,0 means no attract music)
3. Alarm Sound (from 0 to 600 seconds, 0 means no alarm sound)
4. Game time (from 30 to 90 seconds)
5. Award play needs insert coin(from 1-10,1 means no award play)
6. Avg. Win Ratio (Average XX plays Win one prize,5-250)
7. LCD Screen Adjust (suggest using factory setting, number from 32 to 64)
8、Vending Mode(Enable or Disable)
9、Maximum Catch Times in the Vending mode(1--3)
10. Ball Out Enable (allow prize ball out or not. If machine without ball out mechanism, the
optional should be disabling, otherwise ball sw error will be occur)
(3). I/O Test
At current menu, press ENTER into next menu, display screen shows as below.
Test All Inputs
TestAllOutputs
TestAudio
1. Test All Inputs (showing all input terminal, black means valid, blank invalid. For
example, the input port of up button on control stand is 8, pressing up button, black plat shows
on the right of 8, then it means up button input valid. It shows blank plat while releasing up
button, means input invalid. In the way of testing input can check if all wires connect well.)
2. Test All Outputs (showing all output terminal, black means valid, blank invalid. For
example, the output port of up button’s indicator light on control stand is 3, press ENTER,
indicator light of up bottom on, and black plat shows on the right of 3, then it means output
valid. Press ENTER one more time, then light off, and blank plat shows on right of 3, means
output invalid. In the way of testing output can check if all wires connect well.)
Note: port 0 and 1 is for stopwatch output and narrow pulse output, press ENTER button,
theses two ports may not have black plat on display, but the stopwatch will beat one time, it

32″Gets Extra
10
mens out.put valid. Some output may invalid due to the effect of limited switch.
3. Test Audio (selected Test Audio, press ENTER into next menu. Phase X shows on
screen display, it means testing music of part X. Press UP or DOWN to change part number
for test.)
(4). Gantry Test
At current menu, press ENTER into next menu, display screen shows as below.
TestHighPower
TestLowPower
TestGantryMove
(5). Burn In Test
At current menu item, press ENTER into next menu, then the second line on screen shows
Time Of Burn In, the third line shows XX:XX:XX. In the burn testing, gantry will test
automatize. The function is mainly used for factory testing.
(6). Factory Setting
At current menu item, press ENTER into next menu. Next menu only have two optional Yes /
No. If select Yes, system will automatically restore factory setting once press MODE exist.
(7). GSM Info Setting
At current menu, press ENTER into next menu, display screen shows as below.
AreaCode
MobileNumber
CalendarMode
CalendarDate
Select one (anyone) item, press ENTER into next menu, press VOL+ or VOL - change
position of setting, then press UP or DOWN adjust data. Press EXIT back to last menu,
system will save setted parameter automatically.
Note: GSM function only for machine which with GSM module
Description of menu items at below.
1. Area Code (only for continuous number, blank space means end, the longest is 5 digits,
if less than for 5, then fill blank space at behind, such as 86 23, it means area code is 86,
system automatically ignore numbers behind blank space)
2. Mobile Number (only for continuous number, blank space means end, the longest is 11
digits, if less than for 11, then fill blank space at behind)
3. Calendar Mode (24/12, time display mode.)
4. Calendar Date (mode 20YY-MM-DD)
5. Calendar Time (mode HH:MM:SS. Note : while setting time, whatever the time
display mode is 24 or 12 hours system, system unified to 24 hours for setting)
6. Scheduled Sends (only two optional ABLE / ENABLE, able means send message to
moblie phone everyday)
7. GSM Send Time (mode HH:MM:SS. Note : while setting time, whatever the time
display mode is 24 or 12 hours system, system unified to 24 hours for setting.)
8. Alarm Info Send (only two optional ABLE / ENABLE, able means send message to
mobile phone when alarming)
1. GSM Schedule Time Send Context:

32″Gets Extra
11
Coin In:XXXXX, Ball Out:XXXXX,Prize Out:XXXXX
2. GSM Send Alarm Context:
Error Y:XXXXXXXXXXXXXXXXXXXXXXX
Y is Error Code, X is Alarm Information in detail.
The Code can send in the same message, if machine receive successfully, then send
message “System Setting Set Ok!” back to Mobile, the char ‘-‘ is start and stop flag,
For example: SCPG-3-.
SCPG-3- : means 3Coins/Credit
Code SCPG: means Set insert XX Coin player can play 1 game. If machine receive
successfully, then will send message “System Data Set Ok!” back to Mobile.
Code SAWR means Average XX plays Win one prize. If machine receive successfully, then
will send message “System Data Set Ok!” back to Mobile.
Code ADAC means clear System Data. If machine receive successfully, then will send
message “System Data Clear Ok!” back to Mobile.
Code ADAG means Get System Data. If machine receive successfully, then will send
message as follow:
Coin In: XXXXX, Ball Out: XXXXX,Prize Out: XXXXX,
Note: if machine received wrong format message, then won’t feedback to mobile phone.
7. Errors and Solutions
1. Coin SW Error
If an alarm remains in case of the disconnection between coin selector and cable, the main
board might be damaged. Change for a new main board.
2. Prize SW Error
Check if the the Prize sensor might be damaged, and change for a new one.
3 EEPROM Error
Press CLEAR button on the keypad to clear the error. If the error can’t be cleared, the program
panel in the main board may damage, and so change for a new program panel. PS: the
machine will restore factory setting if the error is cleared.
4 Claw Up Switch Error
. The alarm ordinarily occurs during the reset of the crane. If the claw is able to move up
during resetting, examine the switch on the up of the claw and manually hold it: the main
board is damaged if the crane stops moving; or the motor is damaged if it can’t move
5 Claw Down Switch Error
If the claw is able to move down during playing, examine the switch on the down of the claw
and manually hold it: the main board is damaged if the crane stops moving; or the motor is
damaged if it can’t move
6. Left-Crane Detector Switch Error Alarm
The alarm ordinarily occurs during the reset of the crane. If the crane is able to move left
during resetting, examine the switch on the left of the crane and manually hold it: the main
board is damaged if the crane stops moving; or the motor is damaged if it can’t move.
7. Rear Limit SW of Gantry Error Alarm
The alarm ordinarily occurs during the reset, adjusting or test of the crane, or during the game.

32″Gets Extra
12
If the gantry moves normally, detach gantry and check the rear limit SW. The main board
might damage if the SW works normally; if gantry doesn’t work, the motor might damage or
get stuck, or driver board might damage.
7. Front Limit SW of Gantry Error Alarm
adjusting or test of the crane, or during the game. If the gantry moves normally, detach gantry
and check the front limit SW. The main board might damage if the SW works normally; if
gantry doesn’t work, the motor might damage or get stuck, or driver board might damage.
8. Data Error
Press CLEAR button on the keypad to clear the error. If the error can’t be cleared, the program
panel in the main board may damage, and so change for a new program panel. PS: the
machine will restore factory setting if the error is cleared.
Note: it won’t be informed in case of any change of the performance of the
machine, contents of the manual or the program!
Table of contents
Other Panda Vending Arcade Game Machine manuals
Popular Arcade Game Machine manuals by other brands

Lowtech Studios
Lowtech Studios slither.io Operator's manual

Nintendo
Nintendo Donkey Kong Junior DJR1-UP Operation manual

Andamiro
Andamiro OVER THE TOP user manual

Bromley
Bromley SLAP HAPPY Operation manual

Creative Arcades
Creative Arcades 3500 Machine Simple User Manual

Benchmark Games
Benchmark Games GOLDZONE manual

Sega
Sega THE HOUSE OF THE DEAD III DELUXE Operator's manual

NAMCO
NAMCO Mazan Operator's manual

Sega
Sega Virtua Fighter 4 Evolution Installation, instruction and service manual

MERIT INDUSTRIES
MERIT INDUSTRIES FORCE Upright Removal/Installation Instructions

Bay-Tek
Bay-Tek SKEE BALL MARQUEE Service manual

Universal Space
Universal Space Panning for Gold Operation manual