Panduit OptiCam 2 FS133 User manual

Release 1
Issue 2
OptiCam 2 FS133 Termination
Tool User Manual

OptiCam 2 FS133 Termination Tool User Manual
-2-
Copyright © 2019 Panduit Corp. All rights reserved. No part of this book shall be reproduced, stored in a retrieval system, or transmitted by any means, elec-
tronic, mechanical, photocopying, recording or otherwise, without written permission from Panduit. No patent liability is assumed with respect to the use of the
information contained herein.
Although every precaution has been taken in the preparation of this book, Panduit assumes no responsibility for errors or omissions. Neither is any liability
assumed for damages resulting from the use of the information contained herein.

OptiCam 2 FS133 Termination Tool User Manual
-3-
Table of Contents
OptiCam 2 FS133 Termination Tool Overview 5
Safety Precautions 7
Safety Glasses 7
Isopropyl Alcohol (92% or better) 7
Disposal of Bare Fibers 7
Laser Light 7
Cable Handling 8
Tool Set Up 9
Component Identification 14
Buffer Stripping Steps 16
250μm Coated Fiber Strip 16
900μm Tight-Buffered Fiber Strip 16
Jacketed Cable Strip 17
250μm Coated Fiber Termination Using OptiCom Fanout Kit 17
Buffer Stripping 18
Cleave Fiber Steps 19
Prep Stripped Fiber 19
Score & Cleave 19
OptiCam 2 Tool Operation - LC 21
Select Connector Options 21
Load Connector 21
Connector Test 22

OptiCam 2 FS133 Termination Tool User Manual
-5-
OptiCam 2 FS133 Termination Tool Overview
WARNING
Read and understand the instructions and safety information in this manual
before operating this tool. Failure to observe this warning can result in bodily
injury.
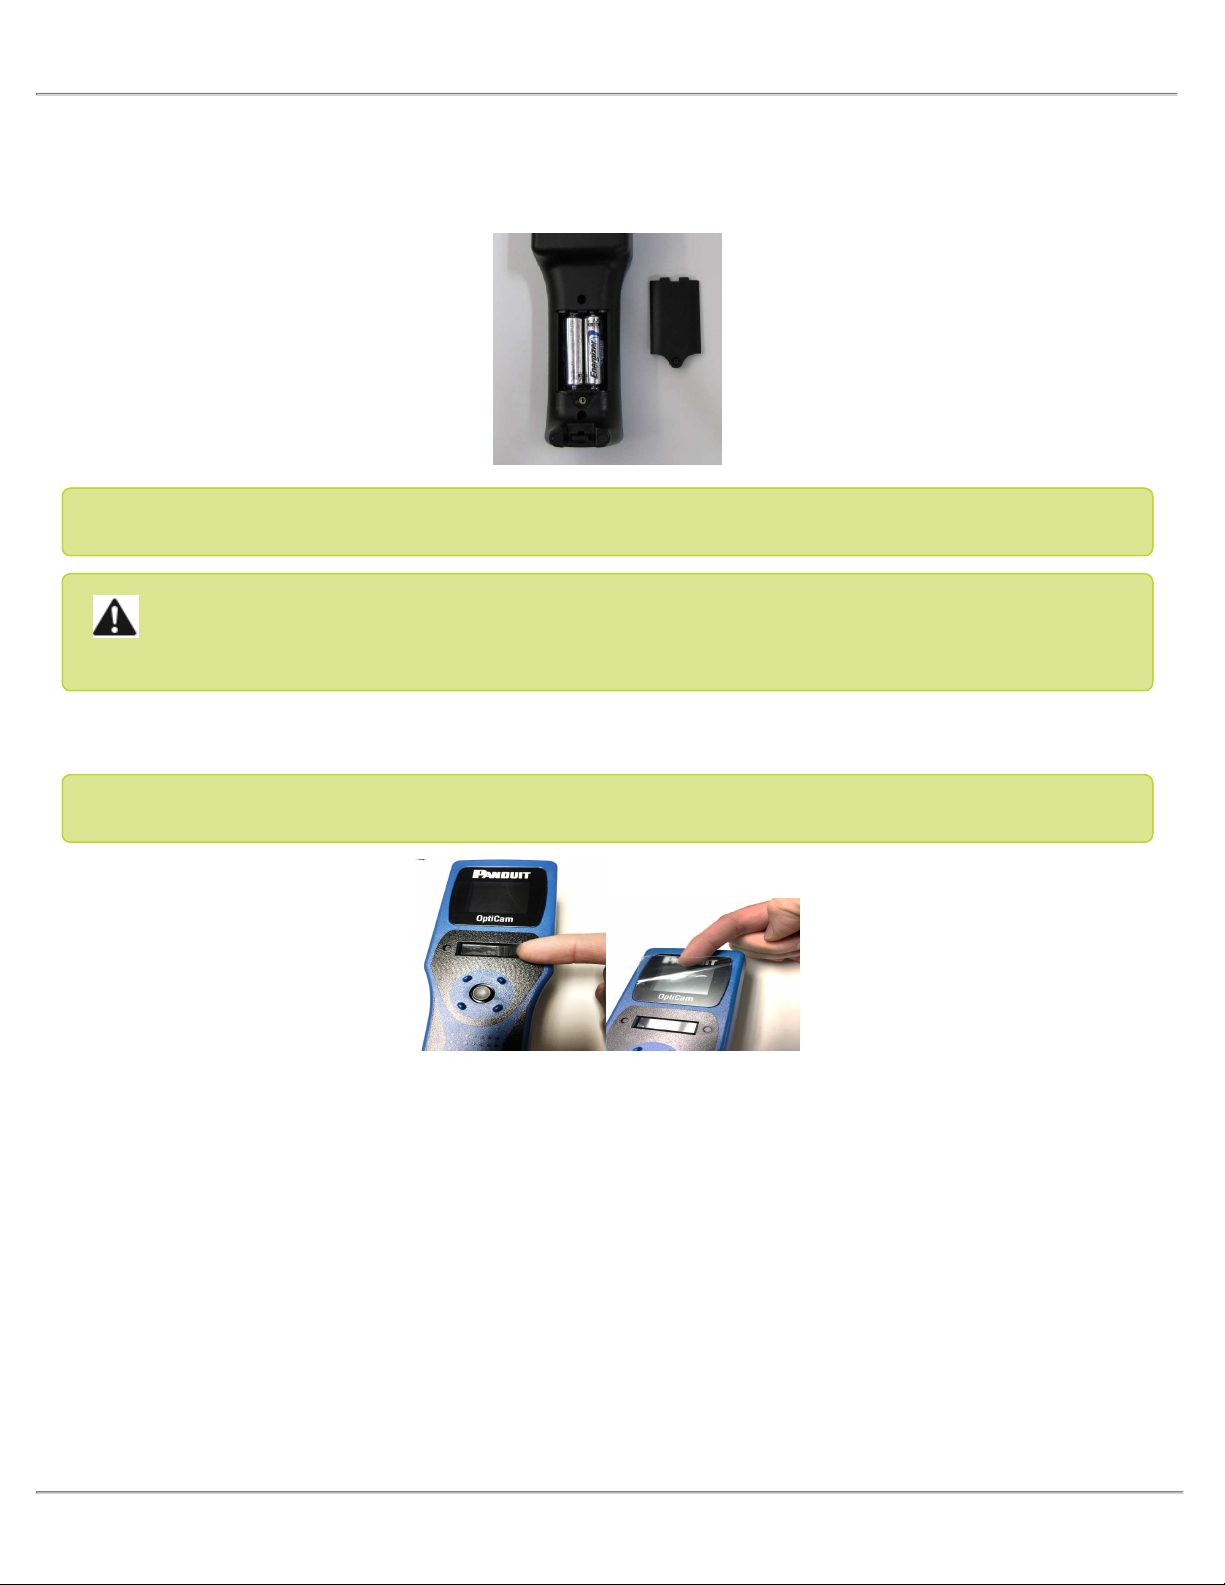
Warning: Risk of fire. Battery can explode or leak and cause injury if installed
backwards, disassembled, charged, crushed, or exposed to fire or high tem-
perature.
CAUTION
Caution - Use of controls or adjustments or performance of procedures
other than those specified herein may result in hazardous radiation expos-
ure. The laser is emitted from the LC connector located at the top of the tool.
See the next page illustration for connector location.
lNever point the laser into the eyes of others.
lDo Not stare directly at the laser beam.
lDo Not set up tool to work at eye level or operate the tool on a reflect-
ive surface as the laser could be projected into your eyes or the eyes
of others.
Viewing the laser output with certain optical instruments (for example, eye
loupes, magnifiers, and microscopes) within a distance of 3.9” (99 mm) may
pose an eye hazard.
Remove the batteries when storing for an extended period of time to avoid
damage to the tool should the batteries deteriorate.
TECHNICAL INFORMATION
lRecommended Use: With available launch cords and cradles only
lLaser Diode Type: IEC 60825-1 Class 1 Laser product
lConnectors: LC, SC, ST, single mode and multimode, Panduit con-
nectors only
lPower Supply: 2 size AA (type L91) 1.5volt Lithium Iron Disulfide bat-
teries, Max Discharge: 2.5 amp continuous, included. Size AA alkaline
batteries can be used at a reduced rate battery life. Tool can also be
powered without batteries through the power/data (5 VDC, 1 amp
max) port on the side of the tool.
lRated Battery Life: Approximately 8 hours (continuous use)
lFirmware Updates: Use power/data port on the side of the tool to
connect to PC, visit www.panduit.com for latest firmware
lEnvironment: FOR INDOOR USE ONLY, Max altitude 2000m, Pol-
lution degree 2
lOperating Temperature: +32° F to +104° F (0° C to +40° C), <93%
RH, non-condensing
lStorage Temperature: -40° F to +158°F (-40°C to +70°C)
lOverall Dimensions: 2.1" H x 2.8" W x 9.1" L (53mm x 71mm x
231mm)
lWeight: 9.0 oz (255 g) without batteries
Tool Storage
After all connector terminations are complete, detach the launch cord from the tool by disconnecting the LC connector at the top of the tool. Detach the ferrule
adapter from the cradle and put dust caps on both ends of the launch cord. Place tool, launch cord, and cradle in a protective case.
Tool Use
This tool is to be used for the termination of Panduit OptiCam connectors only. The tool emits a non-visible laser beam, which, when used in conjunction with
the launch cord and cradle, aids in proper connector termination.
Tool Care and Handling
lLaser tools are precision instruments, which should be handled with care. See Safety Precautions.
lAvoid shock, vibrations, and extreme heat.
lAvoid dust and water that could obstruct laser.
lKeep tool dry and clean.
lCheck batteries regularly to avoid deterioration.
lRemove batteries if the tool is to be stored for an extended period.

OptiCam 2 FS133 Termination Tool User Manual
-6-
lThis tool contains no user-serviceable parts.
lThe laser output is not adjustable.
lContact Panduit Corp. for service needs.
Do not Throw Away
This symbol indicates the need for separate collection of electrical and electronic equipment waste. Separating electronic waste can halt the potential adverse
effects on the environment and human health as a result of the hazardous substances in electrical and electronic equipment. This waste should be returned
to the proper collection facility.
Compliance Symbols
Complies with IEC 60825-1 Ed. 3 (2014).
Complies with FDA performance standards for laser products except for deviations pursuant to Laser Notice No. 50, dated May 15, 2014.
This device compiles with Part 15 of the FCC Rules. Operation is subject to the following two conditions:
(1) this device may not cause harmful interference, and (2) this device must accept any interference received, including any interference that may cause
undesired operation.
La operación de este equipo está sujeta a las siguientes dos condiciones: (1) es posible que este equipo o dispositivo no cause interferencia perjudicial y (2)
este equipo o dispositivo debe aceptar cualquier interferencia, incluyendo la que pueda causar su operación no deseada.
CAN ICES-3(B)/NMB-3(B)
IMPORTANT: DO NOT remove any labels from this tool.

OptiCam 2 FS133 Termination Tool User Manual
-7-
Safety Precautions
Safety Glasses
WARNING: It is strongly recommended that safety glasses be worn when handling bare optical
fiber. The bare fiber is very sharp and can easily damage the eye.
Isopropyl Alcohol (92% or better)
WARNING: Flammable.
Contact with alcohol can cause irritation to the eyes. In case of contact with eyes, flush with water for at least 15 minutes.
Always use alcohol with proper levels of ventilation.
In case of ingestion, consult a physician immediately.
Disposal of Bare Fibers
WARNING: Pick up and discard all pieces of bare fiber with sticky tabs. Do not let cut pieces
of fiber stick to clothing or drop in the work area, where they are hard to see and can cause
injury.
Laser Light
DO NOT VIEW DIRECTLY WITH OPTICAL INSTRUMENTS. CLASS 1M LASER PRODUCT.
Viewing the laser output with certain optical instruments (for example, magnifiers and microscopes) within a distance of 100
mm may pose an eye hazard.

OptiCam 2 FS133 Termination Tool User Manual
-8-
CAUTION: Use of controls of adjustments or performance of procedures other than those specified herein may result in
hazardous radiation exposure.
lNever point the laser into the eyes of others
lDo not stare directly at the laser beam.
Do not set up tool to work at eye level or operate the tool on a reflective surface as the laser could be projected into your eyes, or
the eyes of others.
Cable Handling
WARNING: Fiber optic cable can be damaged by excessive pulling, twisting, crushing or bending stresses. Consult the
appropriate specification sheets as provided by your cable vendor. Any damage may decrease optical performance.
To Ensure Best Termination
lMake sure the batteries are new and fresh.
lMake sure the launch cord is in good condition, the split sleeve is in good condition, and the ferrule end face is clean and not
scratched.

OptiCam 2 FS133 Termination Tool User Manual
-9-
Tool Set Up
Various components of the OptiCam 2 Tool:
1. Select the proper Launch Cord and Cradle. For each connector type, select the correct launch cord and cradle for ter-
mination use.
Connector Type, Launch Cord, and Cradle cross reference table
Connector Type Launch Cord Cradle*
LC single mode yellow cable, 1.25mm single mode(P/N: FOLPC-
1.25SM) LC cradle, black (P/N: FLCC2)
LC multimode: OM1, OM2, OM3, and
OM4
orange cable, 1.25mm multimode(P/N: FOLPC-
1.25MM) LC cradle, black (P/N: FLCC2)
SC single mode yellow cable, 2.5mm single mode(P/N: FOLPC-
2.5SM) SC cradle, gray (P/N: FSCC2)
SC multimode: OM1, OM2, OM3, and
OM4
orange cable, 2.5mm multimode(P/N: FOLPC-
2.5MM) SC cradle, gray (P/N: FSCC2)
ST single mode yellow cable, 2.5mm single mode(P/N: FOLPC-
2.5SM) ST cradle, gray (P/N: FSTC2)
ST multimode: OM1, OM2, OM3, and
OM4
orange cable, 2.5mm multimode(P/N: FOLPC-
2.5MM) ST cradle, gray (P/N: FSTC2)
*Each cradle contains a marking to identify it as type LC, SC, or ST.

OptiCam 2 FS133 Termination Tool User Manual
-10 -
2. To load or replace batteries, remove the battery cover using a Phillips screwdriver.
3. Insert 2 size AA (type L91) 1.5volt Lithium Iron Disulfide batteries, follow the polarity markings in the compartment. Then
replace the cover and secure it using the Phillips screw driver.
Note: The OptiCam 2 Tool does not charge batteries
WARNING: Risk of Fire.Battery can explode or leak and cause injury if installed backwards, disassembled,
charged, crushed, or exposed to fire or high temperature.
4. The protective film on the Camera Aperture has a removal tab. The protective film on the LCD display can be removed by
peeling from one corner.
Note: Remove the protective film from the Camera Aperture before operating the tool.
5. Before attaching the launch cord, first clean the launch cord on both ends. Refer to the Tool Care and Maintenance sec-
tion of these instructions for proper technique.
6. Install the correct OptiCam 2 launch cord and OptiCam 2 cradle. An LC connector on the launch cord attaches to a port at
the top of the tool, and the unique adapter attaches it to the cradle.

OptiCam 2 FS133 Termination Tool User Manual
-11 -
7. Please refer to the Connector Type, Launch Cord, and Cradle Cross Reference Table to make sure you are using the
proper combination of cord, cradle, connector, and orientation.
8. When attaching the metal adapter to the cradle for LC terminations, the opening on the side of the barrel should be placed
facing the tool.
9. The cradle attaches to the tool magnetically. Position the cradle onto the tool with either a left or right orientation, and the
magnets will properly align the cradle. Right and left orientations are shown below (LC launch cord and LC Cradle are
shown).
10. Power on by using the center of the navigation button. The first time the tool is powered on, the language will need to be
selected.

OptiCam 2 FS133 Termination Tool User Manual
-12 -
11. Use the navigation button to navigate to the menus and to Connector Type , and select the correct connector options:
Menu > Connector Type.
12. Use the navigation button to select the correct information. The selected text will become red. Click Save.
Note: To ensure proper function of the tool, check that settings on the tool match the cord, cradle, con-
nector, and orientation being used.
13. To select the Insertion Loss (IL) Threshold, use the navigation button to navigate to the menus and to Tool Settings,
then scroll down to IL Threshold. The settings window will allow you to select the desired threshold by moving the nav-
igation button up and down and selecting Save, which will exit out of this topic.

OptiCam 2 FS133 Termination Tool User Manual
-13 -
14. To load the connector, first clean the connector ferrule end face using Panduit’s best
practices for cleaning fiber components. LC and SC connector loading: A) Insert a
connector while the launch cord is tilted up to receive the connector. B) Tilt the con-
nector down and ensure the connector backbone snaps in to the cradle. This image
shows the new metal ferrule adapter for LC launch cords.
15. To load an ST connector: A) Rotate the ST connector into the cradle. B) Rotate the
retaining clip over the connector. C) Secure the clip with the audible “click”. D) Place
the launch cord on the connector end with the split sleeve attaching to the connector
ferrule.
Note: ST requires that the user hold the launch cord in place.
16. The OptiCam 2 has a data port on the side of the tool which can be used to install firmware updates. The current version
of the software on the tool can be determined in the System Menu on the tool.
17. Update the tool to the most recent firmware available at Panduit.com > Support > Download Center > Soft-
ware/Firmware/Printers > OptiCam 2 Termination Tool.

OptiCam 2 FS133 Termination Tool User Manual
-14 -
Component Identification
LC Connectors, Launch Cord, and Cradle
SC Connectors, Launch Cord, and Cradle
ST Connectors, Launch Cord, and Cradle
Alignment Key must be in the alignment tab to cam properly. Additionally, the flat sides on the back bone will line up into the key
slot of the cradle with the etched, rounded side facing down.

OptiCam 2 FS133 Termination Tool User Manual
-15 -
Connector Types with Colors
Fiber Type Backbone Color (LC, SC) Boot Color
OM3, OM4 (50µm) Aqua Aqua
OM2 (50µm) Black Black
OM1 (62.5µm) Beige Beige
OS1, OS2 (Single mode) Blue Blue

OptiCam 2 FS133 Termination Tool User Manual
-16 -
Buffer Stripping Steps
250μm Coated Fiber Strip
1. Install the boot. Insert the fiber end through the small end of the boot. Slide the boot
back out of the way.
2. Place one build-up tube (F250BT) onto the fiber and slide it back out of the way.
3. Place an insertion mark on the build-up
tube at 0.59” (15mm) for LC and 0.43”
(11mm) for SC/ST, from the end of the
tube closest to the end of the fiber.
4. Use buffer stripper to strip at least 1.18"
(30mm) of coating.
5. Place an insertion mark on the coated
fiber 2" (51mm) from the end of the
stripped coating.
IMPORTANT! 250µm Coated Fiber Stripping Dimensions. Due to printing variations, use a rigid scale for
stripping dimensions, or the appropriate Panduit laminated template.
6. Slide the leading edge of the build-up tube to the start of the coating after cleaving the fiber.
900μm Tight-Buffered Fiber Strip
1. Insert the fiber end through the small end of the 900μm boot. Slide the boot back out of the
way.
2. Use buffer stripper to strip at least 1.18" (30mm) of buffer.
3. Use the marking pen to place an insertion mark at 0.59” (15mm) for LC and 0.43” (11mm) for
SC/ST, back from the end of the stripped buffer.
IMPORTANT! 900µm Coated Fiber Stripping Dimensions. Due to printing variations, use a rigid scale for
stripping dimensions, or the appropriate Panduit laminated template.

OptiCam 2 FS133 Termination Tool User Manual
-17 -
Jacketed Cable Strip
1. If using duplex cable, split the two cables
approximately 6" (152mm) or as needed.
2. Following the stripping dimensions, use the
marking pen to mark the cable jacket at 1.89”
(48mm) for LC, and 1.73" (44mm) for SC/ST,
from the end.
3. Strip off the cable at the jacket removal mark.
To reduce wear on the jacket stripper blades,
do not slide the blades along the aramid yarn.
Instead, use the tool to cut through the jacket,
then pull off the jacket by hand.
4. Insert the fiber through the small end of the appropriate boot for your specific cable type. Use the boot to fold the aramid
yarn back over the jacket, holding it out of the way.
5. Use the marking pen to place a buffer length mark on the buffer at 0.71” (18mm) for LC, and 0.55" (14mm) for SC/ST,
from the edge of the jacket. Place an insertion mark at 0.59” (15mm) for LC and 0.43" (11mm) for SC/ST, back from the
first mark.
IMPORTANT! Due to printing variations, use a rigid scale for stripping dimensions, or the appropriate Pan-
duit laminated template.
6. Use the marking pen to place a mark on the buffer at the edge of the jacket. This mark should remain at the edge of the
jacket after buffer stripping.
7. Use the buffer stripper to strip the buffer to the buffer length mark.
250μm Coated Fiber Termination Using OptiCom Fanout Kit
1. Install the Fanout Kit (FO6CB, FO12CB) according to the installation instructions FS047.
2. Feed the 250μm coated fibers through the 900μm fanout tubing until at least 30mm of fiber
protrudes from the end of the tubing. Trim the coated fibers to length at 30mm.

OptiCam 2 FS133 Termination Tool User Manual
-18 -
3. To reduce the amount of fiber movement, place a drop of
adhesive (Loctite 401 or equivalent Cyanoacrylate adhesive)
at the point that the coated fibers exit the 3mm cable jacket.
250μm coated fibers need to be taut between cable jacket
and the fanout tube assembly.
4. Place the 900μm boots onto the fanout tubing and slide them
back out of the way.
5. Place an insertion mark on the fanout tubing, at 0.59” (15mm) for LC and 0.43" (11mm) for SC/ST, back from the end of
the tubing.
6. Place a coating removal mark on the coated fiber 3mm from the end of the fanout tubing. Strip the coating up to the coat-
ing removal mark. Note: The 3mm of coating extending from the end of the tubing is intended to compensate for fiber
movement within the fanout tubing during termination.
Buffer Stripping
1. Remove no more than 1/4" (6mm) of buffer at a time to avoid breaking the fiber.
2. Hold the buffer stripper such that the tool is at a 90-degree angle to the fiber to ensure
clean cut of buffer.
3. Position the fiber in the tool's V-notches. Squeeze the handles and pull toward the end
of the fiber.

OptiCam 2 FS133 Termination Tool User Manual
-19 -
Cleave Fiber Steps
Prep Stripped Fiber
1. Remove and dispose of any remaining fiber scraps in the cleaving
tool.
2. Clean bare fiber using an isopropyl alcohol (92% concentration)
soaked lint-free wipe. The fiber should be free of all coating and
residue. To prevent contamination, do not set fiber down or
allow it to touch anything after cleaning.
3. Hold the cleaving
tool in your hand and
depress the fiber
clamp lever to raise
the fiber clamp.
Insert the end of the
fiber into the V-
groove and under the
fiber clamp. Release
the fiber clamp lever
when the end of the buffer is located at the 7mm mark (±0.5mm). This length is critical to termination.
Score & Cleave
1. This is a critical step for successful termination. Gently hold the buffered fiber against the groove in the base plate
using thumb and forefinger of your free hand. With your other thumb, gently push down on the housing until the ceramic
blade contacts the fiber only once. DO NOT cut the fiber with the ceramic blade. Release the housing so that the blade is
no longer contacting the fiber.
2. Hold the tool in one hand while still holding the fiber against the base plate. Bend the base plate down until the fiber
breaks. To prevent contamination, do not re-clean the fiber, do not set fiber down, or allow it to touch anything
after cleaving.

OptiCam 2 FS133 Termination Tool User Manual
-20 -
IMPORTANT:Do not clean fiber after cleaving. Replace the ceramic blade in the cleaving tool after
every 1000 cleaves, or if installation yield decreases. Replacement blades (FJQCVRB) are available.
Table of contents
Other Panduit Test Equipment manuals
Popular Test Equipment manuals by other brands

Schaffner
Schaffner MFO 650 Series operating instructions

Ocean Optics
Ocean Optics XE-1 Xenon Installation and operation instructions

Fujikura
Fujikura AFL Telecommunications NOYES TURBOTEST 500B user guide

EUTECH INSTRUMENTS
EUTECH INSTRUMENTS ECOTESTR EC HIGH instruction manual

JYE Tech
JYE Tech DSO 068 Assembly guide

Seica
Seica PILOT H4 Operator's manual