ROAD LED
MODEL: RO-G01/T RO-C03/T
RO-G01/S RO-C03/S
RO-G02/T RO-G06/T
RO-G02/S RO-G06/T
RO-C53/T RO-C56/T
RO-C53/S RO-C56/S
CZE | NÁVOD NA POUŽITÍ
Děkujeme, že jste si vybrali výrobek firmy PANLUX s.r.o.
Před použitím tohoto výrobku si prosím přečtěte návod a postupujte podle
bezpečnostních instrukcí. Instalaci svěřte kvalifikované osobě nebo firmě.
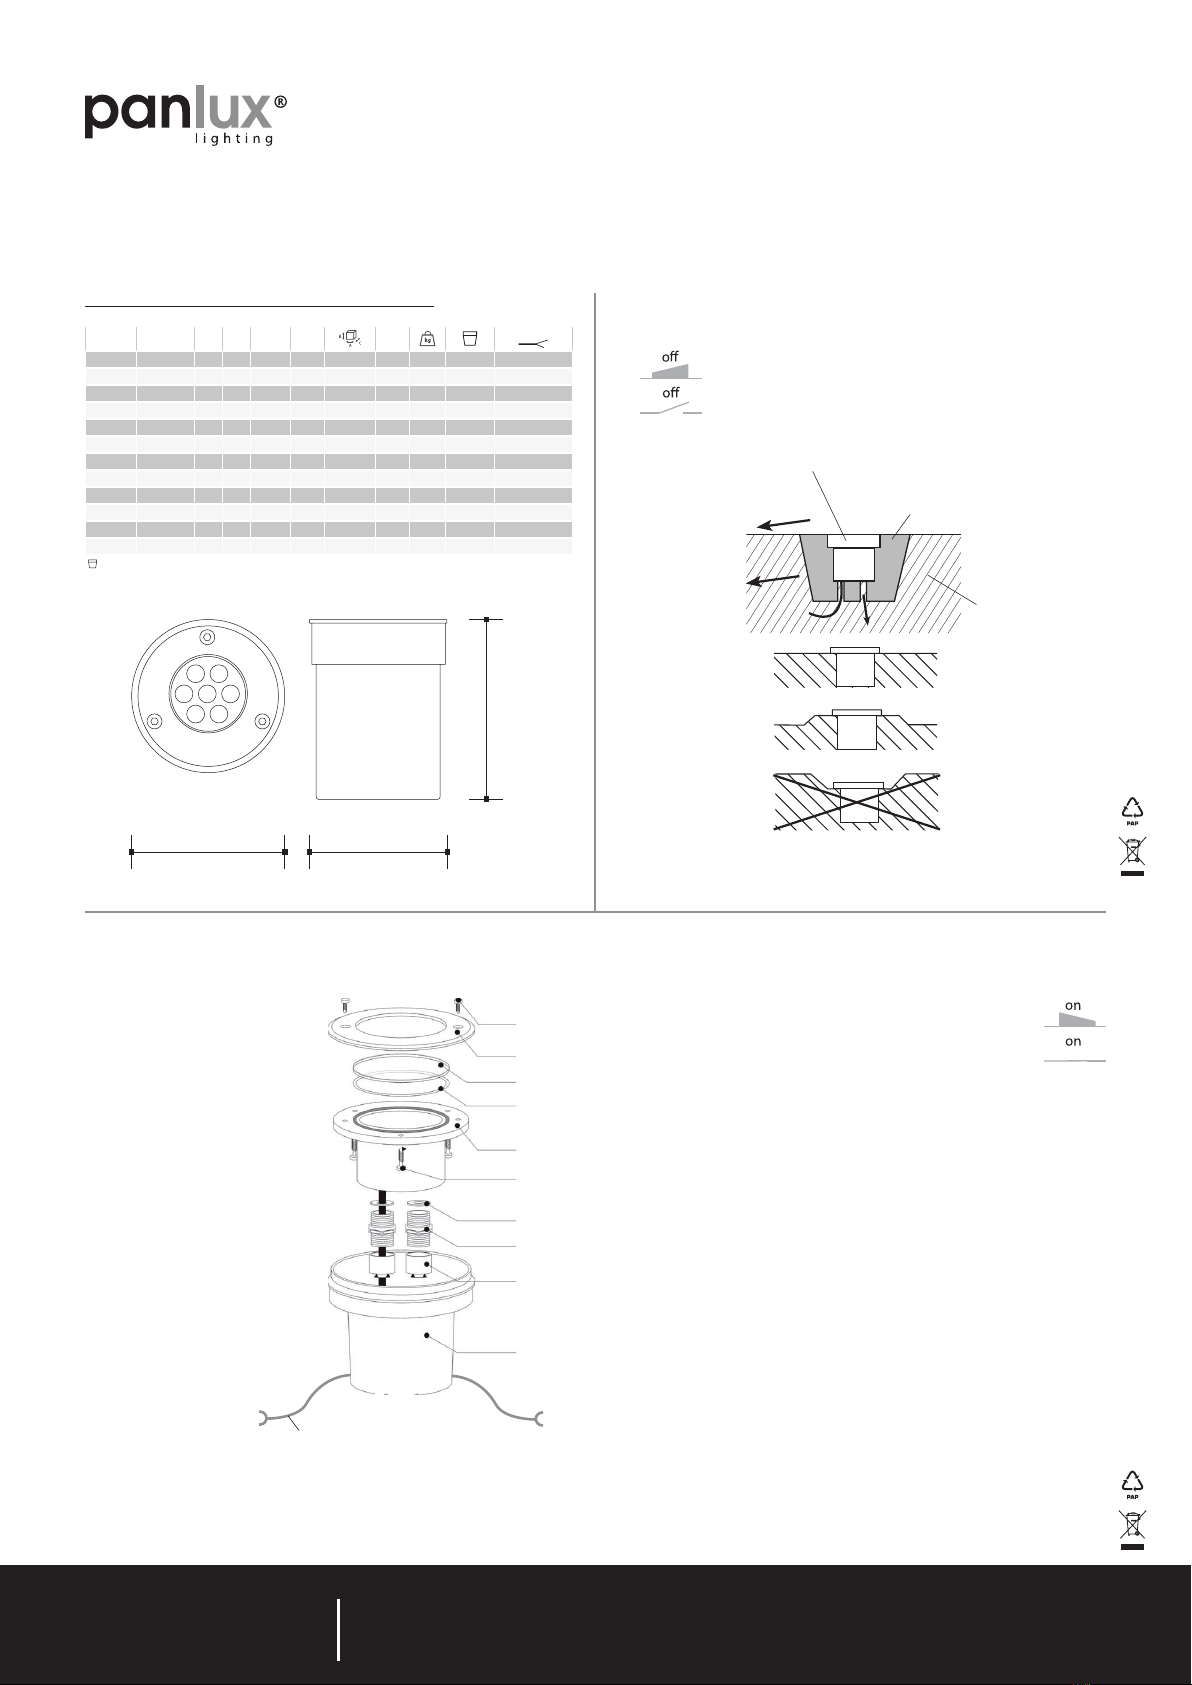
Technické údaje
Materiál: slitina hliníku, plast, nerez kov, sklo
Upozornění
Před použitím výrobek zkontrolujte, je-li jakákoliv část poškozená,
nepoužívejte jej. Před montáží se ujistěte, že je elektrický přívod odpojený.
V případě poruchy výrobek neopravujte ani nerozebírejte. Montážní krabice
(plastová základna) musí být pevně usazena v podloží (např. betonu,
cementové směsi, …..), aby nedošlo k jejímu poškození při nášlapu nebo
pojezdu přes výrobek. V případě, že nebudete používat druhou průchodku,
nedemontujte ji ani ji neperforujte. Porušili byste ochranné krytí svítidla IP67.
Dbejte na správnou polohu těsnění a na rovnoměrné utažení šroubů krytu.
Při montáži výrobku musí být zajištěna drenáž pro odtok vody. Pravidelně
kontrolujte těsnost všech spojů a dotažení všech šroubů ve svítidle.
Postupujte opatrně při odklízení sněhu z ploch a podobných úkonech v
místech, kde jsou umístěna tato svítidla, předejdete tak mechanickému
poškození. Světelný zdroj v tomto svítidle smí vyměnit pouze výrobce
nebo jeho smluvní servisní technik nebo podobně kvalifikovaná osoba.
Nedodržení jakékoliv instrukce uvedené v návodu může způsobit újmu na
zdraví i majetku.
Při mechanickém poškození nebo neodborné manipulaci nemůže být
uznána záruka.
ENG | INSTRUCTIONS
Thank you for choosing this product om PANLUX s.r.o.
Before using or installing the product, please read the instructions and
follow the safety rules. Installation should be carried out by a qualified
professional or company.
Technical data
Material: aluminium alloy, plastic, stainless metal, glass
Notes
Before every manipulation make sure that main electrical supply is
disconnected. In case of damage do not repair or disassemble the
product. The damaged cover must be replaced immediately.Mounting
box (plastic base) must be tightly fixed into the ground (e.g. with
concrete, cement mixture) to avoid its damage while step on or drive
over the lamp. In case of not using the second cable gland – neither
disassemble nor perforate it. IP67 protection would be affected. Make
sure that the position of the seal is correct and tighten the screws
equally to cover. When installing, drainage must be ensured. Check
regularly the tightness of all connections and tighten all the screws in
the luminaire. Proceed with care while removing snow or performing
similar actions in areas with these luminaires installed in order to avoid
mechanical damage. The light source contained in this luminaire shall
only be replaced by the manufacturer or his service agent or a similar
qualified person.
Failure to follow these instructions can cause damage to health and
property.
The warranty is void if the product is damaged or installed incorrectly.
GER | GEBRAUCHSANWEISUNG
Wir danken Ihnen, dass Sie sich für ein Produkt der Fa. PANLUX s.r.o. entschieden
haben.
Lesen Sie sich bitte vor Gebrauch dieses Produktes die Gebrauchsanweisung genau durch
und gehen Sie dann gemäß den Sicherheitsvorkehrungen vor. Vertrauen Sie die
Installation nur einer fachkundigen Person oder einem qualifizierten Betrieb an.
Technische Daten
Material: Aluminiumlegierung, Kunststoff, Edelstahl, Glas
Hinweis
Kontrollieren Sie das Produkt vor dem Gebrauch. Sollte ein Teil beschädigt sein,
benutzen Sie das Produkt nicht. Stellen Sie vor jeder Installierung bzw. Montage
sicher, dass das Produkt nicht am Strom angeschlossen ist. Im Falle einer Störung
des Gerätes nehmen Sie das Gerät nicht auseinander und nehmen Sie keine
Reparaturen vor. Falls das Gehäuse beschädigt ist, muss es sofort ausgetauscht
werden. Der Montagekasten (Kunststoasis) muss fest im Boden verankert
werden (z.B. im Beton, Zementmischung,…), Um eine beschädigung während
des tretens oder fahrt über den artikel zu verhindern. Im Falle, dass die zweite
Kabeldurchführung unbenutzt bleibt, darf diese nicht perforiert oder abgebaut
werden. Sonst würde die Schutzart IP67 gebrochen. Achten Sie auf die richtige
Dichtungsstellung und auf die gleichmäßige Anziehung von Deckung. Während
der Instalation des Geräts muss Ehtwasserung gewährleistet sein, um das
Wasser Abfluss sichern. Während der Schneeräumung seien Sie vorsichtig und
verhindern Sie die mechanische Beschädigung. Lichtquelle in dieser Leuchte darf
ausschliesslich Hersteller oder sein Servicetechniker oder ähnlich qualifizierte
Person austauschen.
Die Nichteinhaltung einer der in der Gebrauchsanweisung genannten Hinweise
kann Gesundheits- und Vermögensschäden verursachen.
Bei mechanischer Beschädigung oder bei nicht fachgerechter Montage kann keine
Garantie gewährt werden.
SVK | NÁVOD NA POUŽITIE
Ďakujeme, že ste si vybrali výrobok firmy PANLUX SK s.r.o.
Pred použitím tohto výrobku si prosím prečítajte návod na použitie
a postupujte podľa bezpečnostných inštrukcií. Inštaláciu zverte
kvalifikovanej osobe, alebo firme.
Technické údaje
Materiál: zliatina hliníka, plast, nehrdzavejúci kov, sklo
Upozornenie
Pred použitím svietidlo skontrolujte, ak je jeho akákoľvek časť poškodená,
nepoužívajte ho. Pred montážou sa uistite, že el. obvod je rozpojený. V prípade
poruchy svietidlo neopravujte ani nerozoberajte. Montážná krabica (plastová
základňa) musí byť pevne usadená v podloží (napr. betóne, cementovej zmesi
...), aby nedošlo k jej poškodeniu při náslapu alebo pojazdu cez výrobok. V
prípade, že nebudete používať druhú priechodku, nedemontujte ju ani ju
neperforujte. Porušíte tým ochranné krytie svietidla IP67. Dbajte na správnú
polohu tesnenia a na rovnomerné utiahnutie skrutiek krytu. Pri montáži
výrobku musí byť zabezpečená drenáž na odtok vody. Pravidelne kontrolujte
tesnosť všetkých spojov a dotiahnutie všetkých skrutiek vo svietidle.
Postupujte opatrne pri odstraňovaní snehu z plôch a podobných úkonoch
v miestach, kde sú umiestnené tieto svietidlá, predídete tak mechanickému
poškodeniu. Svetelný zdroj v tomto svietidle smie vymeniť iba výrobca alebo
jeho zmluvný servisný technik alebo podobne kvalifikovaná osoba.
Nedodržanie akékoľvek inštrukcie uvedené v návode môže spôsobiť
ujmu na zdraví a majetku.
Pri mechanickom poškodení alebo neodbornej manipulácii nemôže
byť uznaná záruka.
Technické údaje se mohou změnit bez předchozího upozornění.
Technické údaje sa môžu zmeniť bez predchodzieho upozornenia.
Technical data can be changed without previous notice.
Technische Daten können sich ohne vorheriges Hinweis verändern.
Všechna práva vyhrazena.
Všetky práva vyhradené.
All right reserved.
Alle Rechte vorbehalten.
shop.panlux.cz UM_ROAD_LED_200519
Stáhněte si aktuální verzi návodu.
Stiahnite si aktuálnu verziu návodu.
Please, download the latest updated version of the manual.
Bitte laden Sie die neueste Version des Handbuchs herunter.
IP67 ˚C
-18~40˚C
30 000
80%