Panta Safe Light Solar User manual

Gebrauchsanleitung................................................. 05
Instructions for Use.................................................. 09
Mode d’emploi.......................................................... 12
Manuale di utilizzazione........................................... 16
Gebruiksaanwijzing ................................................. 19
Használati utasítás................................................... 23
Návod k použití......................................................... 26
Návod na použitie..................................................... 29
Instrucţiuni de utilizare ............................................ 33
M33703_PantaSafeLightSolar_Manual_20220408_MM.indd 1M33703_PantaSafeLightSolar_Manual_20220408_MM.indd 1 08.04.22 12:4608.04.22 12:46

1.
2.
3.
4.
5.
6.
7.
A:
Erdspieß-
Spitze
B:
Erdspieß-
Oberteil
HINWEIS: Stellen Sie vor der Installation sicher, dass sich der Schalter im Motionmodus befindet.
NOTE: Before installation, make sure the switch is switched to motion mode.
REMARQUE : avant l‘installation, assurez-vous que l‘interrupteur est en mode mouvement.
NOTA: prima dell‘installazione, assicurarsi che l‘interruttore sia in posizione modalità movimento.
OPMERKING: Controleer voor de installatie of de schakelaar op de bewegingsmodus staat.
MEGJEGYZÉS: A telepítés előtt győződjön meg arról, hogy a kapcsoló mozgás üzemmódban van-e.
UPOZORNĚNÍ: Před instalací zajistěte, aby spínač byl v režimu pohybu.
UPOZORNENIE: Pred montážou zabezpečte, aby bol vypínač v režime pohybu.
INDICAŢIE: Înainte de instalare asiguraţi-vă că întrerupătorul se află în modul de funcţionare.
M33703_PantaSafeLightSolar_Manual_20220408_MM.indd 2M33703_PantaSafeLightSolar_Manual_20220408_MM.indd 2 08.04.22 12:4608.04.22 12:46

DE
LIEFERUMFANG UND BEZEICHNUNG
DER TEILE
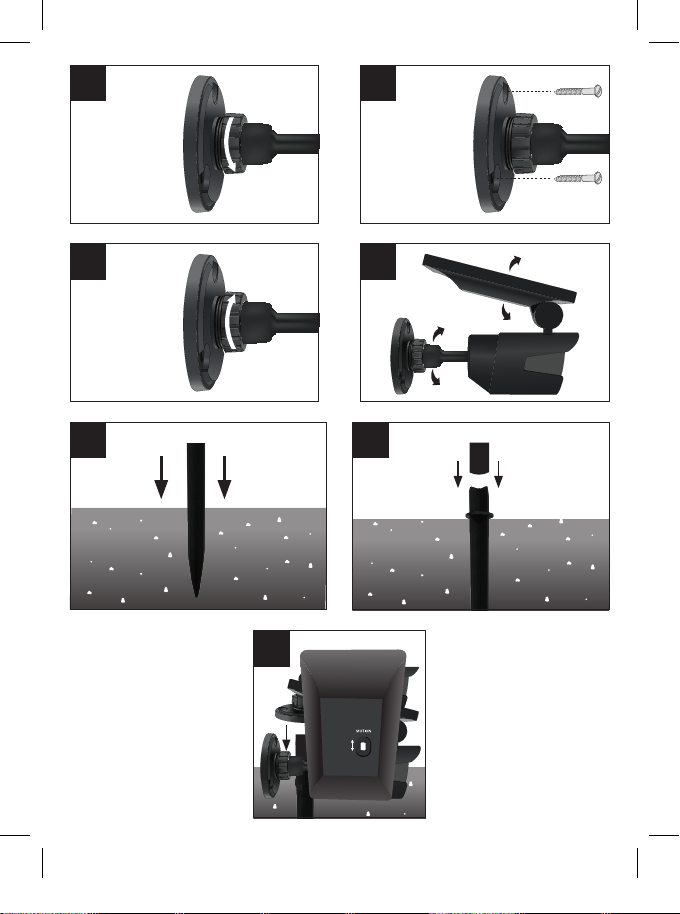
Lieferumfang: 1 x Panta Safe Light
Solar, 1 x Erdspieß, 3 x Schrauben,
3 x Dübel
1. Solarpanel
2. Einstellbarer Schwenkarm
3. Montageplatte
4. Bewegungssensor
5. Motionmodus / Ein-/Aus-
Schalter
6. Erdspieß (bestehend aus 2
Teilen)
7. 3 x Schrauben, 3 x Dübel
A: Erdspieß-Spitze
B: Erdspieß-Oberteil
EN
DELIVERY CONTENTS AND
DESCRIPTION OF THE PARTS
Delivery contents: 1 x Panta Safe
Light Solar, 1 x ground stake,
3 x dowels, 3 x screws
1. Solar panel
2. Adjustable swivel arm
3. Mounting plate
4. Motion sensor
5. Motion mode/On/Off switch
6. Ground stake (consisting of
2 parts)
7. 3 x screws, 3 x dowels
A: Ground stake tip
B: Ground stake upper part
FR
CONTENU ET DÉSIGNATION
DES PIÈCES
Contenu : 1 x Panta Safe Light Solar,
1 x piquet, 3 x vis, 3 x chevilles
1. Panneau solaire
2. Bras pivotant réglable
3. Support de montage
4. Détecteur de mouvement
5. Mode mouvement / interrupteur
marche/arrêt
6. Piquet (en 2 parties)
7. 3 x vis, 3 x chevilles
A : pointe du piquet
B : partie supérieure du piquet
IT
FORNITURA E DESCRIZIONE DEI
COMPONENTI
Fornitura: 1 x Panta Safe Light Solar,
1 x picchetto, 3 x viti, 3 x tasselli
1. Pannello solare
2. Braccio girevole regolabile
3. Piastra di montaggio
4. Sensore di movimento
5. Modalità movimento/interruttore
on/off
6. Picchetto (composto da 2 parti)
7. 3 x viti + 3 x tasselli
A: Punta del picchetto
B: Parte superiore del picchetto
NL
INBEGREPEN IN HET PAKKET
EN BESCHRIJVING VAN DE
ONDERDELEN
Inbegrepen in het pakket: 1 x Panta
Safe Light Solar, 1 x grondpen,
3 x pluggen, 3 x schroeven
1. Zonnepaneel
2. Verstelbare zwenkarm
3. Montageplaat
4. Bewegingssensor
5. Bewegingsmodus / aan-/uitknop
6. Grondpen (bestaand uit 2 delen)
7. 3 x schroeven, 3 x pluggen
A: punt van grondpen
B: bovendeel van grondpen
HU
SZÁLLÍTÁSI TERJEDELEM ÉS AZ
ALKATRÉSZEK MEGNEVEZÉSE
Szállítási terjedelem: 1 x Panta Safe
Light Solar, 1 x talajtüske, 3 x csavar,
3 x tipli
1. Szolárpanel
2. Állítható forgó kar
3. Szerelőlemez
4. Mozgásérzékelő
5. Mozgás-üzemmód / Be-/Ki-
kapcsoló
6. Talajtüske (2 részből áll)
7. 3 x csavar, 3 x tipli
A: Talajtüske hegye
B: Talajtüske felső része
CZ
OBSAH BALENÍ A OZNAČENÍ ČÁSTÍ
Obsah balení: 1 x Panta Safe Light
Solar, 1x zemní kotva, 3x šroub, 3x
hmoždinka
1. Solární panel
2. Nastavitelné otočné rameno
3. Montážní deska
4. Snímač pohybu
5. Režim pohybu/Spínač zapnuto/
vypnuto
6. Zemní kotva (skládá se ze 2 částí)
7. 3 x šroub, 3x hmoždinka
A: Hrot zemní kotvy
B: Horní část zemní kotvy
SK
OBSAH BALENIA A OZNAČENIE
DIELOV
Obsah balenia: 1 x Panta Safe Light
Solar, 1 x zapichovací kolík,
3 x hmoždinky, 3 x skrutky
1. Solárny panel
2. Nastaviteľné výkyvné rameno
3. Montážna doska
4. Snímač pohybu
5. Vypínač režimu pohybu
6. Zapichovací kolík (skladá sa z
2 dielov)
7. 3 x skrutky, 3 x hmoždinky
A: Dolný diel zapichovacieho kolíka
B: Horný diel zapichovacieho kolíka
RO
CONŢINUT COLET ŞI PĂRŢI
COMPONENTE
Conţinut colet: 1 x Panta Safe Light
Solar, 1 x suport pentru fixare în
pământ, 3 x şuruburi, 3 x dibluri
1. Panou solar
2. Braţ pivotant
3. Talpa de montare
4. Senzor de mișcare
5. Mod de funcţionare: întrerupător
ON/OFF
6. Suport pentru fixarea în pământ
(compus din 2 piese)
7. 3 x şuruburi, 3 x dibluri
A: Vârful suportului pentru fixarea
în pământ
B: Partea superioară a suportului
pentru fixarea în pământ
M33703_PantaSafeLightSolar_Manual_20220408_MM.indd 3M33703_PantaSafeLightSolar_Manual_20220408_MM.indd 3 08.04.22 12:4608.04.22 12:46

4
5
#A #B
#C #D
#E #F
#G#H#I
M33703_PantaSafeLightSolar_Manual_20220408_MM.indd 4M33703_PantaSafeLightSolar_Manual_20220408_MM.indd 4 08.04.22 12:4608.04.22 12:46

4
5
#J
DE
WICHTIGE SICHERHEITSHINWEISE
• Lesen Sie diese Bedienungsanleitung sorgfältig, bevor Sie die
Lampe benutzen! Beachten Sie die Sicherheitshinweise bei
der Inbetriebnahme. Bewahren Sie die Bedienungsanleitung
zum späteren Nachschlagen auf. Sollte das Gerät an Dritte
weitergegeben werden, muss diese Bedienungsanleitung ebenfalls
mit ausgehändigt werden.
• Benutzen Sie das Gerät nicht weiter, wenn es beschädigt ist.
• Enthaltene Kleinteile nicht verschlucken. Kleinteile außerhalb der
Reichweite von Kindern aufbewahren. Produkt nicht für Kinder
geeignet. Das Produkt ist kein Spielzeug! Halten Sie das Gerät von
Kindern fern.
• Versuchen Sie nicht, die LED auszutauschen. Die LED kann nicht
ausgetauscht werden.
• Achten Sie darauf, dass Haut, Augen und Schleimhäute nicht mit
Batterieflüssigkeit/-säure in Kontakt kommen. Bei Kontakt mit
M33703_PantaSafeLightSolar_Manual_20220408_MM.indd 5M33703_PantaSafeLightSolar_Manual_20220408_MM.indd 5 08.04.22 12:4608.04.22 12:46

6
7
Batterieflüssigkeit die betroffenen Stellen sofort mit reichlich
sauberem Wasser spülen und einen Arzt konsultieren.
INSTALLATION + TIPPS
• Wählen Sie für das Gerät einen Ort mit tagsüber möglichst viel
Sonnenschein. Vermeiden Sie Bereiche unter Bäumen oder Büschen, da
dies eine ordnungsgemäße Aufladung des Geräts verhindert.
• Installieren Sie das Gerät nicht in der Nähe einer vorhandenen
Außenleuchte. Der eingebaute Sensor verhindert das Einschalten des
Solar-Lichts.
• Wenn Sie das Licht im Herbst und Winter verwenden, beachten Sie bitte,
dass die Batterien aufgrund weniger Tageslichtstunden möglicherweise
nicht vollständig aufgeladen werden. Dies kann die Zeit beeinträchtigen, in
der das Licht eingeschaltet ist.
• Das Gerät ist wetterfest und robust.
• Bei Verwendung des Erdspießes befestigen Sie zuerst die Erdspieß-Spitze
im Boden.
MONTAGE AN DER WAND
1. Entfernen Sie die Montageplatte (3) vom Gerät durch Drehen gegen den
Uhrzeigersinn (#A).
2. Halten Sie die Montageplatte (3) auf die gewünschte Oberfläche und
markieren Sie die Löcher mit einem Bleistift. Wenn Sie sicher sind, bohren
Sie die Löcher in die gewünschte Fläche
3. Befestigen Sie die Montageplatte (3) mit den mitgelieferten Schrauben +
Dübeln (#B).
4. Richten Sie den Arm des Geräts an der Öffnung der Montageplatte aus.
Drehen Sie den Drehknopf im Uhrzeigersinn, um es festzuziehen und zu
fixieren (#C).
5. Wichtig: Achten Sie darauf, das Solarpanel immer in Richtung
Sonneneinstrahlung auszurichten! Schwenken Sie den Schwenkarm (2),
um das Licht nach Bedarf zu lenken (#D).
M33703_PantaSafeLightSolar_Manual_20220408_MM.indd 6M33703_PantaSafeLightSolar_Manual_20220408_MM.indd 6 08.04.22 12:4608.04.22 12:46

6
7
VERWENDUNG MIT ERDSPIESS
1. Die Montageplatte (3) muss am Gerät befestigt sein.
2. Stecken Sie zuerst die Erdspieß-Spitze in den Boden. Achten sie hierbei
auf die Beschaffenheit des Bodens. Ist der Boden zu hart, kann dies den
Erdspieß beschädigen (#E).
3. Befestigen Sie nun den oberen Teil (Erdspieß-Oberteil) auf der Erdspieß-
Spitze (#F).
4. Stecken Sie die Montageplatte (3) auf den Erdspieß und stecken sie diese
vorsichtig auf (#G).
5. Richten Sie nun das Solarpanel aus. Wichtig: Achten Sie darauf, das
Solarpanel immer in Richtung Sonneneinstrahlung auszurichten! Schwenken
Sie den Schwenkarm (2), um das Licht nach Bedarf zu lenken (#H).
VERWENDUNG
• Wichtig: Setzen Sie das Gerät vor der ersten Anwendung mindestens
6 Stunden direktem Sonnenlicht aus, um es aufzuladen. Wenn nicht
genügend Sonnenlicht vorhanden ist, kann das Aufladen der Batterie
länger dauern.
• Sobald es dunkel wird, schaltet sich das Licht automatisch ein, wenn es
Bewegungen erkennt. Das Licht bleibt 30 Sekunden lang an und erlischt,
wenn keine Bewegung mehr erkannt wird.
• Bei Tageslicht schaltet sich das Solarlicht nicht ein. Der Akku wird während
dieser Zeit aufgeladen.
• Ähnlichkeit zu einer Überwachungskamera (#I): Sobald sich der Schalter
in der Position MOTION (EIN) befindet, blinkt das rote LED Licht an der
Vorderseite und simuliert eine Überwachungskamera.
AUFLADE-RHYTHMUS (#J)
5:00 Uhr, Früh – Das Gerät beginnt mit dem Aufladen.
11:00 Uhr, Mittags – Das Gerät lädt sich automatisch tagsüber auf.
19:00 Uhr, Abends/Nacht – Das Gerät schaltet sich automatisch ein, sobald
eine Bewegung erkannt wird.
5:00 Uhr, Früh – Das Gerät beginnt mit dem Aufladen.
WICHTIG: Diese Zeiten können je nach Jahreszeit variieren.
M33703_PantaSafeLightSolar_Manual_20220408_MM.indd 7M33703_PantaSafeLightSolar_Manual_20220408_MM.indd 7 08.04.22 12:4608.04.22 12:46

8
9
FEHLERBEHEBUNG
PROBLEM MÖGLICHE URSACHE MÖGLICHE LÖSUNG
Das Licht
schaltet
sich nicht ein.
Das Gerät ist nicht
ausreichend aufgeladen.
Wählen Sie einen
Ort mit maximaler
Sonneneinstrahlung – das
Gerät benötig mind. 6h, um
aufgeladen zu werden.
Das Gerät befindet sich in
der OFF-Position.
Schalten sie das Gerät
in die Motion-Modus
Position.
Das Gerät wurde neben
einem anderem, starken
Licht positioniert.
Installieren Sie das
Gerät nicht in der Nähe
einer vorhandenen
Außenleuchte. Der
eingebaute Sensor
verhindert das Einschalten
des Solar-Lichts.
Das Gerät wurde unter
Bäumen platziert.
Vermeiden Sie Bereiche
unter Bäumen oder
Büschen, da dies eine
ordnungsgemäße
Aufladung des Geräts
verhindert.
Das Solarpanel ist dreckig. Reinigen Sie das
Solarpanel mit einem
weichen Tuch.
TECHNISCHE DATEN
• LED: 8 x
• Solarplatine: 5,5 V, 300 mA
• Sensorabstand: bis zu 7,5 Meter
• Beleuchtungszeit: 30s
• Batterie: 1 x Lithium-Ionen Batterie 3,7V ⎓1800mAh
• Aufladezeit: mind. 6 Stunden
Hergestellt in China
M33703_PantaSafeLightSolar_Manual_20220408_MM.indd 8M33703_PantaSafeLightSolar_Manual_20220408_MM.indd 8 08.04.22 12:4608.04.22 12:46

8
9
EN
IMPORTANT SAFETY INSTRUCTIONS
• Read this instruction manual carefully before using the lamp!
Observe the safety instructions during installation. Retain this
instruction manual for future reference. If the device is passed on to
third parties, these operating instructions must also be passed on.
• Cease use of the device if it is damaged in any way.
• Do not swallow any small parts. Keep small parts out of the reach of
children. This product is not suitable for children. This product is not
a toy! Keep the device out of the reach of children.
• Never attempt to replace the LED. The LED cannot be replaced.
• Make sure that the skin, eyes and mucous membranes never come
into contact with the battery fluid/acid. In the event of contact with
battery fluid, immediately rinse the affected areas with plenty of
clean water and seek medical advice.
INSTALLATION + TIPS
• Choose a location for the device that receives as much direct sunshine as
possible during the day. Avoid areas under trees or bushes, as these will
prevent the device from charging properly.
• Do not install the device in the vicinity of an existing outdoor light. The
built-in sensor will prevent the solar light from being switched on.
• If you use the light in autumn and winter, please note that the batteries may
not fully charge due to reduced daylight hours. This can affect the duration
of time that the lights stay on.
• The device is weatherproof and robust.
• When using the ground stake, first put the ground stake tip in the ground.
M33703_PantaSafeLightSolar_Manual_20220408_MM.indd 9M33703_PantaSafeLightSolar_Manual_20220408_MM.indd 9 08.04.22 12:4608.04.22 12:46

10
11
WALL INSTALLATION
1. Remove the mounting plate (3) from the device by turning it anti-clockwise
(#A).
2. Hold the mounting plate (3) against the desired surface, and mark the holes
with a pencil. When you are sure, drill the holes in the desired positions
3. Fasten the mounting plate (3) with the supplied screws + dowels (#B).
4. Align the arm of the device with the opening on the mounting plate. Turn the
rotary knob clockwise again to tighten and fix in place (#C).
5. Important: Make sure that you always align the solar panel toward the
source of solar radiation! Swing the swivel arm (2) to receive the light as
needed (#D).
USING WITH THE GROUND STAKE
1. The mounting plate (3) must be attached to the device.
2. First insert the ground stake tip into the ground. Pay attention to the type of
ground. If the ground is too hard, this can damage the ground stake (#E).
3. Now attach the top part (upper part of the ground stake) to the top of the
ground stake (#F).
4. Place the mounting plate (3) on the ground stake and carefully attach it
(#G).
5. Now align the solar panel. Important: Make sure that you always align the
solar panel toward the source of solar radiation! Swing the swivel arm (2)
to receive the light as needed (#H).
USE
• Important: Before using the device for the first time, expose it to direct
sunlight for at least 6 hours to charge it. If there is insufficient sunlight,
the battery may take longer to charge.
• As soon as it gets dark, the light switches on automatically when movement
is detected. The light stays on for 30 seconds, and turns off when motion is
no longer detected.
• The solar light does not turn on in daylight. The battery will be charged
during this time.
• Similarity to a surveillance camera (#I): Once the switch is in the MOTION
M33703_PantaSafeLightSolar_Manual_20220408_MM.indd 10M33703_PantaSafeLightSolar_Manual_20220408_MM.indd 10 08.04.22 12:4608.04.22 12:46

10
11
(ON) position, the red LED light on the front will flash, simulating a
surveillance camera.
CHARGE RHYTHM (#J)
5:00 Uhr, Morning – The device starts charging.
11:00 Uhr, Midday – The device charges automatically during the day.
19:00 Uhr, Evening/Night – The device turns on automatically as soon as
motion is detected.
5:00 Uhr, Morning – The device starts charging.
IMPORTANT: These times may vary depending on the season.
TROUBLESHOOTING
PROBLEM POSSIBLE CAUSE POSSIBLE SOLUTION
The light does
not turn on.
The device is not
sufficiently charged.
Choose a place with
optimal sun exposure - the
device needs to be charged
for at least 6 hours.
The device is in the OFF
position.
Switch the device to the
motion mode position.
The device has been
placed next to another
strong light.
Do not install the device in
the vicinity of an existing
outdoor light. The built-in
sensor will prevent the
solar light from being
switched on.
The device has been
placed under a tree or
vegetation.
Avoid areas under trees
or bushes, as these will
prevent the device from
charging properly.
The solar panel is dirty. Clean the solar panel with
a soft cloth.
M33703_PantaSafeLightSolar_Manual_20220408_MM.indd 11M33703_PantaSafeLightSolar_Manual_20220408_MM.indd 11 08.04.22 12:4608.04.22 12:46

12
13
TECHNICAL DATA
• LED: 8 x
• Solar panel: 5.5 V, 300 mA
• Sensor range: up to 7.5 m
• Lighting duration: 30s
• Battery: 1 x Lithium ion battery 3.7V ⎓1800mAh
• Charging time: min. 6 hrs
Made in China
FR
CONSIGNES DE SÉCURITÉ IMPORTANTES
• Lisez attentivement ce mode d‘emploi avant d‘utiliser la lampe !
Respectez les consignes de sécurité lors de la mise en service.
Conservez le mode d‘emploi pour référence future. Si vous
transmettez l‘appareil à un tiers, ce mode d‘emploi doit également
lui être remis.
• Si l‘appareil est endommagé, cessez de l‘utiliser.
• Contient de petites pièces susceptibles d‘être avalées. Garder les
petites pièces hors de portée des enfants. Produit non adapté aux
enfants. Ce produit n‘est pas un jouet ! Garder l‘appareil hors de
portée des enfants.
• N‘essayez pas de remplacer les LED. Les LED ne peuvent pas être
remplacées.
• Veillez à ce que le liquide ou les acides contenus dans la batterie
n‘entrent pas en contact avec la peau, les yeux et les muqueuses. En
cas de contact avec le liquide de la batterie, rincez immédiatement
les parties touchées abondamment à l‘eau claire et consultez un
médecin.
M33703_PantaSafeLightSolar_Manual_20220408_MM.indd 12M33703_PantaSafeLightSolar_Manual_20220408_MM.indd 12 08.04.22 12:4608.04.22 12:46

12
13
INSTALLATION + CONSEILS
• Choisissez un emplacement pour l‘appareil avec un maximum
d‘ensoleillement pendant la journée. Évitez les zones sous les arbres ou les
buissons car cela empêchera l‘appareil de se charger correctement.
• N‘installez pas l‘appareil à proximité d‘un éclairage extérieur existant. Le
capteur intégré empêche l‘allumage de la lampe solaire.
• Si vous utilisez la lampe en automne et en hiver, veuillez noter que la
batterie peut ne pas être complètement chargée en raison du nombre
réduit d‘heures de luminosité diurne. Cela peut affecter le temps d‘allumage
de la lampe.
• L‘appareil est résistant aux intempéries et robuste.
• Si vous utilisez le piquet, fixez d‘abord la pointe du piquet dans le sol.
MONTAGE MURAL
1. Retirez le support de montage (3) de l‘appareil en le tournant dans le sens
antihoraire (#A).
2. Maintenez le support de montage (3) sur la surface souhaitée et marquez
les trous avec un crayon. Lorsque vous êtes sûr de l‘emplacement, percez
les trous aux endroits souhaités.
3. Fixez le support de montage (3) avec les vis et chevilles fournies (#B).
4. Alignez le bras de l‘appareil avec l‘ouverture du support de montage.
Tournez le bouton dans le sens des aiguilles d‘une montre pour serrer et
sécuriser (#C).
5. Important : veillez à toujours orienter le panneau solaire dans le sens des
rayons du soleil !
Faites pivoter le bras (2) pour diriger la lumière au besoin (#D).
UTILISATION AVEC LE PIQUET
1. Le support de montage (3) doit être fixé à l‘appareil.
2. Enfoncez d‘abord la pointe du piquet dans le sol. Faites attention à la nature
du sol. Un sol trop dur peut endommager ou casser le piquet (#E).
3. Fixez maintenant la partie supérieure du piquet sur la pointe du piquet (#F).
4. Placez le support de montage (3) sur le piquet et fixez-le soigneusement
(#G).
M33703_PantaSafeLightSolar_Manual_20220408_MM.indd 13M33703_PantaSafeLightSolar_Manual_20220408_MM.indd 13 08.04.22 12:4608.04.22 12:46

14
15
5. Orientez maintenant le panneau solaire. Important : veillez à toujours
orienter le panneau solaire dans le sens des rayons du soleil ! Faites
pivoter le bras (2) pour diriger la lumière au besoin (#H).
UTILISATION
• Important : avant d‘utiliser l‘appareil pour la première fois, exposez-le
à la lumière directe du soleil pendant au moins 6 heures pour le charger.
S‘il n‘y a pas assez de soleil, la batterie peut mettre plus de temps à se
recharger.
• Dès qu‘il fait sombre, la lampe s‘allume automatiquement lorsqu‘elle
détecte un mouvement. La lumière reste allumée pendant 30 secondes et
s‘éteint lorsque aucun mouvement n‘est plus détecté.
• La lampe solaire ne s‘allume pas à la lumière du jour. La batterie sera chargée
pendant ce temps.
• Comme une caméra de vidéosurveillance (#I) : Une fois que l‘interrupteur
est en position MOUVEMENT (MARCHE), le voyant LED rouge à l‘avant
clignote, simulant une caméra de surveillance.
RYTHME DE CHARGE (#J)
5:00 heures, matin – L‘appareil commence à se charger.
11:00 heures, milieu de journée – L‘appareil se charge automatiquement
pendant la journée.
19:00 heures, soir/nuit – L‘appareil s‘allume automatiquement dès qu‘un
mouvement est détecté.
5:00 heures, matin – L‘appareil commence à se charger.
IMPORTANT : ces horaires peuvent varier selon la saison.
M33703_PantaSafeLightSolar_Manual_20220408_MM.indd 14M33703_PantaSafeLightSolar_Manual_20220408_MM.indd 14 08.04.22 12:4608.04.22 12:46

14
15
DÉPANNAGE
PROBLÈME CAUSE POSSIBLE SOLUTION POSSIBLE
La lampe ne
s‘allume pas.
L‘appareil n‘est pas
suffisamment chargé.
Choisissez un endroit avec
un ensoleillement maximal
- l‘appareil a besoin d‘au
moins
6 heures pour être chargé.
L‘interrupteur est en
position
OFF (ARRÊT).
Mettez l‘interrupteur
en position de mode
mouvement.
L‘appareil est placé à côté
d‘une autre lumière forte.
N‘installez pas l‘appareil
à proximité d‘un éclairage
extérieur existant. Le
capteur intégré empêche
l‘allumage de la lampe
solaire.
L‘appareil est placé sous
des arbres.
Évitez les zones sous les
arbres ou les buissons
car cela empêchera
l‘appareil de se charger
correctement.
Le panneau solaire est
sale.
Nettoyez le panneau
solaire avec un chiffon
doux.
SPÉCIFICATIONS TECHNIQUES
• LED : 8 x
• Cellule solaire : 5,5 V, 300 mA
• Portée du capteur : jusqu‘à 7,5 mètres
• Temps d‘éclairage : 30 s
• Batterie : 1 x batterie lithium-ion 3,7 V ⎓1800 mAh
• Temps de charge : au moins 6 heures
Fabriqué en Chine
M33703_PantaSafeLightSolar_Manual_20220408_MM.indd 15M33703_PantaSafeLightSolar_Manual_20220408_MM.indd 15 08.04.22 12:4608.04.22 12:46

16
17
IT
NOTE IMPORTANTI SULLA SICUREZZA
• Leggere accuratamente le presenti istruzioni per l‘uso prima di
utilizzare la lampada! Osservare le istruzioni di sicurezza durante
la messa in servizio. Conservare il manuale di istruzioni per
riferimento futuro. Se si cede l‘apparecchio a terzi, consegnare
anche queste istruzioni per l‘uso.
• Interrompere l‘utilizzo dell‘apparecchio se è danneggiato.
• Noningerirepiccole parti contenute.Tenere lepiccole partifuori dalla
portatadeibambini.Prodotto nonadattoaibambini.Ilprodotto nonèun
giocattolo! Tenere l‘apparecchio lontanodalla portatadeibambini.
• Non tentare di sostituire il LED. Il LED non può essere sostituito.
• Fare attenzione a non far entrare in contatto pelle, occhi e mucose
con il liquido /acido della batterie. In caso di contatto con il fluido
della batteria, sciacquare immediatamente le aree interessate con
abbondante acqua pulita e consultare un medico.
INSTALLAZIONE + CONSIGLI
• Scegli una posizione per l‘apparecchio con più sole possibile durante
il giorno. Evita le aree sotto alberi o cespugli in quanto ciò impedirà
all‘apparecchio di caricarsi correttamente.
• Non installare l‘apparecchio vicino a una luce esterna esistente. Il sensore
integrato impedisce l‘accensione della luce solare.
• Se si utilizza la lampada in autunno e in inverno, tenere presente che le batterie
potrebbero non essere completamente caricate a causa del minor numero di
ore di luce diurna. Ciò può influire sul tempo di accensione della lampada.
• L‘apparecchio è solido e resistente alle intemperie.
• Quando si utilizza il picchetto a terra, prima fissare la punta del picchetto a terra.
M33703_PantaSafeLightSolar_Manual_20220408_MM.indd 16M33703_PantaSafeLightSolar_Manual_20220408_MM.indd 16 08.04.22 12:4608.04.22 12:46

16
17
MONTAGGIO A PARETE
1. Rimuovere la piastra di montaggio (3) dall‘apparecchio, ruotando la
manopola in senso antiorario (#A).
2. Tenere la piastra di montaggio (3) sulla superficie desiderata e segnare i fori
con una matita. Quando sei sicuro, fai i fori nell‘area desiderata
3. Fissare la piastra di montaggio (3) con le viti + tasselli in dotazione (#B).
4. Allineare il braccio dell‘apparecchio all‘apertura della piastra di montaggio.
Ruotare la manopola in senso orario per serrarla e fissarla (#C).
5. Importante: assicurati di allineare sempre il pannello solare nella
direzione dei raggi solari! Oscillare il braccio girevole (2), per dirigere la
luce secondo necessità (#D).
UTILIZZO CON PICCHETTO
1. La piastra di montaggio (3) deve essere collegato all‘apparecchio.
2. Per prima cosa inserire la punta del picchetto nel terreno. Si consiglia
di prestare attenzione alle condizioni del terreno. Il terreno duro può
danneggiare o rompere il picchetto (#E).
3. Ora attacca la parte superiore (parte superiore del picchetto) alla parte
superiore del picchetto (#F).
4. Collegare la piastra di montaggio (3) sul picchetto e fissarlo con cura (#G).
5. Allineare adesso il pannello solare. Importante : Assicurati di allineare
sempre il pannello solare nella direzione dei raggi solari! Oscillare il braccio
girevole (2) per dirigere la luce secondo necessità (#H).
UTILIZZO
• Importante: prima di utilizzare l‘apparecchio per la prima volta,
esporlo alla luce solare diretta per almeno 6 ore per caricarlo. Se non
c‘è abbastanza luce solare, potrebbe essere necessario più tempo per
caricare la batteria.
• Quando fa buio, la luce si accende automaticamente quando rileva un
movimento. La luce rimane accesa per 30 secondi e si spegne quando il
movimento non viene più rilevato.
• La luce solare non si accende alla luce del giorno. La batteria verrà caricata
durante questo periodo.
M33703_PantaSafeLightSolar_Manual_20220408_MM.indd 17M33703_PantaSafeLightSolar_Manual_20220408_MM.indd 17 08.04.22 12:4608.04.22 12:46

18
19
• Somiglianza a una telecamera di sorveglianza (#I): una volta che
l‘interruttore è in posizione MOTION (ON), il LED rosso sulla parte anteriore
lampeggerà, simulando una telecamera di sorveglianza.
RITMO DI CARICA (#J)
Ore 5:00, del mattino – L‘apparecchio inizia a caricarsi.
Ore 11:00, mezzogiorno – L‘apparecchio si ricarica automaticamente durante
il giorno.
Ore 19:00, Sera/Notte – L‘apparecchio si accende automaticamente non
appena viene rilevato un movimento.
Ore 5:00, del mattino – L‘apparecchio inizia a caricarsi.
IMPORTANTE: questi orari possono variare a seconda della stagione.
RISOLUZIONE DEI PROBLEMI
PROBLEMA POSSIBILE CAUSA POSSIBILE SOLUZIONE
La luce non si
accende.
L‘apparecchio non è
sufficientemente carico.
Scegliere un luogo con
la massima luce solare -
l‘apparecchio ha bisogno
di almeno 6 ore per essere
caricato.
L‘apparecchio è in
posizione OFF.
Portare l‘apparecchio
in posizione di modalità
movimento.
L‘apparecchio è stato
posizionato accanto a
un‘altra forte luce.
Non installare
l‘apparecchio vicino a una
luce esterna esistente.
Il sensore integrato
impedisce l‘accensione
della luce solare.
L‘apparecchio è stato
posizionato sotto gli alberi.
Evita le aree sotto alberi
o cespugli in quanto ciò
impedirà all‘apparecchio di
caricarsi correttamente.
Il pannello solare è
triangolare.
Pulisci il pannello solare
con un panno morbido.
M33703_PantaSafeLightSolar_Manual_20220408_MM.indd 18M33703_PantaSafeLightSolar_Manual_20220408_MM.indd 18 08.04.22 12:4608.04.22 12:46

18
19
SPECIFICHE TECNICHE
• LED: x8
• Pannello solare: 5,5 V, 300 mA
• Distanza sensore: fino a 7,5 metri
• Tempo di illuminazione: 30 s
• Batterie: 1 batteria a ioni di litio 3,7V ⎓1800mAh
• Tempo di ricarica: almeno 6 ore
Fabbricato in Cina
NL
BELANGRIJKE VEILIGHEIDSAANWIJZINGEN
• Lees deze handleiding zorgvuldig door alvorens de lamp te
gebruiken! Let op de veiligheidsinstructies bij ingebruikname.
Bewaar de bedieningshandleiding voor nadere inzage. Indien
het apparaat aan derden wordt doorgegeven, moet deze
bedieningshandleiding daarbij ook worden overhandigd.
• Gebruik het apparaat niet als het beschadigd is.
• Inbegrepen kleine delen niet inslikken. Kleine delen altijd buiten
bereik van kinderen bewaren. Product niet bestemd voor kinderen.
Dit product is geen speelgoed! Houd het apparaat uit de buurt van
kinderen.
• Probeer de led niet te vervangen. De leds kunnen niet worden
vervangen.
• Zorg ervoor dat huid, ogen en slijmvliezen niet in contact komen
met batterijvloeistof/-zuur. Spoel in geval van contact met
batterijvloeistof de getroffen delen onmiddellijk met veel schoon
water en raadpleeg een arts.
M33703_PantaSafeLightSolar_Manual_20220408_MM.indd 19M33703_PantaSafeLightSolar_Manual_20220408_MM.indd 19 08.04.22 12:4608.04.22 12:46

20
21
INSTALLATIE EN TIPS
• Kies voor het apparaat een plaats die overdag zoveel mogelijk in de
zon staat. Vermijd plaatsen onder bomen of struiken, omdat daar de
voorgeschreven oplading van het apparaat wordt verhinderd.
• Installeer het apparaat niet in de buurt van een aanwezige buitenlamp. De
ingebouwde sensor verhindert dat de zonneverlichting inschakelt.
• Als u de lamp in de herfst en winter gebruikt, houd er dan rekening mee
dat de batterijen mogelijk niet volledig worden opgeladen vanwege minder
uren daglicht. Dit kan van invloed zijn op de tijd dat de lamp branden.
• Het apparaat is weerbestendig en robuust.
• Zet bij gebruik van de grondpen eerst de punt van de grondpen in de grond.
MUURMONTAGE
1. Verwijder de montageplaat (3) van het apparaat door de draaiknop tegen de
klok in te draaien (#A).
2. Houd de montageplaat vast (3) op het gewenste oppervlak en markeer de
gaten met een potlood. Als u zeker bent, boort u de gaten in het gewenste
oppervlak.
3. Bevestig de montageplaat (3) met meegeleverde schroeven en pluggen
(#B).
4. Lijn de arm van het apparaat uit met de opening op de montageplaat. Draai
de draaiknop met de klok mee om hem vast te zetten (#C).
5. Belangrijk: zorg ervoor dat u het zonnepaneel altijd in de richting van
de zonnestraling richt! Draai de zwenkarm (2) om het licht naar wens te
richten (#D).
GEBRUIK MET GRONDPEN
1. De montageplaat (3) moet aan het apparaat worden bevestigd.
2. Steek eerst de punt van de grondpen in de grond. Let op de samenstelling
van de grond. Harde grond kan de grondpen beschadigen of breken (#E).
3. Bevestig nu het bovenste deel (bovendeel van de grondpen) op de punt van
de grondpen (#F).
4. Sluit de montageplaat aan (3) op de grondpen en bevestig deze voorzichtig
(#G).
M33703_PantaSafeLightSolar_Manual_20220408_MM.indd 20M33703_PantaSafeLightSolar_Manual_20220408_MM.indd 20 08.04.22 12:4608.04.22 12:46
Other manuals for Solar
1
Table of contents
Languages:
Other Panta Safe Light Lighting Equipment manuals
Popular Lighting Equipment manuals by other brands

Current
Current Lumination Tetra AL10 Series installation guide

MESTAR
MESTAR FLEXA 3 installation manual

Lanta
Lanta Fireball Galaxy Pro Par64S Owner's handbook

Signal Mate
Signal Mate 3NMMHDKW owner's manual

ENHANCE
ENHANCE VidBRIGHT 72 manual

Vega Industries
Vega Industries PEl 6 Installation and instruction manual