Parker SMOG-HOG PSG User manual

SMOG-HOG®Electrostatic Air Cleaner
Owner’s Manual
Model PSG

KNOW YOUR EQUIPMENT
READ THIS MANUAL FIRST.
Your Smog-Hog®PSG should provide many years of trouble-free service. This manual will
help you understand the operation of your PSG unit. It will also help you understand how
to maintain it in order to achieve top performance. For quick future reference, fill in the unit
information in the spaces below. Should you need assistance, call the Parker customer ser-
vice number shown below. To expedite your service, have the following information avail-
able when contacting Parker.
Parker Order #: ________________________________________________________________
Unit Model #: __________________________________________________________________
Unit Serial #:___________________________________________________________________
System Accessories:
______________________________________________________________________________
______________________________________________________________________________
______________________________________________________________________________
Installation Date:_______________________________________________________________
Parker SMOG-HOG or DUST-HOG Customer Service
1-800-343-4048

i
Table of Contents
Page
Safety Precautions .................................................................................................. iv
1. Introduction...........................................................................................................1
1.1 Description of Operation ........................................................................... 1
1.2 System Definitions..................................................................................... 1
1.3 Unit Nomenclature .................................................................................... 1
1.4 Description of Components....................................................................... 1
1.4.1 Power Packs ................................................................................. 1
1.4.2 Unicell Ionizer Section.................................................................... 2
1.4.3 Unicell Collector Cell Section ......................................................... 2
1.4.4 Filters............................................................................................. 3
1.4.5 Junction Boxes.............................................................................. 3
1.4.6 Other Equipment ........................................................................... 3
2. Installation Planning............................................................................................ 3
2.1 Location .................................................................................................... 3
2.2 Clearances ................................................................................................ 3
2.2.1 Component Access....................................................................... 3
2.2.2 Electrical Enclosure Access ........................................................... 3
2.2.3 Bottom Working Clearance............................................................ 3
2.3 Supports ................................................................................................... 3
2.3.1 Skidded Systems .......................................................................... 3
2.3.2 Unskidded Systems....................................................................... 3
2.3.3 Utilities/Drains................................................................................ 3
2.3.4 Ducting.......................................................................................... 3
3. Installation.............................................................................................................4
3.1 Receiving Inspection ................................................................................. 4
3.2 Unloading by Forklift.................................................................................. 4
3.3 Unloading by Crane .................................................................................. 4
3.4 Unit Storage/Delay to System Installation .................................................. 5
3.5 Installing the System ................................................................................. 5
3.5.1 PSG Systems ................................................................................ 5
3.5.2 Inlet/Outlet Plenums ...................................................................... 5
3.5.3 Motors/Blowers ............................................................................. 5
3.5.4 Pre-Conditioning Equipment.......................................................... 5
3.5.5 Order of Installation ....................................................................... 5
3.5.6 Leveling ......................................................................................... 5
3.5.7 Blowers with Vibration Isolators ..................................................... 5
3.5.8 Drain Pipe Connections ................................................................. 5
3.5.9 Wash Water Supply Connection.................................................... 5
3.5.10 Heating/Cooling Coils .................................................................... 5
3.5.11 Electrical Field Wire Installation ...................................................... 7
3.5.12 Remote Status .............................................................................. 7
3.5.13 Building Maintenance System (BMS) ............................................. 7

ii
Page
4. Operation....... ...................................................................................................... 9
4.1 Start Up Checks ....................................................................................... 9
4.1.1 Installing Unicells.............................................................................. 9
4.1.2 Ducting Connections........................................................................ 9
4.1.3 Blower Rotation ............................................................................... 9
4.1.4 Blower Belt Tension ......................................................................... 9
4.1.5 Blower Current Measurement .......................................................... 9
4.1.6 Adjustable Motor Variable Pulley ..................................................... 10
4.1.7 Power Pack Operation.................................................................... 10
4.1.8 Remote Status Panel ...................................................................... 10
4.1.9 Power Pack Enclosure Push Rod and Ground Bar .................................. 10
4.1.10 Odor Control ................................................................................ 11
4.1.11 In-Place Cleaning ......................................................................... 12
4.1.12 Placing PSG On Line.................................................................... 12
4.1.13 Parker On Site Start Up Visit ........................................................ 12
5. Maintenance........................................................................................................12
5.1 Recommended Maintenance ................................................................... 12
5.1.1 Check Power Pack Enclosure Indicator Light(s) .............................. 12
5.1.2 Unicell(s) Weekly Visual Inspection .................................................. 12
5.1.3 Filters, Drain Sumps, and Access Door Gasket Inspection.............. 12
5.1.4 Perform An In-Place Cleaning Wash Cycle...................................... 13
5.1.5 Manually Cleaning System Components ......................................... 13
6. Manual Cleaning of System Component(s) ...................................................... 13
6.1 Type of Detergent .................................................................................... 13
6.2 Detergent Strength................................................................................... 13
6.3 Water Temperature .................................................................................. 13
6.4 Agitation/Impingement ............................................................................. 13
6.5 Cleaning Cycle Duration ........................................................................... 13
6.6 Rinse Procedure....................................................................................... 14
6.7 Dry-Out Time ........................................................................................... 14
7. Manual Cleaning Methods................................................................................. 14
7.1 Soak Tank................................................................................................ 14
7.2 Portable Pressure Washer........................................................................ 14
7.3 Automatic Parts Washer........................................................................... 14
7.4 Other Cleaning Considerations................................................................. 14
8. Appearance of Components After Cleaning..................................................... 14
8.1 Unicell ..................................................................................................... 14
8.2 Prefilters/Afterfilters................................................................................... 14
8.3 Cabinet .................................................................................................... 14

iii
Page
9. Part Replacement Procedures and Adjustments............................................. 15
9.1 Ionizer Wire Replacement......................................................................... 15
9.2 Door Feed Through Insulator Replacement .............................................. 15
9.3 Indicator Light Replacement..................................................................... 15
9.4 Component Access Door Gasket Replacement ....................................... 15
9.5 Power Pack Enclosure Push Rod Adjustment.......................................... 16
9.6 Blower Lubrication ................................................................................... 16
10. Troubleshooting ............................................................................................... 16
10.1 Tools Required......................................................................................... 17
10.2 Perform Before Troubleshooting............................................................... 17
10.3 Troubleshooting Procedure ...................................................................... 17
10.4 Step 1 Checking the Power Pack ............................................................ 18
10.5 Step 2 Checking the Unicell Components................................................ 19
10.6 High Voltage Probe Measurements .......................................................... 20
10.7 Bench Test Procedure ............................................................................. 20
10.8 Troubleshooting Guide ............................................................................. 22
11. Ordering Parts .................................................................................................. 23
11.1 Replacement Parts................................................................................... 23
11.2 Returning Parts ........................................................................................ 23
11.3 Freight Cost ............................................................................................. 23
12. Power Pack Enclosure Assembly ................................................................... 24
12.1 Power Pack Enclosure Assembly Parts List ............................................. 25
FDNY COA #5585 CONDITIONS of APPROVAL................................................... 26
Equipment Warranty................................................................................................27

iv
IMPORTANT SAFETY INSTRUCTIONS
To reduce the risk of fire, electric shock, or injury when using your air cleaner, follow these basic precautions:
SAFETY PRECAUTIONS
We have provided many important safety messages in this manual on your Smog-Hog PSG. Always read and obey
all safety messages.
• Wear protective clothing and safety glasses when handling
collector components or servicing the unit.
• Use proper lifting and rigging equipment to install your
electronic precipitator.
• The electronic precipitator should be properly grounded
prior to servicing.
• Disconnect power before servicing.
• Replace all access panels before operating.
• Do not operate the unit with component doors open.
• Electrical connections should only be made by qualified
personnel and be in accordance with local and national
codes and regulations.
• Do not use in explosive atmospheres.
• Do not collect emissions which are explosive
• Use non flammable cleaners.
• Keep flammable materials and vapors, such as gasoline,
away from unit.
• The unit should be inspected frequently and contaminants
removed to prevent excessive accumulation which may
result in flash-over or fire damage.
• Operate only in a safe and serviceable condition.
• Operating temperature to the air stream should not
exceed 120° F.
!
!DANGER
!WARNING
!WARNING
!CAUTION
CAUTION
This is the safety alert symbol.
This symbol alerts you to potential hazards that can kill or hurt you and others. All safety messages will follow the safety
alert symbol and the word “DANGER” “WARNING” or “CAUTION”. These words mean:
Indicates a hazardous situation which, if not avoided, will result in death or serious
injury.
Indicates a potentially hazardous situation which, if not avoided, could result in death or
serious injury.
Indicates a potentially hazardous situation which, if not avoided, may result in minor or
moderate injury.
CAUTION used without the safety alert symbol indicates a potentially hazardous
situation which, if not avoided, may result in property damage.

v
COMBUSTIBLE DUST HAZARDS –
SMOG-HOG®and DUST-HOG®Pollution Control Systems
Pursuant to National Fire Protection Agency (NFPA) Standards, the owner/user is required to test their dust mixtures
to evaluate and understand potential combustion or deflagration hazards that may exist. In addition, NFPA standards
require the owner/user to perform and have record of a Dust Hazard Analysis (DHA) if there is potentially a combustible
material involved within or exposed to the process.
The DHA serves as a systematic review of the process to:
1) Identify where fires and explosions can occur;
2) Identify the potential causes and consequences, and;
3) Determine if existing and proposed safeguards are sufficient.
It is the responsibility of the owner/user to evaluate, interpret and document any associated risk in their process
including adherence and compliance to any and all applicable local, state and federal codes, standards, laws and
regulations.
It is the sole responsibility of the equipment owner/user of record to coordinate and perform sample material collection
and combustion/explosivity testing of any and all dust and material that will be extracted and filtered by the Air Pollution
Control (APC) filtration equipment and to notify Parker of the results prior to any discussion involving equipment
specification and solution recommendation. It is recommended to utilize a Certified Industrial Hygienist (CIH) or certified
safety expert that is properly trained, licensed and approved and to use a licensed and approved dust testing facility
for proper dust and material analysis, testing protocol and reporting procedures. A sample of testing facilities and list of
Industrial Hygiene (CIH) and other occupational and environmental health and safety (OEHS) consultants can be located
through AIHA (American Industrial Hygiene Association) website.
To minimize the risk of fire or explosion, user must ensure proper installation, operation and maintenance of Parker
equipment. Since application, installation, operation and maintenance are beyond the control of Parker, Parker disclaims
any liability or responsibility for damage from fires or explosions regardless of origin. Parker recommends that all APC
dust collection equipment, installation and application conform to any and all applicable local, state and federal
standards, codes, laws and regulations including the addition of appropriate fire or explosion protection systems
including but not limited to venting, mitigation, suppression and isolation when and where required. Installation of
Parker equipment should be by a licensed contractor that is also experienced in potential fire and explosion hazards
and adheres to related local, state and federal codes, standards, laws and regulations. Parker is not an expert nor
certified design consultant in relation to spark, fire or explosion mitigation including but not limited to detection,
mitigation, suppression and isolation pf combustible dusts and materials. Therefore, Parker recommends that any
industrial air filtration system recommendation, design or solution be reviewed, approved, stamped and signed by
an industry expert consultant in air filtration systems, combustible dust/materials or certified safety expert such as a
Certified Industrial Hygienist (CIH) or a Certified Professional Engineer (PE) who is a licensed and certified expert with
industrial filtration system design and application including adherence and compliance to any and all applicable local,
state and federal codes, standards, laws and regulations.
Pursuant to Parker’s Offer of Sale (terms and conditions) and by accepting the purchased equipment, Buyer and owner/
user agree to defend, indemnify, and hold harmless Parker, its successors, assignees, suppliers, shareholders, directors,
officers, employees, agents, and affiliated companies from all losses, costs, damages, demands, claims, liabilities, fines,
penalties or any other expenses (including attorneys’ fees, court costs, and expert fees) (collectively “losses”), caused or
contributed to in any way by Buyer or owner/user’s failure to follow these instructions and/or failure to properly install,
apply, operate, or maintain the equipment purchased from or supplied by Parker, or losses caused or contributed to in
any way by Buyer’s and owner/user’s failure to provide accurate information, specifications or dust explosivity values.

1
1. Introduction
You are about to install and operate a SMOG-HOG® PSG
operating on the principle of electrostatic precipitation. PSG
removes submicron, airborne particulate with high efficiency and
at a uniquely low expenditure of energy. With proper handling
and installation, the PSG becomes a powerful tool in controlling
objectionable emissions from a wide range of processes.
The PSG can vary in options, consisting of working groups
of collection components which may, in turn, be preceded or
followed by complimentary conditioning equipment. The PSG
may take the form of a simple component cabinet for inclusion in
a large air handling system or may be a self-sufficient air pollution
control package. Since the PSG generally becomes an integral
part of a process exhaust network, installation should be carefully
planned, starting with mechanical layout drawings and electrical
wiring diagrams provided by Parker. Reading this manual is
important to the successful installation and operation. The PSG
Series has been built to rigid specifications. As with all precision
equipment, the system requires periodic care and maintenance.
This manual contains instructions for standard maintenance and
manual cleaning of components. If the system is equipped with In
Place Cleaning, there is a separate owner’s manual. If assistance
is required please contact Parker Industrial Gas Filtration and
Generation Customer Service, 4087 Walden Avenue, Lancaster,
NY 14086, 1-800-343-4048.
1.1 Description of Operation
PSG Series is a two-stage, Penney-type electrostatic precipitator
used for removal of submicronic hydrocarbon emissions of
smoke and other airborne contaminants. The two “stages”
consist of an ionizing section and a collecting section, combined
in one assembly as a unicell. Each ionizing section consists
of a series of (10 mil) wires charged to a high DC voltage and
centered between a like series of grounded plates. This high
voltage differential generates an intense electrostatic field where
airborne particles are “ionized,” i.e., positive polarity. Each
collecting section consists of a large number of parallel cell
plates, alternately charged at high DC voltage (the same polarity
as the ionizer but about half the voltage magnitude) and ground
potential, thus forming a magnetic field. Charged particles are
simultaneously repelled by the cell charged plates (smaller
dimensional plates) and attracted to cell ground plates (large
dimensional plates). The result being a highly efficient removal
of charged particulate from the airstream as it passes through
the electrostatic precipitator. The total current to both the ionizer
and collector cell circuits is below 5 milliamps which is non
lethal. Unicell components are usually preceded and/or followed
by mesh filters to assure even distribution of air, at low velocity.
Air movement is provided by a system blower located behind
the unicell components that exhausts cleaned air at a specified
cfm rate. More complex systems can include other conditioning
equipment.
1.2 System Definitions
PSG Series is designed for rigorous, often continuous, smoke
and particulate removal duty. The system includes mechanical pre
filters (as applicable), unicells (combination ionizer and collection
cell), power pack enclosures and pre/after filters. The PSG Series
has been tested to operate in accordance with national listing
standards of agencies such as Underwriters’ Laboratories (UL)
and ETL, with local approvals from selected cities as required.
PSG units are designed for installation in customer ducting where
other system components, including the blower, may be provided
by others. PSG systems can include blowers, skids and other
factory-assembled equipment, which arrives in the field ready for
installation.
1.3 Unit Nomenclature
PSG systems may include various combinations of features
connected in series in the direction of airflow. The PSG’s
configuration code is defined with a series of letters. Refer to
Figure 1. On “single-wide”, (the width of one module which is
one or two or three unicells placed in series) the access doors to
collecting components face the operator as air flows from left to
right. Opposite side access right to left is also available. “Double
wide” (the width of two modules placed side by side) have access
doors on both sides, each door accessing one module, left to
right, and right to left in one system. Air which flows through
one set of unicells will make a single cleaning “pass.” When an
application dictates, multiple passes can be placed in series in the
direction of airflow. A two-pass system is illustrated in Figure 2.
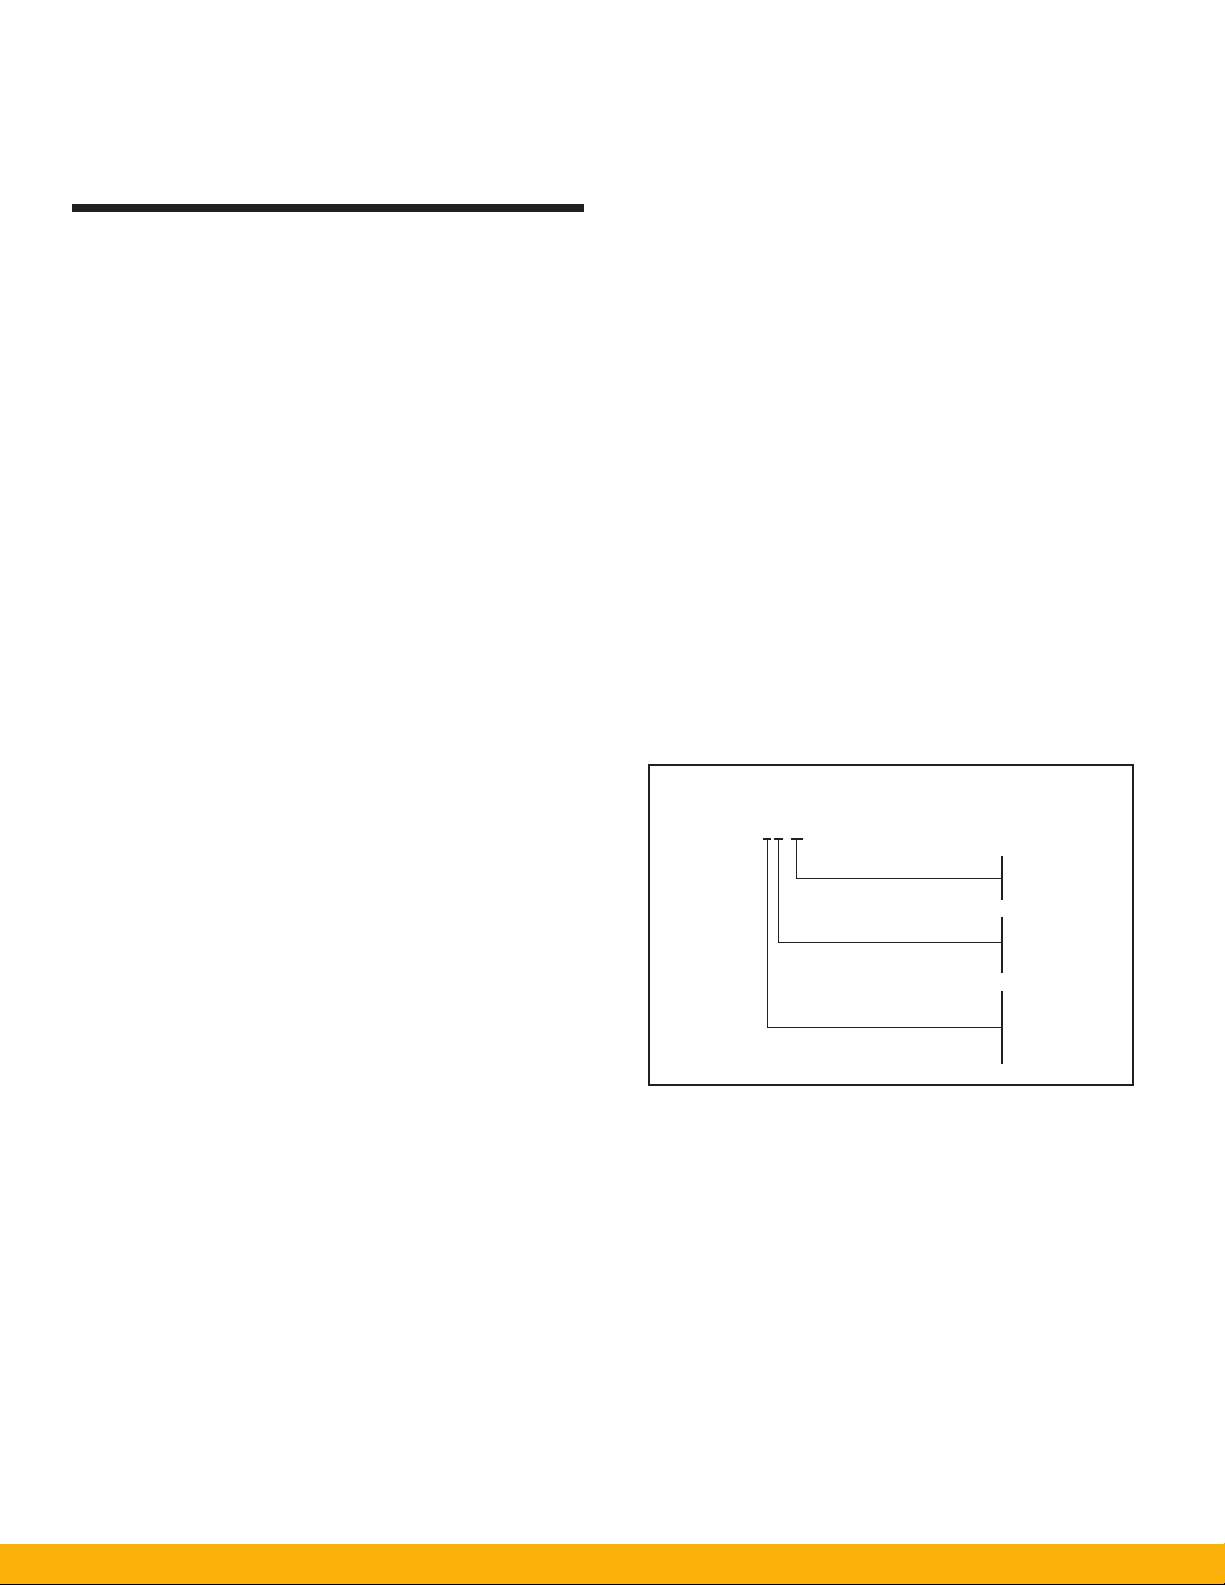
Figure 1
PSG SERIES NOMENCLATURE
PSG-12-2
1-Single pass
2-Double pass
3-Tr iple pass
1-1 Cell wide
2-2 Cells wide
4-4 Cells wide
3-3 Cells wide
1-1 Tier high
2-2 Tiers high
3-3 Tiers high
4-4 Tiers high
5-5 Tiers high
Typical model identifier:
THIS MANUAL IS COMPILED FOR GENERAL
INFORMATION AND DOES NOT NECESSARILY
REPRESENT ALL OPTIONS OR ACCESSORIES.
CONTACT PARKER CUSTOMER SERVICE
1-800-343-4048 FOR ADDITIONAL INFORMATION
1.4 Description of Components
1.4.1 Power Packs
Each power pack converts 115 volt, single-phase AC power to
high voltage DC for one or two or three unicells (each with one ion-
izer and one collecting section). This combination of components
comprises a working “module.” Standard packs supply positive
DC voltage of 11.0 (nominal) KVDC to each ionizer and 5.5 KVDC
to each collection cell. Power packs with special ratings are sup-
plied on certain applications. Power packs are mounted in power
pack enclosures located on the module doors to the PSG.

2
Figure 2
PSG SERIES SYSTEM
Inlet
Plenum
Unicells
Odor
Control
Outlet
Plenum
System
Blower
Main Electrical
Panel
Structural
Steel Skid
Power Pack Enclosures
with Indicator Lights
Baffle Filters
Wash Water Supply
Pipe Connection
Face & Overhead
Wash Headers
Each pack supplies power to a discrete module of unicells with
a dedicated, externally mounted indicator light that illuminates to
indicate normal operation. The PSG power pack meets UL safety
standards. In the event of a short circuit or overload condition to the
output side, the power pack’s high voltage collapses and the indicator
light is in the flashing mode. Upon removal of the overload, the power
pack automatically returns to normal and the indicator light will be
illuminated. The power pack is self-protecting against overloads (e.g.
dirty components, short circuits in ionizer and cell circuits) and is self
regulating when the AC voltage supply varies from 90 to 132 VAC.
1.4.2 Unicell Ionizer Section
Each unicell supports ten (10) 10 mil tungsten steel ionizer wires
spring mounted and centered between aluminum ground plates.
Refer to Figure 6. When high DC voltage is applied to the wires, a
powerful field charges contaminated particles. Ionizer standoff con-
voluted insulators are part of the ionizer wire support bar(s) which
separates high voltage from grounded chassis.
1.4.3 Unicell Collector Cell Section
Each unicell contains a series of parallel plates, alternately charged
and grounded, whose planes are in-line with the direction of airflow.
Refer to Figure 6. Charged plates are connected electrically and sus-
pended from four triangular shaped insulators on each end of the
unicell. The ground plates are independently supported.

3
1.4.4 Filters
Prefilters and afterfilters can take many forms but are normally of
the mechanical type, aluminum metal mesh and encased in an alu-
minum frame. Filters provide even air distribution and collect large
particles.
1.4.5 Junction Boxes
PSG mounted junction boxes are equipped with terminal strips for
115 VAC single phase power entry. On factory-assembled systems,
three phase field connection is usually to a single point to a unit
Main Electrical Panel or a unit Blower Panel. Refer to unit System
Layout Drawings and unit Electrical Drawings which define the re-
quired field installation for each application.
1.4.6 Other Equipment
The PSG may be supplied with in-place cleaning, inlet plenum with
baffle filters or aluminum filters, outlet plenums, pre piped for fire
protection, carbon or potassium permanganate odor filters, skid
mounted, insulated enclosure, cooling/heating coils, and blower.
System components may be shipped skid mounted, or as sub-
assemblies. Planning is required to understand the scope of the
installation, from handling to assembly to the connection of utilities.
2.2 Clearances
2.2.1 Component Access
A clearance of 36” is recommended for maintenance and compo-
nent removal/installation to the access door(s) side, refer to unit
System Layout Drawing for clearances.
2.2.2 Electrical Enclosure Access
A minimum of 18” is required from overhead obstructions to
allow access to electrical top boxes. A side clearance of 48”
usually is recommended for access to electrical panels, refer to
NEC for specified clearance.
!CAUTION
CAUTION
2. Installation Planning
Prior to receipt of equipment, drawings should be reviewed and
plans completed for handling and installation. Site selection, sup-
port structure, utilities, drains, ductwork and work sequence need
to be coordinated.
NOTE: INSTALLATION MUST BE IN ACCORDANCE WITH NFPA
96, Removal of Smoke and Grease Laden Vapor from Commer-
cial Cooking Equipment
Unit electrical panels provide the necessary electrical
interlocks and controls for the PSG. If electrical control
panels supplied by others are not per Parker specica-
tions the PSG is operating in an UNSAFE mode, voiding
the warranty.
The following are general guidelines.
2.1 Location
Systems should be located as near as possible to the emission
source, but with consideration given to utility proximity and safe
maintenance access. Indoor location is preferred since it eliminates
climate associated problems such as servicing the system, heat
traced/insulated wash water and drain pipes or an insulated sys-
2.2.3 Bottom Working Clearance
Plumbing access should be at least 18” beneath the unit.
2.3 Supports
2.3.1 Skidded Systems
Lifting points for skid mounted PSG Series systems are illustrated
to the unit System Layout Drawings including installation notes.
Field structural support design is the responsibility of the installer.
Good design practice should be followed in allowing adequate
clearance for plumbing, conduit installation, and maintenance.
2.3.2 Unskidded Systems
When PSG Series components are shipped unassembled, care
should be taken to provide adequate bearing support on the field
support structure.
Ducting and accessories attached to the PSG unit
should be independently supported.
2.3.3 Utilities/Drains
Mechanical, electrical service requirements and system entry points
are clearly marked on the unit System Layout Drawing and unit Elec-
trical Drawings. The PSG main drain pipe should be have a drain
trap. Refer to Figure 5. When a PSG is equipped with In Place Clean-
ing, operating water pressure (working pressure), flow rates (gpm)
and hot water specified are based on factory testing, refer to unit
System Layout Drawing or In Place Cleaning Owner’s Manual for
specifications. Failure to achieve In Place Cleaning specifications will
result in an ineffective wash cycle, increasing system maintenance
costs. If the PSG is located outside and there are climate associated
problems (32°F or below), exposed piping wash/drain including so-
lenoid valves should be heat traced and insulated. Do not heat trace
the solenoid valve coil.
2.3.4 Ducting
Quality ducting is important system performance. Sealed connec-
tions prevent air and liquid leakage during operation. Welded duct
connections are required with ducting pitched towards the PSG.
Duct design air velocities are typically 1,500 to 2,500 FPM. Gas-
kets and sealant, where used, should be compatible with the mate-
rial collected and the temperature of the airstream. Wet airstreams
(high humidity) typically require insulation to prevent condensation.

4
3. Installation
CRUSH AND ELECTROCUTION HAZARD
Use adequate safety measures when lifting and assembling
heavy components. Consult site safety personnel for rec-
ommendations. Location should be clear of all obstruc-
tions, such as utility lines and building clearances.
3.1 Receiving Inspection
The PSG system components are thoroughly checked and tested at
the factory. Although precautions have been taken to ensure against
shipping damage, be sure to carefully inspect contents upon deliv-
ery. Notify your carrier immediately and enter a claim for any damage
found. Check the material received against shipping papers for any
shortages.
NOTE: Damage to cartons, skids, shrink wrap, etc., may indicate that
rough handing has caused internal damage. Careful inspec-
tion, including the opening of all shipping containers, should
precede acceptance of equipment.
Certain items (e.g., detergent containers) may be drop shipped and/
or shipped separately. Be sure to inspect such items before mark-
ing and storing. Open all cartons. Notify the trucking company and
Parker immediately if cartons or any other shipping list items are
missing. Handling SMOG-HOG skidded systems and subassem-
blies are usually shipped to the job site on flatbed trailers. Most can
be handled by forklift truck but final placement may require a crane
refer to unit System Layout Drawing for weights, sizes and notes
detailing responsibilities of the installing contractor.
3.2 Unloading By Forklift
As shown in Figure 3A, the PSG unit, duct transition or skidded
system may be unloaded by use of forklift trucks. Extreme caution
should be exercised to guarantee that the load is lifted at its center of
gravity. When placing the unit on the ground, blocks should be locat-
ed under the component exactly where placed during shipment. The
preferred method of forklift removal of large components involves
using a spreader bar. Refer to Figure 3B. This guarantees vertical pull
on lifting eyes/lugs on the system or component.
3.3 Unloading By Crane
Handling of large, skidded PSG systems is a job for a competent
rigger. Figure 3C is for a typical PSG unit and Figure 3D illustrates
lifting lugs for a skidded system. Spreader bars should be located
over the two front lugs and the two rear lugs of the system skid, with
a spacer bar between them to assure vertical pull. Lugs are located
to minimize tilting during lift.
CAUTION
When systems are shipped disassembled, certain
sections may be fastened together to minimize truck
space. Remove shipping bolts prior to handling these
components.
!DANGER
Figure 3A
Unloading by Forklift
Figure 3B
Typical Spreader Bar
Figure 3C
Lifting A PSG Unit
Figure 3D
Suggested PSG System Lifting Configuration

5
3.5.4 Pre-conditioning Equipment
For the PSG to operate at peak efficiency, certain pre-conditioning
equipment may be required. When supplied by Parker, this equip-
ment should be installed per unit System Layout Drawing and unit
Electrical Drawings. Incorrect installation of such devices as cool-
ing coils or other equipment may alter system performance and
void the unit warranty.
3.5.5 Order of Installation
When the PSG is shipped in sections refer to the unit System Lay-
out Drawing for proper installation.
The PSG unit should be secured with appropriate hard-
ware by the installing contractor.
3.5.6 Leveling
As base-mounted sections are installed, each section should be
leveled to ensure proper drainage and mutual alignment. If a unit
is not level within 1/8” (front-to-back and side-to-side), place suit-
able Shims between unit and support structure surface. Shims
should run the entire length of the mating surfaces. Skidded sys-
tems should be level to within 1/8” per 4 feet of length and width.
3.5.7 Blowers with Vibration Isolators
Skid mounted units with blowers are normally shipped with vibra-
tion Isolators between blower and skid. Refer to Figure 4. These
assemblies are shipped with isolators in a restrained condition,
remove shipping bands.
3.5.8 Drain Pipe Connections
The PSG modular cabinet is supplied with drain connections refer
to unit System Layout Drawing. The number of drain connections
will depend on the PSG model. All PSG cabinet drain connections
should be connected to one main drain pipe with a drain trap and
properly sloped to the building drain pipe connection. Refer to Fig-
ure 5. Air passing through the system is under negative pressure.
A drain trap is required serving as a vacuum break and to assure
proper drainage during system operation. The trap “height is equal
to the system static pressure, plus three additional inches of water.
Cleanout plugs should be installed to the trap to facilitate cleaning.
If required per code a grease trap should be installed. Drain pipes
should be heat traced and insulated if particulate tends to solidify
at expected ambient temperatures. This precaution also applies to
drain and water pipes exposed to cold climates.
3.5.9 Wash Water Supply Connections
Wash water is required for systems with In-Place Cleaning, refer to
the unit System Layout and the In-Place Cleaning Owner’s Manual
for installation, operation and specifications.
3.5.10 Heating/Cooling Coils
For systems with heating or cooling coils, refer to unit System Lay-
out Drawing.
!WARNING
3.4 Unit Storage or Delay to System Installation
If PSG installation is delayed for an extended period (one month or
more), protect system components as follows:
1. Store in a cool, dry location. Do not disassemble. Do not re-
move components.
2. Cover duct and unit openings with plastic sheeting and duct
tape; cover plumbing openings with plastic hole plugs.
3. Cover skidded systems with plastic sheeting and seal with
duct tape. Do not use black plastic sheeting. When removing
components from storage, check gaskets, seals and electrical
components for long term effects of exposure to moisture and
dust before proceeding with installation.
4. The system exhaust blower should be protected from the
weather. Failure to do so could damage the motor, bearings,
belts, and electrical components. The following are guidelines.
• Store in an area with no vibration.
• Cover blower with a tarp do not use a black tarp which
will promote condensation.
• Remove drive belts.
• Rotate fan wheel monthly
Also consult the blower manufacturer for storage and
start up recommendations.
3.5 Installing The System
Skidded PSG systems arrive from the factory ready for final plumb-
ing and wiring, with proper planning refer to Section 2, Installation
Planning final installation should be straightforward. When PSG sub-
assemblies are to be installed on customer’s structure, further in-
structions are in order.
3.5.1 PSG Systems
The majority of skidded systems are shipped with unicells and filter
installed. The system may be lifted into place without removing
the unicells and filter. However, when job circumstances and or
shipping requirements dictate, unicells and filters are shipped on a
separate skid. These components should not be installed until the
system is in place. Individual units should be rigidly mounted, with
front-to-back bearing support in the direction of airflow. Clearance
for plumbing access should be provided under each unit, refer to
Installation Planning. The PSG main drain pipe should have a drain
trap and multiple passes require drain connection(s) for each pass.
Structural field installed support channels should not interfere with
proposed plumbing and wiring. Where the PSG is to be suspend-
ed, refer unit System Layout Drawing. Do not support ducting,
plumbing or other field hardware from the PSG.
3.5.2 Inlet/Outlet Plenums
As supplied by Parker, transition plenums have all-welded seams.
Inlet plenums include baffle filters or aluminum media to promote
even air distribution across subsequent system components.
3.5.3 Motor/Blowers
Motor/blower assemblies installed in the field should be equipped
with vibration isolators and adequate structural support. When
supplied by others, the motor/blower assemblies should meet air
volume specifications to the PSG model; refer to unit System Lay-
out Drawing.

6
Figure 4
Spring Type Vibration Insulator
Notes (Figure 4):
1. Before the isolators are adjusted, the weight of the equipment
will cause the top plate to come to rest on the housing. The
isolators should be adjusted to provide a minimum clearance
of ¼” between the top plate and the housing.
2. Compress the springs by turning the adjusting nut clockwise.
Start at one isolator and make four turns on the adjusting
bolt. Move to the next isolator and make four turns, etc.,
until all isolators have been adjusted four turns. Repeat this
procedure until a 1/4’’ clearance is obtained between top
place and housing.
3. Check the level of the equipment. The equipment may now be
leveled by making small adjustments of individual isolators at
the high and low points.
Figure 5
Drain Trap
Notes:
1. MAIN DRAIN LINE SHOULD BE SUFFICIENTLY SLOPED, SIZED, AND
VENTED TO HANDLE ALL DRAINS MANIFOLDED.
2. ALL PLUMBING SHOULD CONFORM WITH ALL STATE AND LOCAL CODES.
3. THIS ILLUSTRATION IS NOT MEANT TO BE A RIGOROUS AND ALL
ENCOMPASSING DESIGN. APPROPRIATE DESIGN CRITERIA AS PROVIDED
BY A PLUMBING/MECHANICAL CONTRACTOR SHOULD BE UTILIZED TO
ENSURE PROPER CONTROL OF DRAINAGE EFFLUENT FROM THE SMOG
HOG SYSTEM. PARKER ACCEPTS NO RESPONSIBILITY FOR THE PLUMBING
DESIGN OR INSTALLATION.

7
3.5.13 Building Maintenance System (BMS)
An alternative to the remote status panel is the BMS (signal relay
modules) which also includes additional features other than only
monitoring the power pack enclosure(s); refer to unit Electrical Draw-
ings or Sequence of Operation documentation to determine if the
BMS is part of the PSG system. Some of the additional features
(from the PSG system to BMS), a common signal indicating high
voltages are not within specifications to the power pack enclosures,
indicating the operational status of the PSG system, indicating the
operational status of the In Place Cleaning System, (from BMS to
PSG system), placing PSG system on or off line, and fire system
contact disabling the PSG power pack circuit and make up blower.
Signal relays for the BMS are usually located in the unit Main Electri-
cal Panel or the power pack enclosures, refer to unit Electrical Draw-
ings. The Building Maintenance System (BMS) is supplied by others.
THE FOLLOWING SECTIONS ARE FOR THE
USE OF TRAINED SERVICE PERSONNEL ONLY.
The PSG unit should be inspected frequently and col-
lected contaminant removed from the system regularly
to prevent excessive accumulation which may result in a
ashover or risk of re.
Hazardous live and moving parts are exposed during the
troubleshooting procedures.
Power pack enclosure(s) service voltage is 120VAC. This
can be lethal. Voltage (120 VAC) is present within the
power pack enclosure even though the toggle switch is
placed in the off position.
Risk of electrical shock. The high voltage circuits to
the ionizer and collector should be grounded before
removing the power pack, high voltage wires, door
feed-through insulators and unicell(s). The grounding
procedure can be accomplished by waiting one minute
after placing the toggle switch in off position to the
power pack enclosure or refer to Figures 12 and 13. The
power pack total current output is limited to a maximum
of 5 milliamps to assure personnel safety.
!WARNING
!WARNING
3.5.11 Electrical Field Installation
ELECTRICAL SHOCK HAZARD
When electrical control panels are supplied by others
an electrical interlock should be provided for the pow-
er pack circuit to the Smog-Hog PSG and the system
exhaust blower. This provides safe operation of the
PSG. Do not operate the power pack circuit with the
system exhaust blower off line.
All electrical work should be performed by a qualified electrician
in accordance with local electrical codes. Disconnect electrical
power before installing or servicing electrical components. The
PSG is manufactured per job specifications and Parker speci-
fications, refer to unit Electrical Drawings. Dashed lines on unit
Electrical Drawings identify field wiring requirements and possible
certain recommended equipment not supplied by Parker. When
additional equipment is specified for field installation, refer to unit
System Layout Drawing and unit Electrical Drawings. If the PSG
is skid mounted, interconnection wiring may have been com-
pleted at the factory. Do not mount auxiliary electrical equipment
on or inside Parker equipment unless specifically authorized by
Parker. Such unauthorized action may void the system warranty.
Parker provides solid-state programmable logic controllers (PLC)
on various systems. The PLC operates on a low (24 VDC/120
VAC voltage and is susceptible to faults induced by the close
proximity to higher voltage wires. Accordingly, the following
should be observed during electrical installation:
1. Three-phase leads should not be located within 4 inches of the
solid-state controller.
2. Care should be exercised when drilling conduit entry holes to
protect PLC and other electrical components from metal chips
and dust. Failure to comply with these instructions can result in
a fault condition requiring repair or replacement by authorized
service personnel. Costs of such repair or replacement are the
responsibility of the user/installing contractor.
3.5.12 Remote Status
This panel serves as a monitoring device indicating the opera-
tional status to each power pack enclosure for the end user; refer
to unit Electrical Drawings or Sequence of Operation documen-
tation to determine if the remote status panel is part of the PSG
system. The remote status panel or unit Main Electrical Panel
(if amber lights are integrated to main panel) should be located
remotely from the PSG system preferably in an area which is ac-
cessible and not installed by the PSG system. The panel located
by the PSG system serves no purpose since there is an indica-
tor light to each power pack enclosure. The remote status could
also consist of a beacon light assembly located in an accessible
area for monitoring. The illumination of the beacon light indicates
a failed condition to one of the power pack enclosures. Flasher
modules for each power pack enclosure is either located in a
separate panel, the unit Main Electrical Panel, or in each power
pack enclosure.
!DANGER
!CAUTION
!CAUTION
!WARNING

8
REPLACEMENT PARTS
QUANTITY
ITEM NO. PART NO. DESCRIPTIONS REQUIRED
1 02-1921 UNICELL ASSEMBLY 1
2 36-0068 IONIZER CONTACT SPRING 1
3 30-0452 CONTACT WELD NUT 1
4A 18-0674 IONIZER SUPPORT BAR (TOP) 1
4B 18-0670 IONIZER SUPPORT BAR (BOTTOM) 1
5 02-0749 IONIZER/CELL FEED THRU INSULATOR
ASSEMBLIES 2
37-0026 INSULATOR ONLY 2
6 37-0028 IONIZER STANDOFF INSULATOR 4
7 03-0559 IONIZER WIRE SPRING 20
8 03-0738 IONIZER WIRE, 10 MIL SST 10
9 30-0387 CELL CONTACT SCREW 1
10 30-0384 FLAT WASHER 1/4’’ SST 1
11 36-0012 CELL CONTACT SPRING 1
12 37-0061 CELL TRIANGULAR INSULATOR 8
13 10-0158 WIDE PLATE (GND.) 37
14 10-0157 NARROW PLATE (+/-) 38
15 36-0142 SCREW 8-32 x 1/2’’ 4
Figure 6
Unicell Electrical Alignment and Parts List

9
4. Operation
4.1 Start-up Checks
4.1.1 Installing Components
If unicells and filter media were removed for shipment or
installation, refer to Figure 6 for proper installation and electrical
contact alignment. Filter media is installed as after filters (after
the unicell) with In Place Cleaning. Do not install filter media
as pre filters (before the unicell) with In Place Cleaning. This
will reduce the effectiveness of the wash cycle by 50 percent.
The filter media is utilized as pre and after filters if the PSG is
not equipped with In Place Cleaning. The PSG inlet plenum, if
supplied by Parker, will have baffle filters or aluminum media.
The inlet plenum should be inspected that all baffle filters or
aluminum filters are installed.
4.1.2 Ducting Connections
Blower speeds are factory set by the blower manufacturer to
compensate for static pressure losses in ducting as specified
by others. Starting the blower before ducting is complete or
before debris is removed can result in motor overload or other
system damage.
4.1.3 Blower Rotation
For proper airflow, the blower should be operating in the correct
direction. If the blower is operating in the reverse direction, air
will move in the proper direction, but at significantly reduced
rates. To check rotation:
1. Place PSG unit off line.
2. Remove blower housing from the blower to observe the
pulley rotation.
3. Place the PSG unit on line for approximately one minute.
4. Place PSG unit off line.
5. As the blower pulley slows down, observe the direction of
rotation.
6. Note directional arrow located on the blower housing.
Extreme care should be exercised when operating
blowers with motor/drive belts exposed. Loose
fitting clothing can easily be drawn into these
moving parts.
7. If blower wheel was not rotating in the correct direction,
disengage main three-phase fused disconnect switch.
Do not attempt to rewire “live” electrical connections.
8. Open power panel and reverse any two of the three wires
at the terminal strip (Ll, L2, and L3).
9. Engage the main three phase fused disconnect switch and
place the PSG on line, checking blower rotation.
!WARNING
!WARNING
4.1.4 Blower Belt Tension
The drive belt tension adjustment is critical within the first 24
hours of the system exhaust blower operation. During this 24
hour period, the initial stretch of the belt occurs which requires
a belt tension adjustment. If this tension adjustment is not
completed the belt will wear prematurely, requiring a replacement. A
drive belt tension gage should be used for adjusting belt tension. If
fan belt tension is improper, set tension by adjusting the motor slide
base. Loosen four bolts holding the motor to the base and turn the
adjustment bolt(s) on the base. Check with a steel straight edge to
make sure that motor pulley and blower pulley is still aligned. Tighten
motor mounting bolts. Figure 7 illustrates a typical motor/blower
arrangement (motor/blower configurations will vary).
Improper tension on drive belts will cause premature
failure of belts.
4.1.5 Blower Current Measurement
Using an ammeter measure the current amperage of the blower
motor. The measurement should not exceed the full load ampere
(FLA) rating identified on the blower motor nameplate. If the over-
load relay is tripping perform the following: check overload relay
for proper setting per motor FLA, measure blower rpm and design
static pressure to determine that actual conditions are per blower
specifications. Blower rpm can be measured with a tachometer.
Design or total static pressure (TSP) is the summation in static pres-
sure between the blower inlet and outlet. This summation is best
checked with a manometer and pitot tube measuring readings from
(a) the exhaust transition near the blower inlet and (b) the exhaust
stack after the blower outlet. If the actual static pressure is higher
than the blower specifications, and or the blower rpm is higher than
the blower specifications, reduce the blower speed by opening the
variable pitch pulley as described in the next procedure. Blower
specifications or blower curve refers to the established operating
conditions set by the blower manufacturer, rpm, cfm (air volume),
and TSP. A reduction in blower rpm will decrease the TSP. A new
pulley set may be required to reduce the blower rpm and amperage.
The blower can be supplied either by Parker or by others. A blower
curve can be requested through the blower manufacturer with the
serial number.
Figure 7
Typical Motor/Blower Configuration
CAUTION

10
Improper blower speeds adversely affect system
performance. Contact Parker before adjusting motor
variable pulley settings.
4.1.7 Power Pack Operation
The power pack voltage range is 90 to 130 AC, 60 Hz, supplied
by the unit Main Electrical Panel or electrical panel supplied by
others. If the electrical panel is supplied by others the power
pack circuit should be electrically interlocked with the blower
circuit. The PSG will be operating in an unsafe mode if an
electrical interlock is not installed. The power pack indicator light
on the unit is illuminated when high voltage output is within
specifications. If the indicator light is flashing or fails to illuminate
refer to Section 10 Troubleshooting.
4.1.8 Remote Status Panel
The remote status panel (a remote amber light to each power
pack enclosure indicator light circuit identified by a letter/
number) will display the following conditions. The amber light(s)
could be integrated with the unit Main Electrical Panel or as a
separate panel, refer to unit Electrical Drawings.
Amber light(s) will be illuminated under normal conditions,
high voltages within specifications.
Amber light(s) are in the flashing condition, high voltages are
not within specifications. The PSG system is online.
Amber light(s) are not illuminated, PSG system is off line, or
amber light/flasher module has failed, refer to troubleshooting
section.
Maintenance procedures and the majority of the troubleshooting
section refer to the power pack enclosure indicator light.
Figure 8
Adjustment Motor Pulley Settings
4.1.6 Adjusting Motor Variable Pitch Pulley
Increasing blower speed (RPM) will increase airflow (CFM) and current
amperage. Refer to Figure 8. To increase speed, close the variable
pitch pulley (from “normal,” as in Figure 8A, toward “full closed,” as in
Figure 8B). Decreasing blower speed will decrease airflow (CFM) and
current amperage. To decrease speed, open the variable pitch pulley
(from “normal,”as in Figure 8A, toward “full open,” as in Figure 8C).
To adjust the variable pitch pulley:
1. Loosen motor base nuts, adjust motor slide base and
remove the drive belt.
2. Loosen set screw “A” to clear the drive key between pulley
halves.
3. Remove the key.
4. Adjust pulley in increments of one turn to the desired setting.
5. Install key and tighten set screw “A.”
6. Install drive belt.
7. Loosen set screw “B.”
8. Align belt centerlines of motor and blower pulleys using
straight edge and square.
9. Set belt tension using a belt tension gage.
Some system exhaust blowers will not have an adjustable motor
pulley.
Check operation of each amber light by placing the power pack
toggle switch in the off position, one at time, amber light should
be flashing corresponding to module identification on remote
status panel.
The remote status can be in the configuration of a beacon light
instead of individual amber lights. The beacon light is common
to all the modules. The beacon light is illuminated when a failure
occurs to one or more modules.
4.1.9 Power Pack Enclosure Push Rod and
Grounding Bar
Each power pack enclosure has a captive, spring loaded “push
rod” extending into the module.
Factory-set, the push rod serves the following purposes:
1. High voltage DC power is automatically shut down with the
unicells removed from the module.
2. Whenever a module door or power pack enclosure lid
cover is opened, the limit switch is disengaged, placing
115 VAC off line to the power pack.
3. Opening either of the module door or the power pack
enclosure lid cover also releases the spring loaded push-
rod, placing the grounding bar in contact with the cell door
feed through insulator acorn nut, removing residual cell
voltage.
The opening of only the module door is such that
the grounding bar may not completely short out the cell
circuit. As a precaution, perform the grounding proce-
dure, refer to Figures 12 and 13.
CAUTION
CAUTION

11
During normal operation, with unicells in place, the component
door (10) and the power pack door closed (3), the push rod (5)
is in contact with unicell endplate (6). Push rod extension (1) is
in contact with the ground bar (2) and bends to contact the limit
switch (4). Refer to Figure 9. Upon opening the component door
(10), the push rod (5) is released from the unicell endplate (6) and
spring (7) compression is relieved, breaking the contact of the
push rod extension (1) from the ground bar (2), placing AC volt-
age off line to the power pack and causing the grounding bar to
contact the acorn nut (8). Refer to Figure 10. When opening the
power pack door (3), the spring (7) remains compressed but the
grounding bar (2) is pulled from the push rod extension (1) as the
power pack door (3) is opened. AC voltage is placed off line to the
power pack by opening the limit switch (4) which the unicells are
grounded through the acorn nut (8), but with the contact spring
(12) fully compressed. Refer to Figure 11.
4.1.10 Odor Control
Odor filtration removes troublesome gases from the air stream
as a post treatment to the PSG unicell components. The media
can consists of carbon (18 to 20 pounds per filter) or potassium
permanganate (28 to 30 pounds per filter) a Class 1 rated media
which does not support combustion. PSG systems requiring an
ETL listing will have potassium permanganate.
The odor control cabinet consists of a number of odor filters as
dictated by size of the PSG system. The odor filter dimension is
22” x 22” x 2” at a designed velocity of 50 – 100 fpm. The life of
the media is generally three to six months with a proper primary
filtration (unicell components) maintenance program. Contaminant
collection to the odor filters will decrease the service interval. The
original filter frames should be retained. There is a slide gate to the
filter frame for dumping the spent media and installing new media.
A service company should be selected which is familiar with install-
ing new media into the original filter frames.
The odor filters should be installed one to two days prior to
placing the system on line. The odor filter service life will decrease
if the odor filters are installed before the one to two days recom-
mendation.
Figure 9
Component Door and Power Pack Door Closed
Figure 10
Component Door Open and
Power Pack Door Closed
Figure 11
Component Door Closed and Power Pack Door Open
• Remove plastic sleeves
• Slide odor filters into the cabinet tracks with gaskets parallel to the
back of the cabinet, and such that gaskets on adjacent filters seal
against each other.
• Odor filters are installed in a “V” bank configuration.
• Do not slide the filters with the gasket(s) in the filter tracks.

12
4.1.11 In-Place Cleaning
The spray nozzles to the wash headers can become clogged
or otherwise obstructed due to debris within the field piping.
At initial start-up, water should be purged before final pipe
connection at the PSG. The Y strainer to the detergent injector
tee assembly should also be checked for debris. A wash cycle
should be initiated before placing the PSG on line, refer to the
In-Place Cleaning Owner’s Manual for the start up operational
procedure.
4.1.12 Placing PSG Online
Depending upon job specifications or other requirements, the
PSG may be placed on line by a customer-supplied switch,
or a time clock, or through a building maintenance system
(BMS), refer to unit Electrical Drawings. Upon PSG start-up,
the system blower is placed on line and the power packs are
placed on line after a 45 second delay. The indicator light on
each power pack enclosure should be illuminated. The power
pack enclosure toggle switch should be checked if the indica-
tor light is not illuminated. If the indicator light is not illuminated
after checking the toggle switch or the indicator light is flashing.
Refer to Section 10 Troubleshooting. The unit Main Electrical
Panel has a 40 second time delay at start-up for the power
pack circuit. This represents a standard precaution since PSG
operates in applications where combustible gases could be
present in process enclosures or process duct at start-up. The
time delay of 40 seconds purges the duct before activating
the power pack circuit to assure safe operation. For operation
of auxiliary system equipment, refer manufacturer’s owner’s
instructions for proper operating procedures.
4.1.13 Parker On Site Start Up
The PSG system may include on site start up by a Parker
Field Service Technician. Usually this is listed on the order
acknowledgment. As installation nears completion, allow at
least two weeks for scheduling a Field Service Technician.
Contact Parker Customer Service for a start-up request form.
The completion of the request form is required before
scheduling a Parker Field Service Technician. The on site start
up consist of a complete mechanical and electrical inspection
including the operation of all supplied Parker equipment. A
Parker Field Service Technician is available for on site service
at a daily rate plus travel and expenses.
5. Maintenance and Manual Cleaning
The PSG unit should be inspected frequently and
collected contaminant removed from the system
regularly to prevent excessive accumulation which
may result in a flashover or risk of fire.
5.1.1 Check Power Pack Enclosure Indicator Lights
The PSG should be monitored daily by observing that the indicator
light is illuminated to each power pack enclosure or by the remote
status panel or remote beacon or BMS. Occasional arcing (flashing
of an indicator light) is normal. An established arcing condition or
dead short condition (continuous flashing of an indicator light) or the
indicator light is not illuminated is not normal should be corrected.
Refer to Section 10 Troubleshooting.
5.1.2 Unicell(s) Weekly Visual Inspection
A visual inspection of a few modules could identify problems such
as moderate to extreme contaminant build up to the unicells even
though the indicator lights are illuminated. This will be helpful
in scheduling a manual cleaning of the components, refer to
Section 6 and 7. To check the condition of the unicells, place the
PSG off line. Open the module door and perform the grounding
procedure, refer to Figures 12 and 13, inspect the condition of
the unicells, filters, door feed-thru insulators and interior of the
cabinet. Experience will dictate whether contaminant build-up is
excessive. Contaminant build up will decrease high voltage to
the ionizer and collector cell circuits and also system efficiency.
When accessing a module, always clean the two door feed-thru
insulators. Inspect the ionizer section of each unicell, noting the
condition of the contact spring (distorted?, bent? missing?), ionizer
weld nut (missing?), ionizer standoff insulators (contaminant build
up) and ionizer wires (contaminant build up?, missing?), repair
or replace. Ionizer wires should be taut and centered between
ground plates. Ground plates between each ionizer wire should be
straight and parallel. Unicell module support tracks should be free
of contaminant build-up for ground contact.
Inspect the collector cell section of each unicell, noting the
condition of the contact spring (distorted? bent? missing?) cell
contact screw (missing?), cell plates (bent? warped?) should be
parallel and straight, repair or replace. Cell hot plates (smaller
dimensional plates) should be centered between ground plates
(larger dimensional plate). Cell plates should not have contaminant
bridging between the cell plates or at support structure corners or
the triangular insulators Unicell module support tracks should be
free of contaminant build-up for ground contacts.
5.1.3 Filters, Drain Sumps, and Access Door Gasket
Inspection
Inspect filters, noting the condition (contaminant build up? media
separation? bent frames?) should not have contaminant build up
restricting airflow, repair or replace.
Module drain sumps should not have moderate to extreme
contaminant build up or an accumulation of wash water if
equipped with In Place Cleaning, clean module sumps as required.
Component access doors gaskets should be in-place and in good
condition.
5.1 Recommended Maintenance
Once the system is operational, periodic maintenance is
necessary to assure proper performance. Follow a regular
pattern of system observation and log abnormal conditions.
Since systems reflect the process under control, maintenance
patterns will vary accordingly.
!CAUTION

13
5.1.4 Perform An In-Place Cleaning Wash Cycle
If the PSG is equipped with In Place Cleaning, a daily wash
cycle is required. Refer to In Place Cleaning Owner’s Manual and
Sequence of Operation Instructions. A typical seven day wash
cycle would be six day waterwash without detergent with the
seven day a detergent wash. The “Detergent Frequency Selection”
can be increased up to everyday. The auto wash cycle is initiated
by a Parker time clock, with the wash cycle sequencing, wash
cycle times, and detergent frequency through the unit’s PLC. A
wash cycle can be manually initiated, identical operation as the
auto wash cycle, at the unit Main Electrical Panel for an additional
wash cycle. A wash cycle whether a manual or by time clock can
only be initiated with the PSG off line. The wash cycle frequency
could be increased or decreased depending on visual inspection
of the components and high voltage measurements. When
the PSG is placed on line after a wash cycle, the power pack
enclosure(s) indicator light(s) may intermittently or continuously
flash for approximately 60 minutes. If this condition exceeds 60
minutes refer to Section 10 Troubleshooting.
5.1.5 Manually Cleaning System Components
The system components could require manual cleaning, weekly,
bi weekly, monthly, one to three months interval, every six months,
or yearly depending upon application/high voltage measurements.
Refer to Sections 6, 7, and 8. Manual cleaning should not exceed
yearly.
6. Manual Cleaning of SMOG-HOG®
Components
There are a number of methods for manual cleaning, certain key
cleaning criteria contribute to the effectiveness of every method.
These include the type of detergent, detergent strength, water
temperature, agitation/impingement, duration, rinse procedure and
dry-out time.
6.1 Type of Detergent
In general the detergent used on most hydrocarbons (e.g., oily
residues) will be alkaline in nature. It is extremely important that
the detergent have a built-in buffering agent to reduce aluminum
deterioration.
6.2 Detergent Strength
Detergent concentration in a mixture with water varies with the
application from 1:1 to 25:1 parts water to parts detergent. For
any contaminant condition, the best course is to use a cleaning
solution per the detergent manufacturer’s directions. More or
less detergent may eventually be required for effective cleaning
at reasonable detergent cost. The standard factory detergent
concentration setting is 5% (20:1).
Figure 13
Grounding The Ionizer Section
Figure 12
Grounding The Collector Cell Section
!CAUTION
Never mix caustic and alkaline detergents for any
manual or in-place cleaning. Detergent mixing could
cause rapid heat release, gel formation or some other
undesirable condition. Complete purging of system
piping and soak tanks is required when changing
detergents.
6.3 Water Temperature
Detergents can be up to twice as effective in hot water. Hot
water alone is very effective in softening built-up residue. Water
temperature should be 140°F to 170°F, not to exceed 180°F.
6.4 Agitation/Impingement
These methods are virtually the same, with impingement being
the most extreme form of agitation. Any liquid movement over
built-up residue will remove a layer, allowing detergent to work
on the next layer. A reduction in cleaning time duration usually
results.
6.5 Cleaning Cycle Duration
In most cleaning methods, adequate time should be allowed for
the detergent to remove the contaminant thoroughly. Reaction
time will vary depending on detergent strength, temperature and
agitation. Guidelines for mixing, heating and expected results are
included on specification sheets for most detergents. Time is
necessary for effective cleaning. Soaking may seem slower and
less effective than high impingement and/or hot water above
180°F. Personnel should be forewarned about using excessive
pressure or temperature to shortcut the cleaning process. High
pressure or stream spray cleaning at point blank range until cell
plates edges are shiny is not effective. Not only will penetration
to the cell core not occur, but warping and bending of the plates
may result as well. Patience and thoroughness of cleaning
best preserve the integrity of the components in the long term.
Soaking and gentle rinsing provides for best results.
This manual suits for next models
17
Table of contents
Other Parker Air Cleaner manuals

Parker
Parker CRYSTAL-AIRE User manual

Parker
Parker BAC-4015 User manual

Parker
Parker BAC-4015 User manual

Parker
Parker Domnick Hunter BA-2010 User manual

Parker
Parker SMOG-HOG MSH-05-H User manual

Parker
Parker BA-DME012-E User manual

Parker
Parker BAS-2010 User manual

Parker
Parker OIL-X EVOLUTION User manual

Parker
Parker BAS-2015 User manual

Parker
Parker SMOKEETER SE-40 User manual