Parkside PSHL 2 D1 User manual

AUTOMATIC WELDING
HELMET
AUTOMATSKA MASKA ZA
ZAVARIVANJE
АВТОМАТИЧЕН ЗАВАРЪЧЕН
ШЛЕМ
MΑΣΚΑ ΗΛΕΚΤΡΟΣΥΓΚΟΛΛΗΣΗΣ
AΥΤΟΜΑΤΗ
AUTOMATSKA MASKA ZA
ZAVARIVANJE
MASCĂ DE SUDURĂ,
AUTOMATĂ
Operation and Safety Notes
Translation of the original instructions
Uputstvo za upotrebu i bezbednosne instrukcije
Prevod originalnog uputstva za upotrebu
Указания за монтаж, работа и безопасност
Превод на оригиналното ръководство за екс-
плоатация
Υποδείξεις χειρισμού και ασφαλείας
Μετάφραση των αυθεντικών οδηγιών λειτουργίας
Upute za posluživanje i za Vašu sigurnost
Prijevod originalnih uputa za uporabu
Indicații de operare și siguranță
Traducerea instrucţiunilor de utilizare originale
GB CY
RS
BG GR CY
HR
RO
AUTOMATIK-SCHWEISSHELM
Bedienungs- und Sicherheitshinweise
Originalbetriebsanleitung
DE AT CH
AUTOMATIC WELDING HELMET PSHL 2 D1
GR CY
RS RO
BG
HR
IAN 360197_2007

GB CY
Before reading, unfold the page containing the illustrations and familiarise yourself with all
functions of the device.
HR
Prije nego što pročitate tekst, otvorite stranicu sa slikama i upoznajte se na osnovu toga sa
svim funkcijama uređaja.
RS
Pre čitanja rasklopite obe strane sa slikama te se upoznajte sa svim funkcijama uređaja.
RO
Desfaceți înainte să citiți pagina cu ilustrații și apoi familiarizați-vă cu toate funcțiile
aparatului.
BG
Преди да прочетете, отворете страницата с фигурите и след това се запознайте с
всички функции на уреда.
GR CY
Πριν ξεκινήσετε την ανάγνωση, ανοίξτε τη σελίδα με τις εικόνες και εξοικειωθείτε με όλες τις
λειτουργίες της συσκευής.
DE AT CH
Klappen Sie vor dem Lesen die Seite mit den Abbildungen aus und machen Sie sich
anschließend mit allen Funktionen des Gerätes vertraut.
GB /CY Operation and Safety Notes Page 5
HR Upute za posluživanje i za Vašu sigurnost Stranica 21
RS Uputstvo za upotrebu i bezbednosne instrukcije Stranica 37
RO Indicații de operare și siguranță Pagina 53
BG Указания за монтаж, работа и безопасност Страница 69
GR / CY Υποδείξεις χειρισμού και ασφαλείας Σελίδα 89
DE / AT / CH Montage-, Bedienungs- und Sicherheitshinweise Seite 107

A
1
2
3
4
B
5
1
2
35
6
6
4
7
7
9
9
8
8
Automatic Welding Helmet
Automatska maska za zavarivanje
Mască de sudură, automată
АВТОМАТИЧЕН ЗАВАРЪЧЕН ШЛЕМ
Mάσκα ηλεκτροσυγκόλλησης aυτόματη
Automatik-Schweißhelm
IAN: 360197_2007
Black variant 2272/Varijanta crna 2272/Varijanta u crnoj boji 2272/Variantă de culoare neagră
2272/вариант черен 2272 /Μαύρη έκδοση 2272/Variante Schwarz 2272
Automatic Welding Helmet
Automatska maska za zavarivanje
Mască de sudură, automată
АВТОМАТИЧЕН ЗАВАРЪЧЕН ШЛЕМ
Mάσκα ηλεκτροσυγκόλλησης aυτόματη
Automatik-Schweißhelm
IAN: 360197_2007
Variant with ames 2273/Varijanta s plamenima 2273/Varijanta s plamenovima 2273/
Variantă cu ăcări 2273/ вариант с пламъци 2273/
Έκδοση με φλόγες 2273/Variante mit Flammen 2273

D
B C
12
14
E
16
16
10
13 11
G H
Black variant 2272/Varijanta crna
2272/Varijanta u crnoj boji 2272/
Variantă de culoare neagră 2272/
вариант черен 2272/Μαύρη έκδοση
2272/Variante Schwarz 2272
Variant with ames 2273/Varijan-
ta s plamenima 2273/Varijanta s
plamenovima 2273/Variantă cu ăcări
2273/ вариант с пламъци 2273/
Έκδοση με φλόγες 2273/Variante mit
Flammen 2273
6
7
15
18
17
19
20

5
GB/CY
List of pictograms used..................................................................................Page 6
Introduction.........................................................................................................Page 6
Intended use ...........................................................................................................Page 6
Package contents....................................................................................................Page 6
Parts description for “black” version.......................................................................Page 7
Parts description for version “with flames” .............................................................Page 7
Technical specifications ..........................................................................................Page 7
Safety instructions............................................................................................Page 7
Using the device................................................................................................Page 11
Troubleshooting.................................................................................................Page 14
Cleaning and maintenance..........................................................................Page 15
Storage..................................................................................................................Page 15
Information about recycling and disposal...........................................Page 15
Meaning of the marking...............................................................................Page 15
EU Declaration of Conformity .....................................................................Page 16
Warranty and service information ..........................................................Page 18
Warranty conditions...............................................................................................Page 18
Warranty period and statutory claims for defects ..................................................Page 18
Extent of warranty ..................................................................................................Page 18
Processing of warranty claims ................................................................................Page 19
Service....................................................................................................................Page 19
Table of contents

6
GB/CY
List of pictograms used / Introduction
Automatic Welding Helmet
PSHL 2 D1
zIntroduction
Congratulations! You have
purchased one of our
high-quality devices. Please familiarise
yourself with the product before setup or
first use. To do so, please read through the
following operating and safety instructions
carefully.
KEEP OUT OF THE REACH OF
CHILDREN!
zIntended use
When welding, this welding helmet protects
the eyes and face from sparks, splashes and
UV radiation and automatically adjusts to
the lighting conditions. It ensures immediate,
sensor-controlled darkening when the arc
is ignited as well as automatic lightening
when welding work is finished (including
short delay for protection against afterglow).
Thewelding helmet has an infinitely adjusta-
ble DIN protection level with side adjustment
wheel and can also be set for flying sparks
during grinding work. Use the product
only as described and only for the specific
applications as stated. Keep these instruc-
tions in a safe place. Ensure you hand over
all documentation when passing the product
on to anyone else. Any use that differs to the
intended use as stated above is prohibited
and potentially dangerous. Damage or
injury caused by misuse or disregarding
the above warning is not covered by the
warranty or any liability on the part of the
manufacturer. The device has been designed
for household use only and must not be used
in commercial or industrial applications.
zPackage contents
1 Automatic Welding Helmet
1 Set of operating instructions
List of pictograms used
Caution!
Read the operating instructions! Warning:
Potential hazards!
Do not dispose of any electrical
devices in domestic waste! Important note!
Attention: Welding helmets do
not offer any form of protection
for the eyes, ears or face!
Attention:
Arc beams can damage the
retina of the eye!
Made from recycling material Dispose of batteries in an
environmentally friendly
manner!
Dispose of packaging properly.
Do not dispose of the appliance
in household waste! Direct current

7
GB/CY
Introduction / Safety instructions
zParts description for
“black” version
1
Viewing pane
2
Helmet casing
3
Solar cell
4
Rear lens
5
Headband
6
Rear control dial headband
7
Lateral control dial headband
8
UV filter
9
Darkening control
10
Test button
11
Delay setting
12
Sensitivity setting
13
Low battery display
14
LED light switch
15
Battery compartment
16
Bracket
17
Arc sensor
19
LED light
20
Darkening switch
zParts description for
version “with flames”
1
Viewing pane
2
Helmet casing
3
Solar cell
4
Rear lens
5
Headband
6
Rear control dial headband
7
Lateral control dial headband
8
UV filter
9
Darkening control
10
Test button
11
Delay setting
12
Sensitivity setting
13
Low battery display
14
LED light switch
15
Battery compartment
17
Arc sensor
18
Slide
19
LED light
20
Darkening switch
zTechnical specifications
Filter cassette size: 110x90x15 mm
Field of vision: 9.2x4.2 cm
Light condition: DIN 4
Dark condition: DIN 5 – DIN 9 /
DIN 9 – DIN 13
Cycle times
Light to dark: 0.23~0.72 ms
Dark to light: 0.1~2 s
Switching on/off
Filter: Fully automatic
Switching on/off
LED: manual
Energy supply: Solar cell
UV/IR protection: DIN 16
Operating temperature: -5 °C to +55 °C
Storage temperature: -20 °C to +70 °C
Welding processes: MMA, MIG,
MAG, TIG,
plasma cutting and
plasma welding
Maximum service life: approx. 5 years
Safety instructions
Please read the operating instruc-
tions with care and observe the
notes described. Familiarise
yourself with the device, its
proper use and the safety notes
based on these operating instruc-
tions. The rating plate contains
all technical data of this welding
helmet; please learn about the
technical features of this product.

8
GB/CY
Safety instructions
Prior to each use, check that
it is working properly by
pressing the “Test” button.
The product is not suitable for
laser welding.
The product is only approved
for use within a temperature
range of between -5 °C to
+55°C.
The product is not fire-resistant.
Welding helmet and UV filter
must not be exposed to any
heat or moisture.
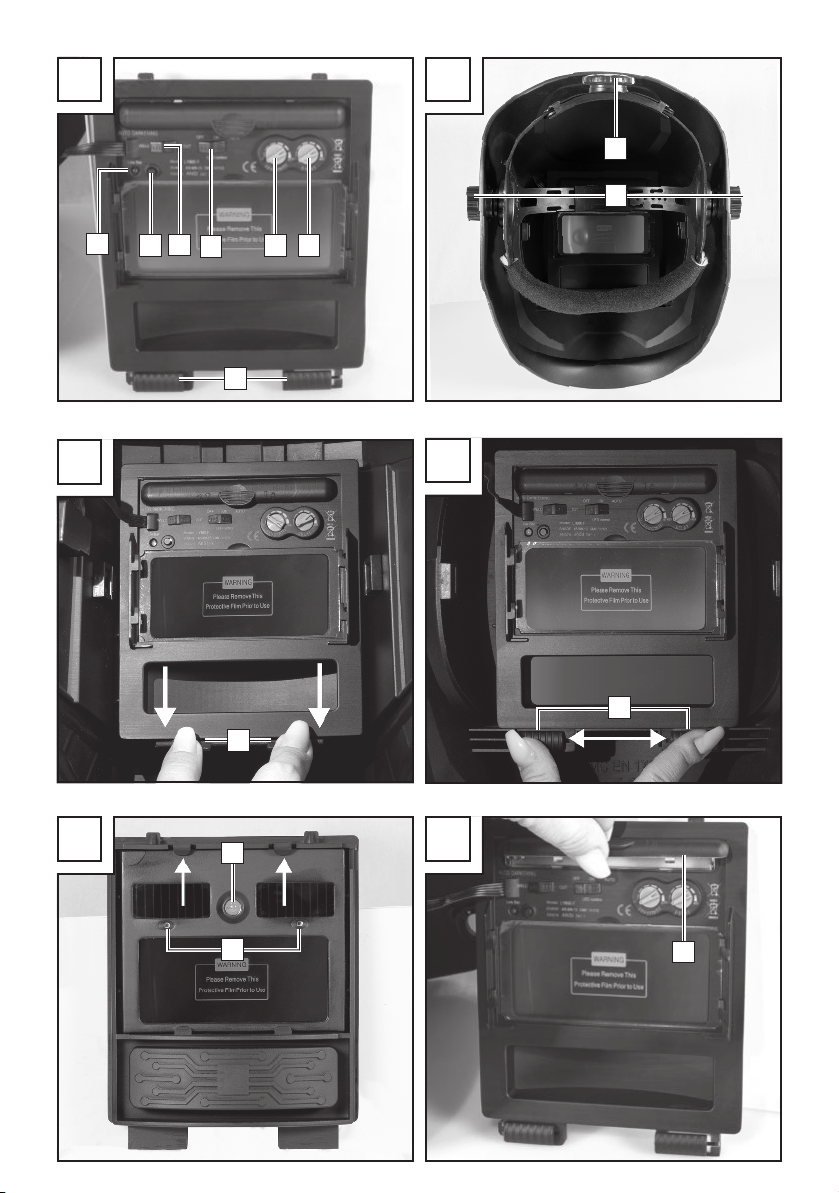
Do not remove the ADF filter
from the welding helmet and
never open the housing of the
ADF filter without authorisation
from the manufacturer.
Prior to each use, check
whether the Welding/Grinding
setting was selected correctly.
The viewing pane must be
installed on the outer side of
the ADF filter. Otherwise, the
ADF filter can get damaged.
Do not carry out any modifi-
cations/replacements on the
welding helmet and ADF filter
without consent.
If the filter does not darken
automatically whilst welding
please stop the operation
immediately and contact the
dealers without delay.
Do not use any alcohol, fuel
or diluting agents to clean the
ADF filter. Do not place the
ADF filter in water.
The response time of the ADF
liquid crystal slows down if the
ambient temperature is lower,
however this does not have
an impact on the protective
functions.
Please replace the housing
of the ADF filter immediately
if it is damaged or scratched
because this can impair
visibility and the protective
performance.
Please replace the viewing
pane immediately if it is bro-
ken or scratched. Do not use
any hard objects to replace the
viewing pane of the filter.
Regularly clean the surfaces
of the ADF filter, sensor and
solar cells.
The welding helmet cannot
withstand any damages that
are caused by a heavy blow,
explosion or abrasive liquids.
The useful life depends on
many different individual
factors such as usage, clean-
ing, storage and maintenance.
Regular inspections and
replacement in the case of
damage are recommended.
The material used to manufac-
ture the product will age
over time. This can result in

9
GB/CY
Safety instructions
breakages on the welding hel-
met, for example. As a result
of these damages, the welding
helmet is no longer able to
provide effective protection.
In this case, the user should
replace the welding helmet
immediately.
This product cannot be used
for overhead welding work
and cutting operations. If this
product is use for overhead
welding or cutting, the molten
metal drops could burn
through the ADF filter and
result in injuries to the user.
If the filter is faulty, the user
must stop using the welding
helmet immediately. Slag
splashes can damage the
surface of the filter and cause
injury to the user’s skin or
cause other serious accidents.
This product is temperature
resistant and hardly inflam-
mable but in case of direct
contact with naked flames or
in case of access to an object
with a high temperature, the
helmet may begin to burn or
melt. Please store and only
use the welding helmet in the
manner described in order to
reduce such risks.
The ADF filter is an electronic
product that is not waterproof.
Please ensure it is kept dry
and clean and not stored in
a damp environment.
Improper use can result in
injuries to the user and other
types of illnesses.
Please examine the filter prior
to each use. As soon as the
function and appearance
seem defective, they must no
longer be used.
The use of the welding helmet
is prohibited if the filter flickers
or if the level of darkening
no longer corresponds to
the standard value or there
are other abnormal working
conditions.
Please do not expose this
product to unnecessary solar
radiation.
Please only use original spare
parts. The use of non-original
parts can cause problems
with regard to the protective
function, serviceability and
degree of product protection.
Exceeding the service life
(insufficient protection) –
please check the welding
helmet prior to each use for
damage and durability.
Using eye protection without
the filter effect against radia-
tion (damages the eyes) – prior
to each use check whether

10
GB/CY
Safety instructions
the eye protection exhibits the
necessary scale number.
Using the product against
splashes (insufficient protec-
tion) – always check whether
the correct protective effect is
present.
Using the product against large
dust particles (injury, accident).
The eye protection equipment
must only be used for the work
described in the operating
instructions. Any deviation from
the instructions in the operating
instructions can result in injuries
or accidents.
Using damaged products
(insufficient protection) – prior
to each use check the weld-
ing helmet for damage and
durability.
Improper use of the eye pro-
tection (injury, accident).
The eye protection device
must only be used for the work
described in the operating
instructions. Any deviation
from the instructions can result
in injuries or accidents.
This device may be used by
children aged 16 years and
older, and by persons with
reduced physical, sensory or
mental capacities, or a lack of
experience and knowledge,
if they are supervised or have
been instructed in how to use
the device safely and under-
stand the dangers that may
arise when using it. Do not
allow children to play with the
device. Cleaning and day-to-
day maintenance must not be
performed by children without
supervision.
The welding helmet with
auto-darkening is not suitable
for laser and autogenous
welding.
Never place the welding
helmet on hot surfaces.
Do not open the welding
helmet under any circum-
stances. Do not carry out any
repair work or alterations to
the welding helmet. This work
must only be carried out by
trained specialist personnel.
Before any welding work,
please make sure that
you have adjusted the
auto-darkening.
The safety visor must not be
opened. It protects the filter
from dirt and damage.
If the filter does not darken
automatically, stop the weld-
ing work immediately and
contact the manufacturer.
Only use the welding helmet
at temperatures between
-5°C and +55°C.

11
GB/CY
Safety instructions / Using the device
The response time of the filter
will slow down if the temper-
atures go below/above these
temperatures.
Clean the filter, helmet surface
and the solar cells regularly.
Replace the protective visor if
it showing signs of scratches
or damage.
The welding helmet does not
protect against impact.
Using, cleaning and storage
can reduce the service life of
approx. 5 years. If the viewing
pane is scratched or there is
other visible damage to the
viewing pane or the welding
helmet, replace immediately.
ATTENTION! Materials which
come into contact with the skin
of the wearer can cause allergic
reactions for sensitive individuals.
ATTENTION! Eye protection
equipment against high-speed
particles can pose a danger
for the wearer through transfer
of impact if they are worn over
standard prescription glasses.
ATTENTION! If protection
against high-speed particles at
extreme temperatures is neces-
sary, the selected eye protection
equipment must be marked with
the letter T in accordance with
the letters relating to impact
intensity, i.e. FT, BT or AT. If the
letter for impact intensity is not
followed with the letter T, the eye
protection equipment must only
be used at room temperature
against high-speed particles.
zUsing the device
Note: Only use the welding helmet with the
rear lens
4
fitted.
Note: Keep the arc sensors
17
of the UV
filter
8
clean.
After opening the package, immediately
check to ensure that the package contents
are complete and are in perfect condition.
Contact your dealer immediately if the
package contents is incomplete or has
any defects. Do not use the device if it is
defective.
Before using the welding helmet each
time, you must check that the protective
screen as well as the helmet is intact. If
the protective screen should show signs of
scratches, cracks or unevenness, then it is
essential that it is replaced before use, as
otherwise this could lead to serious injuries.
Remove the protective film from the
inside and outside of the visor.
Adjust the welding helmet with the help
of the headband
5
. Turn the rear control
dial on the headband
6
in order to
adapt the welding helmet to the respec-
tive head size and the lateral control
dials on the headband
7
to lock the
welding helmet.
During the set-up, make
sure the welding helmet is positioned as

12
GB/CY
Using the device
low as possible on the head and as close
as possible to your face.
Before carrying out welding work, set
the appropriate darkening level. The
darkening level can be set manually
between 5 and 9 and between 9
and13, by turning the darkening control
9
on the outside of the helmet.
Using the darkening switch
20
you
can set whether the darkening will be
set between levels 5-9 or 9-13 on the
darkening control
9
.
Table to adjust the darkening levels
Arc current (Amps)
1.5 6 10 15 30 40 60 70 100 125 150 175 200 225 250 300 350 400 450 500 600
Grind Grinding function – auto-darkening is not active
SMAW 8 9 10 11 12 13 14
MAG 8 9 10 11 12 13 14
TIG/
GTAW 8 9 10 11 12 13
MIG
(heavy) 9 10 11 12 13 14
MIG
(light) 10 11 12 13 14
PAC 9 10 11 12 13
PAW 4 5 6 7 8 9 10 11 12
SMAW: Welding with coated
electrodes
MIG (heavy): MIG welding of heavy metals
MIG (light): MIG welding of light metals
and alloys
TIG/GTAW: Inert gas welding
MAG: Welding with metal active gas
PAC: Plasma cutting
PAW: Plasma welding
Grind: Grinding function: Auto-darkening
is not active. Only use the setting if
you do not use welding helmet for
welding.
ATTENTION! The darkening control
9
has the “Grind” adjustment position. If the
darkening control
9
is set to this position,
then auto-darkening is deactivated. Only use
the setting if you do not want to use welding
helmet for welding. Auto-darkening is then
not active.
Prior to each use check the light seal.
Perform test procedure
You can use the test button
11
to check
whether the welding helmet's darkening
feature is working properly.
Go towards an external light source at
more than 40 W with the viewing pane
and check whether the pane becomes
darker or lighter. To do so, turn the
darkening control
9
clockwise from
"Grind" to the next position. This sets the
filter to auto-darkening mode.

13
GB/CY
Using the device
If you turn the darkening control
9
anticlockwise back to "Grind", the filter's
auto-darkening feature is once again
deactivated.
Replace UV filter
For the black version
Press the clip
16
downwards to replace
the UV filter / solar cell. (see Fig. D).
Subsequently you can remove the filter.
To do this press the locking mechanisms
as shown in Fig. G upwards and then
press gently against the filter from the
other side
Then remove the darkening control
9
on the outside of the welding helmet by
simply pulling it and then releasing the
nut located below.
Once you have released the nut from the
thread, you can completely remove the
filter from the welding helmet.
Replace UV filter
For the version with flames
Press the sliders
18
together to replace
the UV filter / solar cell. (see Fig. E).
Subsequently you can remove the filter.
To do this press the locking mechanisms
as shown in Fig. G upwards and then
press gently against the filter from the
other side
Then remove the darkening control
9
on the outside of the welding helmet by
simply pulling it and then releasing the
nut located below.
Once you have released the nut from the
thread, you can completely remove the
filter from the welding helmet.
Delay setting
You can adjust the delay setting
13
to
configure whether or not the auto-darkening
feature should be switched off immediately
after stopping welding work, depending
on the type of welding work. At the lowest
setting, auto-darkening is switched off
immediately. Turning the control dial further
clockwise towards the highest setting, means
that the darkening function will remain
active for longer after welding work. This
feature is very useful for handling afterglow.
Sensitivity setting
You can use the sensitivity setting
12
to
adjust the light sensitivity of the sensor.
With low incident light, the control can be
adjusted to the highest setting to ensure
that the auto-darkening feature is activated
even for a weak light source. Even with this
additional feature, you can also adjust the
light sensitivity of the sensor to suit your own
personal requirements.
LED light with lowlight sensor
The LEDs
19
integrated in the welding
helmet are controlled with the LED light
switches
14
. First set the required darkening
level. The LED
19
can be manually switched
on by pressing the LED light switch
14
(middle position “ON”).
The welding helmet as a lowlight sensor.
This is activated by switching the LED light
switch
14
to the right position “Auto”. The
lowlight sensor automatically switches the
LED lamp on in dark environments and off
in brightly lit environments. This helps to
illuminate the object being welded in dark
working conditions. The LED light switch
14
should always be switched of (left position
“OFF”) at the end of work and when storing
the welding helmet.
Battery replacement
If the battery charge level is too low you can
replace the batteries. A low battery charge
level is indicated with a red warning light on
the battery display
10
.
In order to open the battery compartment
15
, you must push the lid of the battery
compartment
15
upwards using the
handle (see Fig. B).

14
GB/CY
Using the device / Troubleshooting
You can replace the battery, once you
have removed the cover of the battery
compartment
15
.
F
15
Then, close the battery compartment
15
.
In order to close the battery compart-
ment, you must put the lid of the battery
compartment
15
on and then push the
handle downwards until the cover clicks
into place.
zTroubleshooting
Faults Cause Solution
The filter does not become dark
steadily or flickers.
The viewing pane
1
is dirty or
defective.
Clean the viewing pane or
replace it.
The arc sensor
17
is not clear. Clean the surface of the arc
sensor
17
.
The welding current is too low. Set the sensitivity to the max. level.
The reaction is slowed down.
The ambient temperature is too
low/high.
Only use the welding helmet at
temperatures between -5°C and
+55°C.
The sensitivity is too low. Adjust the sensitivity to a higher
level.
Visibility is poor.
The viewing pane
1
/rear lens
4
is dirty.
Clean the viewing pane
1
/
rear lens
4
.
The protective film on the rear lens
4
has not been removed. Remove the protective film.
The ambient light is not sufficient. Provide more light for the working
environment.
The wrong darkening level has
been set. Re-set the darkening level.
The welding helmet slips. The headband
5
is adjusted
incorrectly.
Re-adjust the headband
5
and
make it tighter.

15
GB/CY
Cleaning and maintenance / Storage / Information about ... / Meaning of ...
zCleaning and maintenance
Do not use any abrasive detergents to
clean the helmet casing
2
.
Never allow the UV filter
8
to come into
contact with water.
Clean the product with a soft and dry or
moistened cloth or clean it with a cloth
moistened with disinfectant.
zStorage
Keep the device in a dry location and
out of the reach of children.
During storage, make sure the LED light
switch
14
is switched off (left position
“OFF”).
zInformation about recycling
and disposal
Don’t throw away – recycle!
Please return this device, accessories
and packaging to your local recy-
cling depot.
Do not dispose of the automatic welding
helmet in household waste, in fire or in
water. Devices that are no longer functional
should be recycled wherever possible.
Ask your local stockist for advice.
As the consumer you are legally
obliged (by the German Battery
Ordinance) to return any and all
used batteries. Batteries containing harmful
substances are labelled with the adjacent
symbol, which indicates the prohibition on
disposal in household waste. The abbrevia-
tions for the relevant heavy metals are:
Cd = cadmium, Hg = mercury, Pb = lead.
Take used batteries to a waste management
company in your city or community or return
them to your dealer. This satisfies your legal
obligations while also making an important
contribution to protecting the environment.
zMeaning of the marking
Safety viewing pane tested in
accordance with DINEN166
(C6316CMC, C6317CMC,
C6318CMC):
• Viewing pane: CMC F CE
CMC = Manufacturer code
F = mechanical resistance
(low-velocity impact at 45 m/s)
CE = CE mark
• Rear lens: CMC 1 F CE
CMC = Manufacturer code
1 = Optical class
F = mechanical resistance
(low-velocity impact at 45 m/s)
CE = CE mark
ADF tested in accordance with
DIN EN 379: 4/5-9/9-13 CMC
1/1/1/2/379 CE (C6606CMC)
Explanation:
4 = light condition
5-9/9-13 = dark conditions
CMC = Manufacturer code
Digit 1 = Optical class
Digit 2 = Scattered light class
Digit 3 = Homogeneity class
Digit 4 = Angle-dependence class
379 = Test standard
CE = CE mark
Welding helmet shell: CMC EN 175 F
CE (C6314CMC, C6315CMC)

16
GB/CY
Meaning of the marking / EU Declaration of Conformity
Identification of the manufacturer: CMC
Number of this standard: EN 175
Application area(s) (if required): S, F, B
Mass in grams (if required)
Protection class for the welding helmets
item no.: 2272/2273
CE= CE mark
Sym-
bol Protection
type
Description of
the application
area
SIncreased
resistance
Mechanical
resistance
FLow-velocity
impact
Mechanical
resistance
BMedium-
velocity impact
Mechanical
resistance
If the symbols F, B and S are not
present for either the viewing pane or the
frame, then the complete eye protection
equipment is to be rated at the lower level.
Certification body:
DIN CERTCO Gesellschaft für
Konformitätsbewertung mbH
Alboinstrasse 56
12103 Berlin
Notified body number 0196
zEU Declaration of
Conformity
1. PSA (product, type, batch or serial
number):
Automatic Welding Helmet
IAN: 360197_2007
Serial number:
Black variant 2272
Variant with flames 2273
Year of manufacture: 2021/18
Model: PSHL 2 D1
2. Name and address of the manufacturer
and his/her representative, if required:
C.M.C. Creative Marketing &
Consulting GmbH
Responsible for documentation:
Dr Christian Weyler
Katharina-Loth-Str. 15
66386 St. Ingbert
GERMANY
3. The manufacturer is solely responsible for
the creation of the declaration of conformity.
C.M.C. Creative Marketing &
Consulting GmbH
4. The object of the declaration (identifica-
tion of the PPE that enables traceability; if
necessary, it can also contain a sufficient
sharp image if it is necessary for the identifi-
cation of the PPE):
Welder visor
Black variant
PSHL 2 D1, item no. 2272
Rear lens without filter effect
PSHL 2 D1, item no.: 2272, 2273

17
GB/CY
EU Declaration of Conformity
Viewing pane without filter effect
PSHL 2 D1, item no.: 2272
CMC F
Automatic welder protective
filter with manually adjustable
protection level PSHL 2 D1t,
item no.: 2272, 2273
Welder visor
Variant with flames
PSHL 2 D1, item no. 2273
Rear lens without filter effect
PSHL 2 D1, item no.: 2272, 2273
Viewing pane without filter effect
PSHL 2 D1, item no.: 2273
CMC F
Automatic welder protective
filter with manually adjustable
protection level PSHL 2 D1t,
item no.: 2272, 2273
5. The object of the declaration described
under number 4 corresponds to the relevant
harmonisation legislation of the union:
General product safety directive
2001/95/EC
Electromagnetic Compatibility
2014/30/EU
RoHS directive
2011/65/EU+2015/863 EU
Personal Protective Equipment –
Ordinance
(EU)/2016/425
6. Indication of the relevant harmonised
standards used or other technical
HI
LO
AUTO DARKENING
9-13 5-9
SHADE OFF ON AUTO
LED Control
Model: PSHL 2 D1t
SHADE 4/5-9/ 9-13 CMC 1/1/1/2
EN 3 79 ANS I Z87 .1
Low Bat Test
HI
LO
AUTO DARKENING
9-13 5-9
SHADE OFF ON AUTO
LED Control
Model: PSHL 2 D1t
SHADE 4/5-9/ 9-13 CMC 1/1/1/2
EN 3 79 ANS I Z87 .1
Low Bat Test

18
GB/CY
EU Declaration of Conformity / Warranty and service information
specifications in relation to which conformity
is declared, including the date of the stand-
ards or other technical specifications:
EN 166:2001
EN 175:1997
EN 379:2009
7. The notified certification body DIN
CERTCO Gesellschaft für Konformitätsbewer-
tung mbH, Alboinstrasse 56, 12103 Berlin,
Notified body number 0196, carried out the
EC type examination and issued the
EC type examination certificate
C6606CMC/R0, C6314CMC/R0,
C6315CMC/R0, C6316CMC/R0,
C6317CMC/R0, C6318CMC/R0.
St. Ingbert, 01/10/2020
On behalf of Dr Christian Weyler
– Quality Assurance –
zWarranty and service
information
Warranty from Creative
Marketing & Consulting GmbH
Dear Customer,
The warranty for this equipment is 3 years
from the date of purchase. In the event
of product defects, you have legal rights
against the retailer of this product. Your
statutory rights are not affected in any way
by our warranty conditions, which are
described below.
zWarranty conditions
The warranty period begins on the date of
purchase. Please retain the original sales
receipt. This document is required as your
proof of purchase.
Should this product show any defect in mate-
rials or manufacture within 3 years from the
date of purchase, we will repair or replace
it – at our discretion – free of charge.
This warranty service requires that you retain
proof of purchase (sales receipt) for the
defective device for the three year period
and that you briefly explain in writing what
the fault entails and when it occurred.
If the defect is covered by our warranty, we
will repair and return your product or send
you a replacement. The original warranty
period is not extended when a device is
repair or replaced.
zWarranty period and
statutory claims for defects
The warranty period is not extended by the
guarantee. This also applies to replaced
and repaired parts. Any damages or defects
detected at the time of purchase must be
reported immediately after unpacking.
Any incidental repairs after the warranty
period are subject to a fee.
zExtent of warranty
This device has been manufactured accord-
ing to strict quality guidelines and carefully
inspected before delivery.
The warranty applies to material and
manufacturing defects only. This warranty
does not extend to product parts, which are
subject to normal wear and tear and can
thus be regarded as consumable parts, or
for damages to fragile parts, e.g. switches,

19
GB/CY
Warranty and service information
rechargeable batteries or parts made
from glass.
This warranty is voided if the product
becomes damaged or is improperly used or
maintained. For proper use of the product,
all of the instructions given in the operating
instructions must be followed precisely. If the
operating instructions advise you or warn
you against certain uses or actions, these
must be avoided in all circumstances.
The product is for consumer use only and is
not intended for commercial or trade use.
The warranty becomes void in the event of
misuse and improper use, use of force, and
any work on the device that has not been
carried out by our authorised service branch.
zProcessing of warranty
claims
To ensure prompt processing of your claim,
please follow the instructions given below.
Please retain proof of purchase and the
article number (e.g. IAN) for all inquiries.
The product number can be found on the
type plate, an engraving, the cover page of
your instructions (bottom left), or the sticker
on the back or underside of the device.
In the event of malfunctions or other defects,
please first contact our service department
below by phone or email. If your product
is found to be defective, you can then send
your product with proof of purchase (till
receipt) and a statement describing what the
fault involves and when it occurred free of
charge to the service address given.
Note:
You can download this handbook and
many more, as well as product videos and
software at www.lidl-service.com.
With this QR code you can gain imme-
diate access to the Lidl Service page
(www.lidl-service.com) and you can open
your Operating Instructions by entering the
article number (IAN) 360197.
zService
Only use original spare parts:
Black model
(PSHL 2 D1, item no.: 2272):
• Viewing pane (CMC F CE):
140.4 mm x 156.6 mm x 1.5 mm
• Rear lens (CMC 1F CE):
103.8 mm x 47.3 mm x 1.0 mm
Model with flames
(PSHL 2 D1, item no.: 2273):
• Viewing pane (CMC F CE):
140 mm x 172.3 mm x 1.5 mm
• Rear lens (CMC 1F CE):
103.8 mm x 47.3 mm x 1.0 mm
How to contact us:
GB, CY
Name: C. M. C. GmbH
Website: www.cmc-creative.de
E-mail:
service.gb@cmc-creative.de
Phone: 0-808-189-0652
Registered office: Germany
IAN 360197_2007

20
GB/CY
Please note that the following address is not
a service address. Please first contact the
service point given above.
Address:
C.M.C. Creative Marketing & Consulting GmbH
Katharina-Loth-Str. 15
66386 St. Ingbert
GERMANY
Ordering spare parts:
www.ersatzteile.cmc-creative.de
Warranty and service information
Other manuals for PSHL 2 D1
3
This manual suits for next models
1
Table of contents
Languages:
Other Parkside Welding Accessories manuals
Popular Welding Accessories manuals by other brands

Tregaskiss
Tregaskiss TOUGH GUN TT4E owner's manual

Abicor Binzel
Abicor Binzel ABIMIG 0 Series operating instructions

Lincoln Electric
Lincoln Electric VIKING 3350 Series Operator's manual

Miller Electric
Miller Electric 301239 owner's manual

GYS
GYS 067226 quick start guide

A.C.E. International Company
A.C.E. International Company ArcOne Singles Series manual