manuals.online logo
Brands
  1. Home
  2. •
  3. Brands
  4. •
  5. Paso
  6. •
  7. Speakers
  8. •
  9. Paso TRX20-TW User manual

Paso TRX20-TW User manual

1
INTRODUZIONE
Nel ringraziarVi per aver scelto un prodotto PASO,
vogliamo ricordarVi che la nostra azienda opera
con sistema di qualità certificato ISO 002.
Tutti i nostri prodotti vengono pertanto controllati
in ogni fase della produzione per garantirVi la
piena soddisfazione del Vostro acquisto. Per ogni
evenienza la garanzia coprirà, nellanno di validità,
eventuali difetti di fabbricazione.
Vi raccomandiamo di leggere attentamente le
seguenti istruzioni duso per sfruttare appieno le
prestazioni offerte da questo prodotto e per
evitare eventuali problemi.
INTRODUCTION
While thanking you for having chosen a PASO
product, we would like to remind you that our
company works according to a Quality System
certified for compliance with ISO 002 standards.
This means that all our products are checked
during every phase of manufacturing in order to
guarantee that you will be fully satisfied with your
purchase. At all events, the guarantee will cover
any manufacturing flaws for the whole year for
which it is valid. We recommend that you read
the following instructions for use carefully in order
to exploit in full the performance of this product
and to avoid any problems.
NOTA
Nel continuo intento di migliorare i propri prodotti,
la PASO S.p.A. si riserva il diritto di apportare
modifiche ai disegni e alle caratteristiche tecniche
in qualsiasi momento e senza alcun preavviso.
NOTE
PASO S.p.A. strive to improve their products
continuously, and therefore reserve the right to
make changes to the drawings and technical
specifications at any time and without notice.
Istruzioni per luso
Instructions for use
Manuel d'utilisation
Gebrauchsanleitung
Gebruiksaanwijzing
Instrucciones de empleo
TRX20-TW
Diffusore a tromba
Hor speaker
Diffuseur a pavillo
Trichterlautsprecher
Hoor luidspreker
Difusor de trompeta
20 W
IP66
11-526_A.p65 13/02/02, 14.501
Ref. 11/526-A TRX20-TW
2
DESCRIZIONE GENERALE
Il diffusore sonoro a tromba TRX20-TW è
completamente realizzato in alluminio.
Il tipo di costruzione ed i materiali impiegati ne
permettono l'uso anche in esterno o in ambienti
particolarmente umidi (piscine, ecc.).
È consigliabile, per motivi di sicurezza, porre
particolare cura nella connessione a terra del
telaio e nel fissaggio dei diffusori alla struttura
portante (parete, soffitto, palina, traversino,
ecc.). Tutti i diffusori devono essere collegati in
derivazione alla linea a tensione costante (vedi
esempio in fig. 1).
Si raccoma da di porre particolare
atte zio e alla polarità.
Fare riferimento, per la potenza che si desidera
impiegare, ai collegamenti riportati nelle tabella
posta sul lato posteriore.
Verificare, in ogni caso, che la potenza assorbita
dai diffusori collegati alla linea sia uguale o
inferiore alla potenza nominale erogabile
dall'amplificatore utilizzato.
Fig. 1
ISTRUZIONI PER IL MONTAGGIO
 Mantenere una distanza minima dal punto di
ascolto almeno di 2/3 metri.
 Fissare i diffusori ad una parete robusta
utilizzando tasselli ad espansione adeguati
al peso della tromba e al tipo di supporto.
Nel caso di fissaggio ad un pannello,
utilizzare dadi e bulloni con diametro minimo
di 5 mm.
GENERAL DESCRIPTION
The body of the TRX20-TW horn speaker is
completely made in aluminium.
The type of construction and the materials
used are such that they can be used outdoors
and in particularly damp environments
(swimming-pools, etc.).
For safety reasons, it is advisable to pay special
attention when securing the speakers to the
structure used to support it (wall, ceiling, stake,
cross-member, etc.). All speakers have to be
connected to the constant voltage line (see
example in Figure 1).
Careful atte tio should be required for
the polarity.
For the voltage and power, which are to be
used, please refer to the relevant label on the
rear side of the diffuser.
In any case, please check that the absorbed
power by the diffusers, which are connected
to the line, is equal or lower to the nominal
power supplied by the amplifier.
MOUNTING INSTRUCTIONS
 Keep a distance of at least 2 to 3 metres from
the listening point.
 Secure the speakers to a particularly strong
wall, using expansion bolts large enough to
bear the weight of the horn and suitable for
the type of surface. If securing to a panel
use nuts and bolts with a diameter of at least
5 mm.
11-526_A.p65 13/02/02, 14.502
Ref. 11/526-A TRX20-TW
3
Fig. 2
 Direct the horns towards the area to be
covered, consulting the polar diagrams
contained in the section on TECHNICAL
SPECIFICATIONS.
 In the event of outdoor mounting, always
point the mouth of the horn downwards.
CONNESSIONI
 Collegare le terminazioni del cavo uscente
dal diffusore alla linea di distribuzione 100V
(vedi fig. 1).
Si raccoma da di porre particolare
atte zio e alla polarità.
 Collegare l'apposito cavetto giallo-verde
alla terra.
CONNECTIONS
 Connect the ends of the cable leading out
from the horn to the 100 V distribution line
(see Figure 1).
Careful atte tio should be required
for the polarity.
 Connect the yellow-green cable to earth.
REGOLAZIONI
Il cambio di potenza può essere effettuato
operando sull'apposito regolatore a 5 posizioni
(part. A, fig. 2) presente sul lato posteriore
del diffusore. Inserire un piccolo cacciavite a
lama piatta nella cava [B] e ruotare in senso
orario od antiorario fino a che il segno di
riferimento non indica la potenza desiderata.
La correlazione posizione/
potenza sono indicate nella
tabella [C].
MANUTENZIONE
Verificare periodicamente il serraggio delle viti
di fermo della staffa del diffusore e quelle del
sistema di fissaggio a muro della stessa.
Verificare inoltre lo stato di efficienza dei cavi
di collegamento e rimuovere l'eventuale eccesso
di polvere o detriti depositati dal vento o dagli
insetti. Non utilizzare per la pulizia dei diffusori
sostanze corrosive come: alcool, solvente,
benzina, etc.
ADJUSTMENTS
The change of the power value can be simply
carried out by means of the relative 5-position
trimmer located on the rear side of the horn
(det. A, Fig. 2). Insert a little flat-blade
screwdriver into the slot [B] and turn it
clockwise or anti-clockwise until the reference
mark matches the desired power.
The position/power
correlation is indicated
in tabel [C].
MAINTENANCE
Check periodically the tightness of the screws
securing the bracket of the horn and those of
the wall-mounting system of same.
Also check the condition of the connecting
cables and remove any excess dust or waste
deposited by the wind or by insects.
Do not use substances capable of corroding
(e.g. alcohol, solvents, petroleum, etc.) to clean
the speakers.
 Orientare i diffusori verso l'area da sonorizzare
facendo riferimento ai diagrammi polari
riportati nella sezione CARATTERISTICHE
TECNICHE.
 In caso di montaggio in esterno, rivolgere
sempre la bocca della tromba verso il basso.
11-526_A.p65 13/02/02, 14.503
Ref. 11/526-A TRX20-TW
4
CARATTERISTICHE TECNICHE TECHNICAL SPECIFICATIONS
Diagrammi polari
Polar plots
Risposta in frequenza in asse 1W/1m - On axis frequency response 1W/1m
elanimonaznetoP W02 rewopdetaR
elibalogeraznetoP W5.2-W5-W01-W51-W02 rewopelbatsujdA
aznedepmI 005 Ω076-ΩK1- ΩK2- ΩK4-ΩenadepmI
enoisrepsididolognA °08
)zHk2@(elgnanoisrepsiD
azneuqerfniatsopsiR zH005.21÷053 esnopseryneuqerF
aronosenoisserpolleviL )m1/W1(Bd011 levelerusserpdnuoS
)LxØ(inoisnemiD mm032x312 snoisnemiD)LxØ(
oseP gk5,1 thgieW
11-526_A.p65 13/02/02, 14.504
Ref. 11/526-A TRX20-TW
5
DESCRIPTION GÉNÉRALE
Le diffuseur sonore à pavillon TRX20-TW est
entièrement réalisé en aluminium. Le type de
fabrication et les matériaux utilisés permettent
de l'installer en extérieur ainsi qu'en milieu
particulièrement humide (par exemple dans les
piscines). Pour des raisons de sécurité, il est
important d'accorder tout le soin nécessaire au
raccordement à la terre de la structure et à la
fixation des diffuseurs à la structure portante
(paroi, plafond, poteau, traverse, etc.) Tous les
diffuseurs doivent être raccordés en dérivation
à la ligne à tension constante (voir l'exemple
de la fig. 1).
Il est recomma dé de faire atte tio à
la polarité. Pour la puissance à utiliser, faire
référence aux branchements figurant sur le
tableau au dos de l'appareil.
Dans tous les cas, s'assurer que la puissance
absorbée par les diffuseurs branchés à la ligne
est égale ou inférieure à la puissance nominale
de l'amplificateur utilisé.
Fig./Abb. 1
INSTRUCTIONS DE MONTAGE
 Maintenir le diffuseur à une distance du point
d'écoute d'au moins 2 à 3 mètres.
 Fixer les diffuseurs à une paroi solide en
utilisant des chevilles à expansion adaptées
au poids du pavillon et au type de support;
en cas de fixation sur un panneau, faire
usage d'écrous et de boulons d'un diamètre
minimum de 5 mm.
ALLGEMEINE BESCHREIBUNG
Der Trichterlautsprecher TRX20-TW ist
vollständig aus Aluminium gefertigt. Die Art der
Fertigung und die verwendeten Materialien
machen seine Verwendung auch im Außenbereich
oder in besonders feuchten Räumen möglich
(Schwimmbäder, usw.). Aus Sicherheitsgründen
empfiehlt es sich, besonders sorgfältig beim
Anschluss der Erdschutzleitung des Rahmens
und bei der Montage der Lautsprecher an
Tragstrukturen (Wand, Decke, Pfosten,
Querträgern usw.) vorzugehen. Alle Lautsprecher
müssen mit Nebenschlussschaltung an die
Leitung für konstante Spannung angeschlossen
werden (siehe Beispiel in Abb. 1)
Beachte Sie die Polu ge .
Beachten Sie bei der Auswahl der gewünschten
Leistung die Anschlüsse, die in der Tabelle auf
der Rückseite angegeben sind. Überprüfen Sie
auf jeden Fall, dass die aufgenommene
Leistung der an eine Leitung angeschlossenen
Lautsprecher gleich oder niedriger als die vom
verwendeten Verstärker abgegebenen
Nennleistung ist.
ANWEISUNGEN FÜR DIE MONTAGE
 Lassen Sie einen Mindestabstand von der
Hörzone von 2/3 Metern.
Befestigen Sie die Lautsprecher an einer
starken Wand mit Hilfe von Dübeln, die für
das Gewicht des Trichterlautsprechers und
die Art der Auflage geeignet sind; verwenden
Sie Schraubmuttern mit einem Durchmesser
von mindestens 5 mm bei der Montage auf
Paneelen.
11-526_A.p65 13/02/02, 14.505
Ref. 11/526-A TRX20-TW
6
Fig./Abb. 2
 Richten Sie die Lautsprecher zur Klangzone
hin aus und beachten Sie hierbei die
Polungsdiagramme im Abschnitt TECHNISCHE
EIGENSCHAFTEN.
Bei der Montage im Außenbereich, muss die
Öffnung des Trichterlautsprechers stets nach
unten gerichtet werden.
BRANCHEMENTS
Brancher les terminaisons du câble arrivant
du diffuseur à la ligne de distribution à
100V (voir fig. 1) e veilla t à bie
respecter les polarités.
 Raccorder le câble jaune-vert à la terre.
ANSCHLÜSSE
 Verbinden Sie die Endstücke des aus dem
Lautsprecher austretenden Kabels an die
100V- Verteilerleitung (siehe Abb. 1).
Beachte Sie dabei i sbeso dere die
Polu ge .
 Schließen Sie das gelb-grüne Kabel an die
Erdschutzleitung an.
RÉGLAGES
Le réglage de la puissance s'obtient en
intervenant sur le régulateur à 5 positions
prévu à cet effet (détail A, fig. 2) et situé au
dos du diffuseur. Introduire un petit tournevis
à pointe plate dans le logement [B] et tourner
dans un sens ou dans l'autre pour amener
l'indice de référence à hauteur de la puissance
voulue.
Les correspondances
position/puissance sont
indiquées dans le tableau
[C].
ENTRETIEN
Contrôler à intervalles réguliers le serrage des
vis de fixation de la bride du diffuseur et celles
du système de fixation murale de la bride.
Contrôler également l'état des câbles de
branchement et les débarrasser au besoin de
la poussière ou autres détritus déposés par le
vent ainsi que par déventuels insectes.
Pour le nettoyage des diffuseurs ne pas faire
usage de produits corrosifs tels q'alcool,
solvant, essence, etc.
EINSTELLUNGEN
Die Umstellung der Leistung erfolgt einfach
über einen Schalter mit 5 Positionen (Detail A,
Abb. 2) auf der Rückseite des Lautsprechers.
Setzen Sie den Schlitz-Schraubendreher in den
Schlitz [B] ein und drehen Sie ihn nach links
oder rechts bis das Zeichen die gewünschte
Leistung anzeigt.
Die Beziehung zwischen
Position und Leistung
ist in der Tabelle [C]
angegeben.
WARTUNG
Überprüfen Sie regelmäßig den festen Sitz der
Halteschrauben des Lautsprechers und den der
Schrauben des Befestigungssystems an der
Wand. Überprüfen Sie auch den Zustand der
Verbindungskabel und entfernen Sie Staub und
ggf. den vom Wind oder von Insekten
angetragenen Schmutz von den Kabeln.
Verwenden Sie keine korrodierenden
Reinigungsmittel wie Alkohol, Lösungsmittel,
Benzin usw.
 Orienter les diffuseurs vers la zone à sonoriser
en faisant à cet effet référence aux
diagrammes polaires figurant à la section
"CARACTÉRISTIQUES TECHNIQUES".
 En cas d'installation en extérieur, veiller à
toujours orienter l'ouverture du pavillon vers
le bas.
11-526_A.p65 13/02/02, 14.506
Ref. 11/526-A TRX20-TW
7
CARACTÉRISTIQUES TECHNIQUES TECHNISCHE EIGENSCHAFTEN
Diagrammes polaires
Polardiagramme
Réponse en fréquence dans l'axe 1W/1m - Frequenzgang an der Achse 1W/1m
elanimonenassiuP W02 gnutsielnneN
elbalgérenassiuP W5.2-W5-W01-W51-W02 gnutsieLerablletsniE
enadépmI 005 Ω076-ΩK1- ΩK2- ΩK4-ΩznadepmI
noisrepsidedelgnA °08
)zHk2@(lekniwsgnulhartsbA
eneuqérfneesnopéR zH005.21÷053 gnagzneuqerF
eronosnoisserpeduaeviN )m1/W1(Bd011 kurdllahS
)LxØ(snoisnemiD mm032x312 negnussembA)LxØ(
sdioP gk5,1 thiweG
11-526_A.p65 13/02/02, 14.507
Ref. 11/526-A TRX20-TW
8
ALGEMENE BESCHRIJVING
De hoornluidspreker TRX20-TW bestaat geheel
uit aluminium. De constructie van de luidspreker
en de gebruikte materialen laten ook
toepassingen in de openlucht of in bijzonder
vochtige omgevingen toe (zwembaden etc.).
Om veiligheidsredenen wordt aanbevolen
bijzondere aandacht te besteden aan de
aarding van het frame en aan de bevestiging
van de luidsprekers op de draagstructuur
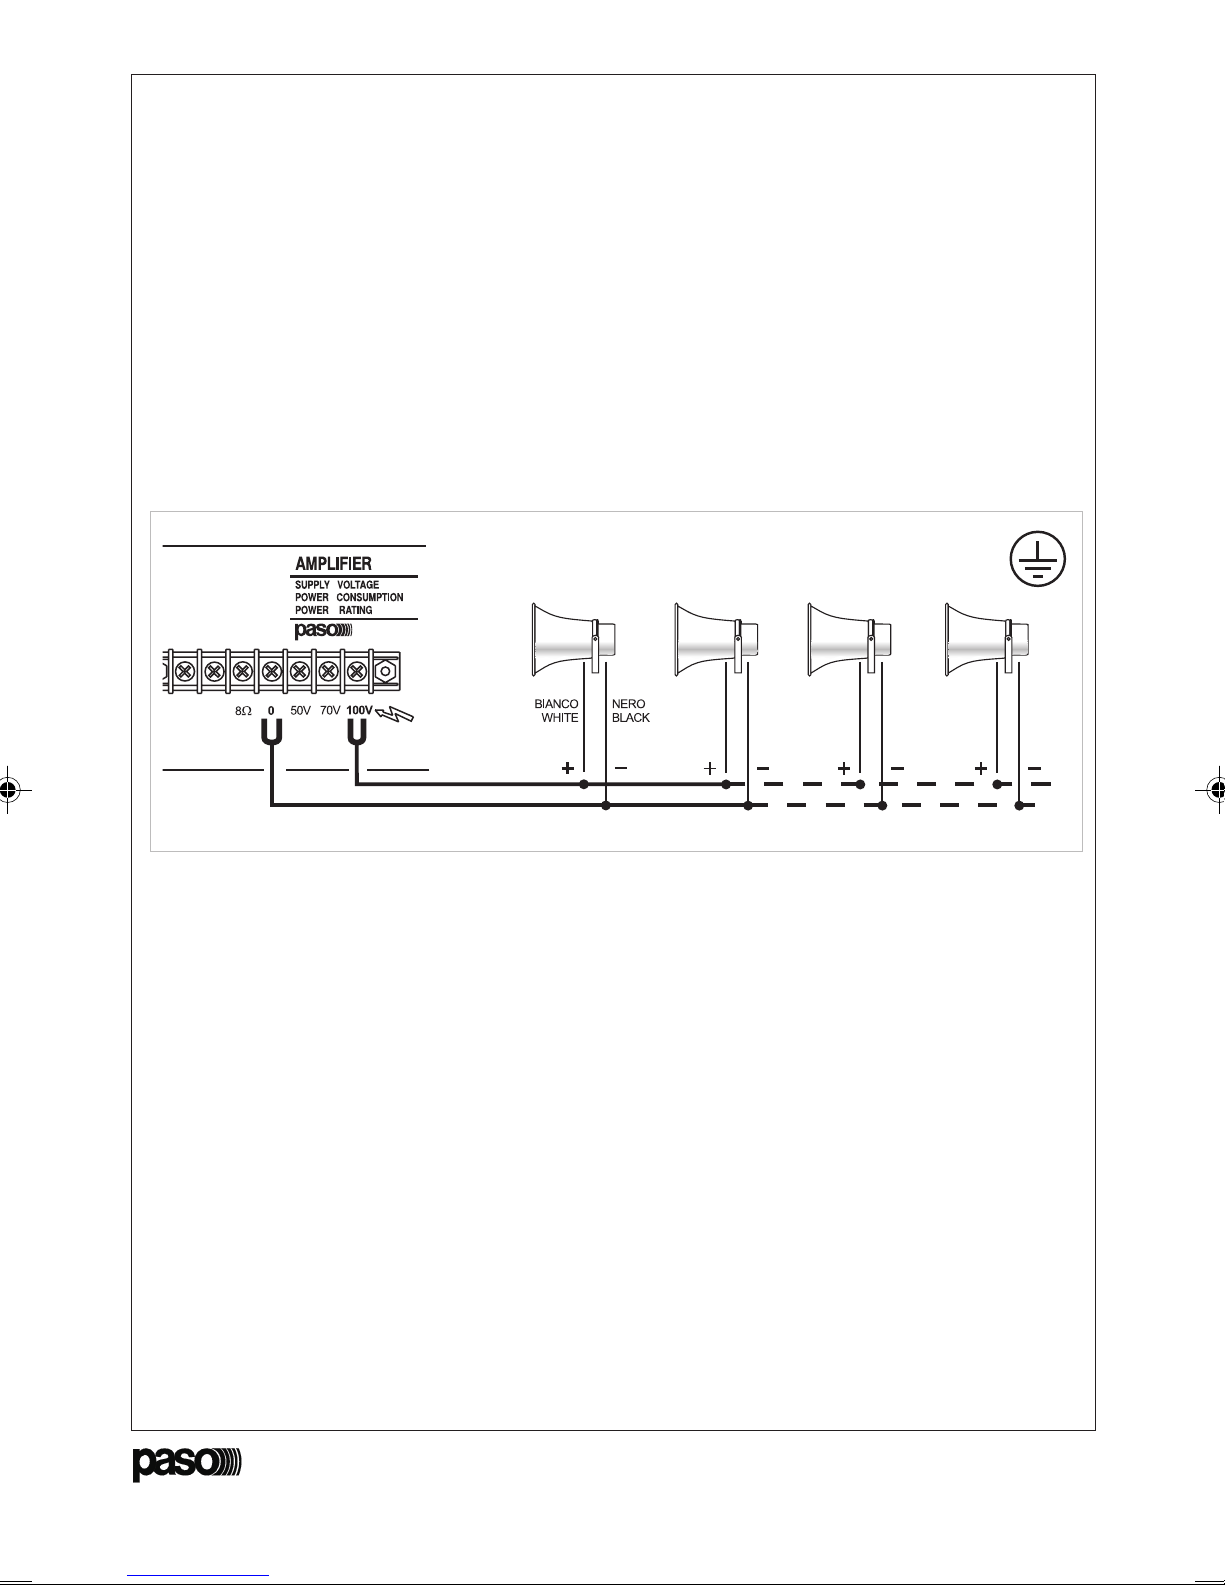
(wand, plafond, paal, dwarsbalk etc.). Alle
luidsprekers moeten bij de aansluiting worden
afgetakt van de constante-spanninglijn (zie
voorbeeld op afb. 1).
Let goed op de juiste polariteit.
Zie voor het vermogen dat u wilt gebruiken de
aansluitingen in de tabel aan de achterzijde.
Controleer in elk geval of het vermogen dat
wordt opgenomen door de luidsprekers die op
de lijn zijn aangesloten gelijk is aan of kleiner
dan het nominale vermogen dat kan worden
geleverd door de gebruikte versterker.
Afb./Fig. 1
INSTRUCTIES VOOR DE MONTAGE
 Houd een afstand van ten minste 2/3 meter
tot het luisterpunt aan.
Bevestig de luidsprekers aan een stevige
muur met behulp van expansiepluggen die
sterk genoeg zijn om het gewicht van de
hoorn en de drager van de luidspreker te
dragen; indien de luidspreker op een paneel
wordt bevestigd, dient u moeren en bouten
met een diameter van tenminste 5 mm te
gebruiken.
DESCRIPCIÓN GENERAL
El difusor sonoro de trompeta TRX20-TW está
enteramente realizado en aluminio.
El tipo de construcción y los materiales
empleados permiten utilizarlo también en
exteriores o en entornos particularmente
húmedos (piscinas, etc.).
Se aconseja, por motivos de seguridad, prestar
especial atención en la conexión a tierra del
bastidor y en la fijación de los difusores a la
estructura portante (pared, techo, palo, viga,
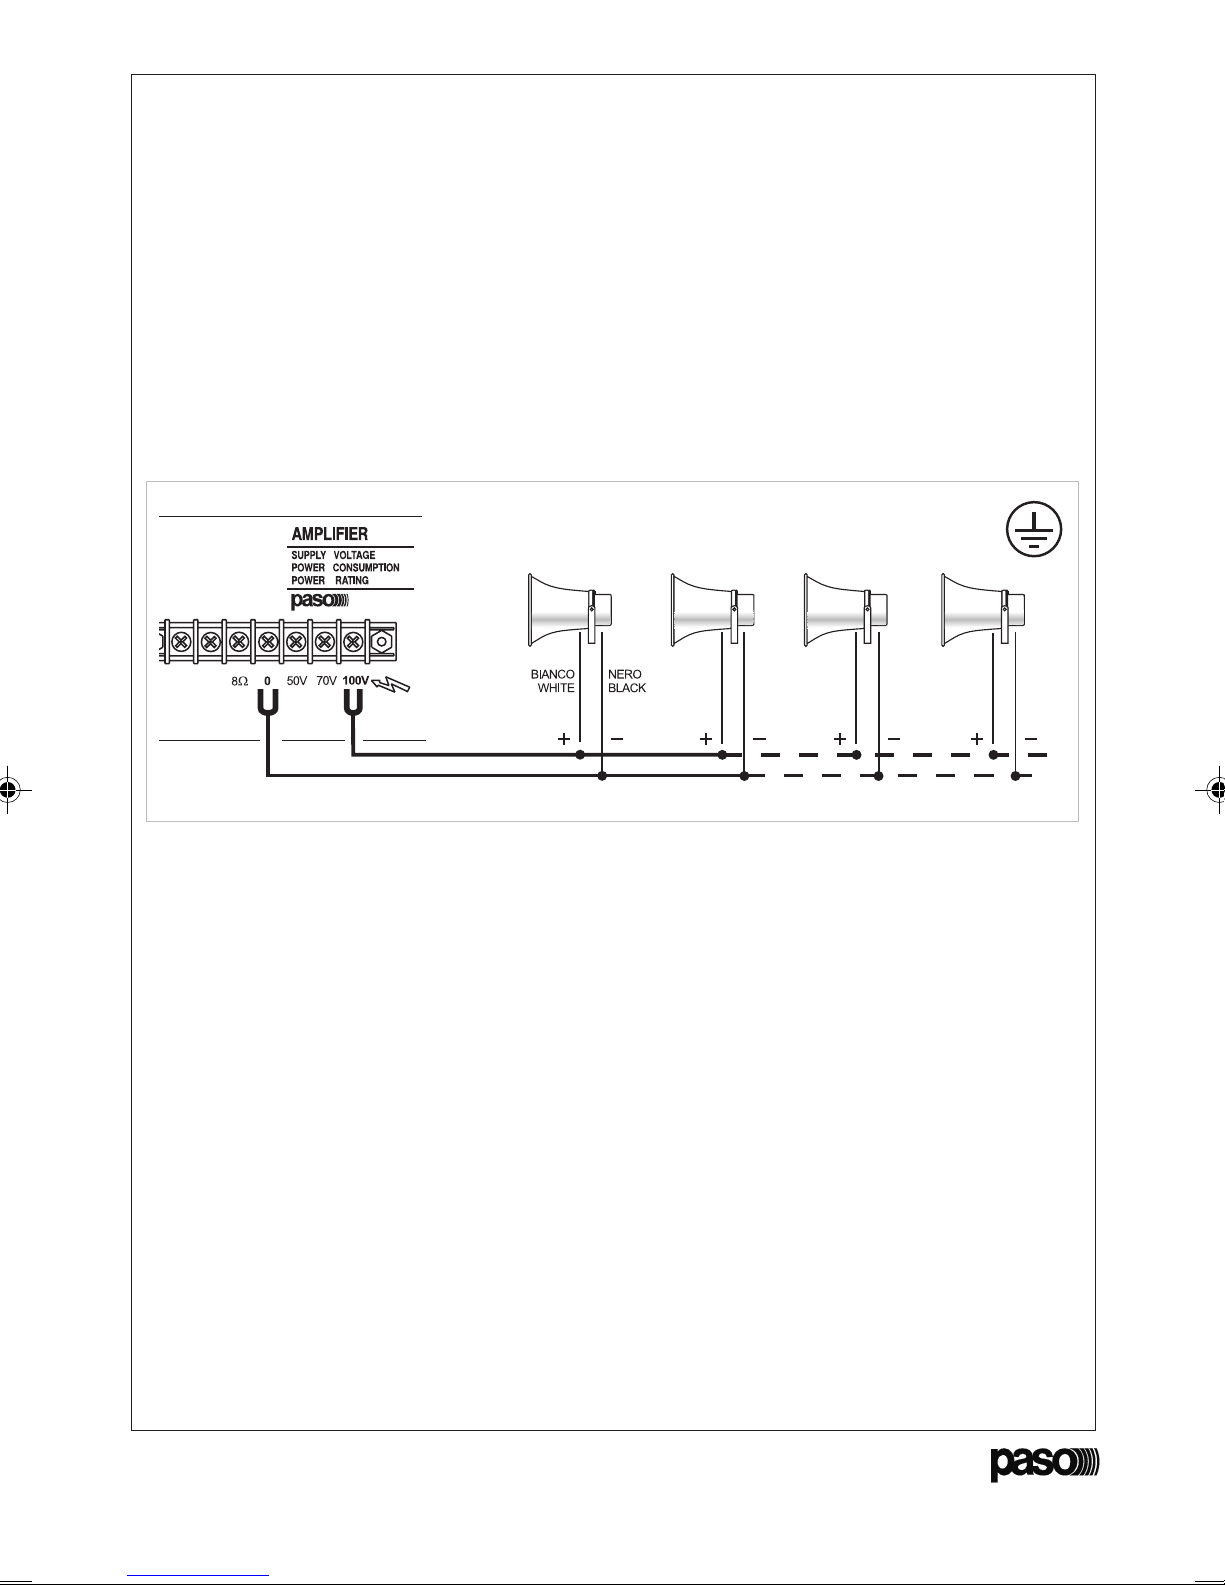
etc.). Todos los difusores deben estar enlazados
en derivación con la línea de tensión constante
(ver ejemplo en la fig. 1).
Se recomie da prestar particular ate ció
a la polaridad.
Hacer referencia, para la potencia que se desea
emplear, a las conexiones presentadas en la
tabla presentada en el lado trasero.
Verificar, en todo caso, que la potencia
consumida por los difusores conectados con la
línea sea igual o inferior a la potencia nominal
proporcionable por el amplificador utilizado.
INSTRUCCIONES PARA EL MONTAJE
 Mantener una distancia mínima con respecto
al punto de escucha por lo menos de 2/3
metros.
 Fijar los difusores a una pared robusta
utilizando pernos de expansión adecuados
para el peso de la trompeta y el tipo de
soporte; en caso de fijación a un panel
utilizar tuercas y pernos con diámetro
mínimo de 5 mm.
11-526_A.p65 13/02/02, 14.508
Ref. 11/526-A TRX20-TW
9
Afb./Fig. 2
 Orientar los difusores hacia el área a sonorizar
haciendo referencia a los diagramas polares
presentados en la sección CARACTERÍSTICAS
TÉCNICAS.
 En caso de montaje en exteriores, dirigir
siempre la boca de la trompeta hacia abajo.
AANSLUITINGEN
 Sluit de uiteinden van de kabel die uit de
luidspreker komt aan op de distributielijn
van 100 V (zie afb. 1).
Let goed op de juiste polariteit.
 t goed op de juiste polariteit.
 Verbind het geel/groene kabeltje met de
massa.
CONEXIONES
 Conectar los terminales del cable que sale
del difusor a la línea de distribución 100 V
(ver fig. 1).
Se recomie da prestar particular
ate ció a la polaridad.
 Conectar a la tierra el cable amarillo-verde
previsto.
AFSTELLINGEN
Het vermogen kan eenvoudig veranderd worden
met behulp van de speciale regelaar met 5
standen (detail A, afb. 2) op de achterzijde van
de luidspreker. Steek een kleine platte
schroevendraaier in de uitsparing [B] en draai
met de klok mee of tegen de klok in totdat het
referentieteken het gewenste vermogen
aangeeft.
Zie voor de correlatie
positie/vermogen de tabel
[C].
ONDERHOUD
Controleer of gezette tijden of de borgschroeven
van de beugel van de luidspreker en de
schroeven van het systeem, waarmee deze
beugel aan de muur is bevestigd, goed zijn
aangehaald. Controleer bovendien of de
verbindingskabels in goede staat zijn en
verwijder eventueel stof of vuil die door de wind
of door insecten in de luidspreker gebracht zijn.
Gebruik voor het schoonmaken van de
luidsprekers geen bijtende stoffen zoals
bijvoorbeeld alcohol, oplosmiddel, benzine etc.
REGULACIONES
El cambio de potencia se puede efectuar
simplemente actuando sobre el regulador
previsto con 5 posiciones (A, fig. 2) presente
en el lado trasero del difusor. Introducir un
destornillador de hoja plana pequeño en la
ranura [B] y girar en sentido horario o
antihorario hasta que el signo de referencia
indique la potencia deseada.
La relación posición/
potencia viene indicada
en la tabla [C].
MANTENIMIENTO
Verificar periódicamente el apriete de los
tornillos de fijación del soporte del difusor y
de los tornillos del sistema de fijación mural
del soporte.
Verificar además el estado de eficiencia de
los cables de conexión y eliminar el eventual
exceso de polvo o detritos que el viento o los
insectos hayan podido depositar. No utilizar,
para la limpieza de los difusores, sustancias
corrosivas como: alcohol, solvente, gasolina,
etc.
 Richt de luidsprekers naar de zone waar het
geluid verspreid moet worden en raadpleeg
hierbij de pooldiagrammen uit de paragraaf
"TECHNISCHE KENMERKEN".
 Indien de luidsprekers in de openlucht worden
geïnstalleerd, de opening van de hoorn altijd
naar beneden richten.
11-526_A.p65 13/02/02, 14.509
Ref. 11/526-A TRX20-TW
10
TECHNISCHE KENMERKEN CARACTERÍSTICAS TÉCNICAS
Pooldiagrammen
Diagramas polares
Frequentierespons in as 1W/1m - Respuesta en frecuencia alineada 1W/1m
negomrevlaanimoN W02 lanimonainetoP
negomrevraablegeR W5.2-W5-W01-W51-W02 elbalugerainetoP
eitnadepmI 005 Ω076-ΩK1- ΩK2- ΩK4-ΩainadepmI
keohsgniioortsreV °08
)zHk2@(nóisrepsidedolugnÁ
snopsereitneuqerF zH005.21÷053 aineuerfneatseupseR
uaevinkurdsdiuleG )m1/W1(Bd011 aronosnóiserpleviN
)LxØ(negnitemfA mm032x312 sadideM)LxØ(
thiweG gk5,1 oseP
11-526_A.p65 13/02/02, 14.5110
Ref. 11/526-A TRX20-TW
11
LISTA DELLE PARTI DI RICAMBIO LIST OF SPARE PARTS
PIÈCES DÉTACHÉES ERSATZTEILE
VERVANGINGSONDERDELEN REPUESTOS
ENOIZIRCSED WT-02XRT NOITPIRCSED
anarbmeM 2D99 mgarhpaiD
erotatummoC 4/9199 htiwsrevoegnahC
affatS 7/6399 tekarB
erotalsarT 2MT99 remrofsnarT
NOITPIRCSED WT-02XRT GNUBIERHCSEB
enarbmeM 2D99 narbmeM
ruetatummoC 4/9199 retlahS
edirB 7/6399 legüB
ruetamrofsnarT 2MT99 rotamrofsnarT
GNIVJIRHCSEB WT-02XRT ICPIRCSEDÓN
naarbmeM 2D99 anarbmeM
rotatummoC 4/9199 rodatumnoC
legueB 7/6399 etropoS
rotamrofsnarT 2MT99 rodamrofsnarT
11-526_A.p65 13/02/02, 14.5111
Ref. 11/526-A TRX20-TW
12
Via Mecenate, 0 - 20138 MILANO - ITALIA
TEL. +3 -02-580 77 1 (15 linee r.a.)
FAX +3 -02-580 77 277
http://www.paso.it
UDT - 02/02 - 11/526-A
S.p.A
NOTA
Nel continuo intento di migliorare i propri prodotti, la PASO S.p.A. si riserva il diritto di
apportare modifiche ai disegni e alle caratteristiche tecniche in qualsiasi momento e senza
alcun preavviso.
NOTE
PASO S.p.A. strive to improve their products continuously, and therefore reserve the
right to make changes to the drawings and technical specifications at any time
and without notice.
NOTE
En raison de lamélioration constante de ses produits, PASO S.p.A. se réserve le droit
dapporter des modifications aux dessins et caractéristiques techniques à tout instant et sans
préavis aucun.
MERKE
In der Überzeugung, die eigenen Produkte beständig verbessern zu wollen, behält sich PASO
S.p.A. das Recht vor, jederzeit und ohne Vorankündigung Änderungen an technischen
Zeichnungen und - Merkmalen vorzunehmem.
OPMERKING
Aangezien PASO S.p.A. voortdurend verbeteringen aanbrengt aan haar producten, behoudt zij
zich het recht voor op ieder moment zonder voorbericht de tekeningen en technische
eigenschappen aan wijzigen te onderwerpen.
NOTA
Siempre con la firme intención de mejorar sus productos, Paso S.p.A. se reserva el derecho
de modificar los dibujos y las características técnicas, sin preaviso alguno.
11-526_A.p65 13/02/02, 14.5112

Other manuals for TRX20-TW

2

Other Paso Speakers manuals

Paso C37/6-V User manual

Paso

Paso C37/6-V User manual

Paso C420-EN User manual

Paso

Paso C420-EN User manual

Paso C57-T Service manual

Paso

Paso C57-T Service manual

Paso C572/6-V User manual

Paso

Paso C572/6-V User manual

Paso C37/6-EN User manual

Paso

Paso C37/6-EN User manual

Paso C420-T User manual

Paso

Paso C420-T User manual

Paso TA16-F User manual

Paso

Paso TA16-F User manual

Paso C58/20-HF User manual

Paso

Paso C58/20-HF User manual

Paso C980 User manual

Paso

Paso C980 User manual

Paso C44/12-EN User manual

Paso

Paso C44/12-EN User manual

Paso TR10-TW User manual

Paso

Paso TR10-TW User manual

Paso C51/20-HF User manual

Paso

Paso C51/20-HF User manual

Paso C44/6-TB Service manual

Paso

Paso C44/6-TB Service manual

Paso C470/6-TW User manual

Paso

Paso C470/6-TW User manual

Paso C36/6 User manual

Paso

Paso C36/6 User manual

Paso C33/10-T User manual

Paso

Paso C33/10-T User manual

Paso C36/6-T Service manual

Paso

Paso C36/6-T Service manual

Paso C402-T User manual

Paso

Paso C402-T User manual

Paso TRX20-TW User manual

Paso

Paso TRX20-TW User manual

Paso C93 Series Service manual

Paso

Paso C93 Series Service manual

Paso PMS2000 Series User manual

Paso

Paso PMS2000 Series User manual

Paso C150-HF Guide

Paso

Paso C150-HF Guide

Paso C45/12V-EN User manual

Paso

Paso C45/12V-EN User manual

Paso TR1-B User manual

Paso

Paso TR1-B User manual

Popular Speakers manuals by other brands

REVELL W970 instruction manual

REVELL

REVELL W970 instruction manual

Whelen Engineering Company WS100CH Product description

Whelen Engineering Company

Whelen Engineering Company WS100CH Product description

Proficient Protege LDA5 owner's manual

Proficient Protege

Proficient Protege LDA5 owner's manual

OEM Endeavor IO-510 brochure

OEM

OEM Endeavor IO-510 brochure

Amina MOBIUS 7 installation guide

Amina

Amina MOBIUS 7 installation guide

Infinity 612m user guide

Infinity

Infinity 612m user guide

Air 2U E10 Product information

Air 2U

Air 2U E10 Product information

Q Acoustics M20 owner's manual

Q Acoustics

Q Acoustics M20 owner's manual

Grundig PartyHit user manual

Grundig

Grundig PartyHit user manual

KLING & FREITAG CA 106 user manual

KLING & FREITAG

KLING & FREITAG CA 106 user manual

Meridian M60C Specification sheet

Meridian

Meridian M60C Specification sheet

EisSound KBSound iSelect user manual

EisSound

EisSound KBSound iSelect user manual

a/d/s/ C50ic owner's manual

a/d/s/

a/d/s/ C50ic owner's manual

Brookstone Aviator Mini Wireless Speaker user manual

Brookstone

Brookstone Aviator Mini Wireless Speaker user manual

Philips HTL5120 quick start guide

Philips

Philips HTL5120 quick start guide

Bigben PARTY PARTYBTLITE operating instructions

Bigben PARTY

Bigben PARTY PARTYBTLITE operating instructions

Audiocom SPK-2000 Specification sheet

Audiocom

Audiocom SPK-2000 Specification sheet

Ground Zero Competition Series owner's manual

Ground Zero

Ground Zero Competition Series owner's manual

manuals.online logo
manuals.online logoBrands
  • About & Mission
  • Contact us
  • Privacy Policy
  • Terms and Conditions

Copyright 2025 Manuals.Online. All Rights Reserved.