manuals.online logo
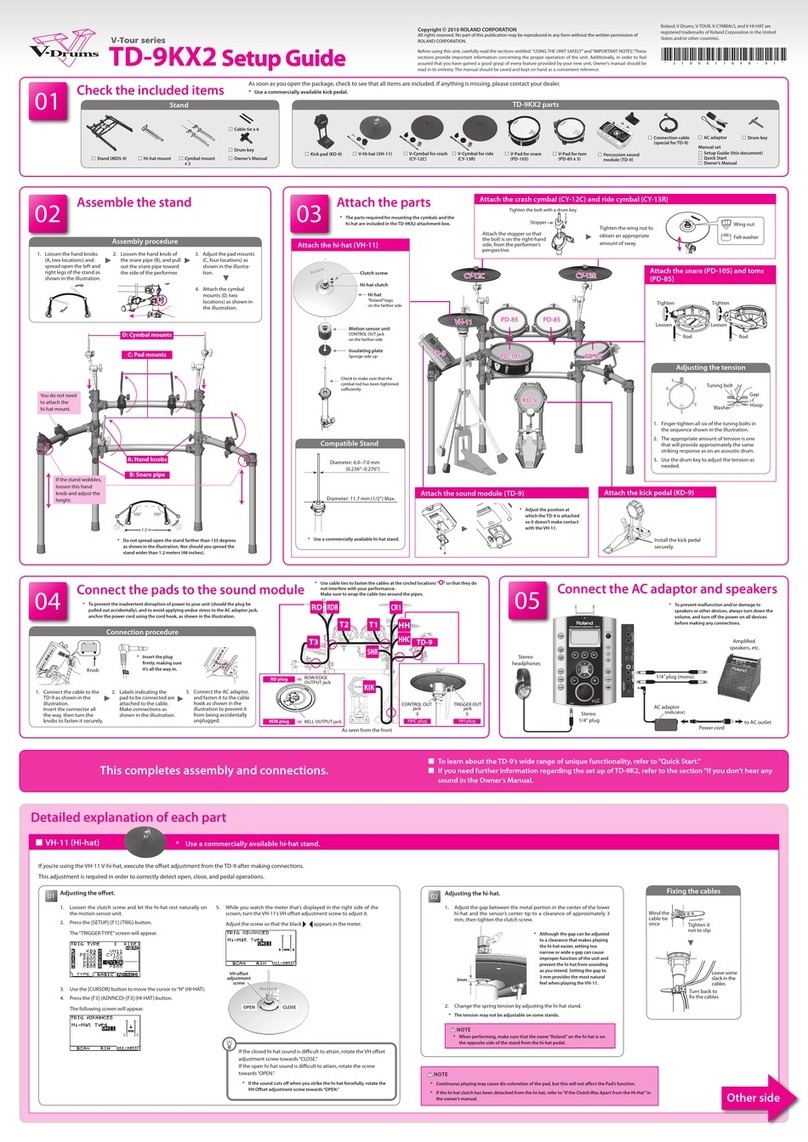
Brands
  1. Home
  2. •
  3. Brands
  4. •
  5. Pearl
  6. •
  7. Drum
  8. •
  9. Pearl Travel Timbales User manual

Pearl Travel Timbales User manual

Congratulations on your purchase!
For optimum performance, please read this Instruction Manual before playing.
PTTM-1415
PEARL TRAVEL TIMBALES
Instruction Manual
このたびは、本製品をお買い上げいただき誠にありがとうございます。
製品の機能を十分に発揮してお使いいただくために、この取扱説明書をぜひご覧下さい。
取扱説明書
Fig.2 / 図2
Fig.2-A / 図2-A
Fig.2-B / 図2-B
Fig.1 / 図1
Upper Tube Assembly
上部パイプ Handle / ハ ンドル
Hasp / レバー
Wing-Nut (A)
ウイングナット (A)
Wing-Nut
ウイングナット
Tripod base
脚部
Wing-Bolt / ウイングボルト
Mount
マウント
Square Receptacle
レシーバー
Wing-Bolt / ウイングボルト
Wing-Bolt
ウイングボルト
Mount / マウント
Accessory Post
アクセサリーポスト
Step 1.
Stand Assembly
スタンドの組み立て
Extend the legs of the Tripod Base and place it on a flat
surface. Insert the Upper Tube Assembly into the Tripod
Base and tighten Wing-Nut (A). Set the Hasp and
Handle to the off position as shown in (Fig.1).
脚部のウイングボルトをゆるめ三脚を開き、ウイングボルト
をしっかりと締めて脚部を固定します。
上部パイプを脚部の
パイプジョイントに差し込み、
お好みの高さに調整できまし
たらパイプジョイントのウイングナット (A) をしっかりと締
めて固定します。次に、レバーとハンドルをオフの位置図 1
の位置にセットします。
Step 2.
Stand Assembly
スタンドの組み立て
Locate the Accessory Post and Mount (FIG.2). Attach
the Mount with the Wing-Bolt facing upward to the
square receptacle of the Upper Tube Assembly
(Fig.2-A). Ensure it is fully inserted onto the receptacle
until it “stops” and tighten the Wing-Bolt to secure
(Fig.2-B).
アクセサリーポストとマウントを取り付けます(図2 )。
ウイングボルトを上向きにしてマウントをアッパーチューブ
アッセンブリーのレシーバーに取り付けます(図2-A)。
完全にレシーバーに挿入されていることを確認し、ウイング
ボルトを締めて固定します(図2-B)。
Fig.3 / 図3 Fig.3-A / 図3-A
Fig.3-B / 図3-B
Fig.4 / 図4
Fig.4-A / 図4-A
Fig.5 / 図5
Tip / 注意
Once assembly is final, adjust the Accessory Post to your
desired playing position using one of the six-hole positions for
the instrument(s) attached (FIG.3-B).
組 み 立 て が 完 了 し ま し た ら 、6 つ の 穴 の う ち の 1 つ を 使 用 し て 、ア ク
セ サ リ ー ポ ス ト を ご 希 望 の 演 奏 位 置 に 調 整 し て く だ さ い( 図 3 - B )。
Flat Washer
ワッシャー
Flat Washer
ワッシャー
13mm Lock-Nut
ロックナット(13mm)
Accessory Post
アクセサリーポスト
Accessory Post
アクセサリーポスト
13mm Wrench
レンチ(13mm)
Guide Hooks
ガ イド フック
Hook
ガ イド フック
Hasp
レバー
Hook
ガ イド フック
Handle/ハンドル
Hasp
レバー
Hinge Bracket edge into the Guide Hooks
ヒンジ・ブラケットの端をガイド・フックへ
Step 3.
Stand Assembly
スタンドの組み立て
Insert the Accessory Post into one of the six-hole
positions as shown in (Fig.3). Using the 13mm Wrench
supplied, tighten the Lock-Nut located on the bottom of
the post to secure it into place (Fig.3-A).
アクセサリー・ポストを 6 つの穴のいずれかに挿入し、ポ
ストの底部にあるロックナットを付属のレンチ(13mm)で
締め所定の位置に固定します(図 3、3-A)。
Step 4.
Timbales to Stand Attachment
トラベルティンバレスの設置
Unfold the Travel Timbales and place them onto the top
of the stand with the hook toward the Hasp. Ensure the
slots of the Hinge Bracket mate with the Guide Hooks of
the Upper Tube Assembly. Slide the Travel Timbales
toward the player inserting the Hinge Bracket edge into
the Guide Hooks as shown in (Fig.4) and (Fig.4-A).
2 つのトラベルティンバレスを広げ、スタンドの上に置きま
す。ヒンジ・ブラケットのスロットがアッパー・チューブ・
アセンブリーのガイド・フックに合っていることを確認しま
す。ヒンジ・ブラケットの端をガイド・フックに挿入して、ト
ラベル・ティンバーレをプレーヤーに向かってスライドさ
せます(図 4,4-A)。
Step 5.
Timbales to Stand Attachment
トラベルティンバレスの設置
Lift the Handle to place the Hasp onto the Hook of the
Hinge Bracket (Fig.5).
ハンドルを持ち上げて、レバーをヒンジブラケットのフック
に取り付けます(図 5)。
CAUTION / 注意
Failure to fully insert the Hinge Bracket into the Guide Hooks
may cause the Travel Timbales to fall off the stand resulting in
damage or personal injury.
ヒンジブラケットをガイドフックに完全に挿入しないと、トラベ
ルティンバレスがスタンドから落下し、破損や人身事故の原因に
なることがあります。
Hinge Bracket Slots
ガ イド フック
Fig.5-A / 図5-A
Fig.5-B / 図5-B
Fig.6-A / 図6-A Fig.6-B / 図6-B
Wing-Nut (A)
ウイングナット (A)
Wing-Nut
ウイングナット
Wing-Nut
ウイングナット
Memory Lock
メモリーロック

CAUTION
Before use, check all Wing-Bolts/Nuts and the
Accessory Post to ensure everything is tight
and secure. Failure to do so may result in
personal injury or property damage.
Step 6.
Timbales to Stand Attachment
トラベルティンバレスの設置
Loosen Wing-Nut (A) of the height adjustment collar of
the Tripod Base and set the Travel Timbales to your
desired height. Tighten Wing-Nut (A) to secure the
setting. Next, loosen and adjust the Memory Lock onto
the height adjustment collar. Once set, tighten the
Memory Lock Wing-Nut as shown in (Fig.6-A) &
(Fig.6-B).
あからじめメモリーロックのウイングボルトをゆるめます。
次に、脚部のウイングナット(A)をゆるめ、トラベルティンバ
レスをお好み高さに設定し、再度ウイングナット(A)を締め
て固定します。設定 が完了しましたら、メモリーロックのウ
イングナットを締め付けます(図 6-A,6-B)。
Next pull the Handle down to secure the Travel
Timbales into place. (Fig.5-A) & (Fig.5-B).
次にハンドルを引き下げて、トラベル・ティンバレスを所定
の位置に固定します ( 図 5-A,5-B)。
演奏中の転倒や落下を防ぐために、ネジ類はしっか
りと 締 めて からご 使 用くだ さい 。
スタンド設置時には三脚を十分に開き、可動部をバ
ランス良く調整し、転倒しないようご注意ください。
スタンドの 転 倒 や ケ ガ 予 防 の ため 、ス ネア スタンド の
高さや角度を調整する際は必ず片方の手でスネアド
ラ ム を 支 え て く だ さ い 。
各部を調整する際は指を挟まないようご注意ください。
注意
パール楽器製造株式会社
〒276-0034千葉県八千代市八千代台西10-2-1
電話:047-484-9111(代表)
〒276-0046千葉県八千代市大和田新田593-1
電話:047-450-1090(テクニカルサポート)
Printed in Thailand
-Jun 2021-
https://www.pearldrum.com
Products and specifications are subject to change without notice.
製品改良のため予告なくデザイン・仕様を変更する場合がありますので御了承下さい。

This manual suits for next models

1

Other Pearl Drum manuals

Pearl h-890 User manual

Pearl

Pearl h-890 User manual

Pearl MIMP24B User manual

Pearl

Pearl MIMP24B User manual

Pearl P-3002D User manual

Pearl

Pearl P-3002D User manual

Pearl Vision Series User manual

Pearl

Pearl Vision Series User manual

Pearl FORUM FZ User manual

Pearl

Pearl FORUM FZ User manual

Pearl BD-10 User manual

Pearl

Pearl BD-10 User manual

Pearl TGX Series User manual

Pearl

Pearl TGX Series User manual

Pearl MSS-3000 User manual

Pearl

Pearl MSS-3000 User manual

Pearl MTS-3000 User manual

Pearl

Pearl MTS-3000 User manual

Pearl Forum FZ User manual

Pearl

Pearl Forum FZ User manual

Pearl e/MERGE PUREtouch TOM PAD User guide

Pearl

Pearl e/MERGE PUREtouch TOM PAD User guide

Pearl DR 503 User manual

Pearl

Pearl DR 503 User manual

Pearl H-1050 User manual

Pearl

Pearl H-1050 User manual

Pearl P-930 User manual

Pearl

Pearl P-930 User manual

Pearl Red Box RBM 20 User manual

Pearl

Pearl Red Box RBM 20 User manual

Pearl P-1000 User manual

Pearl

Pearl P-1000 User manual

Pearl MARCHING TENOR User manual

Pearl

Pearl MARCHING TENOR User manual

Pearl Optimount OPTA-0708 User manual

Pearl

Pearl Optimount OPTA-0708 User manual

Pearl R2AS User manual

Pearl

Pearl R2AS User manual

Pearl VISION Series User manual

Pearl

Pearl VISION Series User manual

Pearl P-3000D User manual

Pearl

Pearl P-3000D User manual

Pearl VISCOUNT User manual

Pearl

Pearl VISCOUNT User manual

Pearl P-2000C User manual

Pearl

Pearl P-2000C User manual

Pearl E-PRO Live User manual

Pearl

Pearl E-PRO Live User manual

Popular Drum manuals by other brands

Medeli AP40 owner's manual

Medeli

Medeli AP40 owner's manual

RACKBABD 822148 Assembly instructions

RACKBABD

RACKBABD 822148 Assembly instructions

Alesis SR-18 quick start guide

Alesis

Alesis SR-18 quick start guide

Medeli DD508 user manual

Medeli

Medeli DD508 user manual

thomann Millennium Drums Rookie user manual

thomann

thomann Millennium Drums Rookie user manual

Medeli DD401 owner's manual

Medeli

Medeli DD401 owner's manual

Medeli DD508DX owner's manual

Medeli

Medeli DD508DX owner's manual

Gewa G3 owner's manual

Gewa

Gewa G3 owner's manual

Roland V-Drums TD-1KV owner's manual

Roland

Roland V-Drums TD-1KV owner's manual

Yamaha DTXPRESS IV owner's manual

Yamaha

Yamaha DTXPRESS IV owner's manual

Yamaha EMR-1 user guide

Yamaha

Yamaha EMR-1 user guide

Yamaha DD-75 owner's manual

Yamaha

Yamaha DD-75 owner's manual

Roland V-Tour TD-6KW owner's manual

Roland

Roland V-Tour TD-6KW owner's manual

Roland V-drums manual

Roland

Roland V-drums manual

XM Enterprise XSM-5S user manual

XM Enterprise

XM Enterprise XSM-5S user manual

Prime Brands Group WCP2 instructions

Prime Brands Group

Prime Brands Group WCP2 instructions

Simmons SD1500 owner's manual

Simmons

Simmons SD1500 owner's manual

Livoo TEA286 user manual

Livoo

Livoo TEA286 user manual

manuals.online logo
manuals.online logoBrands
  • About & Mission
  • Contact us
  • Privacy Policy
  • Terms and Conditions

Copyright 2025 Manuals.Online. All Rights Reserved.