Peg-Perego Orion User manual

Orion
2
ANS GARANTIE
ANOS GARANTIA
YEAR WARRANTY
LIB139R00EU
Orion_InstructionManual.indd 1 11/02/14 15:07

Orion
2
ANS GARANTIE
ANOS GARANTIA
YEAR WARRANTY
LIB139R00EU
Orion_InstructionManual.indd 2 11/02/14 15:07

11 89
15
6
7
10
12
13
17
14
16
1
2
4
5
3
Orion_InstructionManual.indd 3 11/02/14 15:07
11 8
7
9
8
15
17
16
6
7
6
10
10
12
1
3
5a
6
5b
7
2
14 4
7
Orion_InstructionManual.indd 4 11/02/14 15:07
20
4
18
19
20
22
21
8
10
12
9
11
14
13
15 16 17 18
Orion_InstructionManual.indd 5 11/02/14 15:07

13
15
17
16
18
Orion_InstructionManual.indd 6 11/02/14 15:07

Orion Instruction Manual - Peg Perego
1
ORION
Front-Mounted Child Bike Seat
Read the instructions and keep them for future reference. Follow
and comply with the safety precautions! Make sure you know how
to mount and use the Orion child bike seat before using it.
Product Description:
Orion is a front-mounted child bike seat that is mounted on the
head tube with a round section diameter between 32 to 52 mm
(1.25” - 2”). Orion is designed for carrying children who are up to a
maximum of 15kg (33lbs).
Components:
1 Seat
2 Padding (fixed with Velcro system)
3 Safety belts
4 Footrests with their respective straps
5 Fastening shackle
6 Support arm
7 Fastening block
8 2 U-shaped brackets
9 2 plastic covers
10
2 M6x20 screws and their respective nuts with toothed washers
11 Set of five reductions for different sized bicycle frames
12 Seat fixing plate
13 2 closing caps and relative M5x50 screws with M5 nuts
(when the fastening shackle is to be removed)
14 Hexagon ring wrench
15 2 rotating pins
16 4 M6 hexagonal flanged nuts
17 2 screw casings
CAUTION
1) The Orion child bike seat must be mounted on the head tube,
as shown in this manual (Illustration 10). Tighten fasteners
securely, and check them frequently.
2) Check that the bicycle is in good working order and is suitable
for adding supplementary loads. The bicycle should be of
proper size and adjustment of the rider. Check the information
supplied with the bicycle or ask for information and advice from
the bicycle manufacturer.
3) Do not carry a child who is less than 12 months of age in the
EN
!
ENGLISH
Orion_InstructionManual-Text.indd 1 12/02/14 15:47

2
Orion Instruction Manual - Peg Perego
Child Bike Seat. A child must be able to sit independently and
comfortably in the child bike seat. Please consult a pediatrician
regarding children under 12 months.
4) Ensureinitiallyandperiodicallythatthechild’sweightdoesnot
exceed 15kg (33lbs).
5) Additional luggage or accessories should not be attached to the
child bike seat, as they may exceed the load limit and lessen
the stability. The total load limit for the child bike seat is 33
pounds.
6) The load of a child bike seat may lessen the stability and alter
the riding characteristics of the bicycle, particularly regarding
steering and braking.
7) Donotmakeanymodicationstothechildbikeseat.
8) Donotallowanyofthechild’sbody,clothing,shoelaces,or
toys to come in contact with moving parts of the bicycle.
9) Always attach the retention system snugly around the child.
10) Ensure that the safety belts are not loose and do not come into
contact with the moving parts of the bicycle. When no child
is being carried, fasten the safety belts so the straps are not
hanging loosely.
11) Never ride in inclement or hazardous conditions.
12) Never leave the child unattended in the child bike seat.
13) Never leave the child in the child bike seat with the bicycle
supported only by a kickstand.
14) Never ride bicycle at night without adequate lighting.
15) The rider and child should wear approved bicycle helmets.
16) Check that the seat is not too hot (e.g., overheated by the sun)
prior to placing the child in it.
17) Remove the child bike seat when the bicycle is transported by
motor vehicle. Strong wind could damage the seat or detach it
from the bicycle, causing accidents or damage the child bike
seat to the point it will not perform reliably.
18) It is recommended to change the type of handlebar if the
steering angle for each side is less than 45 °.
19)Beforeeachuse,checktheseatisttedontothefasteningblock
correctly: on pulling the support arm upwards, the fastening
blockmustholdtheseatdownrmly.
20) Before each use, ensure the child bike seat does not interfere
with braking, pedaling or steering of the bicycle.
21) Presence of a child bike seat on a bicycle may require alteration
of the method used by the rider to mount or dismount the
bicycle.Caremustbetakenwhenevertheridergetsonoroof
Orion_InstructionManual-Text.indd 2 12/02/14 15:47

Orion Instruction Manual - Peg Perego
3
the bicycle.
22) A front mounted seat can reduce the manoeuvrability of the
handlebar.
23) Check the existence of any laws present in your State that
govern the use of bicycle seats to carry children.
24) Ensure that there are no sharp edges that could come into
contact with the child (for example, frayed or deteriorated wires
etc.).
25)Coveranysaddlespringstoavoidachild’sngersbeing
trapped and/or squashed by them.
26) The child in the seat must be clothed and protected from the
cold more than the person riding the bicycle. Protect the child
from rain.
27) Do not use the seat if any part is missing or broken.
28) The seat material (polypropylene) loses some of its mechanical
properties with ageing if exposed for longer periods to
environmental conditions (sun, rain, ice, etc.). In the case of
normal use and exposure to environmental conditions, the seat
should be replaced after 3 years.
WARNING!
Failuretocomplywiththemanufacturer’sinstructionscanleadto
serious injury or death of the passenger/rider!
Mounting and Assembling the Child Seat:
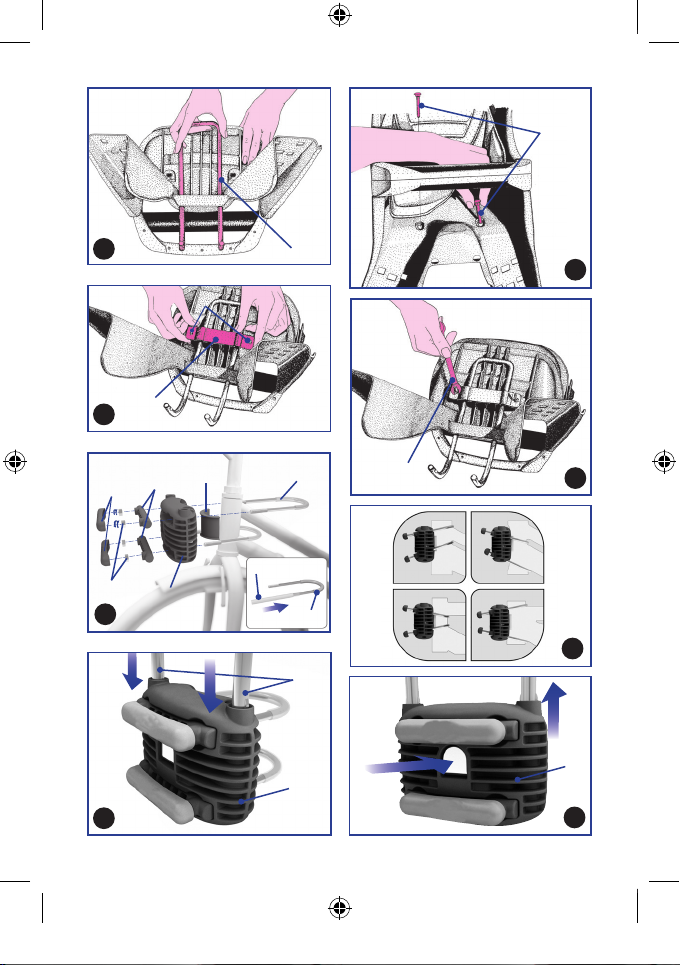
Illustration 1:
Holding the seat upside-down, insert the support arm (6).
Illustration 2:
After having lifted up the padding in the seating area, insert the
shortest two screws (10) in the holes.
Illustration 3:
Placethexingplate(12)incorrespondencewiththescrews(10)
protruding from the bottom of the seat. Attach the clamp using the
two M6 hexagonal nuts with the toothed washers.
Illustration 4:
With the screws loosened, place the support arm in one of three
possible positions, then tighten the nuts using the wrench (14) until
they are tightly fastened.
Illustration 5A-5B
Choose the plastic reduction (11) which is adapted to the diameter
ofthebicycle’sheadtubeandinsertitinthefasteningblock(7).
Each reduction shows the reference diameters. Apply the covers
(9) to the U-shaped brackets (8). Choose one of the possible
congurationsbasedonthetypeofbicycleframeyouhave,as
Orion_InstructionManual-Text.indd 3 12/02/14 15:47

4
Orion Instruction Manual - Peg Perego
showningure5B.InserttheendsoftheU-shapedbrackets(8)
in the fastening block (7), in the rotating pins (15) and then secure
them with the 4 hexagonal nuts (16). Apply the casings(17) to cover
the protruding parts of the U-shaped brackets (8).
Illustration 6:
Take the seat and insert the two ends of the support arm (6) into
the fastening block holes. Verify that the support arm is correctly
inserted and locked by the safety spring release: pulling the seat
upwards, this should not exit the fastening block.
In case the seat interferes with the handlebar or with pedalling,
return to the illustration 4 and adjust the support arm of the seat,
moving it forwards or backwards as required.
Illustration 7:
To remove the seat, hold the centre button of the fastening block
(7) and pull the seat upwards.
Illustration 8:
Insert each footrest (4) with the respective strap in the relative
housing.
Illustration 9:
Pass the four hooks (18) in the housings provided and press down
until the catch snaps (19).
To adjust the height of the footrests:
•Pushthecatch(19)withangerfromtheoutside,whileraising
the footrest with the other hand, then remove the footrest from its
housing.
• Insert the footrest in the desired position.
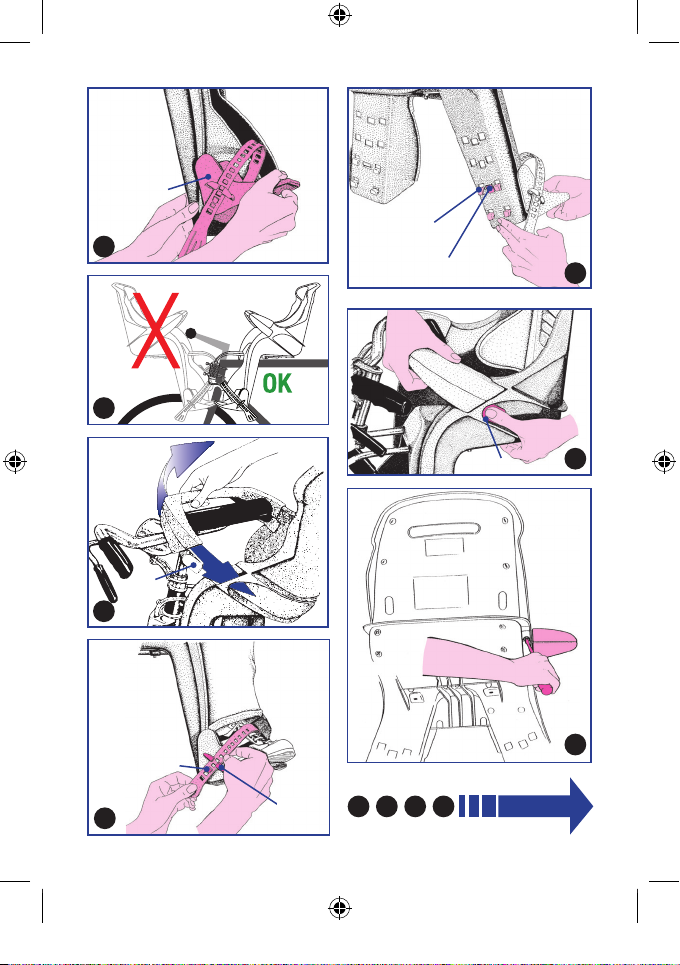
Use of the Seat:
Illustration 10:
Only mount the seat between the handlebar and the bicycle saddle.
Illustration 11:
Apartfromthesafetybelts,theOrionchild’sseathasafastening
shackle that prevents the child from getting up and moving around
dangerously while being carried. To open the fastening shackle,
push the button (20). Take the fastening shackle out of its housing
by rotating it until it stops.
Illustration 12:
After having seated the child, close the fastening shackle until the
button (20) is completely inserted in its housing. Check that the
fastening shackle is blocked.
Illustration 13:
When the child is seated in the seat, secure his/her feet by passing
the strap under the connector (21), and blocking the strap on the
pin(22)inthedesiredposition.Toreleasethechild’sfeet,pullthe
strap outwards to release it from the pin (22).
Illustration 14:
Orion_InstructionManual-Text.indd 4 12/02/14 15:47

Orion Instruction Manual - Peg Perego
5
The fastening shackle is suitable for children who are a few months
old (weighing about 7 to 10 Kg/15 - 22 lbs). When the child weighs
over 10kg (22 lbs), the fastening shackle could squeeze the child
and it would therefore be necessary to remove it. In this way the
seat can be used up to a maximum child weight of 15kg (33 lbs).
To remove the fastening shackle, exercise pressure with a normal
screwdriver, removing the cap blocking the pin.
Illustration 15:
At this point the pin can be extracted from the housing, releasing
the fastening shackle.
Illustration 16:
Using light pressure, snap the two closing caps (13) into place to
close the openings that have been formed due to the absence of the
fastening shackle.
Illustration 17:
If you want to replace the fastening shackle, remove the closing
caps (13) and put the fastening shackle back into place using the
relative screw and nut, tightening it with the wrench supplied (14).
Illustration 18:
Fasten the child with the seat belts by adjusting the length based on
thechild’sheight.Theadjustmentisachievedbyslidingthebuckles
on the belts. To unfasten the belts, simultaneously press the two
buttons (front and rear) on the clasp.
Maintenance:
1) Clean the seat, the padding and the belts with warm water and
a mild detergent. Do not use solvents or abrasive or corrosive
detergents. Leave the padding to dry in the open air. Do not
iron
2) Repair of the seat and replacement of damaged components
must only be performed by authorized personnel.
Technical Specications:
Product Child Bike Seat
Model ORION
Size 54x45x33 cm/(24.3” x 17.7” x 13”) (HxLxP)
Weight 2,2kg (4.85lbs)
Orion_InstructionManual-Text.indd 5 12/02/14 15:47

6
Orion Instruction Manual - Peg Perego
FR
ORION
Siège d’Enfant pour Vélo à Installation frontale
Lisez les instructions et conservez-les pour référence future. Vous
devez suivre et respecter les précautions de sécurité! Assurez-vous
debiensavoircommentinstalleretutiliserleSièged’Enfantpour
Vélo Orion avant son utilisation.
Description du Produit:
Orionestunsièged’enfantpourvéloàinstallationfrontalequi
semontesurletubededirectiondontlediamètred’unesection
circulairefaitentre32et52mm(1.25’’à2‘’).Orionestconçupour
transporter des enfants qui pèsent un maximum de 15kg (33lbs).
Composantes:
1 Siège
2 Rembourrage
3 Ceintures de sécurité
4 Appuie-pieds avec leurs courroie respectives
5 Chaînes de fixation
6 Bras de support
7 Bloc de fixation
8 2 Attaches en forme de U
9 2 couvercles de plastique
10 2 vis M6x20 et leurs écrous respectifs avec rondelles dentelées
11 Ensemble de 5 réducteurs pour différentes grandeurs de
châssis de bicyclettes
12 Plaque de fixation du siège
13 2 capuchons et leurs vis respectives M5x50 avec écrous M5
14 Clé circulaire hexagone
15 2 épingles rotatives
16 4écrousM6hexagonalesàailettes
17 2 recouvrements de vis
ATTENTION
1) Lesièged’enfantpourvéloOriondoitêtremontéentrele
guidon et le conducteur sur le tube de direction du vélo, comme
démontrédanscemanuel(illustration10).Serrezlesxations
defaçonsécuritaireetvériez-lesfréquemment.
2) Assurez-vous que la bicyclette est en bonne condition et
peut supporter des charges supplémentaires. La bicyclette
devraitêtredegrandeuretd’ajustementappropriéspourle
cycliste.Vériezlesinformationsfourniesaveclabicyclette
oudemandezlesinformationsoul’avisdumanufacturierdela
!
FRANÇAIS
Orion_InstructionManual-Text.indd 6 12/02/14 15:47

Orion Instruction Manual - Peg Perego
7
bicyclette.
3) Ne transportez pas un enfant âgé de moins de 12 mois dans
leSièged’EnfantpourVélo.Unenfantdoitêtrecapablede
s’asseoirtoutseulconfortablementdanslesiègedevélopour
enfant. Veuillez consulter un pédiatre en ce qui concerne des
enfants âgés de moins de 12 mois.
4) Assurez-vous initialement et régulièrement que le poids de
l’enfantn’excèdepas15kg(33lbs).
5) Unbagageadditionneloudesaccessoiresnedevraientpasêtre
attachésausièged’enfantpourvélo,parcequ’ilpourraient
excéder la limite de charge et en diminuer la stabilité. La limite
totaledechargedusièged’enfantestde15kg(33lbs).
6) Lachargedusièged’enfantpourvélopeutdiminuerlastabilité
et altérer les qualités de tenue de route de la bicyclette,
particulièrementencequiatraitàlaconduiteetaufreinage.
7) N’apportezaucunemodicationausièged’enfant.
8) Veilleràcequ’aucunepartieducorpsdel’enfant,des
vêtementsdel’enfant,deslacetsdechaussure,oudesjouets
ne puisse se prendre dans les parties mobiles du cycle.
9) Attacheztoujourslesystèmederetenueautourdel’enfantde
façonbienajustée.
10) Assurez-vous que les ceintures de sécurité ne soient pas lâches
etqu’ellesnepuissentpasentrerencontactavecdespièces
mobilesdelabicyclette.Lorsqu’aucunenfantn’esttransporté,
attachezlesceinturesdesécuritédefaçonàcequ’ellesne
soient pas pendantes.
11) Ne roulez jamais lors de conditions mauvaises ou dangereuses.
12)Nelaissezjamaisl’enfantsanssurveillancedanslesiège
d’enfantpourvélo.
13)Nelaissezjamaisl’enfantdanslesièged’enfantpourvélo
lorsque ce dernier est supporté seulement par une béquille.
14) Ne roulez jamais en bibyclette pendant la nuit sans éclairage
adéquat.
15)Lecyclisteetl’enfantdevraienttousdeuxporterdescasques
de vélo homologués.
16)Assurez-vousquelesiègenesoitpastropchaud(e.g.chaué
parlesoleil)avantd’yplacerl’enfantàl’intérieur.
17)Retirezlesièged’enfantlorsquelabicycletteesttransportée
surunevéhiculeàmoteur.Lesventsfortspourraient
endommager le siège ou le détacher de la bicyclette, causant
ainsidesaccidentsoudesdommagesausièged’enfantàun
pointtelqu’ilpourraitneplusêtreable.
Orion_InstructionManual-Text.indd 7 12/02/14 15:47

8
Orion Instruction Manual - Peg Perego
18)Ilestrecommandédechangerletypedepoignéesil’anglede
direction de chaque côté est moins que 45 °.
19) Avant toute utilisation, assurez-vous que le siège soit bien
attachésurleblocdexation:mêmeenrelevantlebrasde
support,leblocdexationdoitmaintenirlesiègefermement
en place.
20)Avantchaqueutilisation,assurez-vousquelesièged’enfant
pourvélon’aectepaslefreinage,lemouvementdepédaleni
la direction de la bicyclette.
21)Laprésenced’unsièged’enfantpourvélosurunebicyclette
peutchangerlafaçondontuncyclisteymonteoudémonte.Le
cyclistedoituserdeprudencelorsqu’ilmonteoudémonteune
bicyclette.
22) Unsiègemontéàl’avantpeutréduirelamanoeuvrabilitédela
poignée.
23)Vériezl’existencedetouteloiprésentedansvotreétat
ouprovincerégissantl’usagedesiègesdebicyclettesqui
transportent des enfants.
24)Assurez-vousqu’iln’yaitaucunrebordcoupantpouvantvenir
encontactavecl’enfant(parexemple,descâblesendommagés
ouelochés,etc.).
25) Couvrez tous les ressorts de selle pour éviter que les doigts des
enfants ne soient ni pris ni écrasés par ceux-ci.
26)L’enfantdanslesiègedoitêtrehabilléetmieuxprotégédu
froidquelecycliste.Protégezl’enfantdelapluie.
27)N’utilisezpaslesiègesil’unedesespiècesestmanquanteou
brisée.
28) Le matériel du siège (polypropylène) perd certaines de ses
propriétésmécaniquesavecletempss’ilestexposéaux
conditions environnementales pour de longues périodes (soleil,
pluie,glace,etc).Encasd’utilisationetd’expositionnormales
auxconditionsenvironnementales,lesiègedevraitêtre
remplacé après 3 ans.
MISE EN GARDE!
Ne pas suivre les instructions du manufacturier pourrait causer des
blessures sérieuses ou la mort du passager/cycliste!
Pour Monter et Assembler le Siège d’Enfant pour Vélo:
Illustration 1:
Entenantlesiègeàl’envers,insérerlebrasdesupport(6).
Illustration 2:
Aprèsavoirrelevélerembourragedusiègedel’assise,insérerles
Orion_InstructionManual-Text.indd 8 12/02/14 15:47

Orion Instruction Manual - Peg Perego
9
deux plus petites vis (10) dans les trous.
Illustration 3:
Placerlaplaquedexation(12)encorrespondanceaveclesvis(10)
qui ressortent du dessous du siège. Attacher la pince en utilisant
lesdeuxécrousenformed’hexagoneM6aveclesrondelles
dentelées.
Illustration 4:
Aveclesvisrelâchées,placerlebrasdesupportdansl’unedestrois
positions possible, puis resserrer les écrous en utilisant la clé (14)
jusqu’àcequetoutsoitbienserré.
Illustration 5A-5B
Choisir le réducteur de plastique (11) qui est adapté au diamètre
deletubededirectiondelabicycletteetl’insérerdansleblocde
xation(7).Chaqueréducteurmontredesdiamètresderéférence.
Installer les couvercles (9) et les attaches en forme de U (8).
Choisirl’unedescongurationsenfonctiondutypedechâssisde
bicyclettequevouspossédez,telquemontrédansl’illustration5B.
Insérer les embouts des attaches en forme de U (8) dans le bloc de
xation(7),danslesépinglesrotatives(15)puisattachez-lesavec
les4écrousenformed’hexagone(16).Installerlesrecouvrements
de vis (17) pour couvrir les parties des attaches en forme de U qui
ressortent (8).
Illustration 6:
Prendre le siège et insérer les deux embouts du bras du support
(6)danslestrousdublocdexation.Vérierquelebrasde
support est correctement inséré et verrouillé en observant le
déclenchementàressortdel’attachedesécurité:entirantlesiège
verslehaut,lesiègenedevraitpasquitterleblocdexation.Dans
le cas où le siège causerait une interférence avec les poignées ou
aveclemouvementdepédaler,retourneràl’illustration4etajuster
lebrasdesupportdusiège,enlebougeantversl’avantouvers
l’arrièretelquerequis.
Illustration 7:
Pourretirerlesiège,tenirleboutoncentraldublocdexation(7)
et tirer vers le haut.
Illustration 8:
Insérer chaque appuie-pied (4) avec sa courroie respective dans le
boîtier correspondant.
Illustration 9:
Enlerlesquatrecrochets(18)danslesboîtiersfournisetpousser
verslebasjusqu’àcequeleloquets’enclenche(19).
Pour ajuster la hauteur des appuie-pieds:
•Pousserleloquet(19)avecundoigtdel’extérieur,touten
relevantl’appuie-pieddel’autremain,puisretirerl’appuie-piedde
son boîtier.
Orion_InstructionManual-Text.indd 9 12/02/14 15:47

10
Orion Instruction Manual - Peg Perego
•Insérerl’appuie-piedàlapositiondésirée.
Utilisation du siège:
Illustration 10:
Seulementxerlesièged’enfantentrelespoignéesetlaselledela
bicyclette.
Illustration 11:
Misesàpartlesceinturesdesécurité,lesièged’enfantOrion
possèdeunechaînedexationquiempêchel’enfantdeselever
oudebougerdangereusementlorsqu’ilesttransporté.Pourouvrir
lachaînedexation,pousserlebouton(20).Sortezlachaînede
xationhorsdesonboîtierenlafaisantpivoterjusqu’àcequ’elle
cesse.
Illustration 12:
Aprèsavoirassisl’enfant,fermerlachaînedexationjusqu’àce
que le bouton (20) soit complètement inséré dans son boîtier.. Vous
assurerquelachaînedexationsoitbienverrouillée.
Illustration 13:
Lorsquel’enfantestassisdanslesiège,attachersespiedsen
passant la courroie sous les connecteurs (21), et bloquer la courroie
avecl’épingle(22)danslapositiondésirée.Pourlibérerlespieds
del’enfant,tirerlacourroieverslehautpourlalibérerdel’épingle
(22).
Illustration 14:
Lachaînedexationconvientpourdesenfantsquisontâgésde
quelquesmois(pesantenviron7à10kg/15-22lbs).Lorsque
l’enfantpèseplusde10kg(22lbs),lachaînedexationpourrait
écraserl’enfantetilseraitalorsnécessairedelaretirer.Decette
façon,lesiègepeutêtreutiliséjusqu’àcequel’enfantfasseun
poidsmaximumde15kg(33lbs).Pourretirerlachaînedexation,
exercer une pression avec un tournevis normal, en retirant le
recouvrementquiverrouillel’épingle.
Illustration 15:
Acemoment,l’épinglepeutêtreretiréedesonboîtier,cequilibère
lachaînedexation.
Illustration 16:
En faisant une petite pression, fermer les deux recouvrements
(13)enplacepourcouvrirlesouvertureslaisséesparl’absencede
chaînedexation.
Illustration 17:
Pourremplacerlachaînedexation,retirerlesrecouvrements(13)
etreplacerlachaînedexationàl’aidedesesvisetdesesécrous
respectifs, en la serrant bien avec la clé fournie (14).
Illustration 18:
Attacherl’enfantaveclesceinturesdesécuritéenajustantleurs
longueursselonlagrandeurdel’enfant.L’ajustementestcomplété
Orion_InstructionManual-Text.indd 10 12/02/14 15:47

Orion Instruction Manual - Peg Perego
11
en glissant les boucles des ceintures. Pour détacher les ceintures,
pesersimultanémentsurlesdeuxboutons(àl’avantetàl’arrière)
du fermoir.
Entretien:
1) Nettoyer le siège, le rembourrage et les ceintures avec de
l’eautièdeetundétergentdoux.Nepasutiliserdedétergent
corrosif ou abrasif, ni de solvant. Laisser le rembourrage sécher
àl’air.Nepasrepasser.
2) Les réparations et le remplacement de pièces endommagées
dusiègedoiventseulementêtreexécutéspardupersonnel
autorisé.
Caractéristiques Techniques:
Produit Sièged’EnfantpourVélo
Modèle ORION
Dimension 54x45x33 cm/(24.3” x 17.7” x 13”) (HxLxP)
Poids 2,2kg (4.85lbs)
Orion_InstructionManual-Text.indd 11 12/02/14 15:47
12
Orion Instruction Manual - Peg Perego
ES
ORION
Asiento de Bicicleta para niño
Montado-Delantero
Leer las instrucciones y guarder para referencias futures. Seguir y
cumplir con las precauciones de seguridad! Asegurese de saber como
montar y usar el asiento Orion para niño antes de usarlo.
Descripcion de el Producto:
Orion es un asiento de bicicleta montado a la cabezera de el tubo de
la estructura de el manubrio con una seccion redonda de diametro
entre 32 a 52 mm (1.25”-2”). Orion esta diseñado para cargar niños
de peso maximo 15kg (33lbs).
Componentes:
1 Asiento
2 Covertura (fijo con sistema de Velcro)
3 Cinturon de seguridad
4 Porta pies con sus respectivas correas
5 Grilletes para sostenimiento
6 Brazo de soporte
7 Bloque de sostenimiento
8 2 bracetes de forma U
9 2 coverturas plasticas
10 2 tornillos M6-20 con sus respectivas tuercas y rondanas de
dientes
11 Juego de cinco reducciones para estructura de bicicletas de difer
ente tamaño
12 Placa para arreglar asiento
13 2 Tapas de cerrar con sus tuercas y tornillos de M5x50 (cuando
para quitar grilletes)
14 Llave de anillo exagonal
15 2 Pernos giratorios
16 4 Tuerca exagonal dee M6
17 2 Covertura de tornillo
PRECAUCION
1) El asiento Orion tiene que ser montado a la cabezera de el tubo
de la bicicleta, como enseña este manual (Ilustracion 10). Aprieta
los grilletes bien seguros, y revisalos frecuentemente.
2) Revizar que la bicicleta este buenas condiciones y pueda aceptar
cargas adicionales. La bicicleta debe ser de tamaño apropiado y
ajustable para el conductor. Revise la informacion que biene con
la bicicleta o pregunte por informacion sugerencia a el fabricante
de la bicicleta.
!
ESPAÑOL
Orion_InstructionManual-Text.indd 12 12/02/14 15:47

Orion Instruction Manual - Peg Perego
13
3) No cargue un niño menor de 12 meses de edad en el Asiento
de Bicicleta para Niño. El niño tiene que poder sentarse
independiente y comodamente el asiento de bicicleta para niño.
Favor de consultar a su Pediatra acerca de niños menores de 12
meses.
4) Asegurese periodocamente de que el peso de el niño no exeda
15kg (33lbs).
5) Equipaje adicional o accesorios no deben ponerse en este asiento
de bicicleta para niño, pueden exedir el peso limite dañar la
estabilidad. El peso de limite total para asiento de bicicleta para
niño es 33 libras.
6) La carga de la asiento de bicicleta para niño puede causar
perdida de estabilidad y caracteristicas de el paseo de la bicicleta,
particularmente en el manejo o frenos.
7) Noaganingunamodicacionalasientodebicicletaparaniño.
8) No permita que ninguna parte del cuerpo, ropa, cordones de los
zapatos del niño o juguetes queden en contacto con cualquier
parte movil de la bicicleta.
9) Siempre ajuste bien el sistema de retencion alrededor de el niño
10) Asegurese que el cinturon de seguridad no este suelto o pueda
tener contacto con partes movibles de la bicicleta. Cuando no
este un niño en el asiento, asegure el cinturon de seguridad para
que no cuelguen..
11) Nunca pasee con inclemencia, o condiciones peligrosas.
12) Nunca deje al niño desatendido en el asiento de bicicleta para
niño.
13) Nunca deje el niño en el asiento de bicicleta para niño con la
bicicleta soportada solo por el soporte.
14) Nunca use la bicicleta de noche sin luces adecuadas.
15) El conductor y el niño siempre deben usar cascos aprobados para
bicicleta.
16) Revise que el asiento no este demasiado caliente (exe:
sobrecaliente por el sol).
17) Quite el asiento de bicicleta para niño cuando la bicicleta se
transporte por automóvil. Fuertes vientos pueden dañar el asiento
de bicicleta para niño o desprender de la bicicleta, causando
accidentes o dañando el cargador hasta el punto de no perfomar
conable.
18) Es recomendable cambiar el tipo de manubrio si el angulo de
manejo por cada lado es meno de 45 grados.
19) Antes de usar, revise que el asiento este asegurado
correctamente al bloque de seguridad: jallando el brazo de
Orion_InstructionManual-Text.indd 13 12/02/14 15:47

14
Orion Instruction Manual - Peg Perego
soporte hacia arriba, el bloque de seguridad tiene que detener el
asientorme.
20) Antes de cada uso, asegurese que el asiento de bicicleta para
niñonointereraconelfreno,pedalearoelmanejodela
bicicleta.
21) La precencia de el asiento de bicicleta para niño en la bicicleta
pueda requerir alteracion en el modo que el conductor monta o
desmonta la bicicleta. Tener cuidado cuando el conductor se baje
o suba de la bicicleta.
22) Asiento montado delante puede reducir el manejo de el
manubrio.
23) Revise la existencia de leyes en su estado que regulen el uso de
asiento de bicicleta para cargar niños.
24)Aseguresedequenoaigaladoslososquepuedanestaren
contacto con el niño (por exemplo, cables deteriorados o
deshilachados ect.).
25) Cubra cualquier resorte en la silla para evitar que el niño se
machuque o atore sus dedos.
26) El niño en el asiento tiene que estar bien arropado y protegido de
el frio mas que la persona manejando la bicicleta. Protejer al niño
de la lluvia.
27) No use el asiento si falta partes o estan quebradas.
28) El material de el asiento (polypropylene) pierde propiedades
mecanicas con el tiempo si se expone a condiciones de
medioambiente (sol, lluvial hielo, ect). En caso deuso normal y
condiciones de medioambiente, el asiento debe ser remplasado
despued de 3 años.
ADVERTENCIA!
Incumplimiento de la instrucciones de el fabricante pueden causar
daños serios o muerte de el pasajero/ciclista!
Montaje y ensamblaje de la silla
Figura 1:
Con la silla girada introducir el brazo de soporte (6).
Figura 2:
Después de haber levantado el relleno, en la zona del asiento, in-
troducirlosdostornillosmáscortos(10)enlosoriciosprevistos.
Figura 3:
Apoyelaplacadejación(12)enlostornillos(10)quesobresalendel
fondo del asiento. Fijar la abrazadera por medio de las dos tuercas
M6 hexagonales con arandela dentada.
Figura 4:
Orion_InstructionManual-Text.indd 14 12/02/14 15:47
Table of contents
Languages:
Other Peg-Perego Bicycle Accessories manuals


