Pella Insynctive Lifestyle Series User manual

Pella®Insynctive®Product Guide
Pella®Lifestyle Series Motorized, Integrated Blinds and Shades

Pella®Lifestyle Series Motorized, Integrated Blinds and Shades with Insynctive | 2
Table of Contents
3 General and Safety Information
• Need Help?
• Have a Home Automation System?
• Warnings
4 Product Overview
• Specications
5 Detailed Instructions
• Setting Up Pella® Lifestyle Series Motorized, Integrated Blinds or Shades
• Programming Positions
• Operating Blinds or Shades with Remote
• Tilting Blind Slats
• Pairing to Pella Bridge
• With Home Automation
10 Additional Instructions
• Charging Battery in Blinds or Shades
• Care and Maintenance
• Replacing Batteries
• Adding or Deleting a Remote
• “Homing” Blinds or Shades
• Resetting to Factory Defaults
13 Troubleshooting
14 Inductive Charging Instructions
• Getting Started
• Using the Charger
• LED Color Indicators on Transmitter
16 FCC Compliance and Industry Canada
• Limited Warranty

Pella®Lifestyle Series Motorized, Integrated Blinds and Shades with Insynctive | 3
NEED HELP?
For instant access to warranties, troubleshooting information and videos, visit Pella.CustHelp.com
or call 855-473-5524.
HAVE A HOME AUTOMATION SYSTEM?
To view a list of compatible systems and contact your home automation provider for further
information, visit ConnectPella.com.
WARNINGS
Failure to adhere to the warnings below may result in death, serious injury and/or loss of valuables.
• Pella®BLINDS and SHADES with Insynctive®technology are not 100% reliable for a variety
of reasons. For example, BLINDS and SHADES with Insynctive technology:
— communicate data wirelessly, and wireless data is susceptible to interference or failure.
— require proper installation.
— require a battery with an adequate charge.
— may be damaged after installation.
Therefore, Pella Insynctive products should not be relied upon in situations where life, safety,
and/or protection of valuables are solely dependent on their function. Test each product at least
once per year to help ensure proper operation.
• Pella Insynctive products are not a substitute for careful adult supervision of children.
• Keep battery and other small parts out of reach of children. If small parts are swallowed,
immediately seek medical help.
• Batteries carry the risk of fire, explosion and burns. Do not disassemble or incinerate.
General and Safety Information

Pella®Lifestyle Series Motorized, Integrated Blinds and Shades with Insynctive | 4
SPECIFICATIONS
Frequency: 433.92 MHz (Insynctive®)
Operating Temperature: 32° – 120°F (0° – 49°C)
Operating Humidity: 5% – 95% RH noncondensing
Battery: Rechargeable Lithium Ion battery pack
Typical Battery Life: 8 years (may vary with use)
PELLA® LIFESTYLE SERIES MOTORIZED, INTEGRATED BLINDS or
SHADES help to improve the comfort and convenience of your
home. BLIND or SHADE may be controlled with a remote, app or
a compatible home automation system. The slats of BLIND may be
tilted to control privacy or the amount of light entering a room.
BLIND or SHADE includes a power unit which is located at
the bottom of the Hinged Glass Panel (HGP) and contains a
rechargeable battery. The battery can be charged by:
1) the solar panel on the exterior side of the unit, requiring
approximately 3 hours of direct sunlight a day, OR
2) a Pella Lifestyle Series WALL CHARGER that magnetically
couples to the HGP. A wire provides power from the battery to
the motor located in the headrail of BLIND or SHADE.
Product Overview

Pella®Lifestyle Series Motorized, Integrated Blinds and Shades with Insynctive | 5
DETAILED INSTRUCTIONS
1. Get started.
• To unpack BLIND or SHADE, remove the cardboard corner
protector and bands that secure BLIND or SHADE. It is not
necessary to open the Hinge Glass Panel (HGP) to unpack
your BLIND or SHADE.
• Unpack REMOTE.
2. Prepare SINGLE-CHANNEL REMOTE.
• Slide the battery cover in the direction of the arrow
on the cover.
• Remove battery tab.
• Ensure battery is fully seated.
• Slide the battery cover back into closed position.
3. Pair REMOTE to Pella Lifestyle Series motorized BLIND or SHADE.
• Hold REMOTE up to top cover approximately 6" from the end to
activate pair mode. Move remote from side to side while pressed
up against the glass. BLIND or SHADE will make a quick up/down
motion to indicate it’s in pair mode.
• Press and hold the Up button on REMOTE until BLIND or SHADE
completesaquickup/downmotion.NOTE: Up/down motion
conrmsthatREMOTEwassuccessfullypaired.
UP
BUTTON
DOWN
BUTTON
LED
LIGHT
CENTER
BUTTON
COVER
REMOTE
MEASURE 6"
FROM END WHERE
WIRE CONNECTS
VIEW WITH HGP CLOSED
Pella®Lifestyle Series Motorized, Integrated Blinds or Shades

Pella®Lifestyle Series Motorized, Integrated Blinds and Shades with Insynctive | 6
4. Test BLIND or SHADE.
• Press the Down button to move BLIND or SHADE down.
• Press the Up button to move BLIND or SHADE up.
5. Set up BLIND or SHADE.
Complete the following steps to set up BLIND or SHADE.
Program upper position.
• Touch the top end of REMOTE to BLIND or SHADE cover
approximately 6” from the end where the wire connects.
Move REMOTE back and forth slowly until BLIND or SHADE
completes a quick up/down motion to indicate BLIND or
SHADE has entered program mode.
• Simultaneously press and hold the Center and Up buttons
until BLIND or SHADE completes a quick up/down motion.
This will require the buttons to be pressed for about 5
seconds. The light on REMOTE will begin blinking when
the buttons are released to acknowledge that REMOTE is
in program mode.
• Press the Up or Down button on REMOTE to move BLIND
or SHADE bottom rail to the desired position.
• Press and hold the Center button until BLIND or SHADE
makes a quick up/down movement. This should take about
3 seconds. The light on REMOTE will stop blinking.
UP
BUTTON
DOWN
BUTTON
LED
LIGHT
CENTER
BUTTON
COVER
REMOTE
MEASURE 6"
FROM END WHERE
WIRE CONNECTS
Pella®Lifestyle Series Motorized, Integrated Blinds or Shades (continued)

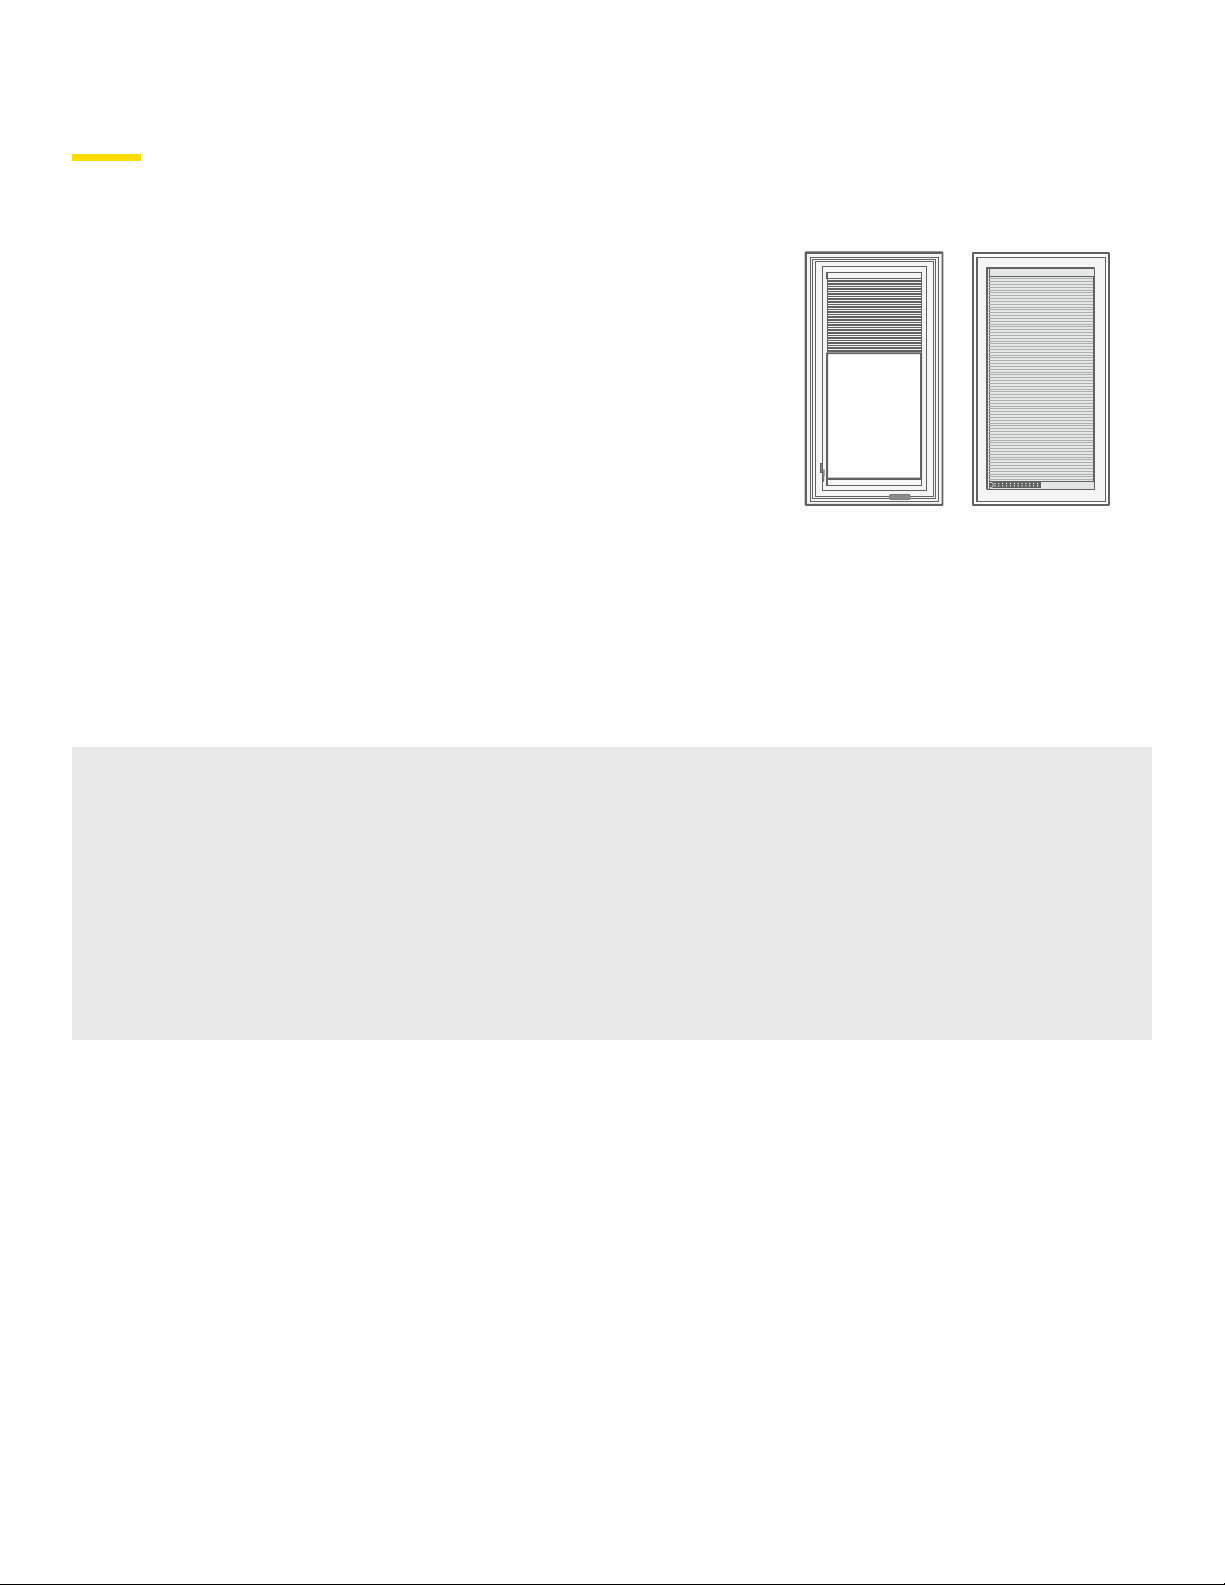
Pella®Lifestyle Series Motorized, Integrated Blinds and Shades with Insynctive | 7
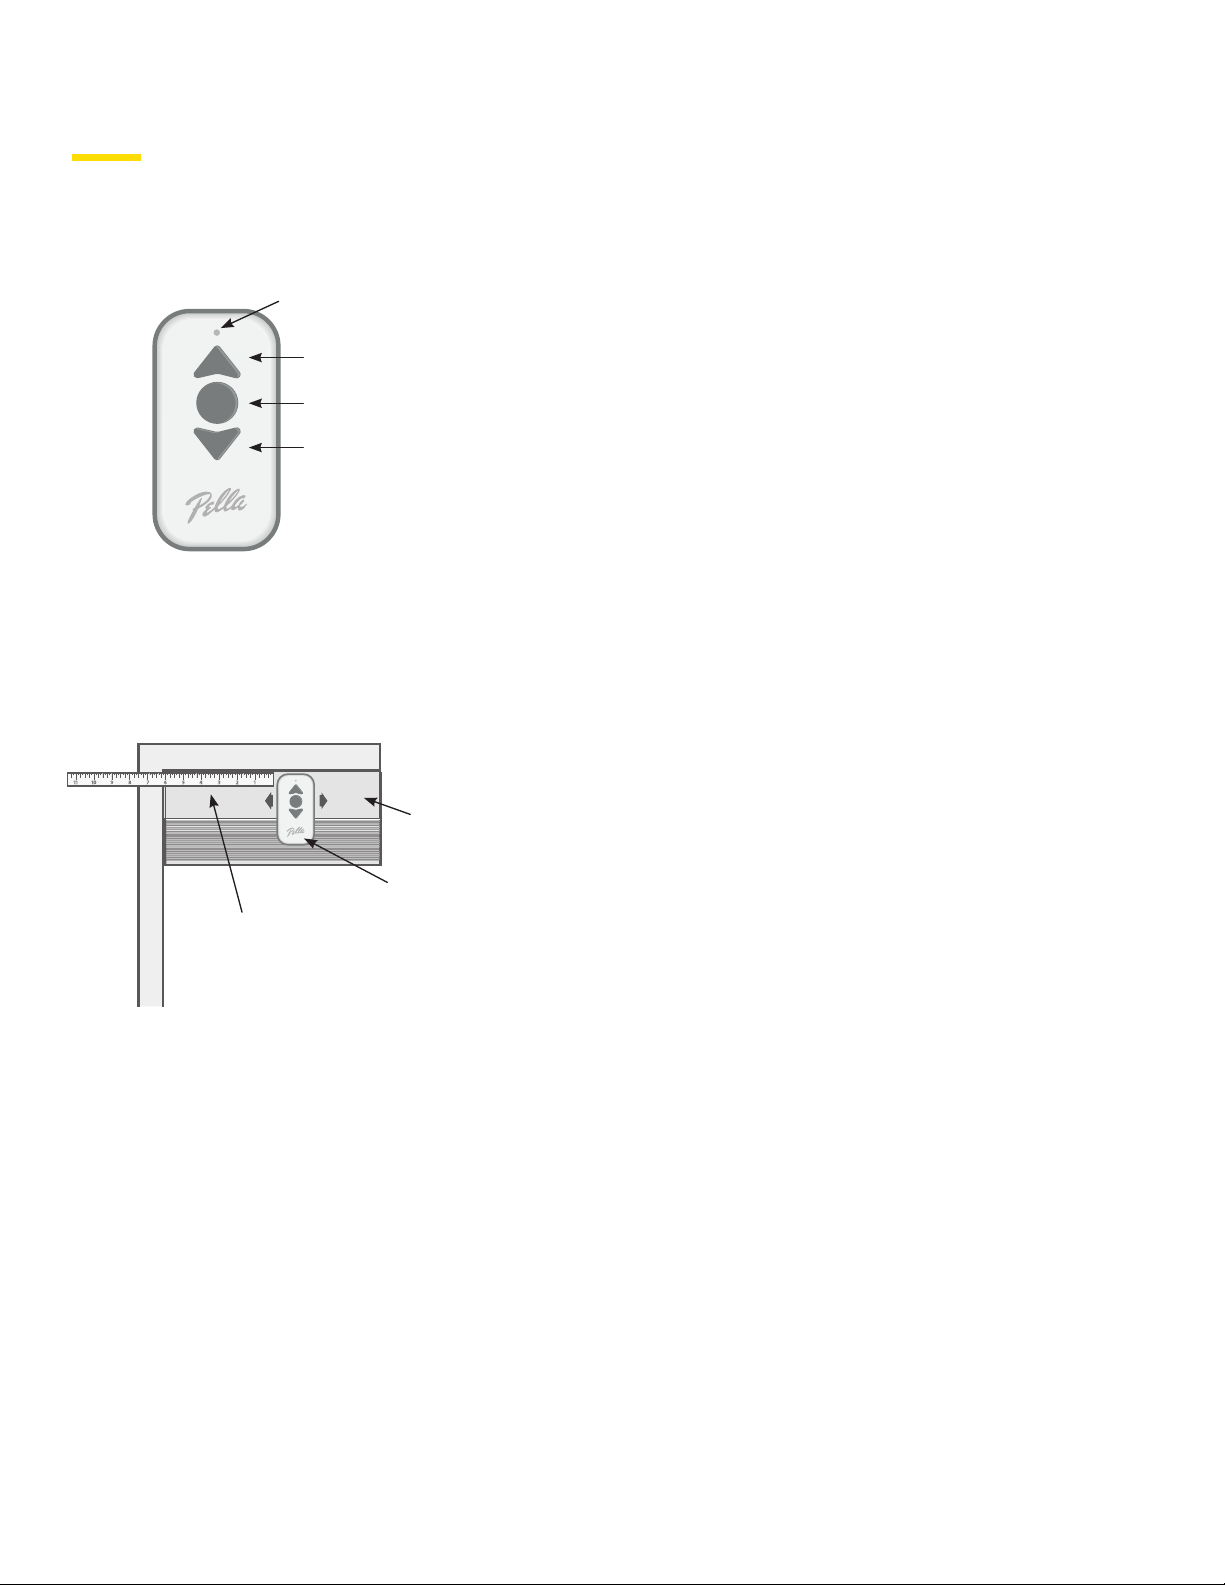
Program user position.
• Touch the top end of REMOTE to BLIND or SHADE cover
approximately 6" from the end where the wire connects.
Move REMOTE back and forth slowly until BLIND or SHADE
completes a quick up/down motion to indicate BLIND or
SHADE has entered program mode.
• Simultaneously press and hold the Up and Down buttons
until BLIND or SHADE completes a quick up/down motion.
This will require the buttons to be pressed for about
5 seconds. The light on REMOTE will begin blinking when
the buttons are released to acknowledge that REMOTE is
in program mode.
• Press the Up or Down button on REMOTE to move BLIND
or SHADE bottom rail to the desired position.
• Press and hold the Center button until BLIND or SHADE
makes a quick up/down movement. This should take about
3 seconds. The light on REMOTE will stop blinking.
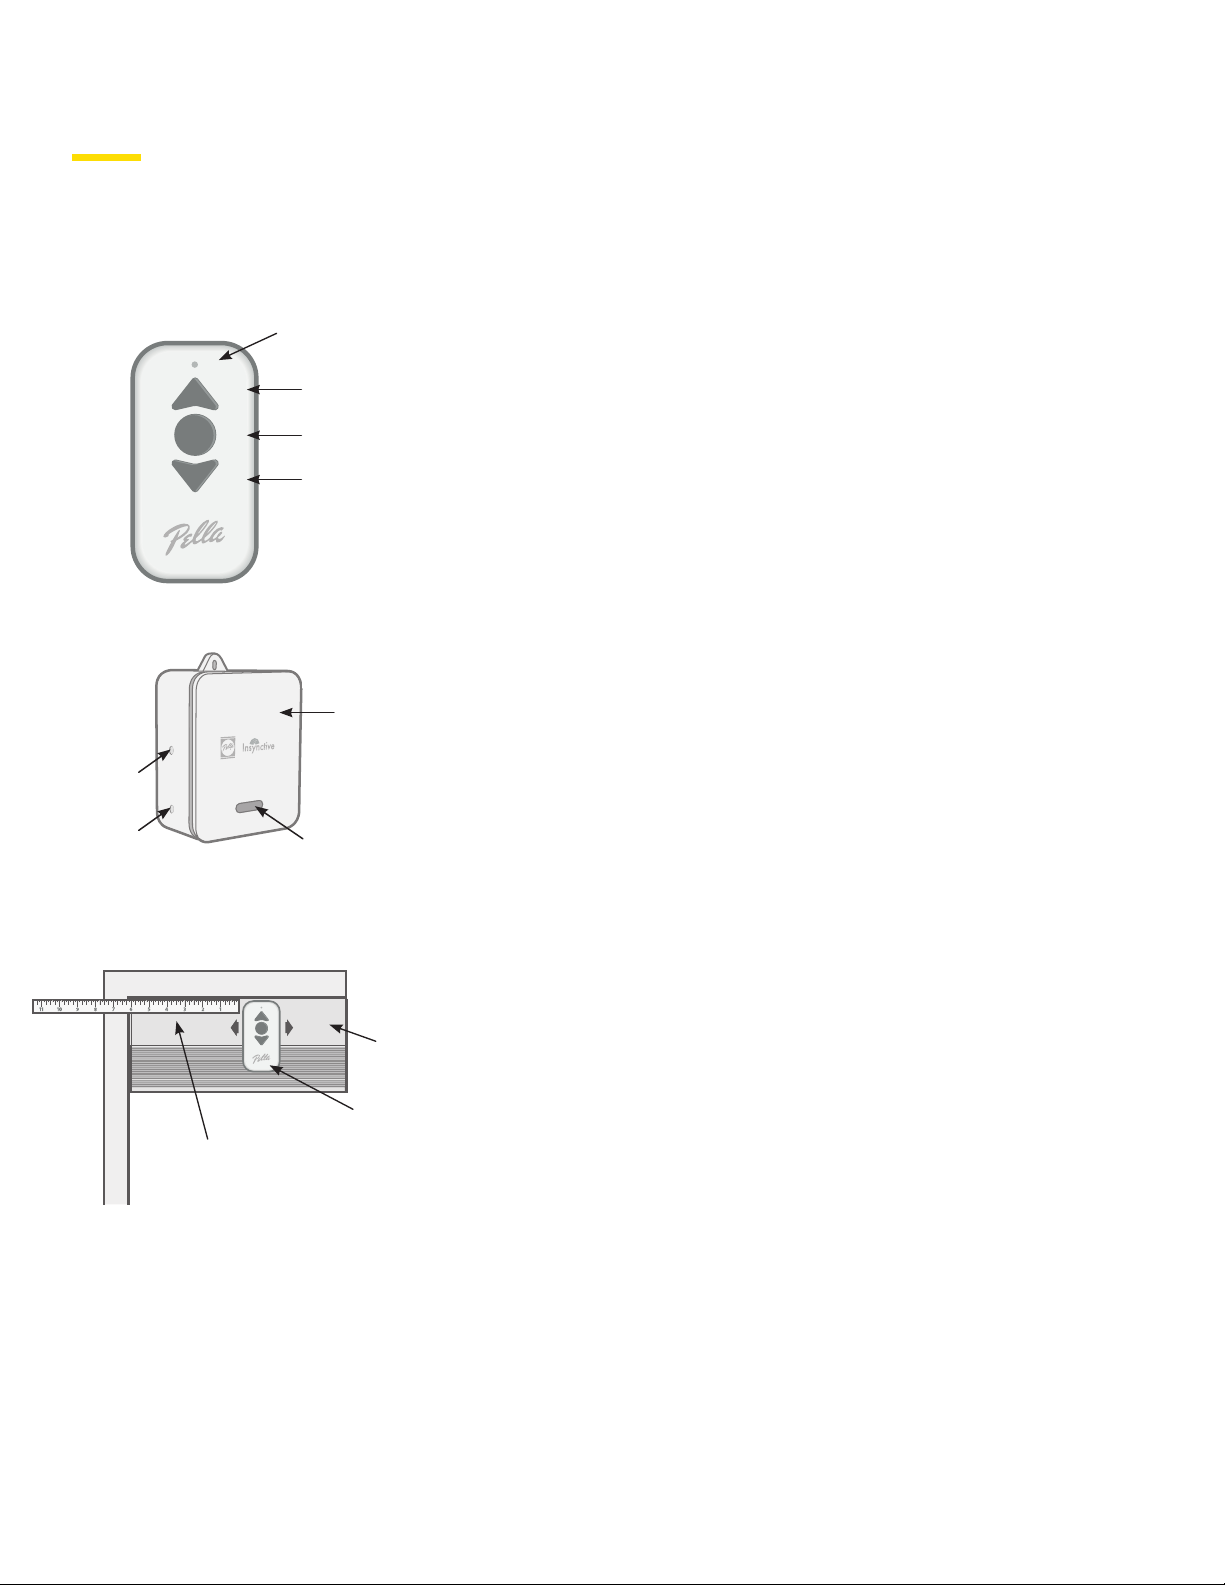
Program lower position.
• Touch the top end of REMOTE to BLIND or SHADE cover
approximately 6" from the end where the wire connects.
Move REMOTE back and forth slowly until BLIND or SHADE
completes a quick up/down motion to indicate BLIND or
SHADE has entered program mode.
• Simultaneously press and hold the Center and Down
buttons until BLIND or SHADE completes a quick
up/down motion. This will require the buttons to be
pressed for about 5 seconds. The light on REMOTE
will begin blinking when the buttons are released to
acknowledge that REMOTE is in program mode.
• Press the Up or Down button on REMOTE to move BLIND
or SHADE bottom rail to the desired position.
• Press and hold the Center button until BLIND or SHADE
makes a quick up/down movement. This should take about
3 seconds. The light on REMOTE will stop blinking.
UP
BUTTON
DOWN
BUTTON
LED
LIGHT
CENTER
BUTTON
COVER
REMOTE
MEASURE 6"
FROM END WHERE
WIRE CONNECTS
COVER
REMOTE
MEASURE 6"
FROM END WHERE
WIRE CONNECTS
Pella®Lifestyle Series Motorized, Integrated Blinds or Shades (continued)

Pella®Lifestyle Series Motorized, Integrated Blinds and Shades with Insynctive | 8
OPERATING BLIND OR SHADE WITH REMOTE
• Press and release Up button: Pressing the Up button for less than
1 second will cause BLIND or SHADE to automatically move to the
upper position that has been programmed by the user.
• Press and hold Up button: Pressing the Up button for longer than
1 second will cause BLIND or SHADE to moveup until the button
is released or until the shade reaches the fully opened position.
• Press and release Center button: Pressing the Center
button for less than 1 second will cause BLIND or SHADE to
automatically move to the user position.
• Press and release Down button: Pressing the Down button for less
than 1 second will cause BLIND or SHADE to automatically move
to the lower position that has been programmed by the user.
• Press and hold Down button: Pressing the Down button for
longer than 1 second will cause BLIND or SHADE to move
down until the button is released or until the shade reaches
the fully closed position.
• While BLIND or SHADE is moving to a position, it may be
stopped by pressing either of the other two buttons. For
example, if the Center button is pressed to move to the user
position, BLIND or SHADE will stop moving if the Up or Down
button is pressed.
TILTING BLIND SLATS
• To enter tilt mode, press and hold the Center button on
REMOTE until light turns solid red.
• Press and release the Up button to rotate the slats up.
• Press and release the Down button to rotate the slats down.
• REMOTE will exit tilt mode after 10 seconds of no activity
or when Center button is pressed and held until the light
turns off.
UP
BUTTON
DOWN
BUTTON
LED
LIGHT
CENTER
BUTTON
Pella®Lifestyle Series Motorized, Integrated Blinds or Shades (continued)

Pella®Lifestyle Series Motorized, Integrated Blinds and Shades with Insynctive | 9
PAIRING TO PELLA®INSYNCTIVE®BRIDGE
By pairing to BRIDGE, you can control your BLIND or SHADE from
virtually anywhere using the Pella Insynctive app. Download the
Pella Insynctive app from the app store appropriate to your device.
• Press and hold the pair button until the light begins flashing
orange. The pair button is the bottom button located on
the side of the BRIDGE. The BRIDGE is now ready to pair
Insynctive products.
• Touch the top end of REMOTE to BLIND or SHADE cover
approximately 6" from the end where the wire connects.
Move REMOTE back and forth slowly until BLIND or SHADE
completes a quick up/down motion to indicate
BLIND or SHADE has entered pair mode.
• Press and release the Center button on REMOTE three times
within 5 seconds. BRIDGE light will begin blinking green ADD
bridge will issue a long tone to indicate successful pairing.
WITH HOME AUTOMATION
For a list of compatible home automation systems or pairing
instructions, visit ConnectPella.com.
LIGHT
PAIR
BUTTON
TEST
BUTTON
UP
BUTTON
DOWN
BUTTON
LED
LIGHT
CENTER
BUTTON
COVER
REMOTE
MEASURE 6"
FROM END WHERE
WIRE CONNECTS
BRIDGE
Pella®Lifestyle Series Motorized, Integrated Blinds or Shades (continued)

Pella®Lifestyle Series Motorized, Integrated Blinds and Shades with Insynctive | 10
CHARGING BATTERY IN BLINDS AND SHADES
The solar panel requires approximately 3 hours of direct sunlight each
day to charge the battery for BLIND or SHADE operation solely by power
generated from the exterior solar panel. Additional charging is necessary
when the solar panel on the exterior of the unit does not receive
adequate sunlight.
• See Inductive Charging Instructions starting on pg 14.
CARE AND MAINTENANCE
Cleaning Integrated Aluminum Blinds
• First make sure BLIND is in the horizontal (opened) position.
To remove dust, use a vacuum cleaner with an upholstery brush
attachment.Youcanremovesmudgesorngerprintswitha
damp cloth.
Cleaning Integrated Cellular Shades
• Begin by making sure SHADE is fully extended. To remove dust, use
a vacuum cleaner with an upholstery brush attachment. Smudges
orngerprintscanbecarefullyremovedwithadampcloth.Never
use cleaners with ammonia — they will damage the fabric. If there
are any exposed threads, trim them and seal them with a fray-check
solution (available at most fabric stores) to reduce fraying. Once
SHADE is clean and dry, raise SHADE.
Cleaning Solar Cell
• For optimal performance of the solar cell, keep the exterior
glass surface clean of dust and dirt. It is recommended that the
exterior glass surface be cleaned every six months or whenever
dirt noticeably builds up on the glass. Use an ammonia-free glass
cleaner and soft cloth.
Additional Instructions

Pella®Lifestyle Series Motorized, Integrated Blinds and Shades with Insynctive | 11
REPLACING BATTERIES
The battery pack used in this product is recharged by the solar cell or
by using the Pella®Lifestyle WALL CHARGER. Battery life is dependent
upon a number of factors such as number of charge/discharge cycles
and average temperature in the environment. Battery life is expected
toexceedveyearsinmostapplications.Whenthebatteryreachesthe
end of its life, it will lose its charge quickly and will require charging with
the wall charger on a more frequent basis. Contact your local Pella sales
representative to purchase a replacement battery.
WARNING:Batteriescarrytheriskofre,explosionandburns.Do
not disassemble or incinerate. Failure to change battery properly
when low will impair BLIND or SHADE performance.
IMPORTANT NOTES:
• BLIND or SHADE does not need to be paired to REMOTE or BRIDGE
following a battery change.
• Properly dispose of used batteries based on your local requirements.
A best practice is to dispose of batteries at your local home chemical
collection center. California Only: Contains perchlorate material.
See dtsc.ca.gov/hazardouswaste/perchlorate for any special
handling regulations.
ADDING AN ADDITIONAL REMOTE OR DELETING A REMOTE
These procedures may be used to pair or delete a REMOTE from
BLIND or SHADE. A total of eight REMOTES may be paired to BLIND
or SHADE.
• Touch the top end of REMOTE to BLIND or SHADE cover
approximately 6" from the end where the wire connects. Move
REMOTE back and forth slowly until BLIND or SHADE completes
a quick up/down motion to indicate that BLIND or SHADE has
entered pair mode.
— To add a new REMOTE, press and hold the Up button on
new REMOTE until BLIND or SHADE completes a quick
up/down motion to acknowledge that new REMOTE was
successfully paired.
— To delete REMOTE, press and hold the Down button on
REMOTE until BLIND or SHADE completes a quick up/down
motion to acknowledge that REMOTE was successfully deleted.
SOLAR
PANEL
COVER
REMOTE
MEASURE 6"
FROM END WHERE
WIRE CONNECTS
BATTERY
Additional Instructions (continued)

Pella®Lifestyle Series Motorized, Integrated Blinds and Shades with Insynctive | 12
“HOMING” THE BLIND OR SHADE
Over time, you may notice that the fully opened position for raise-and-
lower BLINDS or bottom-up SHADES or the fully closed position for
top-down SHADES has drifted. This is due to normal wear and use of
BLIND or SHADE and can be corrected by homing BLIND or SHADE. The
homing process will cause BLIND or SHADE to move up until it is fully
compressed. BLIND or SHADE then resets the position. To initiate the
homing process, press and hold the Up button on REMOTE until BLIND or
SHADE reaches the top point of travel, then release the button. Press and
hold the Up button for about 5 seconds until BLIND or SHADE begins to
move up. BLIND or SHADE will stop moving when fully compressed and
will reset the fully opened or closed position. May take multiple homing
cycles to fully home Blind or Shade.
PROGRAMMING POSITIONS (OPTIONAL)
REMOTE may be used to program up to three positions to motorized
BLIND or SHADE including an upper position, user position and lower
position. Once placed into program mode, REMOTE will stay in program
mode until the programming process is completed, or REMOTE will
automatically exit program mode if no buttons are pressed for 1 minute
or if battery is removed and reinserted.
RESETTING TO FACTORY DEFAULTS
This procedure will reset all BLIND or SHADE positions to factory
default settings.
• Open the HGP.
• Locate the small hole in the top cover about 4" from the end where
the wire connects. (see photo)
• Insert a paper clip or other small tool into the hole, and depress the
reset switch for about 3 seconds. (see photo)
• BLIND or SHADE will move to top position to acknowledge
successful reset. (see photo)
UP
BUTTON
DOWN
BUTTON
LED
LIGHT
CENTER
BUTTON
Additional Instructions (continued)
Locate the small hole in the top cover about 4" from
the end where the wire connects
BLIND or SHADE will move to top position, to
acknowledge successful reset
For a video walk-thru showing how to reset Blinds
or Shades to their factory resets, use your phone's
camera to capture this QR code.

Pella®Lifestyle Series Motorized, Integrated Blinds and Shades with Insynctive | 13
Troubleshooting
PROBLEM CAUSE AND POSSIBLE SOLUTION
BLIND or SHADE is
moving slowly. • Batteries are low. Batteries may be recharged with WALL
CHARGER. If problem persists after charging batteries for
12 hours, contact your local Pella sales representative to
purchase a replacement battery.
• If the light on REMOTE is blinking, BLIND or SHADE is in
program mode and runs at a slower rate to allow for easier
movement of BLIND or SHADE to the desired position.
Wait 2 minutes, and BLIND or SHADE and REMOTE will exit
program mode.
BLIND or SHADE
will not move.
• VerifythatallconnectorsarermlypluggedinatBLINDor
SHADE cover and power unit.
• BLIND or SHADE may be in pair mode. Wait 2 minutes and
BLIND or SHADE will exit pair mode, or press and hold the
Up button on REMOTE until BLIND or SHADE makes a quick
up/down motion to exit pair mode.
• Batteries are dead in BLIND, SHADE or REMOTE. If REMOTE
light does not come on when buttons are pressed, replace
REMOTE battery. Otherwise, try charging BLIND or SHADE
with WALL CHARGER.
• Temperature in the Hinged Glass Panel (HGP) may have
exceeded 140°F. The motor will function once the HGP cools
to below 140°F.
BLIND or SHADE will not
pair to BRIDGE.
• BLIND or SHADE is out of range of BRIDGE. Move BRIDGE
closer to BLIND or SHADE.
Bottom rail is not level. • BLIND or SHADE strings are not evenly tensioned. Move
BLIND or SHADE to lower position and then to upper position.

Pella®Lifestyle Series Motorized, Integrated Blinds and Shades with Insynctive | 14
Inductive Charging Instructions
GETTING STARTED
IfyourPellaInsynctiveMotorizedBlindsorShadeshavebeenworkingjustneup
until recently and then quit working, they likely need to be charged with the Insynctive
Inductive Charger.
NOTE: Ensure you are using the supplied wall adapter with the Inductive Charger to
ensure safe and proper operation of the Inductive Charger. Failure to do so could
result in injury, damage to product and property, and void any warranty of Insynctive
products.
Locating the Inductive Charger Receiver
On the other end of the inductive charger is the receiver (not visible), located inside
the battery pack. In order for the charger to work properly, the transmitter and
receiver must be properly aligned.
TondthelocationofthereceiverlocatedinsideyourPellaLifestyleSeriesproduct,
place the transmitter on the glass, along the bottom edge of the unit, with the wire on
the transmitter pointing in towards the center of the unit.
• If on the correct side, the transmitter will magnetically connect to the receiver,
LED will turn BLUE.
• If the transmitter does not magnetically connect to the receiver, place the
transmitter on the other side of the unit.
Using the Charger
1. Connect transmitter with the AC adapter and plug in
• When you plug in the 12V wall adapter to the transmitter, the LED on the
transmitter should turn GREEN. This indicates that there is power to the
transmitter, and the correct power source is being used.
• If the wrong wall adapter is used, or there is an issue with the power source
itself, the LED on the transmitter will blink RED (pattern: Blink, Blink, Stop; Blink,
Blink Stop; etc…)
• The transmitter requires a 12VDC power source. Only use the wall adapter
provided to you with charger kit purchased from Pella.
• If you are using the provided power source, and still have a blinking RED LED,
call Customer Service at 855-473-5524.
2. Place transmitter on the window unit
• When the transmitter has been properly placed on the receiver, the LED on
the transmitter will turn BLUE. The BLUE LED indicates the inductive charger is
charging the battery pack. It will remain blue until the battery is fully charged, at
which time it will turn Green (approx. 8 hours for full charge).
3. Remove transmitter once charging is complete
Closeupofspecications
on the 12V wall adapter
Inductive transmitter paired with receiver
located on casement unit, with wire facing interior.
If needed the suction cup included can help keep
some of the cord weight off of the charger.
Shown is the 12V wall adapter cord, Inductive
Charger Transmitter, and suction cup, all
included in the charging kit.
Inductive Transmitter paired with Receiver
located on Casement Unit
Wire facing interior

Pella®Lifestyle Series Motorized, Integrated Blinds and Shades with Insynctive | 15
Inductive Charging Instructions (continued)
LED COLOR INDICATORS ON TRANSMITTER
Green Light - Good
• Indicates the transmitter is properly powered, on.
• Indicates battery charging is complete when attached to receiver.
Blue Light - Good
• Indicates the receiver and transmitter are properly aligned.
• Indicates inductive charger is currently charging battery.
Red Light – Error Code
• RED light is an error or warning indicator of 2 possible types:
• The wrong wall adapter is being used, or there is an issue with
the power source itself (Voltage is too high, low)
• LED will blink RED (pattern: Blink, Blink, Off)
• The charger is too hot, remove transmitter
• LED will blink RED (pattern: On, Off)
Yellow Light – Error Code
• Indicates the transmitter is properly powered, but not optimally aligned with
the receiver.
• Readjust the transmitter until the LED turns BLUE.
If you have any questions or issues regarding your Pella Insynctive inductive charging
system for motorized blinds and shades, or any other Pella product please reach out
to our Customer Service at 855-473-5524.
Green Light - Good
Blue Light - Good
Red Light - Error Code
Yellow Light - Error Code

Pella®Lifestyle Series Motorized, Integrated Blinds and Shades with Insynctive | 16
This equipment has been tested and found to comply with the limits for Class B digital devices, pursuant
to Part 15 of the FCC Rules. These limits are designed to provide reasonable protection against harmful
interference in a residential installation. This equipment generates, uses and can radiate radio frequency
energy and, if not installed and used in accordance with the instruction manual, may cause harmful
interference to radio communications. However, there is no guarantee that interference will not occur
in a particular installation. If this equipment does cause harmful interference to radio or television
reception, which can be determined by turning the equipment off and on, the user is encouraged to try
to correct the interference by one or more of the following measures:
• Reorient or relocate the receiving antenna.
• Increase the separation between the equipment and receiver.
• Connect the equipment to an outlet on a different circuit from the receiver.
• Consult the dealer or an experienced radio/TV contractor for help.
ChangesormodicationsnotexpresslyapprovedbyPellaCorporationcouldvoidtheuser’sauthorityto
operate the equipment.
This device complies with Industry Canada license-exempt RSS standard(s). Operation is subject to the
following two conditions: (1) this device may not cause interference, and (2) this device must accept any
interference, including interference that may cause undesired operation of the device.
Cet appareil est conforme avec Industrie Canada exempts de licence standard RSS. L’opération est
soumise aux deux conditions suivantes : (1) cet appareil ne peut causer d’interférences, et (2) cet
appareil doit accepter toute interférence, y compris les interférences qui peuvent causer un mauvais
fonctionnement de l’appareil.
FCC ID: SO7-206B0000
IC: 11009A-206B0000
FCC ID: SO7-209L0000
IC: 11009A-209L0000
A two-year limited warranty comes standard with purchase. For complete warranty details,
visit Pella.com/Warranty.
FCC Compliance and Industry Canada
Limited Warranty
© 2020 Pella Corporation
ILSPG0920 | W13194
Table of contents
Other Pella Window Blind manuals
Popular Window Blind manuals by other brands

rollease acmeda
rollease acmeda CU40 installation manual

Silent Gliss
Silent Gliss 5100 Autoglide quick start guide

HunterDouglas
HunterDouglas LiteRise Installation operation care

HunterDouglas
HunterDouglas Vignette Traditional Instrallation, Operation, Care

Silent Gliss
Silent Gliss Silent Gliss 7630 Fitting instructions

HunterDouglas
HunterDouglas Duette Installation operation care

HunterDouglas
HunterDouglas Skyline Installation operation care

Velux
Velux Integra MML instructions

Project Source
Project Source 40000 quick start guide

Diy Blinds
Diy Blinds Zebra installation instructions

living b.p.c
living b.p.c 880807 Mounting instruction

Jalousie
Jalousie Iso Line Assembly and operating instructions