Pentair 78241100 User manual

1
DANGER
RISK OF ELECTRICAL SHOCK OR ELECTROCUTION!
This niche - fixture housing must be installed by a licensed or certified electrician in accordance with the National Electrical
Code and all applicable local codes and ordinances. Improper installation will create an electrical hazard which could result
in death or serious injury to pool users, installers or others due to electrical shock, and may also cause damage to property.
Read and follow the specific instructions below.
Important Notice
Attention Installer.
This manual contains important information about the installation, operation and safe use of this product. This information
should be given to the owner/operator of this equipment.
WARNING
Beforeinstallingthisproduct,readandfollowallwarningnoticesandinstructionsaccompanyingthisniche.Failuretofollowsafetywarnings
andinstructionscanresultinsevereinjury,death,andpropertydamage. Call(800)831-7133foradditionalfreecopiesoftheseinstructions.
SPABRITE®& AQUALIGHT®LIGHT NICHE
IMPORTANT SAFETY INSTRUCTIONS
READ AND FOLLOW ALL INSTRUCTIONS
SAVE THESE INSTRUCTIONS
Pentair Aquatic Systems
1620 Hawkins Ave., Sanford, NC 27330 • (800) 831-7133 or (919) 566-8000
10951 West Los Angeles Ave., Moorpark, CA 93021 • (800) 831-7133 or (805) 553-5000
INSTALLATION INSTRUCTIONS
CONTENTS
Section I. GeneralInformation. ............................................................................................................ 3
Section II. Vinyl Liner/Fiberglass Pool Installation Instructions............................................................. 4
SectionIII. Concrete/Gunite Pool Installation Instructions..................................................................... 5
Section IV. Technical Data ..................................................................................................................... 6
A. Replacement Parts.............................................................................................................. 6
HolePatternTemplate.......................................................................................................... 7

2
DANGER! Risk of Electrical Shock or Electrocution!
This product must be installed by a licensed or certified electrician or a qualified pool serviceman
in accordance with the National Electrical Code and all applicable local codes and ordinances.
Improper installation will create an electrical hazard which could result in death --- or serious
injury to pool users, installers or others due to electrical shock, and may also cause damage to
property. Always disconnect the power to the pool light at the circuit breaker before servicing
the light. Failure to do so could result in death or serious injury to serviceman, pool users or
others due to electrical shock. READ AND FOLLOW ALL INSTRUCTIONS IN THIS MANUAL.
WARNING — Important Safety Information for Pentair Aquatic Systems Niche and
Light Installation
•All Niche and Light installations must conform with all codes. If local codes mandate a
cord seal, use Pentair plastic niches (P/N 79206600 and P/N 79206700).
• Under no circumstances replace lights by splicing wire under water or behind niche.
WARNING —
RISK OF ELECTRIC SHOCK AND INJURY.
USE ONLYTHE INSTALLATION METHOD SPECIFIED BELOW.
Important Safety Information for Fountain Fixture Installations
Location of Pentair Fountain Fixture* Required Installation Method
Luminaire (Light) Use (P/N 560000 – P/N 560001)
(P/N 560002 – P/N 560003)
Swimming Pool or Spa Wet-Niche SwimmingPool Fixture Housing (Forming Shell) ONLY.
(or Spa) Luminaire (Light) DO NOT USE Fountain Fixture Stand.
Fountain Wet-NicheSubmersible Fixture Housing (Forming Shell) or
Swimming Pool (or Spa) Fountain FixtureStand.
Luminaire(Light)
(*) Note: Wet-niche luminaires complying with requirements for both uses may bear both the Listed Wet-Niche
SwimmingPool(orSpa)LuminaireULMarkandtheListedWet-NicheSubmersibleLuminaireULMark.Aluminaire
notbearingthecorrespondingULListingMarkisnotconsideredbyULtohavebeenproducedunderUL’sListing
and Follow-Up Service for the associated usage location.

3
CONCRETE MUST BE CUT BACK
PILOT SCREW AT 12 O'CLOCK POSITION
AROUND NICHE TO ALLOW FOR
A COMPACTED PLASTER SEAL
#8 AWG GROUND CONNECTOR
BONDED TO REBAR
RIGID CONDUIT
8" MIN JUNCTION BOX
OR LOW VOLTAGE TRANSFORMER
48"
MIN
4.94
5.25
6.50
18" MIN TO TOP OF LENS (UNLESS LIGHT IS
UL LISTED FOR LESSER DEPTHS, REFER TO LIGHT
MANUAL FOR EXACT DEPTH REQUIREMENTS)
NOT LESS THAN 4"
TO GFCI, (FOR 120V)
CIRCUIT BREAKER
AND POWER SOURCE
Figure 1.
Section I. GeneralInformation–USAONLY
A. EnsurethattheelectricalsystemofyourpoolconformswiththefollowingrequirementsofthecurrentNational
ElectricalCode(NEC),andalllocalcodesandordinances.Alicensedorcertifiedelectricianmustinstallthe
electricalsystemtomeetorexceedthoserequirementsbeforethelightand(fixture-housing)isinstalled.
B. SomeoftheNECrequirementsarelistedbelow.
1. ThelightingcircuitmusthaveaGroundFaultCircuitInterrupter(GFCI),andhaveanappropriatelyratedcircuit
breaker.
2. Thejunctionboxorthelowvoltagetransformershallbelocatedatleasteight(8)inchesabovethemaximum
waterlineandatleastfour(4)inchesabovethegroundlevelorpooldeckwhicheverprovidesthegreater
elevation. Thejunctionboxshallbenolessthan48inchesfromtheinsidewallofthepool,unlessseparated
fromthepoolbyasolidfence,wallorotherpermanentbarrier. SeeNEC680.24coderequirement.See
Figure1.
3. Thelightfixtureandallmetalitemswithinfive(5)feetofthepoolmustbeproperlyelectricallybonded.See
NEC680.26coderequirement.SeeFigure1.
4. Thenichemustbeproperlyinstalledsothepilotscrewholeisatthe12o’clockpositionandthatthetopedge
oftheunderwaterlight’slensisatleast18inchesbelowthesurfaceofthewaterinthepool.SeeFigure1.
NOTE
TherequiredorientationofallPentairlightsiswiththepilotscrewatthe12o’clockposition.Thisisguaranteedbypropernicheinstallation.
NOTE
Differentrules applyto Fountain Lightinstallations, consultthe NationalElectric Code.
5. Bondtheniche-fixturehousingtoallothermetallicitemswithinfive(5)feetofthepool,usingaNo.8AWG
bondwire.TheBondconnectionislocatedattherearoftheniche,seeFigure1.
C. UseonlyPentairlightingfixturesinthisnichetoensureproperbondingandgroundingconnections.
DANGER
RISK OF ELECTRICAL SHOCK OR ELECTROCUTION
For proper bonding and grounding connections, use only Pentair Underwater Light Fixtures with this niche-fixture
housing. Failure to do so could create an electrical hazard which would result in death or serious injury to pool users,
installers and others.

4
SectionII. VinylLiner/FiberglassPoolInstallationInstructions
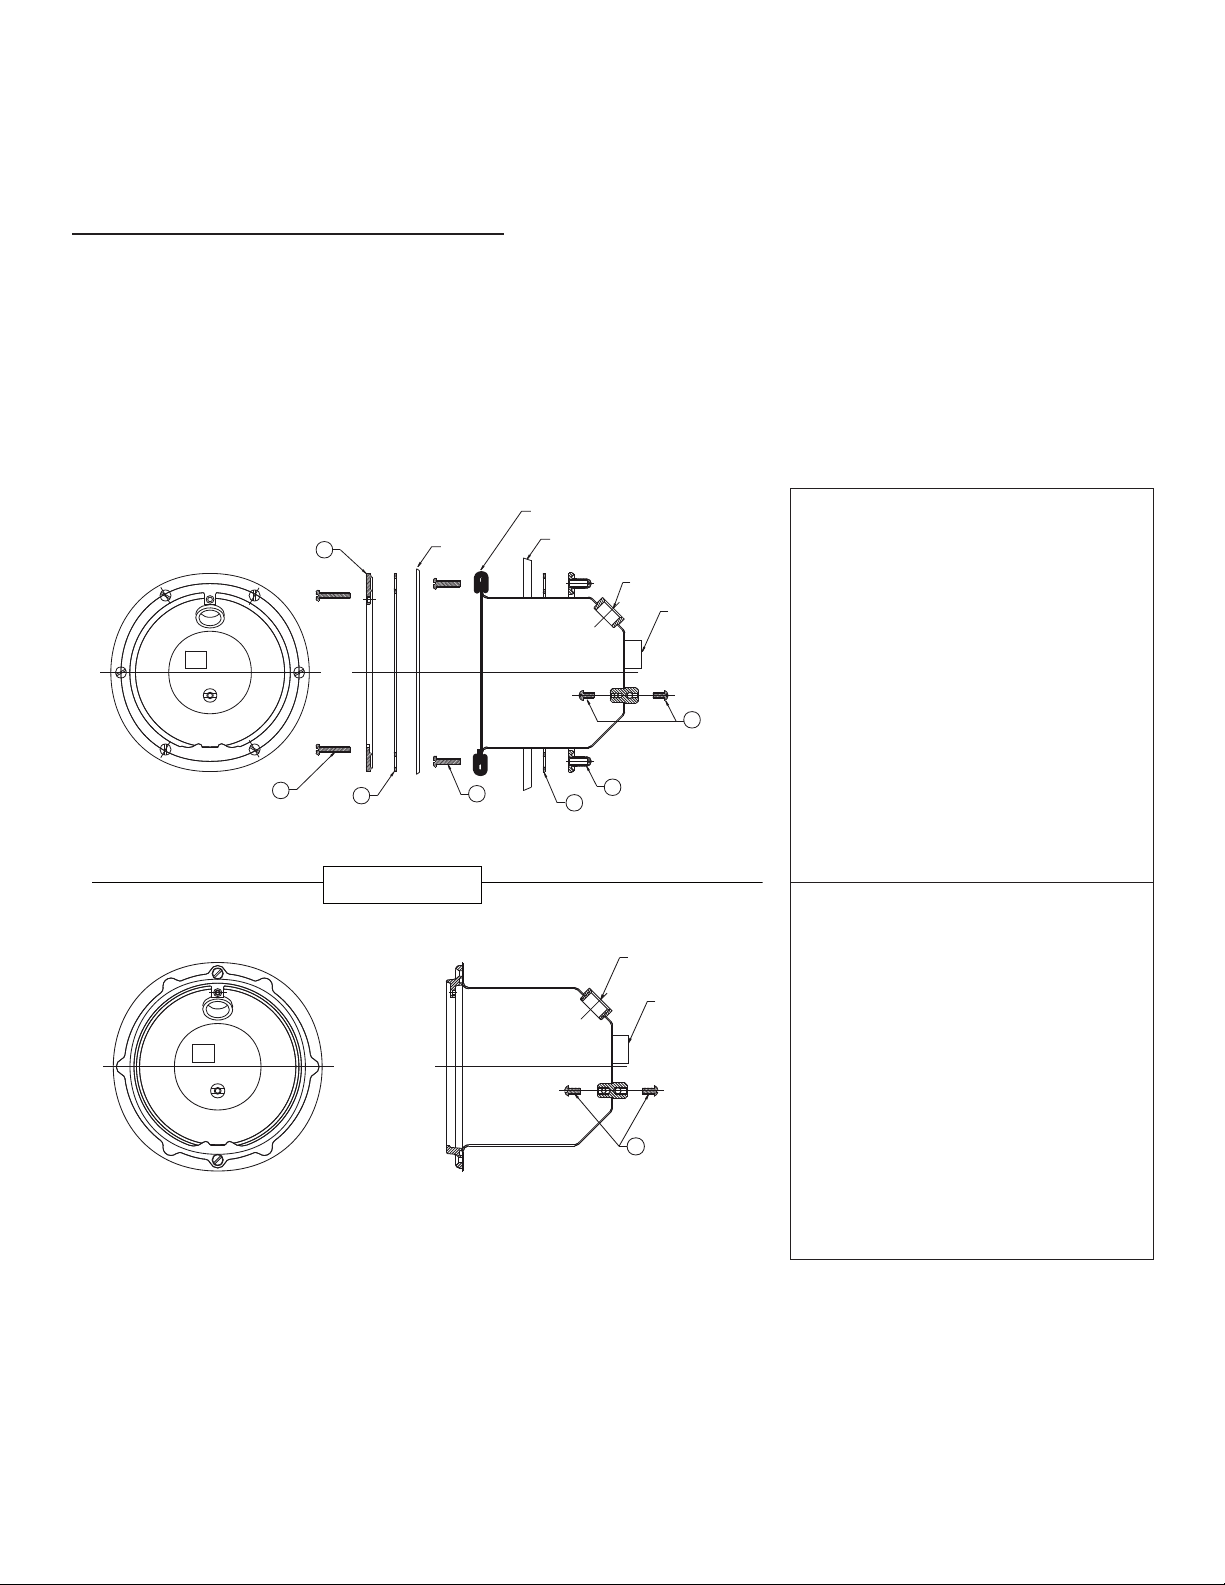
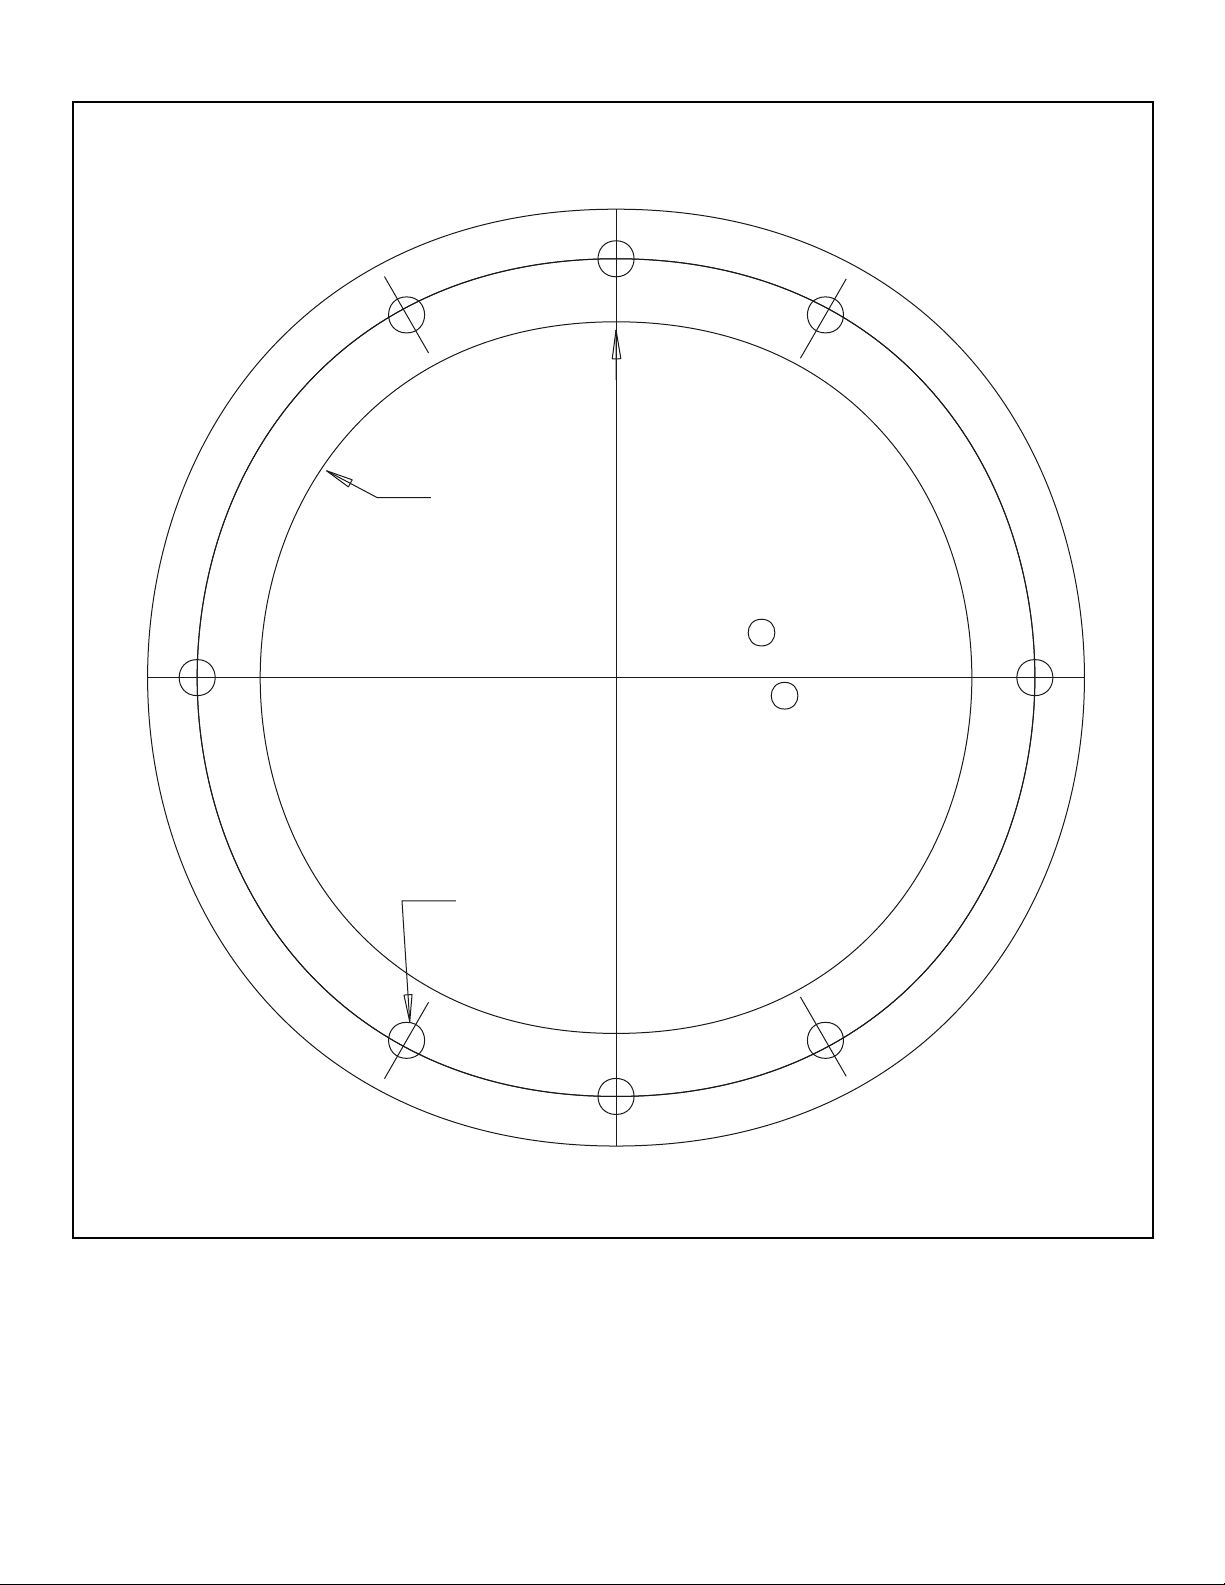
1. Punchordrill6sealingholes,2retainerholesandlargepanelhole,aspercircularpanelcut-outinformation.
NOTE
One of the two gaskets has larger holes to go over the retainer screw head.
2. Makesuredoublewallgasketisaroundthenicheflange.Insertthestainlesssteellightnichethroughwallpanelfrominside
thepool.
a. Alignthetworetainerscrewsholes(diametricallyoppositeoneanotherattopandbottom)ofthelightnichewith
thosethatweredrilledorpunchedinthewallpanel.
b. Insertthetwofillisterheadretainerscrewsthroughlightnicheandwallpanel.
c. Aligntheholesoftheback-upringandreargasket,(thegasketwithoutlargerholes),withtheholesontheback
sideofthewallpanel.
d. Fastentheback-upringandsecondgaskettothebackofthewallpanelbytighteningthetwofillisterheadretainer
screws.Atthispointthewallpanelissandwichedbytwogaskets.
3. Ifthisisavinylpool,installthevinylliner.Forfiberglasspoolsskiptostep4.
4. Alignfrontgasket(gasketwiththetwolargerholestogoovertheretainerscrewheads)withbrass-chromesealing
ringandfastentightlytothelightnichewiththesix10-24x11/8inchflatstainlessscrewsprovidedforthatpurpose.
a. Besurethetwocountersinksonthebackofthesealingring(topandbottom)lineupwiththeheadsoftheretainer
screws,andthetwolargeholesinthethirdgasketareplacedovertheheadsoftheretainerscrews.
b. Besurethepilotscrewholeofthesealingringisatthecentertop.Forvinyllinerpools,piercethelinerthrough
thesealingringholes,oneatatime,andinsertandtighteneachscrewatit'sholepierced.
c. Eachscrewshouldbeinsertedandtightenedthroughthesealingring(inproperorder),frontgasket,vinylliner
ifthereisone,flangeofthelightniche,doublewallgasket,wallpanel,reargasketandintotheback-upring.
5. Foravinyllinerpool,cutoutvinyllineralonginsidediameteredgeofthesealingring.
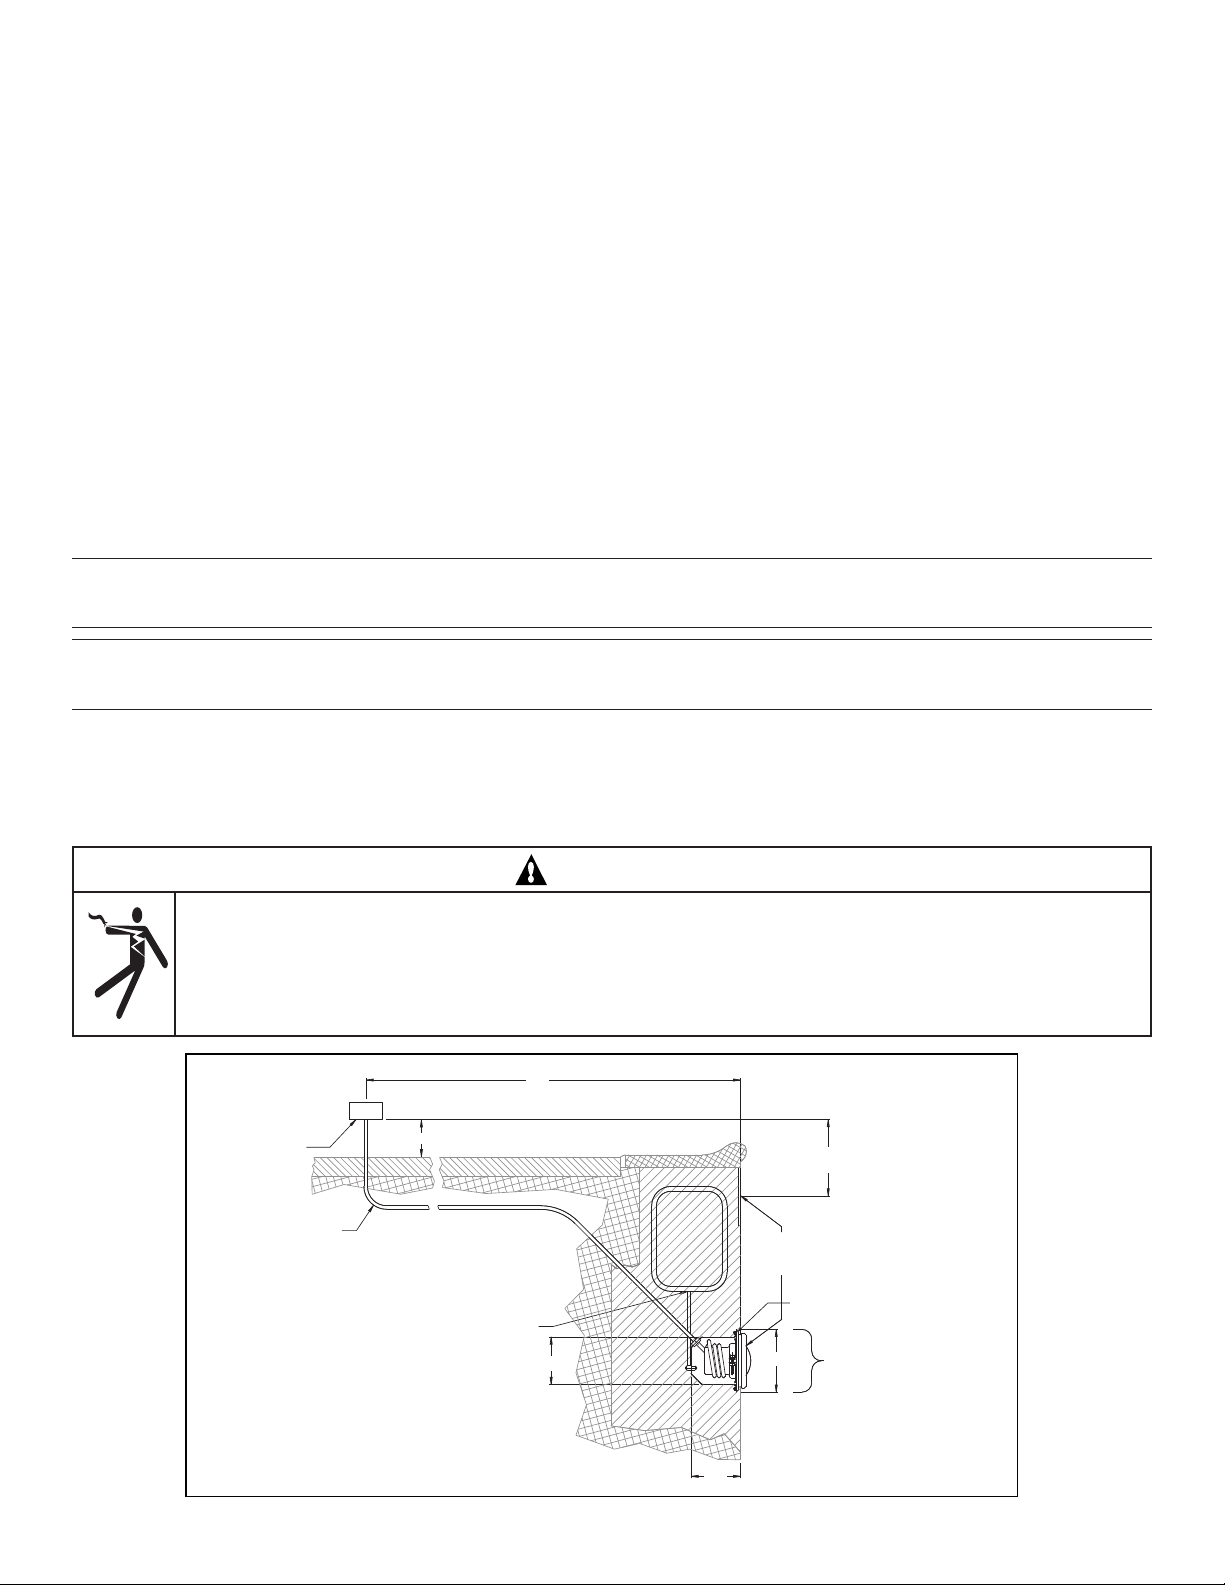
6. Connectrigidconduitfromniche-fixturehousingtojunctionbox.Thejunctionbox(orfor12voltmodels,thelow
voltagetransformer)mustbelocatedatleastfour(4)inchesabovegroundlevelandeight(8)inchesabovewater
levelandatleast48inchesfromtheedgeofthepool.
7. Bondtheniche-fixturehousingtoallothermetallicitemswithinfive(5)feetofthepool,usingaNo.8AWGwire.
Bondconnectionislocatedattherearoftheniche.SeeNEC680.26coderequirement.
8. Ifnon-metallicconduitisused,aNo.8AWGbonding/groundingwiremustbeinstalledthroughtheconduitfrom
theJunctionBoxtothebonding/groundingluginsidetheniche.Sealthewire/lugconnectionwithalistedsealantsuch
as3M™Scotchcast™PottingKit2136orequivalent,toprotecttheconnectionfrompossiblepoolwatercorrosion.
Seefigure2.SeeNEC680.23coderequirement.
For proper bonding and grounding connections, use only Pentair underwater light fixtures with this niche-fixture
housing. Failure to do so could create an electrical hazard which would result in death or serious injury to pool users,
installers and others.
DANGER
RISK OF ELECTRICAL SHOCK OR ELECTROCUTION!
Thisniche-fixturehousingmustbeinstalledbyalicensedorcertifiedelectricianinaccordancewiththeNationalElectricalCode
andallapplicablelocalcodesandordinances.Improperinstallationwillcreateanelectricalhazardwhichcouldresultindeath
orseriousinjury topoolusers,installersor othersduetoelectricalshock,andmayalsocausedamage to property. Readand
followthespecificinstructionsbelow.

5
Section III. Concrete/GunitePoolInstallationInstructions
1. Locatepositiononverticalwallwherelightistobeinstalled.Thetopofthelightlensmustbeaminimumof18
inchesbelownormalwaterlevelunlessthelightbeingusedisULlistedforlesserdepths.RefertotheInstallation
Manualofthelightforexactdepthrequirements.
2. Connectconduittothenicheusingarecommendedthreadsealant.
3. Securenichetorebarwithtiewires.Orientthenichesothatthepilotscrewreceptacleislocatedatthetopof
theniche.
4. Connectbondingwirefromrebarandbondinggridtothebondinglugattherearoftheniche.
5. Bondtheniche-fixturehousingtoallothermetallicitemswithinfive(5)feetofthepool,usingaNo.8AWG
wire.Bondconnectionislocatedattherearoftheniche.SeeNEC680.26coderequirement.
6. Ifnon-metallicconduitisused,aNo.8AWGbonding/groundingwiremustbeinstalledthroughtheconduit
fromtheJunctionBoxtothebonding/groundingluginsidetheniche.Sealthewire/lugconnectionwithalisted
sealantsuchas3M™Scotchcast™PottingKit2136orequivalent,toprotecttheconnectionfrompossiblepool
watercorrosion.Seefigure2. SeeNEC680.23
7. Supportconduittoholdnichetheproperdistanceinfrontofrebarsothatthefrontofmountingringisflushwith
thedesiredfinishsurface.
8. Ifpoolsurfaceistobeplastered,youmustallowproperconcretecut-backforplasterthickness.Finished
concrete surface must be cut-back behind the niche flange. Finished area surrounding niche must be flat
and flush with the brass mounting ring on the front of the niche. This ensures a snug fit between light
andwall.

6
SMALL NICHE FOR MANUFACTURED
VINYL LINER/FIBERGLASS
POOLS OR SPAS & TUBS
(AVAILABLE NICHE HUB SIZES)
78241100 Niche Top 1/2 in. Hub
78241200 Niche Top 3/4 in. Hub
78241300 Niche Top 1 in. Hub
78242100 Niche Rear 1/2 in. Hub
78242200 Niche Rear 3/4 in. Hub
78242300 Niche Rear 1 in. Hub
SMALL NICHE FOR CONCRETE/GUNITE
POOLS OR SPAS
(AVAILABLE NICHE HUB SIZES)
78243100 Niche Top 1/2 in. Hub
78243200 Niche Top 3/4 in. Hub
78243300 Niche Top 1 in. Hub
78244100 Niche Rear 1/2 in. Hub
78244200 Niche Rear 3/4 in. Hub
78244300 Niche Rear 1 in. Hub
SectionIV. TechnicalData
A. ReplacementParts
Item P/N Description
1 79205500 Screw Kit, Vinyl
2 98204400 Screw, 10-24 x 1/2 in. R.H.
3 79206000 Sealing Ring
4 79204600 Front Gasket
5 79205600 Back-up Ring
6 79207600 Rear Gasket, Vinyl
POOL WALL
POOL WALL
VINYL
LINER
DOUBLE WALL GASKET
DOUBLE WALL GASKET
TOP HUB
REAR HUB
3
1165
2
4
VINYL/FIBERGLASS SMALL NICHE
CONCRETE/GUNITE SMALL NICHE
TOP HUB
REAR HUB
2
Figure 2.

7
SAVE THESE INSTRUCTIONS.
R
R
R
TEMPLATE
AQUALIGHT
SPABRITE
1/4 IN. DIA.
HOLE THRU WALL
4-15/16 IN. DIA. MIN.
5 IN. DIA. MAX.
HOLE THRU WALL
TOP
HOLE PATTERN TEMPLATE

1
WATER SOLUTIONS
1620 HAWKINS AVE., SANFORD, NC 27330 • (919) 566-8000
10951 WEST LOS ANGELES AVE., MOORPARK, CA 93021 • (805) 553-5000
WWW.PENTAIRPOOL.COM
All Pentair trademarks and logos are owned by Pentair, Inc. Pentair Aquatic Systems™, SpaBrite®, and Aqualight®are trademarks of
Pentair Water Pool and Spa, Inc. and/or its affiliated companies in the United States and/ or other countries. 3M™ and Scotchcast™ are
trademarks of 3M Company Corporation. Unless expressly noted, names and brands of third parties that may be used in this document
are not used to indicate an affiliation or endorsement between the owners of these names and brands and Pentair Water Pool and Spa,
Inc. Those names and brands may be the trademarks or registered trademarks of those third parties. Because we are continuously
improving our products and services, Pentair reserves the right to change specifications without prior notice. Pentair is an equal
opportunity employer.
© 2012 Pentair Aquatic Systems. All rights reserved. This document is subject to change without notice.
P/N 99610000 REV F8/12
*99610000*
This manual suits for next models
11
Table of contents
Other Pentair Underwater Lighting manuals
Popular Underwater Lighting manuals by other brands

Nitelighter
Nitelighter NL50 Installation & operation manual

Volt
Volt Salty Dog Brass MR16 VWL-704-BBZ installation instructions

Oceanled
Oceanled ALLURE XFM Series installation manual

PXM
PXM PX 229-H user manual

Pontec
Pontec PondoStar LED Set 6 operating instructions

ASTEL MARINE
ASTEL MARINE PLAQUE MFM0680 operating instructions

hentech
hentech HT029D instruction manual

Oceanled
Oceanled Sport S3116d Installation & operation manual

EasyPro
EasyPro LED9WW Instructions for operation

Shadow-Caster
Shadow-Caster SCM-DL-RGBW quick start guide

Pontec
Pontec PondoStar LED Set 1 operating instructions

Nitelighter
Nitelighter NL35 Installation & operation manual