INST-TC-UV (1 of 2) 130201
SportQuest & SporTrek Roof Racks
Universal Mounting Hardware for Installation on Fiberglass/Composite Truck Caps
This supplemental installation hardware must be used in conjunction with additional parts from the hardware
kits contained in standard track-style SporTrek / SportQuest Roof Racks and SportQuest Pad Mount Roof Racks.
For SportQuest Pad-Mount installations, use the enclosed hardware as outlined for use on rails / tracks, except for
1/8” Foam Washers!! Follow original instructions from Pad-mount kit for assembly, substituting original-kit sheet metal
fasteners with the special fiberglass mounting components contained in this universal hardware kit.
Warning: Do not use sheet metal screws to attach roof racks to fiberglass roof panels! External roof racks do not
increase the GVWR of the vehicle. Maximum load ratings: SportQuest - 180 lbs; SporTrek - 75 lbs, evenly distributed on
crossbar assemblies. Keep in mind that torque applied to any straps, cords, etc. between the load and the vehicle body effectively
add "load weight" to crossbars and the roof. Large or flat items such as plywood or watercraft can trap air and create wind lift.
Secure the ends of such objects directly to the vehicle bumpers or tie downs. Bulky or tall loads can create tremendous horizontal
wind resistance from headwinds and crosswinds. Extreme caution should be used when transporting such loads, taking into
consideration road conditions, vehicle speed, crosswinds, load securing methods, etc. Large, bulky, tall or flat objects should be
properly secured to both crossbars, tie-down loops, and other attachment points on the vehicle body. PERRYCRAFT, Inc. does
not assume responsibility for style or size of rack installed, improper rack installation, exceeding rack load limit, load securement
methods, vehicle roof strength, wind lift or any other factors beyond its control. All fasteners, knobs, and load securements
should be checked frequently and tightened as necessary.
For technical assistance, please contact PERRYCRAFT, INC. at 800-777-7081.
Contents: 8/ea. - #10-24x1" and 4/ea. - #10-24x11/4" Stainless Phillips Head Machine Screws: 12/ea. - #10-24 Propeller Tee
Nuts, 1 1/8" Retainer Washers and Snap-on Caps, 3/16"x3/8"x1/32" Neoprene Washers, 3/16"x1/2"x1/8" Foam Washers, #10-24
Lock Nuts, 1/4” Stainless Steel Flat Washers; 1/ea. - Instruction Sheet
Tools Required: Tape Measure, Hand Drill, 3/16" Drill Bit (2" or longer), 9/32" Drill Bit, Phillips Screwdriver, Pliers and/or
Adjustable Wrench.
Important Note: For roofs exceeding 1" in thickness, substitute proportionately longer stainless machine screws for the 1" and
1-1/4" screws furnished. For truck caps without sandwiched core roofs, for mounting outside the core area, or for mounting in
any fiberglass roof less than 1/2" thick, substitute enclosed #10-24 lock nuts and 1/4” flat washers for propeller tee nuts. Select/use
a minimum of 4 holes in each rail that will provide equal spacing between the fastener positions.
Sizing/Rail Positioning: Prior to assembling rack, measure the size of the "core" area of the cap roof. If mounting inside the
core area, side rails should be positioned so that mounting hardware penetrates the core a minimum of 1" in from edges of core.
If mounting outside core area, position so that mounting hardware penetrates a minimum of 1" outside edges of core. Next, place
the side rails on the cap roof in the location to be installed. The ends of the rails should make contact with the roof surface and
the center of the rails should be no more than 1/2" off the roof surface. To adjust the "bow" of the rails, suspend the rails between
two points so that moderate hand pressure can be applied to the area of the rails needing adjustment.
Before drilling mounting holes check for appropriate clearances of other cap features such as ribbing, embedded wiring, interior
roof attachments, etc.
Rack Assembly: Note - You may be installing a rack having the number of mounting holes in the side rails designed for sheet
metal roof application (more mounting holes than fasteners provided in this kit). If so, select/use a minimum of 4 holes in each
rail that will provide equal spacing between the fastener positions. Drill through all roof layers at these holes only! DO NOT drill
at any other hole locations.
1. Install 3/16"x3/8"x1/32" neoprene washers on all machine screws positioning
washers under heads of screws.
2. Install 3/16"x1/2"x1/8" self-adhesive foam washers to bottom of side rails at
each mounting hole being utilized.
3. Insert stanchions into ends of crossbars, securing with #8x5/8" screws through
holes in underside of crossbars.
.
(over)
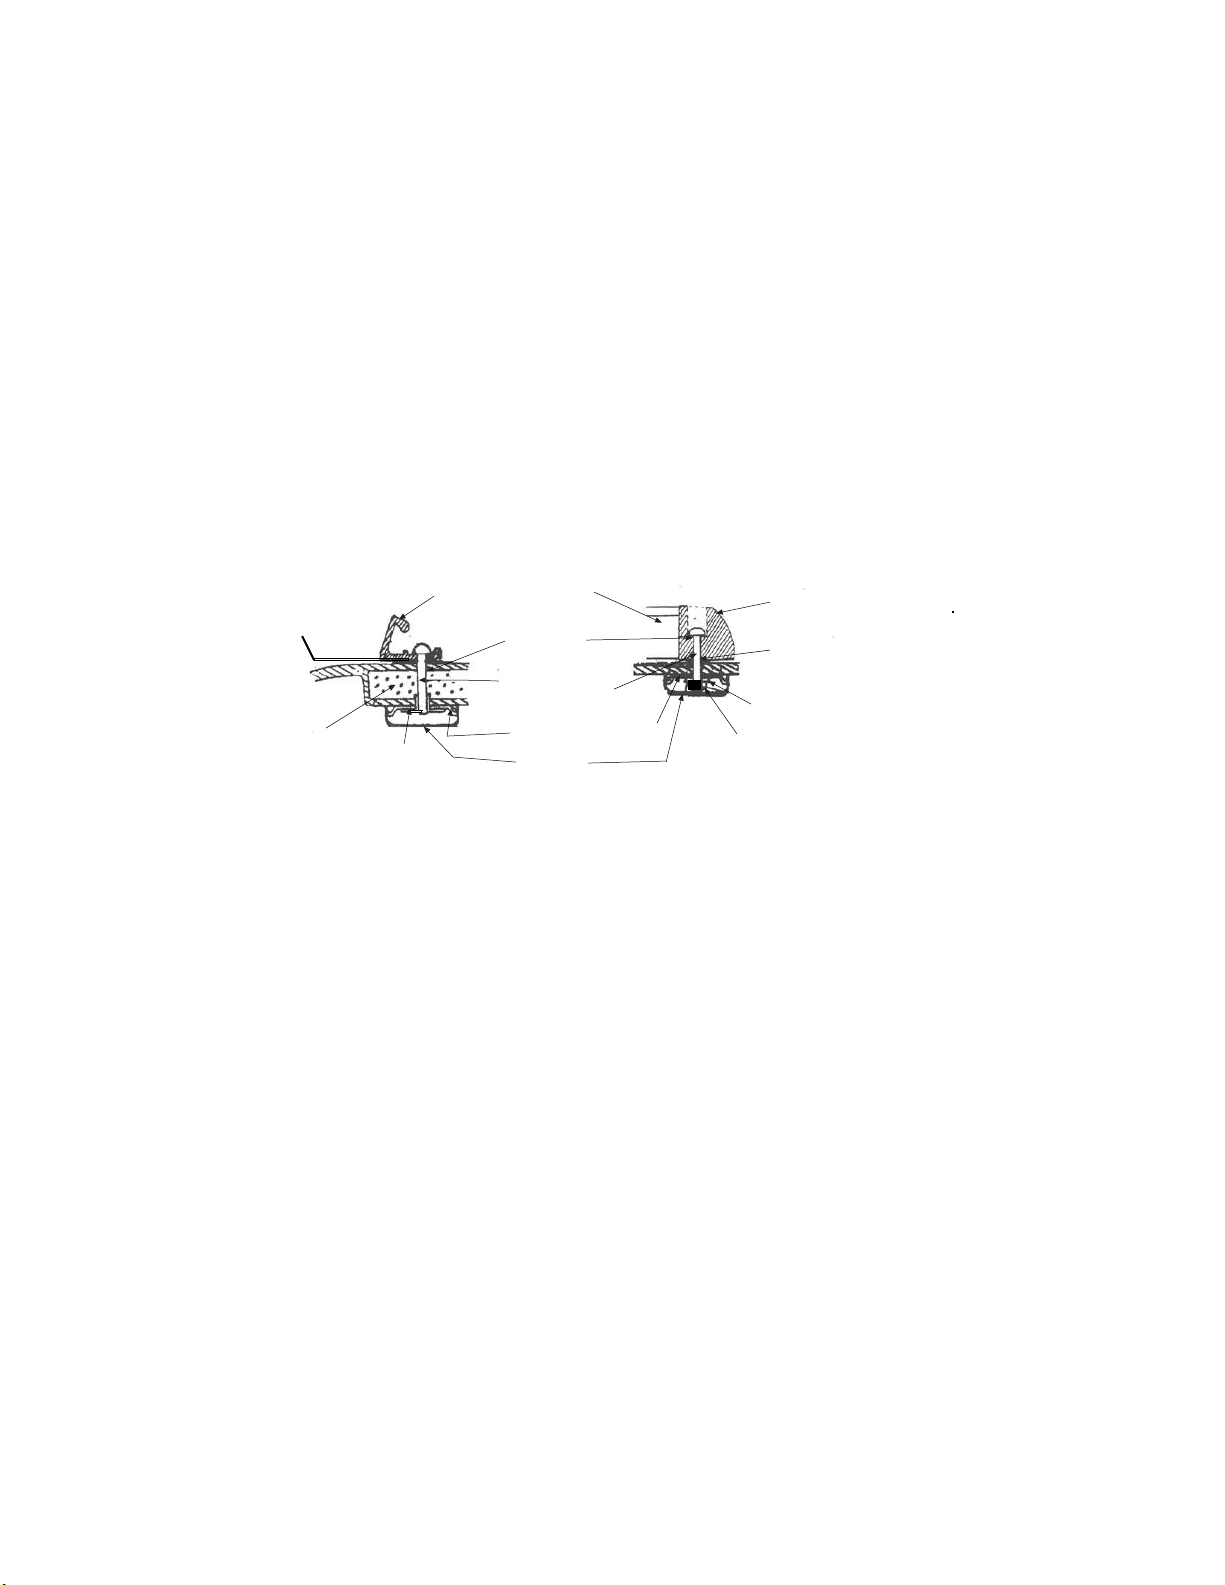
Foam Washer Foam Washer
Side Rail (track) End Cap
Neoprene
Washer
#10-24x 1.25”
#10-24x 1”
Cap Core Retainer Washer
Propeller Tee Nut
1/4” Stainless Steel Flat Washer
#10-24 Lock Nut
Cover
Core Area Installation Single Layer Installation
Side Rail (track)
Vinyl Insert
Tie Loop
Screw Hole
3/16” x 1/8”
foam washer