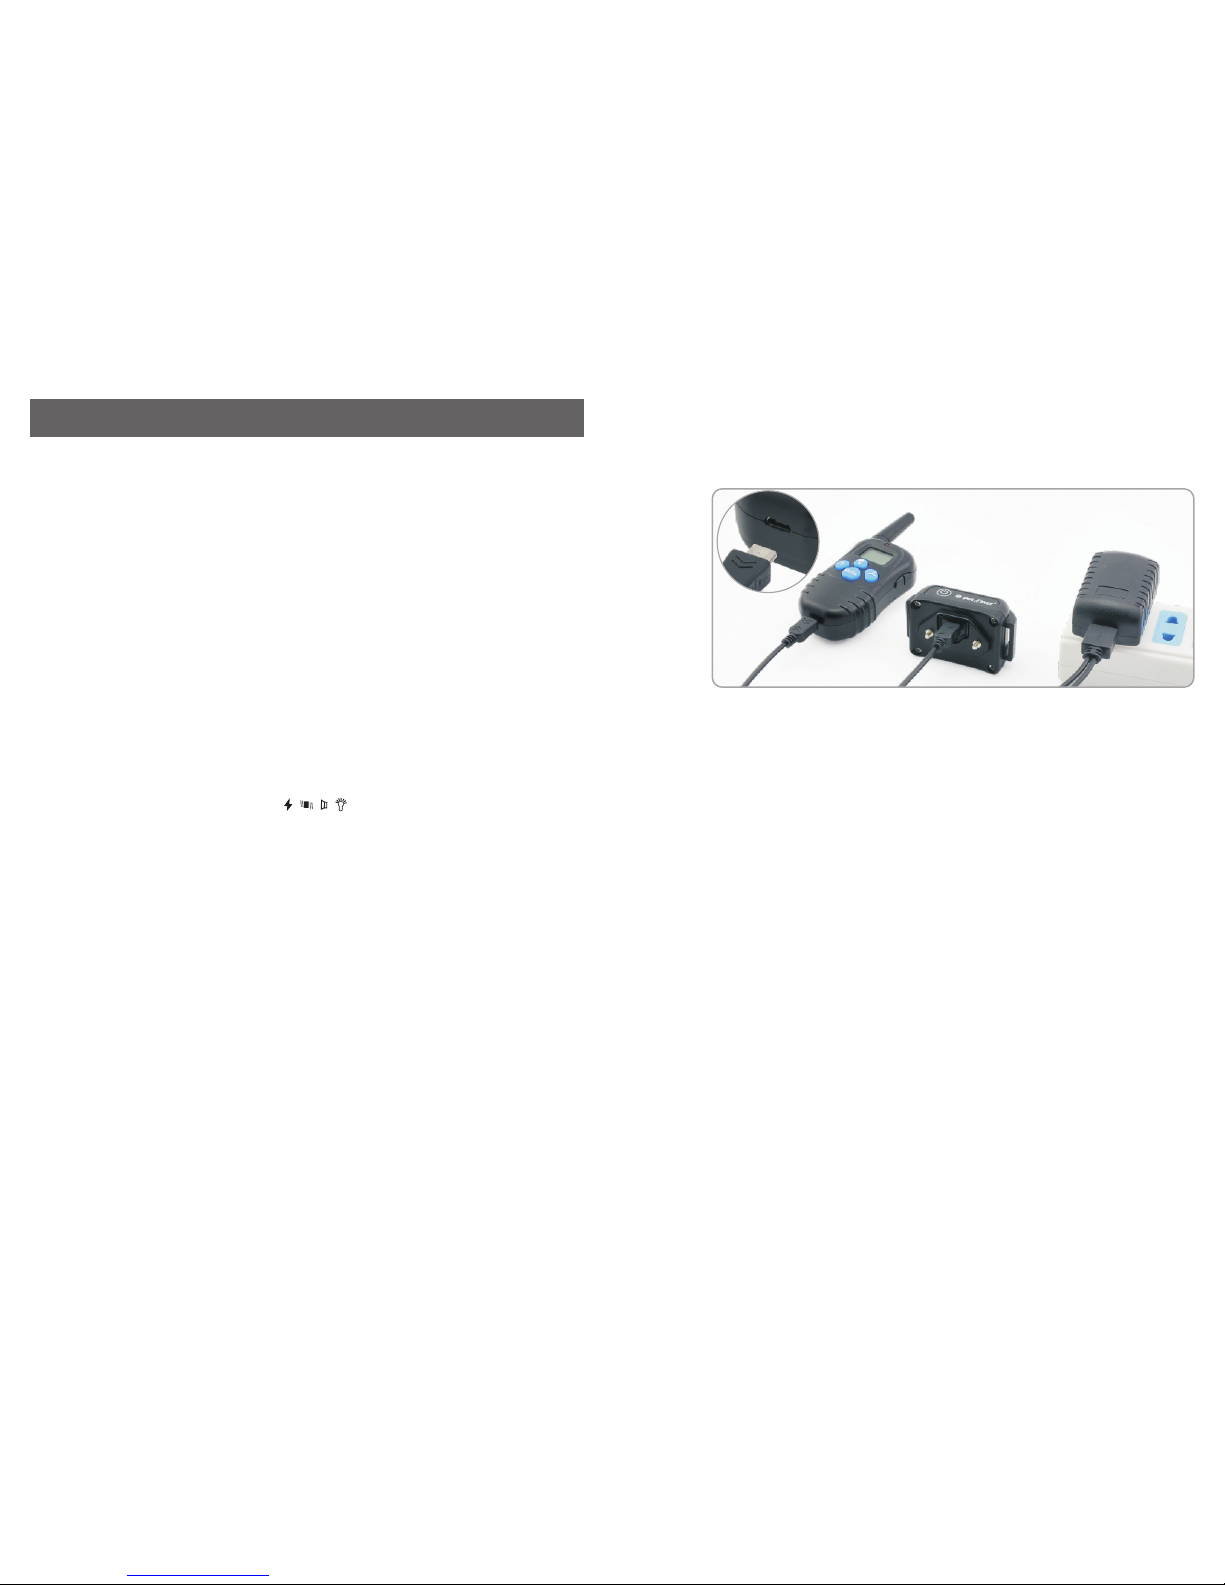
Petainer IS-PET998DBU User manual

Perfecting Basic Obedience
Note: When we refer to stimulation button this will change depending on your
model, for models PET998DRU, PET998DBU, this will be your “Y” button. For any
other models, there should be a stimulation button for each type of stimulation
(static shock, vibration and beep).
The “Sit” Command
1 Put a separate, non metallic collar on your pet's neck above the Receiver collar
and attach at least a 10-foot leash.
.
Note: Be sure the extra collar does not put pressure on the Contact Points.
2 Hold the leash and the Remote Transmitter in one hand, keep your other hand
free to guide your pet into a “Sit” position.
.
3 Press and hold your stimulation button, be it shock, vibration or beep. .
4 Immediately give the “Sit” command while holding down your desired stimulation
button.
.
5 Release the stimulation as soon as your dog sits and then give him praise. .
6 Release your dog from the “Sit” command and play. .
7. Repeat Steps 2 through 6.
The “Come” Command
1. Put a separate, non-metallic collar on your pet's neck ABOVE the Receiver
Collar, and attach a 10-foot leash. Note: Be sure the extra collar does not put
pressure on the Contact Points.
2. Hold your leash in one hand and the Remote Transmitter in the other.
3. Wait for your pet to walk away from you. Once he's far enough away, press
and hold the Stimulation Button (shock, vibration or beep) on your Remote
Transmitter.
4. Immediately give the command “Come” while continuing to hold your Stimulation
Button.
5. Using the leash, gently guide your pet toward you until he begins to come in your
direction.
6. Immediately release the Stimulation Button as soon as your pet steps towards
you, and praise him enthusiastically.
7. Quickly move backwards as your pet begins to come back to you, praising him
the entire time.
8. Praise your pet when he returns to you.
9. Repeat Steps 3 through 8.
10. Once your pet responds readily to the “Come” command several times, back
away from him without giving a command. When your pet turns toward you,
give the comm and “Come” (WITHOUT STIMULATION) and praise him while
you continue to back up. Praise your pet when he returns to you.
11. Use your leash to prevent your pet from running past you. If your pet manages
to run past you, repeat Steps 3 through 8.
The “Stay” Command
1. Put a separate, non-metallic collar on your pet's neck ABOVE the Receiver
Collar, and attach a 10-foot leash. Note: Be sure the extra collar does not put
pressure on the Contact Points.
2. Put your pet on his bed. Hold your leash in one hand and the Remote Transmitter
in the other.
3. Staying within 3 feet, walk the perimeter of the bed. Do not say anything to your
pet.
4. If your pet tries to leave the bed, press and hold the Stimulation Button and give
the “Stay” command. Continue to hold the button until your pet is back on his
bed. If necessary, use the leash to guide your pet onto his place.
5. Praise your pet when he is back on his bed.
6. Once your pet has settled for a few seconds, release him and play calmly.
7. Repeat steps 1 through 5.
Eliminating Unwanted Behavior
Jumping Up
Pets t ypic ally j ump up t o g et attent ion. I f y ou do no t want y our pe t to jump o n
you, then friends or members of the family should not encourage this behavior.
That means every time your pet jumps on someone, he should be reprimanded
or redirected to an alternate and acceptable behavior, for which he can receive
praise.
Note: It is best if your pet first understands the “Sit” command.
1. As soon as your pet lifts his paws off the ground to jump on you, press the
Stimulation Button and give the command “Sit.”
2. Release the Stimulation Button immediately once your pet is sitting, and verbally
praise him.
12

Digging
It is important to first understand why your pet is digging. Many dogs, such as
terriers, were bred to flush out prey, and digging is very innate to them. Other dogs
may be digging to find a cool spot to lie down, or simply out of boredom. Your pet
may no longer have the desire to dig if he is provided with the following: A cool,
shaded area in which to lie down, and plenty of water. An alternate activity, such
as a favorite toy. Plenty of play, exercise, and attention. A yard free from rodents
or prey that he may be trying to flush out.
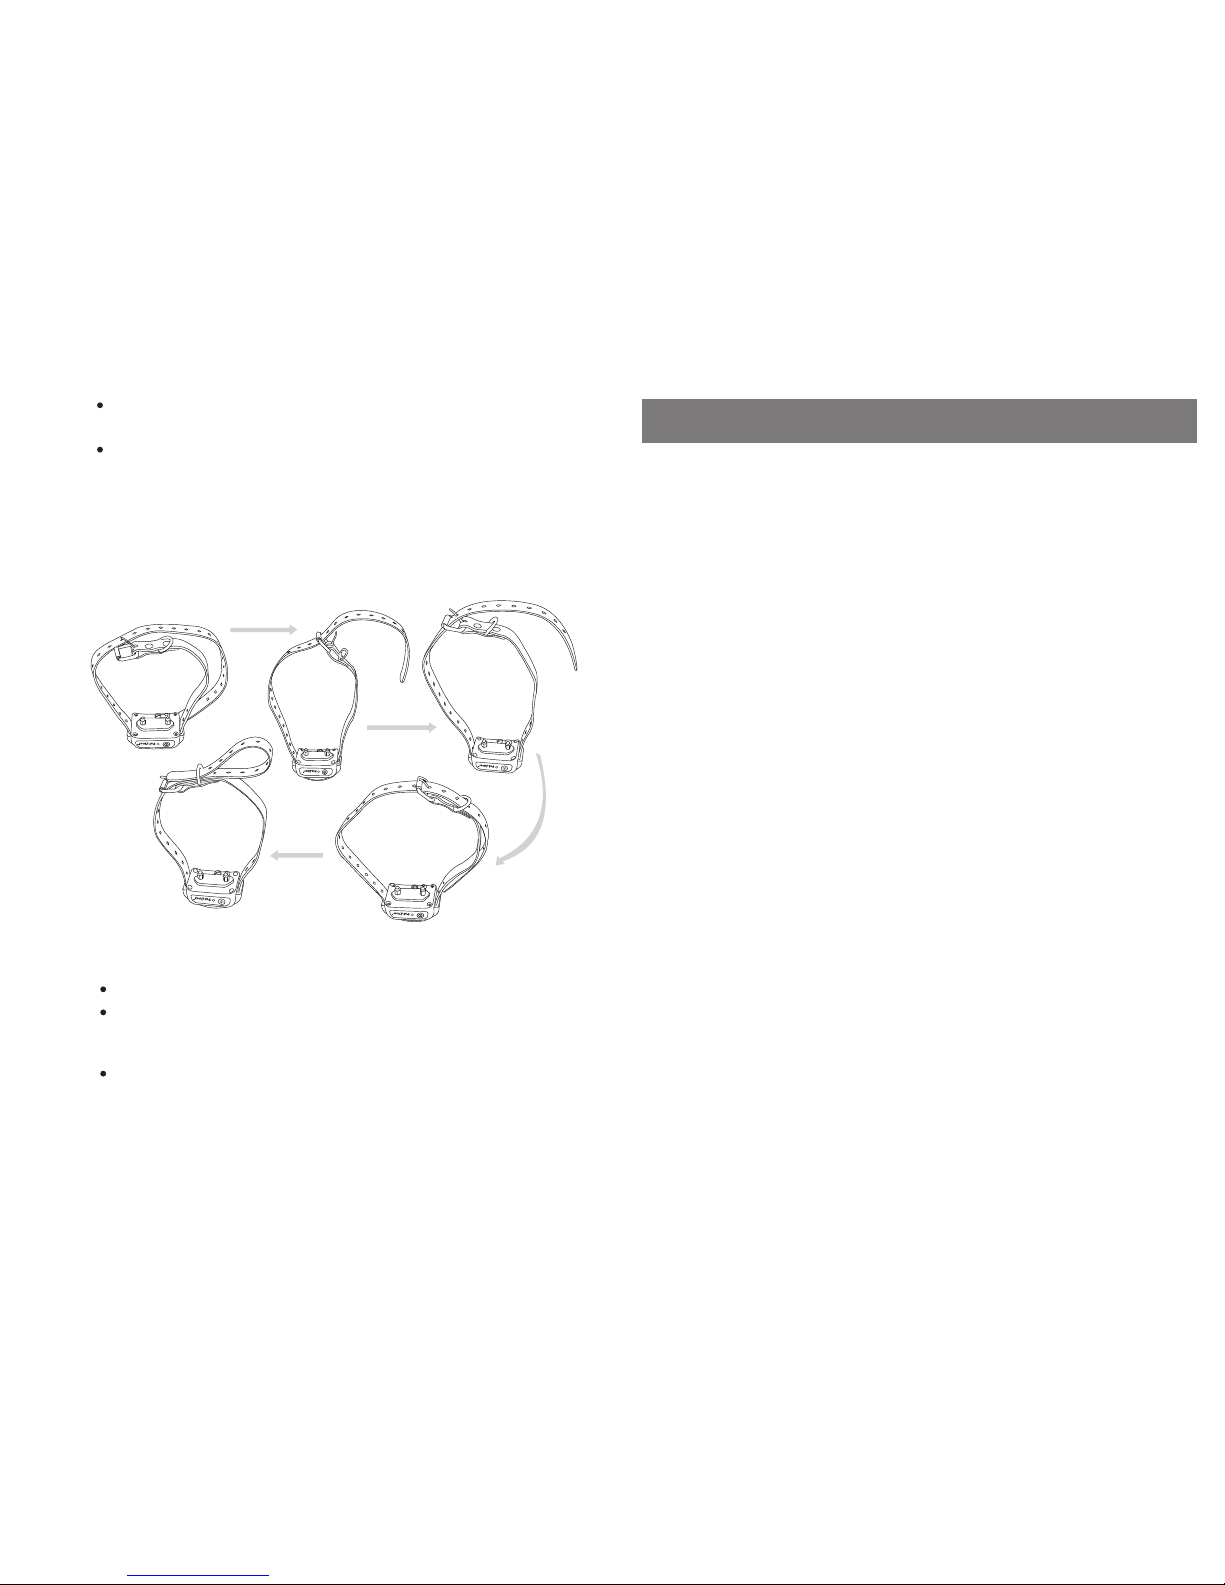
1. Place the Receiver Collar on your pet and wait at least 10 minutes before placing
him in the yard. No other people or pets should be in the yard, as you do not want
your pet to associate the stimulation with anything other than his digging. Your
pet must be securely fenced in or contained during training.
4. Practice this exercise in several different areas and use different people for
distractions.
2. From a window or area where your pet cannot see you, wait until your pet begins
to dig.
3. While your pet digs, press the Stimulation Button and release it when he stops
digging. Only press the button while your pet is in the act of digging, and do not
say anything to him.
4. If your pet ignores the stimulation, increase the Intensity Level.
5. Continue to watch your pet, as he may choose another area to dig.
6. Do not allow your pet in the yard unsupervised until he has completely stopped
digging.
Chasing
Chasing is an instinctive behavior stimulated by moving objects. Some dogs have
a particularly strong desire to chase that can put them in harm's way and leave
you helpless. Never allow your dog off the leash or out of a contained area until
he has learned the “Come” command, regardless of the distraction. Be consistent
and correct your dog every time he chases something. It is vitally important that
you and your dog remain safe while learning during on-leash training. Your dog
should be on a strong leash, long enough for him to attempt to chase an object,
but short enough for him not to reach a road or other unsafe area. You must also
be physically strong enough to restrain your dog when he tries to chase.
1. If your dog has not learned the “Come” command, keep a leash on him so you
can physically stop him before he reaches the object he is chasing.
2. Set up a scenario where your dog is enticed to chase an object. Common items
could be cars, motorcycles, bicycles, etc. (do not use toys).
3. When the object passes in front of your dog, make sure to hold the leash with
a firm grip. As soon as your dog begins to chase the object, press and hold the
Stimulation Button until he stops.
4. When your dog stops chasing the object, immediately release the button, walk
backwards and give the command “Come.” Praise your dog as he comes to you.
5. Repeat the process until your dog stops chasing the object.
Trash Raiding
The easiest way to prevent trash raiding is to remove garbage and tempting food
from your pet's environment. You can use the Remote Trainer to teach your pet to
stay away from these items; however, you must be prepared to correct your pet
every time he approaches them.
1. Pick a temptation for your pet and position yourself where he cannot see you.
2. While your pet's mouth is touching the temptation, press and hold the Stimulation
Button. Immediately release the button when your pet leaves the temptation.
3. Do not say anything, as you want your pet to associate the stimulation with his
behavior, not you.
4. If your pet does not respond to the stimulation, increase the Intensity Level and
repeat the process.
5. Repeat this process in several different locations with different temptations.
General Training Tips
The following are tips on how to get the best out of your Petrainer Remote Pet
Training Collar:
(1) Make the training sessions short and positive (between 10-15 minutes long
for each time), which will enable your dog to keep its attention focused on you.
(2) Train one dog at a time.
(3) During initial training sessions, keep your dog in a familiar outdoor environment
e.g. an enclosed area of the garden and away from other dogs/ animals and people.
3. If your pet ignores the stimulation, increase the Intensity Level until he/she
responds.
34

(15) Please be reminded that you should keep training sessions short and end
every session on a high note. Stop training and play with your dog as soon as
he/she has accomplished a new level of proficiency.
(9) Avoid over-correcting your dog. Use as few remote corrections as possible
during the training process.
(10) When you r dog has b ecom e appa rent ly per plex ed, shift the f ocus of t he
train ing sess ion by dra wing his /her attention to a c omman d t hey are familiar
with, e.g. sit. Give your d og prai se and enc ouragemen t galor e o n succe ssful
completion of the command. Repeat this several times before returning to training
with remote corrections.
(11 ) I f y ou kn ow a par ti c ul a r m is b eh avi or yo u r d og do es , t h en re inv en t t h is
situation during a training session. You will have far more success if you deal
with one misbehavior at a time in a controlled situation.
(12) Be consistent; give your dog a tone, vibration or static-stimulation correction
for each misbehavior. When reinforcing a command with a correction. It is critical
that you do so without emotion then immediately praise and reward your dog for
marking the right decision.
(13) When your dog seems to react in a timid and frightened fashion to either
the tone, vibration or static-stimulation, particularly in early training sessions,
do not be flabbergasted. Shift the focus of the training session by drawing his/
her attention to a command they ar e f amiliar with. E. G. sit an d g ive your do g
abundant praise and encouragement on successful completion of the command.
(14) D o not us e Pet rain er Re mote P et Trai ning C oll ar to co rrect or elimin ate
form o f a g g r e s s i o n o r b i t i n g b e h a v i o r. Wh e n y o u r dog i s s h o w i n g s i g n s o f
aggress ive b eha vio r then c ont act a profe ssi ona l dog trainer in y our v icinity.
(7) Issue an obedience command at a time, which will focus your dog's attention
and reduce confusion. Do not use the remote collar to correct commands that
have not already been covered.
(8) During training, look for all the positive changes in your dog's behavior and
remember to reinforce them promptly with ample praise and reward.
(6 ) F o r b a sic ob e die n ce t ra i n in g , V I BR AT I ON an d A UDI O m o d es ar e mo r e
us e ful .
(5 ) You w il l h av e m or e su cce ss b y t ea ch in g t he d og a co mma nd f ir st be fo re
tr yi ng to r ei nf or ce to c omm an d wi th th e r em ot e tra in er.
(4) Use a long leash fastened to a non-metallic collar to help his/her learning.
Ensure the additional collar and leash does not interfere with the skin contact
of the metal probes on the collar-receiver. Do not use the remote training collar
without a long leash until your dog is fully trained.
more than accordingly.
reinforce your commands with the remote collar-receiver more often collar-receiver
Training in new locations may cause your dog to become distracted causing you to
56
If needing more training tips, please visit us at
or www.facebook.com/itronicsmall for plenty of resources.
www.ipets-mall.com

45
Components
IS-PET998DBU 1 for 1
Charger Testing Bulb 3 sets Contact Points
Adjustable TPU Belt
Receiver Collar
Remote Transmitter
Charger 6 sets Contact Points
IS-PET998DBU 1 for 2
Remote Transmitter Receiver Collar
Adjustable TPU Belt Testing Bulb
USB Cable
USB Cable
Petrainer Rechargeable and Waterproof LCD Remote Pet Training System has
been proven safe, comfortabl e, and effectiv e for all pets over 8 pou nds. T his
system assists you in controlling your pet without a leash in a range up to 328
yards (300m). At the push of a button, the Remote Transmitter sends a signal,
ac tiv at i ng th e R ec e iv e r Col la r. Us ing t h e R em o te Tra i ne r c ons is t en t ly an d
cor re ctl y, m an y mis be havio rs t hat y ou r pet exh ib its w il l be c orr ec ted or an y
basic obedience commands can be taught.
Imp ort ant : The R emote Tr ain er ha s a ran ge up to 32 8 yar ds. D epe nding o n
the way you hold the Remote Transmitter, the range may vary. Hold the Remote
Transmitter in a horizontal positio n away from your body to achieve optimum
range. Terrai n, we ather, veg eta tion, tra nsm iss ion from ot her r adio devi ces ,
and other factors will affect the range of your Remote Trainer.
How the Petrainer Rechargeable and Waterproof LCD
Remote Pet Training System Works
Features
3. 100 levels of vibration.
4. 100 levels of static shock (optional).
7. Power save:
1. Rechargeable Remote Transmitter and Receiver collar.
2. Waterproof Receiver Collar, allowing your pet to swim in water.
5. Alter stimulation levels by pressing the Up & down buttons.
6. Tone button activates a tone on the receiver collar.
The receiver collar will go into deep sleep if there is no operation for 4
minutes and any dog movement will activate the receiver.
The transmitter will go into STANDBY MODE if there is no operation after 10
seconds and go into deepsleep after 1 minutes, press any button except the
LED light button to act ivate the transmi tter.
8. The system can be used for 1 or 2 Receiver Collars.
9. Two pairs of metal prongs with silicone covers(short/long) to be suitable for
dogs with different fur lengths.

67
Key Definition
1. Antenna
2. LED Light
3. LED Indicator
4. LCD Display
Light Mode
Static Shock Mode
1-100 Level
Vibration Mode
Beep Mode
5. U
6. Led Light Button
7. Channel Button
8. Launch Button
9. Mode Button
10. Lithium Battery
11. Charging Jack
p/Down Button
Channel 1
Channel 2
Low Battery Indicator
Y
1. Antenna: Transmits the signal from the Transmitter to the Receiver Collar.
2. LED Light: This light will be on when pressing the LED light button.
3. Indication Light: This light will flash when the “Y” button is pressed. The
will be activate when charging as well.
light
4. LCD Display:
Static Mode: With this mode selected, pressing the “Y” button will cause the
receiver to emit shock.
Vibration Mode: With this mode selected, pressing the “Y” button will cause
the receiver to vibrate.
Beep Mode: With this mode selected, pressing the “Y” button will cause the
receiver to emit a beep sound.
Light Mode: With this mode selected, pressing the “Y” button will cause the
LED light on the receiver to flash green once every second. Its primary purpose
is to help locate your pet.
Channel 1: Indicates the selection of the first collar receiver.
Channel 2: Indicates the selection of the second collar receiver.
5. Up/Down Button: Selects intensity level for Vibration and Static Shock.
6. LED Light Button: When pressing the LED light button, the LED light on the
transmitter will be on.
7. Channel Button: Pressing this button will swap between the first and second
receiver.
collar
8. Launch Button: Sends the signal from transmitter to r eceiver, resulting in
stimulation, beep or light, depending on your mod e selection.
9. Mode Button: Press this button to switch between modes. There are 4 modes:
Static, Vibration, Beep and light mode.
10. Lithium Battery: 3.7V 240 mAhLiP.
11. Charging Jack: Insert charging connector into charging hole to charge the
Transmitter.
Contact Points: Delivers
safe static correction. Do
not remove silicone covers
as it helps protect dog's
neck from irritation due to
the stainless steel contacts.
Static shock can still be felt
through silicone covers.
Charging Jack: Insert
to charge the Receiver
Collar.
On/Off/Pairing Button:
Turns on/off the Receiver
Collar or hold to enter the
pairing process.
A B C D
Rubber Cover: Seals
charging jack to keep
dust and water from
entering. If not sealed,
then the item will not
be waterproof.
A. When charging the battery, a red Led light
will appear and will change to a green LED
once fully charged.
B. In the LED Light mode, press the launch
button and a green LED will appear on the
Receiver Collar.
C. When in Standby, the Receiver Collar will flash a green LED light every four
seconds.
D. After powering on the Receiver Collar, press and hold the on/off/pairing button
for 5 seconds to enter the pairing process. The green LED light will keep flashing
for 10 seconds to indicate the pairing process.

89
Note: Please check whether the battery needs recharging before you
use the device. When you turn on the receiver, if there are beeps for 20
seconds, you need to recharge the receiver collar before using the unit.
3. Press Up/Down buttons on right hand side of the transmitter to set
Vibration or Static Shock level.
4. Press the ½ b utton to swap between channel 1 or 2, depending on
which receiver you wish to select.
5. The Remote Transmitter will go into STANDBY MODE if no operation
for 10 seconds and will TURN OFF if no operation for 1 minutes.
6. In STANDBY MODE, press any button (except LED light button) to wake
up the transmitter.
Operating Guide
How to use the Remote Transmitter
2. S et to th e d iff er ent mo de s b y p re ss ing th e M od e B ut to n-The LC D
images will change from .
Prepare the Remote Transmitter:
Charge the Remote Transmitter
1. Connect the charger connector to the charging jack.
2. Plug the charger into a standard outlet.
3. The red light on the Transmitter will be on.
4. Charge the Transmitter for 2 hours or until the light indicates charging
is complete.
5. After fully charged, the red led will turn off automatically.
Low Battery Indicator: The symbol will show up on the right side of
screen when recharging is necessary.
LCD
1.
To turn off the Transmitter, hold the Mode button for 5 seconds.
To turn on the Transmitter, press any button except the LED light button.
Step
1
Prepare the Receiver Collar:
Charge the Receiver Collar
1. To TURN ON the Receiver Collar, press the on/off button, a beep will
sound, and the green LED will turn on and begin to flash every 4 seconds.
2. Open the rubber cover and insert the charger connector into the
Jack.
charging
3. Plug the charger into a standard outlet.
4. The red LED will be on.
5. Charge the Receiver Collar for 2 hours
charging is complete.
or until the light indicates
6. After the unit is fully charged, the red LED light will turn to a green LED
light automatically.
7. Put the rubber cover back in place.
8. If the battery needs recharging, the receiver collar will beep for 20
seconds.
Step
2
HOW TO USE
Note: Please charge before using the product! Please ensure you’re
putting the correct side of the cable into the USB charger port as the
connector is not the same size on both ends.

10 11
Important: If the transmitter is in sleep mode (the LCD display is turned
off) you must press the “Y” button once to wake up the unit, then press
the “Y” button again to send the signal from the remote to the collar
receiver. This applies to all functions.
Test Static Shock Function
Take out the test bulb from the
the Receiver Collar’s Contact Points with the silicone covers on. (Static
shock can still be felt through silicone covers, do not remove, as it helps
protect your dog from skin irritation from the stainless steel contact point).
package and place its metal wire against
Press Mode button on the Remote
confirm using the LCD display that the stimulation level is not at 0, you
can press the UP/DOWN button on the right side to adjust.
Transmitter, switch to Shock Mode,
Press Y button, test bulb will flash, that means Shock function works.
To Test Petrainer Rechargeable and Waterproof
LCD Remote Pet Training System:
The sta tic imp ulse re le ased by t he R ec eiv er C ol lar can not be se en
wit h th e na ked eye . Yo u ca n test th e St im ula ti on w ith thi s metho d:
Step
Note: If wanting to test the shock function on yourself, please ensure
your finger or hand is across both contact points with silicone covers on to
ensure the connection is complete. Otherwise, user will feel no stimulation.
Test Vibration Function
Press Mode button on the
Remote Transmitt er, s witch
to Vibrate mode, confirm using
the LCD display that the
stimulation level is not at 0,
you can press UP/DOWN button
on the right side to adjust.
PressY button, Remote Collar
will vibrate, that means Vibration
Function works.
Test Beep Function
Press Mode button of Remote
Tra nsmi tte r, swit ch to Beep
Mode.
Press Y button, Receiver Collar
wi ll be ep, t h at me an s B eep
Mode works.
4
2. Press and hold the ON/OFF button for 5 seconds until a beep sounds,
and the indicating light will begin to flash quickly.
3. Press the Y button on the Remote Transmitter once the Receiver Collar
beeps and flashes quickly.
When the Remote Transmitter and Collar Receiver are paired
successfully, the Collar Receiver will beep again, and the indicating
light will stop flashing quickly.
4. If needing to pair a second Collar Receiver, follow the same steps but
first press 1/2 button to different channel.
Note: Pairing has to be finished within 10 seconds after the 1st beep from
the Receiver Collar. Meaning, you have to press the Y button within 10
seconds of the 1st beep for pairing to be completed.
Static Shock Stimulation Tester
In your package that you received,
you will find a clear almost translucent
plastic piece that has a light bulb/
fuse in the middle of it. This is your
Static Shock Stimulation Tester.
This component DOES NOT attach
to the Collar Receiver by any means
and is only for testing the static
shock mode. To test static shock
function, follow these steps:
31. Power on the Receiver Collar by pressing the ON/OFF button, a beep
will sound.
Step Pairing the Remote Transmitter and Receiver
Collar:

12 13
4. Allow your pet to wear the collar for
sever al minu tes the n r echeck
becom es more comfor table w ith the Co llar.
the fit. C heck the f it again a s y our pet
CAUTION: Risk of Skin Damage.
The R eceiv er Co ll ar is n ot desi gne d to b e wor n co nst antly. We
rec omm en d the C ollar n ot be wor n for more tha n 12 hour s out of
eve ry 24-h our p er iod .
Assemble and Fit the Collar Receiver
3A
3B
Important: The proper fit and placement of your collar is important for
effective tr aining. The Contact Points must hav e direct con tact with
your pet’s skin on the underside of the dog’s neck.
To assure a proper fit, please follow these steps:
1. Have your pet standing comfortably (3A).
2. Centre the Contact Points underneath your
pet’s neck, touching the skin (3B). If your pet
has a long or thick coat, please use longer
Contact Points, we enclosed 3 sets Contact
Points, short ones and longer ones.
CAUTION: There are 100 levels for
Vibration and Stimulation. The strong
Stimulation can penetrate the hair of
the pet and fabric within 6mm thick. Do
not shave the pet’s neck as this may
increase the risk of skin irritation.
3. The Collar should fit snugly, yet loose
enough to allow one finger to fit between
the strap and your pet’s neck.(3C)
Step
3C
Receiver Collar will show green, which means the Receiver Collar is
activate and will work.
III: When testing, choose any mode except LED light. When you
under Vibration or Static Shock mode, Intensity Level cannot be
at a stimulation level of 0, press UP/DOWN to adjust.
are
5
II: The receiver collar will go into deep sleep if no operation for 4
And any movement by the dog will activate the receiver.
minutes.
If the Receiver Collar has no response when you press the Y button, and
the Indication light of the Receiver Collar is not on either, you can shake
Receiver Collar or force the dog to move, and the indication light of the
1. Light Standby : In order to save power, the Remote Transmitter will
go into Standby Mode if there is no operation after 10 seconds, press
any button except LED Light Button to activate Remoter Transmitter,
LCD will display.
2. Deep Sleep: In order to save power, the Remote Transmitter will
go into Deep Sleep Mode if there is no operation after 1 minutes,
press any button except the LED light button to activate the
transmitter.
I: If LCD of Remote Transmitter does not display, there is probably two
reasons:
Note:
Attaching the Contact Points
In your package that you received, you will find 3 set of contact points
with silicone covers placed over the contact points, DO NOT REMOVE
the covers as they protect your dog from the irritation from the contact
points. These contact points are screwed onto the receiver so that the
points can effectively contact the dogs skin without hair/fur interfering
with the connection.
Attaching the Collar Strap to the Collar Receiver
button works.
will turn on, means LED light
Press LED light Button, LED light
Test LED Light Function

15
Is the Receiver Collar waterproof?
Yes, your pet can swim in the water.
Frequently Asked Questions
How old does my pet have to be before using Petrainer Rechargeable and
Waterproof LCD Remote Pet Training System?
Your pet should be able to recognize basic obedience commands such as “Sit”
or “S tay.” P etrai ner R echar gea bl e and Waterp roo f LC D Rem ote Pet Tr ainin g
System may be too large for pets under 8 pounds.
Once my pet is tr ained an d h as been obe ying my com mands , w ill my pet
have to con tinue to we ar the Rece iver Col lar?
Probably not. You may need to reinforce training with the Receive Collar from
time to time.
Can I use Petrainer Rechargeable and Waterproof LCD Remote Pet Training
System with more than one pet?
Yes, there i s 2 seri es w it h ou r Pe tra in er R ec har ge ab le a nd Wate rp ro of L CD
Remote Pet Training System, one kind is 1V1 (1 Transmitter to 1 Receive Collar )
TT-PT05;the other one kind is 1V2 (1 Transmitter to 2 Receive Collar) TT-PT06.
Will I get exactly 328 yards of range with the Remote Trainer?
The e ffec tive ra nge of th e Remot e Trai ner means th e strai ght -line d istan ce
between Remote Transmitter and Receiver Collar without obstacles in between.
Range may vary ac cording to terrain, weather, vegetat ion, batte ry capabil ity
as well as transmission from other radio devices.
How long can I continuously deliver vibration or Static Shock to my pet ?
The m axi mum amou nt of time you can p res s the Vi bra tio n or St ati c Sho ck to
you r pe t co nti nu ously i s 10 s econd s. Af ter thi s, the Re mo te Tr ans mi tte r wi ll
time-out, and the Vibration or Static Shock must be released and pressed again.
Regular Maintenance
Check Contact Points for tightness weekly.
Clean Contact Points with alcohol weekly.
Note: remove the battery and discharge Regular the Bark Automatic
Control Collar before touching the Contact Points.
Check your dog’s neck for irritation and wash neck weekly.
Re-Thread the Collar (as diagram)
Step
6
Most pets feel uncomfortable at first wearing the collar. Don’t use
any functions until the pet has gotten used to the collar.
We suggest you give the dog Vibration before starting the Static Shock.
After a time of training, the dog will learn that Static Shock Stimulation
will come after Vibration. In this way, the vibration alone can effectively
curb the improper deeds of the pet. The Stimulation only acts as a
menace that might be unnecessary most of the time.
14

16 17
Remote Transmitter will automatically goes into deep sleep status if no action
is detected within 2 minutes. At this time, there will be no LCD display. You
have to press “Mode” button for 5 seconds until the LCD display reappears.
Troubleshooting
My pet does not respond after correct installation Petrainer Rechargeable
and Waterproof Training Collar.
You need to charge the Remote Transmitter and Receiver Collar for 2 hours
individually first.
You ne e d to tu r n on th e R e mo te Tran sm i tt er By ho ld ing t h e mod e b ut ton
fo r 5 s e co nd s .
Check the levels of vibration or static shock.
Make sure the Receiver has enough power to operate.
Restart the Receiver collar by pressing the on/off button.
Test 4 functions (Beep, Light, Vibration and Shock) first before using. See
part “Test” of Operation Guide.
Intensity level has to be more than “0” when pairing. Test launch for vibration
and Static Shock Function.
The Receiver Collar will go into deep sleep if no operation for 5 minutes and
any dog movement will activate the device.
Make sure the Contact Points are placed snugly against your pet's skin.
Trim your pet's fur where the Contact Points touch the neck or switch to
longer Contact Points.
the
If none of the above works, you can try repairing between the Remote Transmitter
and Receiver Collar. (See part “Pairing” of Operation Guide)
Remote Transmitter does not work.
You need to charge the Remote Transmitter for 2 hours when you get product
for the first time.
Check if the Remote Transmitter is on low battery status, the symbol will show
up on the right side of the LCD screen.
You need to hold the Mode button on the Remote Transmitter for 5 seconds
to power it the device on.
Remo te Tran smit ter autom aticall y goes i nto st and by mod e if no ac tion i s
detected within 20 seconds, at this time there will be no LCD display. Press
any bu tton t o re-acti vate t he Rem ote Transm itter.
What do I do If my pet’s neck becomes red and irritated?
Discontinue use of the Petrainer Rechargeable and Waterproof LCD Remote Pet
Training System for a few days. If the condition persists beyond 48 hours, your
veterinarian. Once the skin returns to normal, monitor your pet’s skin condition
closely.
Can I attach a leash to the Receiver Collar?
NO. This can result in pulling the Contact Points too tightly against your pet’s
neck. Use a separate collar placed above the Receiver Collar.
How will I know when to charge the batteries?
For Remote Transmitter: the symbol will show up on the right side of LCD screen.
For Receiver Collar: will her a beep for 20 seconds, indicating the device needs
to be charged.
How long is your lithium battery lifetime?
Ou r L it hi um ba tte ry ca n cha rg e 4 00 ti me s f or r e mo te Co nt rol a nd Re cei ve r
Collar.
How long can I leave Receiver Collar on mydog?
The Collar is not designed to be worn constantly. We recommend the Collar not be
worn for more than 12 hour out of every 24-hour period.
How long should my training sessions be for my pet?
Training sessions should be kept positive and short, it is better for about 10-15
minutes long each session.
Wha t kin d of do gs ar e your Pe tra ine r Rec hargeabl e and Wate rpr oof LCD
Rem ote P et Tra ining Syst em su ita ble f or?
The collar is adjustable from length 5.9”(15cm) to 19.6”(50cm),if your pet’s neck
is smaller than 5.9”, you have to rethread it, if your pet’s neck is larger than 22”,
please don’t buy it: and this Collar is not suitable for the dogs less than 8 pounds
either.

18 19
You have to turn on Receiver Collar again after you're finished charging.
We turned on the receiver collar and it starts to beep for 20 seconds.
Receiver Collar will beep for 20 seconds in low battery status unless it gets
charged. Charge it for 2 hours and the other functions will work after charging
is finished.
The Receiv er Collar is damaged and it doesn't w ork after being k nocked
down.
Our Receiver Collar is designed to not be knocked down, please don't knock
down the device, to avoid breaking structure and circuits.
I want to test Receiver Collar myself, but it does not work.
If you test Receiver Collar by your hand or leg, please touch the 2 electrodes
at the same time, only touching one electrode will not work.
My Receiver Collar works great for some time, but it does not work anymore
after I charged the device.
First, check if charging is successful, when you are charging, red LED light
will be on, after fully charged, the red led light will turn off automatically.
Common size of different dogs
Size Neck
(cm)
Back
Length
(cm)
Type
Mini
Small
Medium
Large
Large
Large
Huge
20-22
20-24
23-28
27-31
30-34
33-37
43-48
47-52
52-62
25-30
29-36
35-42
41-47
46-53
52-59
76-84
88-97
92-100
19
23
28
31
35
40
60
65
70
Chest
Measurement
(cm)
Chihuahua, Yorkshire Temier
Chihuahua, Yorkshire Temier,
Poodle, Pomeranian
Maltese Dog, Shih Tzu
Miniature Schnauzer,
Pekingese
Beagle
Husky
Labrador Retriever
Golden Retriever, Old
English Sheepdog
Schnauzer, English Cocker
Spaniel
This device complies with Part 15 of the FCC Rules. Operation is subject to the
following two conditions:
(1) This device may not cause harmful interference, and (2) this device must
accept any interference received, including interference that may cause undesired
operation.
FCC Notice
NOTE 1: This equipment has been tested and found to comply with the limits for
a Class B digital device, pursuant to part 15 of the FCC Rules. These limits are
designed to provide reasonable protection against harmful interference in a
residential installation. This equipment generates, uses and can radiate radio
frequency energy and, if not installed and used in accordance with the instructions,
may cause harmful interference to radio communications. However, there is no
guarantee that interference will not occur in a particular installation. If this
equipment does cause harmful interference to radio or television reception, which
can be determined by turning the equipment off and on, the user is encouraged
to try to correct the interference by one or more of the following measures:
- Reorient or relocate the receiving antenna.
- Increase the separation between the equipment and receiver.
- Connect the equipment into an outlet on a circuit different from that to which the
receiver is connected.
- Consult the dealer or an experienced radio/TV technician for help.
NOTE 2: Any changes or modifications to this unit not expressly approved by the
party responsible for compliance could void the user's authority to operate the
equipment.
This manual suits for next models
2
Table of contents
Other Petainer Pet Care Product manuals

Petainer
Petainer PET853 User manual

Petainer
Petainer PET851 User manual

Petainer
Petainer IS-PET998DR-B 1 for 2 User manual

Petainer
Petainer IS-PET998DBB User manual

Petainer
Petainer IS-PET998DRU-1 Installation guide

Petainer
Petainer PET910 User manual

Petainer
Petainer IS-PET998DB User manual

Petainer
Petainer PET916N User manual

Petainer
Petainer PET803 User manual

Petainer
Petainer IS-PET998DR-B 1 for 2 User manual