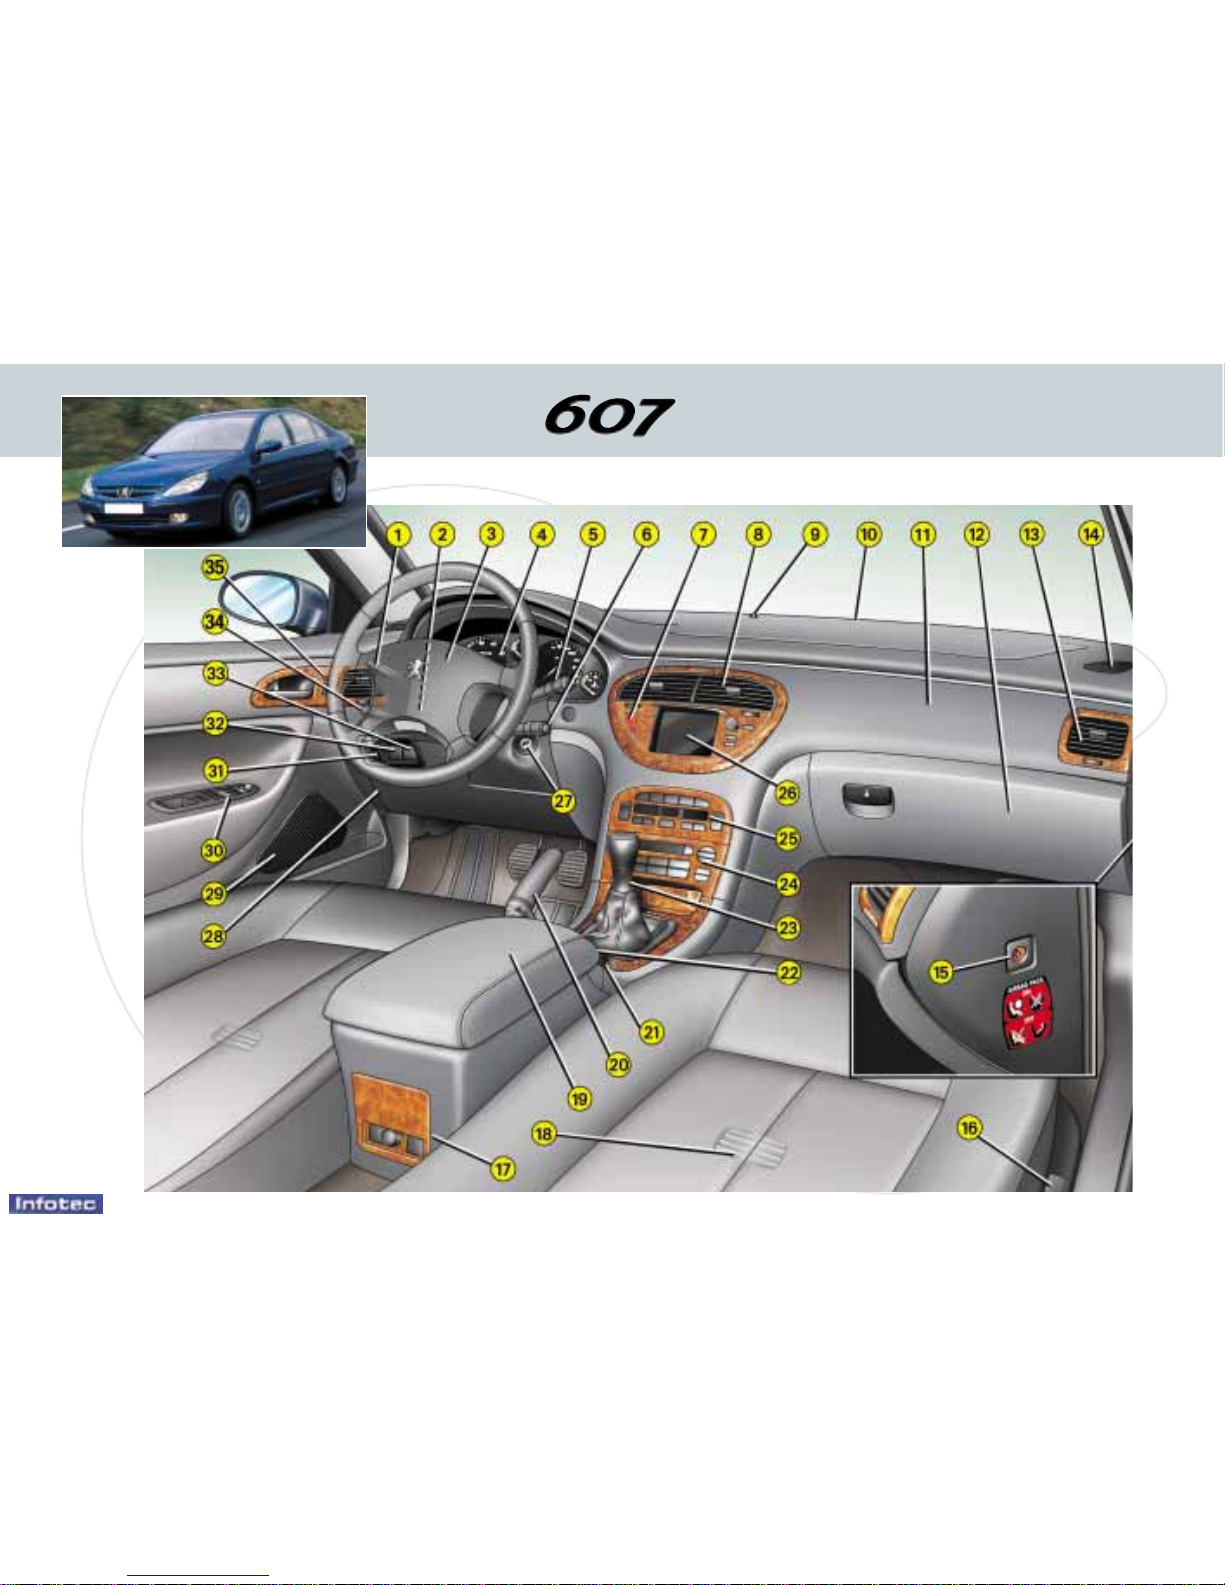
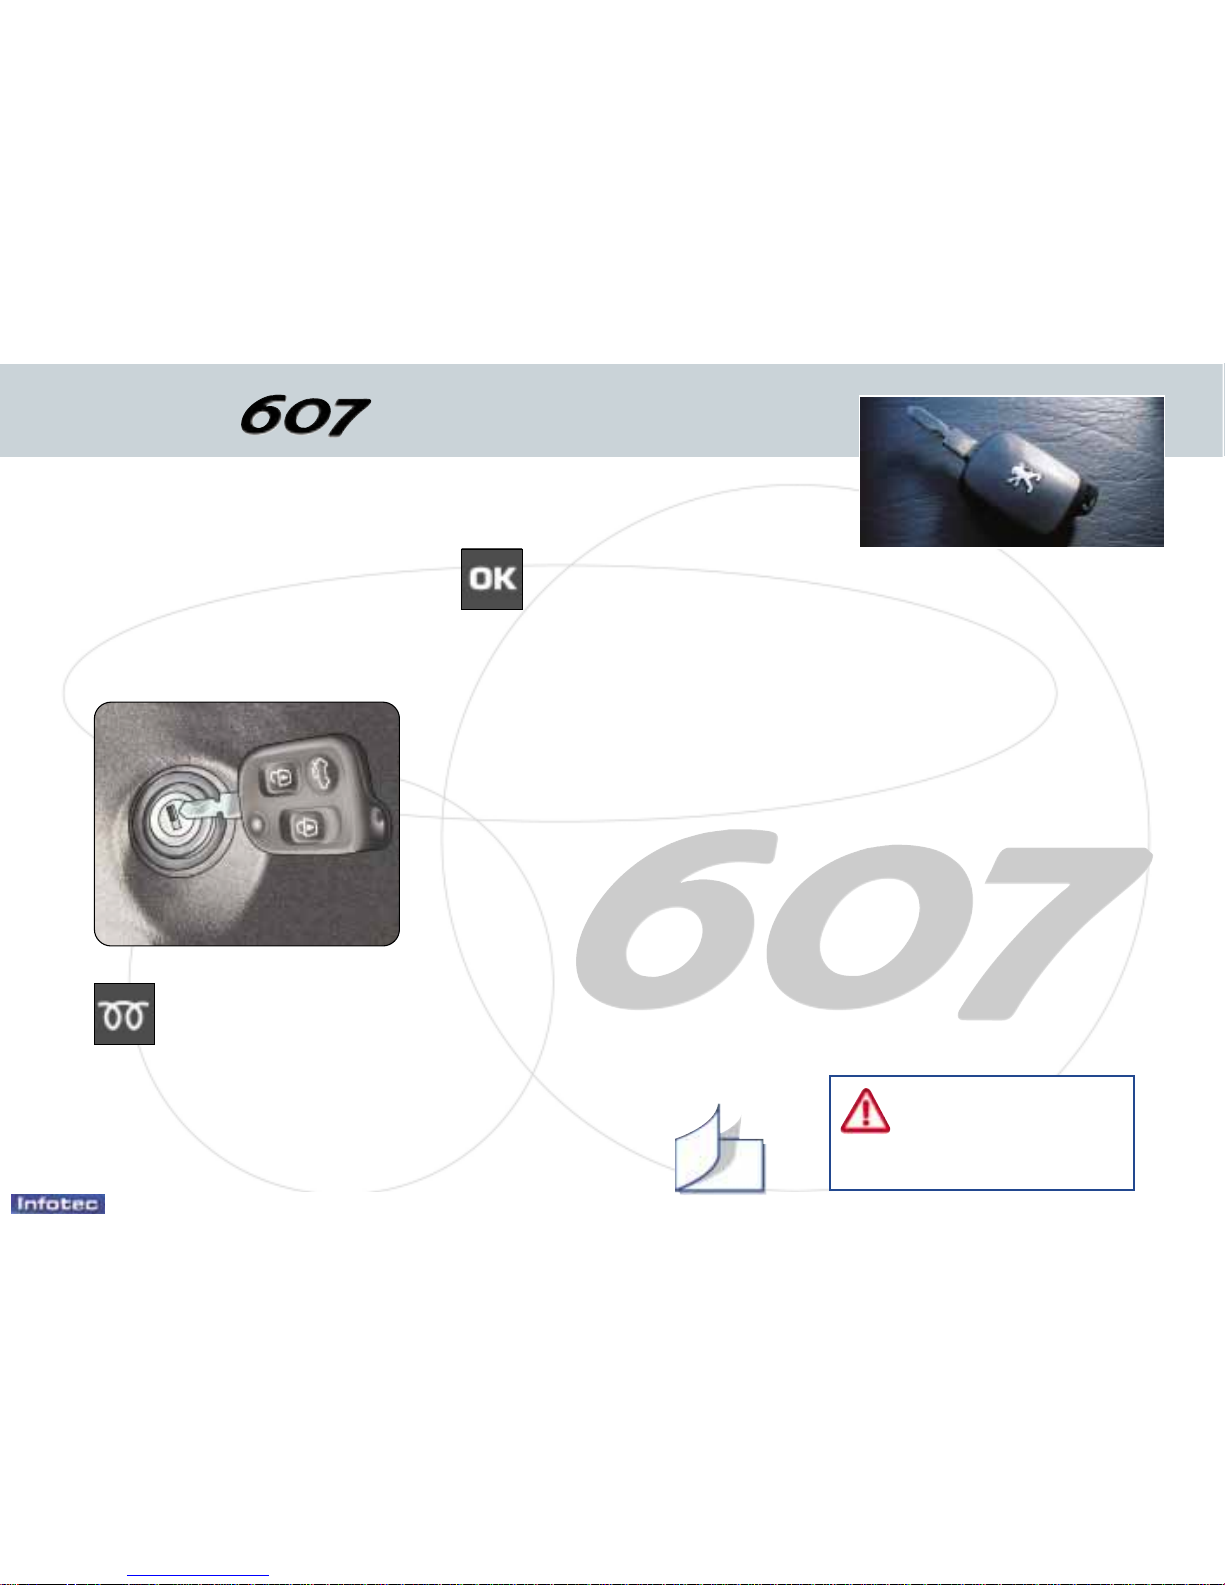
PEUGEOT 607 User manual

15-07-2002
YOUR AT A GLANCE
2

3
YOUR AT A GLANCE
1-Lights and direction indica-
tors stalk.
2-Steering wheel adjustment.
3-Driver's front air bag.
-Horn.
4-Instrument dials.
5-Windscreen wash/wipe
stalk.
-Trip computer stalk.
6-Audio remote control stalk.
7-Hazard warning lights
switch.
8-Central adjustable
heating/ventilation vents and
air flow regulation.
9-Sunshine / brightness
sensor.
10 - Windscreen demisting vents.
11 - Passenger air bag.
12 - Glove compartment.
13 - Side adjustable
heating/ventilation vents and
air flow regulation.
14 - Door window demisting vent.
15 - Passenger airbag disarming
switch.
16 - Front seats heating switch.
17 - Rear ashtray.
-Rear lighter.
-Rear seats heating switch.
18 - Rear footwell heating vent.
19 - Two-position armrest with
compartments.
20 - Handbrake.
21 - Electronically controlled
suspension switch.
-Doors and boot locking
switch.
-Sunroof switch.
-Rear blind switch.
22 - Front ashtray.
-Front lighter.
23 - Gear lever.
24 - RM2 audio system or RT2
audio/telephone system with
PEUGEOT call button.
25 - Heating/ventilation controls.
26 - Multi-function display.
27 - Steering lock and ignition.
28 - Fuse box.
29 - Speakers location.
30 - Electric mirror controls.
-Window controls.
-Rear window locking control.
31 - Headlamp height adjust-
ment.
32 - ESP disarming switch.
33 - Alarm button.
34 - Cruise control.
35 - Memory buttons for:
-Front seat settings
-Electric mirror settings
15-07-2002

15-07-2002
YOUR AT A GLANCE
4
THE REMOTE CONTROL
KEY
From the driver's door, the key
allows you to lock or unlock the
doors, the boot and the fuel filler
flap, as well as to fold back or
open out the exterior mirrors.
The remote control in the key
performs the same function at a
distance.
Locking with the remote
control
☞Press button A.
This is confirmed by fixed lighting
of the direction indicators for
approximately two seconds.
Unlocking with the remote
control key
☞Press button B.
This is confirmed by rapid flash-
ing of the direction indicators.
With the vehicle unlocked, the
boot is opened using the push
button located on the right rear
side, in the 'zero' of the 607
badge.
Opening the boot with the
remote control key
☞Keep button Cpressed.
Key in ignition
If you leave the key in the
ignition, this is indicated by a
buzzer upon opening the driv-
er's door.
Locating the vehicle
To locate your vehicle in a car
park, press button A; the cour-
tesy lights come on and the
direction indicators flash for
approximately twenty seconds.
Driving position memorised
by the remote control key
When locking the doors, the
remote control key memorises
the position of the driver's seat
and the driving mirrors.
Each remote control key mem-
orises a specific setting.
When unlocking the doors, the
driver's seat and the driving mir-
rors assume the position memo-
rised by the remote control key, if
this position has been changed in
the meantime.
Note: do not press the buttons of
your remote control key out of
range of your vehicle as there is
a risk that you could render it
inoperative. It would then be nec-
essary to reprogramme it.
Deadlocking
This renders the internal and
external door locking controls
inoperative and permits the auto-
matic closing of the windows and
the sunroof.
With the key:
☞lock the vehicle and keep the
key in the locked position for
approximately one second.
With the remote control:
☞press button Ato lock the
vehicle (the direction indicator
lights remain on for approxi-
mately two seconds),
☞within five seconds, press but-
ton Aagain to deadlock the
vehicle (the direction indicator
lights remain on for approxi-
mately two seconds).
102

YOUR AT A GLANCE
5
STARTING
STOP position:
The ignition is switched off.
1st notch, Accessories position:
The ignition is switched off but
the accessories still function.
2nd notch, Running position:
The ignition is on.
Starting position:
Operates the starter.
Starting a diesel engine
If the temperature is high
enough, the pre-heat indi-
cator light does not come
on and you can start
immediately.
If the indicator light comes on,
wait for it to go out before operat-
ing the starter.
If the engine stalls, it is neces-
sary to return the key to the
'Stop' position before re-starting.
CHECK (vehicle autotest)
Automatic check
With the ignition on (2nd notch)
If no malfunction has been
detected: In the absence of
vehicle function status indi-
cator lights, the OK light is
displayed after two seconds
on the instrument panel screen.
Otherwise, it will be displayed after
these indicator lights come on.
If a 'minor' malfunction has been
detected: the warning light for the
faulty function is displayed on the
instrument panel screen. Certain
indicator lights showing the status of
vehicle functions may also come on,
followed by the OK indicator light.
If a 'major' malfunction has been
detected: the corresponding warn-
ing light is displayed on the instru-
ment panel screen. Certain indicator
lights showing the status of vehicle
functions may also come on. The
OK indicator light does not come
on. Do not start your vehicle.
Contact a PEUGEOT dealer.
Afterwards, if the passenger airbag
is disarmed, the corresponding
warning light will come on.
With the engine running or if the
vehicle is moving, the instrument
panel screen temporarily displays:
– lights indicating warnings, when
these occur,
– vehicle function sta-
tus indicator lights,
when a change
occurs.
The display of certain indicator
lights is accompanied by an audi-
ble signal and a message on the
multi-function display.
Manual check
☞Press the "CHECK" button on the
instrument panel.
With the ignition key in the accessories
position, with the ignition switched on,
with the engine running or the vehicle
moving, this function informs you at all
times of the following:
– any current warnings,
– the status of functions which it is
possible to switch on or switch off
(windscreen wipers, automatic
switching on of lights, cruise con-
trol, disarming of passenger air
bag, etc.).
The corresponding warning lights are
displayed in succession on the instru-
ment panel screen.
If a warning or a change of status
occurs during the CHECK mode, the
corresponding indicator light(s) will be
displayed at the end of this mode.
31
Never run the engine in
a confined space.
Do not make any modi-
fications to the steering
lock.
15-07-2002

15-07-2002
YOUR AT A GLANCE
6
STEERING WHEEL
STALKS
LIGHTS
Front and rear lights (ring A)
Lights off.
Side lights.
Dipped / main
beam headlamps.
Front and rear fog lamps
(ring B)
Front fog lamps.
Neutral position of the
ring.
Rear fog lamps.
Parking lights
To switch on the parking lights on
the traffic side, with the engine
off, place the direction indicator
lights stalk on the traffic side.
Automatic switching on of lights
This occurs if the light is poor, as well as in cases of continuous operation
of the windscreen wipers, and stops as soon as the light has become
bright enough or the windscreen wipers have stopped.
☞To activate or disarm the function, place the key in the accessories
position (1st notch), place the lights stalk in position 0and press the
end of the stalk for more than two seconds.
Do not cover the sunshine / brightness sensor located in
the centre of the fascia. It helps to regulate the air condi-
tioning, the automatic switching on of the lights and the
automatic adjustment of the instrument panel bright-
ness.
Windsreen wipers
3Rapid wipe
2Normal wipe
1Automatic wipe
0Off
Automatic wipe
In position 1, the wipers operate
automatically and adjust their
speed to the intensity of the rain-
fall.
When the ignition has been
switched off for more than one
minute with the control in a
wipe position, it is necessary
to reactivate this function.
To do this, move the control to
any position, then return to the
required position.
109 111

YOUR AT A GLANCE
7
ELECTRIC WINDOWS
1 - Driver's electric window.
2 - Passenger's electric window.
3 - Rear right electric window.
4 - Rear left electric window.
5 - Disarming the rear window controls.
Manual mode:
☞Press or pull the switch lightly. The window stops as soon as the switch
is released.
Automatic mode:
☞Press or pull the switch firmly.
One touch completely opens or closes the window.
Safety auto-reverse: when the glass rises and meets an
obstacle, it stops and lowers again.
ELECTRIC REAR VIEW MIRRORS
☞Turn knob 6to the right or to the left to select the corresponding mirror.
☞Move the knob in all four directions to adjust.
When parked, the mirrors can be folded back manually,
electrically by means of button 6or automatically on locking
the vehicle.
STEERING WHEEL
HEIGHT AND DEPTH
ADJUSTMENT
☞Pull handle Adownwards to
unlock the steering wheel.
☞Adjust the height and depth of
the steering wheel.
☞Lock by pushing handle Afully
upwards.
116
117 119
15-07-2002

15-07-2002
YOUR AT A GLANCE
8
THE SEATS
Manual front seats
1 - Forwards-backwards adjustment.
2 - Seat angle adjustment*.
3 - Seat height adjustment*.
4 - Seat back angle adjustment.
5 - Lumbar adjustment*.
6 - Head restraint height and tilt adjust-
ment (press the tab to slide it down).
* Driver's seat only.
Electric front seats
A-Forwards-backwards adjust-
ment.
B- Seat angle adjustment.
C- Seat height adjustment
D- Seat back angle adjustment.
E- Lumbar adjustment.
F- Head restraint height adjust-
ment.
M - Memorises settings.
☞Switch on the ignition and
adjust the seat and the mirrors.
☞Press button 'M' then within
4 seconds either button '1' for
the first position, or button '2'
for the second
position.
1 - Recalls the first
position.
2 - Recalls the
second position.
94
93

YOUR AT A GLANCE
9
REAR PARKING
ASSISTANCE
This system, installed in the rear
bumper, detects any obstacle (per-
son, vehicle, tree, gate, kerb...)
located behind the vehicle.
To activate
With the engine running, the sys-
tem is activated as soon as
reverse gear is engaged; a bleep
sounds to inform you that it is
active.
The proximity information is
given by an audible signal, con-
sisting of bleeps which become
more and more rapid as the vehi-
cle approaches the obstacle.
When the distance between the
rear of the vehicle and the obsta-
cle is less than approximately
twenty-five centimetres, the
signal becomes con-
tinuous.
☞The system ceas-
es to be active
when you change
to neutral.
TYRE UNDER-INFLATION
DETECTION
Sensors check the tyre pressure
during driving, and trigger a warn-
ing if there is a malfunction (speed
greater than 15 mph (25 km/h).
Tyre under-inflation
When this warning light
comes on, accompanied
by a bleep and the mes-
sage 'Tyre(s) pressure
low', have the tyre pressure
checked as soon as possible.
Puncture
Display of this warning
light, accompanied by an
audible signal and the
message 'Punctured
tyre(s) detected', is fol-
lowed by illumination of the
STOP warning light.
Stop immediately, avoiding all
abrupt manoeuvres with the
steering wheel and the brakes.
Change the damaged (punctured
or very under-inflated) wheel and
have the tyre pressure checked
as soon as possible.
Note: if the damaged wheel is
stored temporarily in the boot, it
will again send this message as a
reminder of the necessity of hav-
ing it repaired. This will prevent a
similar warning being displayed.
Sensor(s) not detected
Display of this warning
light, accompanied by an
audible signal and the
message 'X tyre pres-
sure sensor(s) missing', indi-
cates that one or more wheels
are not being detected.
Contact a PEUGEOT dealer to
replace the faulty sensor(s).
Warning: this message is dis-
played when one of the wheels is
at a distance from the vehicle
(being repaired) or when a wheel
without a sensor is fitted (winter
fitting).
This system does not eliminate
the need to check the tyre
pressure regularly.
129 140
15-07-2002

15-07-2002
YOUR AT A GLANCE
10
AUTOMATIC GEARBOX
'PORSCHE TIPTRONIC system'
The four speed automatic gearbox offers a choice between the comfort
of integral automatic operation, enhanced by a sport programme and
a snow programme, or the pleasure of manual gear changing.
Gear selection gate
☞Move the lever in the gate to select one of the functions.
Once the function is selected, the indicator light for that function is dis-
played on the instrument panel screen.
S: sport programme.
: snow programme.
Park: to immobilise the vehicle and to start the
engine, with the handbrake on or off.
Reverse: to engage reverse; select this function
with the vehicle stationary and the engine at idle.
Neutral: to start the engine and to park, with the
handbrake on.
Note: if position Nis engaged by mistake while
the car is moving, allow the engine to return to
idling speed before engaging function Dto accel-
erate.
Drive: for automatic gear changing.
Manual: for manual gear changing.
To change the four gears manually:
☞Push the lever to the +symbol to change up to
the next gear and pull it towards the -symbol to
change down a gear.
Note: the S (sport) and (snow) programmes do
not operate in manual mode.
Moving Off
With the engine running, to move
off from position P:
☞it is essential to press the
brake pedal to exit position P,
☞select function R, Dor M, then
gradually release the pressure
on the brake pedal; the vehi-
cle will move off immediately.
You can also move off from posi-
tion N:
☞release the handbrake, with
your foot on the brake,
☞select function R, Dor M, then
gradually release the pressure
on the brake pedal; the vehi-
cle will move off immediately.
WARNING
When the engine is idling with
the brakes not applied, if function
R, Dor M is selected, the vehicle
moves without the accelerator
being pressed.
For this reason, do not leave
children unsupervised inside
the vehicle, with the engine
running.
When maintenance operations
have to be carried out with the
engine running, apply the hand-
brake and select position P.
123

CRUISE CONTROL
Cruise control enables the vehi-
cle to maintain a steady speed
programmed by the driver, with-
out the accelerator being
pressed.
In order for it to be memorised,
the speed of the vehicle must be
greater than 25mph (40km/h) or
40mph (60km/h) depending on
engine.
Operation
☞Place the ring of stalk
Ain the ON position.
The indicator light
comes on, accompa-
nied by an audible
signal.
FRONT AIR BAGS
Disarming the passenger
air bag*
☞
with the ignition off, insert the
key into slot 1and turn it:
– to the 'ON' position, the pas-
senger air bag is armed,
– to the 'OFF' position, the pas-
senger air bag is disarmed.
Operating check
When the passenger air
bag is disarmed, the
warning light comes on
when the ignition is
switched on (2nd notch),
accompanied by an audible sig-
nal and the message 'Passenger
air bag disarmed'.
Front air bag faulty
If this warning light
comes on, accompanied
by an audible signal and
the message 'Air bag
faulty', contact a
PEUGEOT dealer to have the
system checked.
Passenger air bag
precautions
☞
Disarm the
air bag if
you install
a rear-
facing child
seat.
☞
Arm the air
bag for an
adult pas-
senger.
Never place your feet or any
object on the fascia.
*According to country
YOUR AT A GLANCE
11
128 130
15-07-2002

15-07-2002
No. Symbol Function
1Air conditioning
on/off.
2Front visibility
programme.
3Air intake
control.
4Rear screen
demisting.
5Switching
off.
6Passenger
setting
7Passenger comfort
programme.
8Passenger
air distribution
setting.
9Air flow
adjustment.
10 Driver
air distribution
setting.
11 Driver comfort
programme.
12 Driver
setting.
12
YOUR AT A GLANCE
AUTOMATIC AIR CONDITIONING
Do not cover the sunshine / brightness sensor located
in the centre of the fascia.
It helps to regulate the air conditioning, automatic
switching on of the lights and the automatic adjust-
ment of the instrument panel brightness.
90

13
YOUR AT A GLANCE
RM2 AUDIO SYSTEM
RT2 AUDIO/TELEPHONE SYSTEM
48
50
15-07-2002

15-07-2002
14
FUEL FILLER FLAP
Opening / Closing:
Locking and unlocking of the fuel filler
flap, the doors and boot is simultane-
ous (except when selective unlocking
is initialised; in this case press the
unlocking button of the remote control
once).
FILLING WITH FUEL
This must be carried out with the engine and the ignition switched
off.
A hook is provided inside the fuel filler flap to hold the filler cap.
A label affixed to the inside of the fuel filler flap informs you which fuels
are authorised or prohibited.
The tank capacity is approximately 80 litres.
When the minimum level of the tank is reached, this light comes
on, accompanied by an audible signal and the message 'Fuel
level low' on the multi-function display.
You have enough fuel to drive approximately
30 miles (50 km).
OPENING THE BONNET
From inside:
☞pull the handle downwards.
From outside:
☞lift the catch and
raise the bonnet.
YOUR AT A GLANCE
108 108

15-07-2002
PEUGEOT SERVICING
The maintenance cycle of your 607 is based on level A (including the replacement of the engine oil, the oil filter and a
set of checks) and level C services [service level A + workshop operations carried out every 40,000 miles (60 000 km)] in
accordance with the tables on the following pages.
So that the driving conditions and your style of driving may be taken into account, your 607 is fitted with a service indica-
tor which programmes the intervals for the level A service:
• every 20,000 miles (30 000 km) maximum or 2 years for petrol engines,
• every 12,000 miles (20 000 km) maximum or 2 years for direct injection diesel engines.
The frequency of level A services specific to your vehicle will be determined by three elements:
• the number of engine revolutions,
• the engine oil temperature,
• prolonged periods of the vehicle not being used.
Depending on these elements, the service indicator will suggest a time which is more or less the same as the initial plan.
Depending on the conditions of use, one or more level A services can be carried out between two level C services.
Depending on the mileage recorded, your dealer may offer to carry out the level C service to avoid the visits being too close
together.
PEUGEOT SERVICING
18

15-07-2002
The extension of the service intervals means that the engine oil level must be checked regularly: topping up of the
oil between two oil changes is normal.
It is for this reason that your PEUGEOT dealer will invite you to an intermediate visit between services. The date of
this visit is not shown by the service indicator.
It is to be carried out between two services.
A Peugeot professional will carry out a quick check and will top up the levels if necessary (oil, coolant, screen wash up to
2 litres).
If the oil level is too low, there is a risk of significant damage to the engine: check the engine oil level at least every
3,000 miles (5 000 km).
This maintenance frequency is the result of developments to our vehicles and to the lubricants:
THUS IT IS ESSENTIAL THAT YOU ONLY USE ENGINE LUBRICANTS THAT ARE APPROVED AND RECOMMENDED
BY THE MANUFACTURER (see pages on 'Lubricants').
PEUGEOT SERVICING 1919

15-07-2002
PEUGEOT SERVICING
20
A few seconds after the ignition is
switched on, the total distance
recorder resumes normal operation
and the display shows the total and
trip distances.
The distance remaining before the
next service is less than 1,000 km.
A few seconds after the ignition is
switched on, the distance recorder
resumes normal operation and the
spanner remains lit. This indicates
that a service should be carried out
shortly.
SERVICE INDICATOR
Located on the instrument panel with
the total distance recorder (total and
trip distances), this programmes
drain/refill intervals depending on the
use of the vehicle.
Operation
A few moments after the ignition has
been switched on, the spanner sym-
bolising services lights up; the dis-
play for the total distance recorder
tells you (in round figures) the dis-
tance remaining before your next
service.
Example: 4,800 km remain before
the next service is due. When the
ignition is switched on and for a few
seconds, the display shows:
The service is overdue.
Each time the ignition is switched on
and for a few seconds, the symbol
and the excess distance flash.
Note: with the engine running the
symbol flashes until the service has
been carried out

15-07-2002
MAINTENANCE OF PARTS SUBJECT TO WEAR AND A CHECK OF CONSUMABLES
Certain essential components on your vehicle are subject to checks at specific
frequencies.
•The brake fluid is to be replaced at a maximum of every 36,000/40,000 miles
(60 000km) or every two years.
•The pollen filter must be checked at each service by a PEUGEOT dealer
(services and intermediate visits) or more often, depending on the environ-
ment (dust, pollution, etc.).
•For HDI turbo diesel engines with particulate emission filter, maintenance
of the filter and topping up of the additive reservoir must be carried out
every 48,000 miles (80 000 km) by a PEUGEOT dealer.
•Replacement of the timing belt : contact a PEUGEOT dealer.
• Air bags and pretensioning parts on seat belts must be checked every
10 years by a PEUGEOT dealer.
• Tyre pressure sensors are to be replaced every 10 years.
•The check on tyre inflation presure must be carried out cold at least once a
month.
PEUGEOT SERVICING 21
Zero re-set
Your PEUGEOT dealer carries out
this operation after each service.
However, if you carry out the service
yourself, the re-set procedure is as
follows:
☞Switch off the ignition,
☞
Press and hold the trip recorder re-
set button,
☞Switch on the ignition.
The display begins a countdown.
When the display shows 0, release
the button; the service symbol disap-
pears.
Important: after this operation, if you
wish to disconnect the battery, lock
the vehicle and wait for at least five
minutes, otherwise the zero re-set
will not be registered.

15-07-2002
PEUGEOT SERVICING
22
THE SERVICE LEVELS
Each vehicle has its own servicing cycle, defined by the manufacturer in terms of its technical specification.
This cycle consists of alternating 2 types of service A and C, intermediate visits and a few additional operations specific to
your vehicle; these correspond to key stages in the life of your 607.
At your first and each subsequent service, your dealer will advise you of the type and content of the next service
due.
Intermediate top-up
visit.
MAINTENANCE CYCLE FOR YOUR PETROL ENGINE 607
2 litre 16 V and 2.2 litre 16V petrol engines : service every 2 years or 20,000 miles (30 000 km) maximum (unless the
service indicator shows it is required before this)
1st service at 6,000 miles
(10 000 km) or 6 months*.
This is necessary in order to
benefit from the warranty.
MILES (KM) 40,000 (60 000) 80,000 (120 000) 120,000 (180 000)
24V V6 petrol injection engine: service every 2 years or 20,000 miles (30 000 km) maximum (unless the service indi-
cator shows it is required before this)
1st service at 6,000 miles
(10 000 km) or 6 months*.
This is necessary in order to
benefit from the warranty.
MILES (KM) 40,000 (60 000) 80,000 (120 000) 120,000 (180 000)
Automatic gearbox oil level every 40,000 miles (60 000 km).
Replacement of brake fluid every 2 years or 40,000 miles (60 000 km).
These fixed operations are carried out with synthetically based oil. Fuel economy oil
or synthetic oil may also be used (except for the 2.2 litre 16 V petrol engine).
+ replacement of air filter
+ replacement of
fuel filter
+ replacement of air filter
+ replacement of
fuel filter
* Whichever comes first.

15-07-2002
PEUGEOT SERVICING 23
Intermediate top-up
visit.
MAINTENANCE CYCLE FOR YOUR 607 TURBO DIESEL HDI
Turbo diesel HDI: service every 2 years or 12,000 miles (20 000 km) maximum (unless the service indicator shows it is
required before this).
1st service
at 6,000 miles (10 000 km)
or 6 months*.
This is necessary in
order to benefit from
the warranty.
MILES (KM) 36,000 (60 000)
72,000 (120 000) 108,000 (180 000)
+ maintenance of particu-
late emission filter at
48,000 miles (80 000 km)
+ maintenance of
particulate emission filter at
96,000 miles
(160 000 km)
Automatic gearbox oil every 36,000 miles (60 000 km).
Replacement of brake fluid every 2 years or 36,000 miles (60 000 km).
These fixed operations are carried out:
– with synthetically based oil, Fuel Economy oil or synthetic oil;
– with 5W 40 oil for Turbo Diesel HDI engines fitted with a particulate emission filter.
* Whichever comes first.

15-07-2002
ARDUOUS CONDITIONS OF USE
• Continuous door-to-door use.
• Town use (e.g. taxi).
• Repeated short journeys, with the engine cold at low temperatures.
• A prolonged stay under the following conditions:
– countries with temperatures often above +30 °C,
– countries with temperatures often below –15 °C,
– countries with a dusty atmosphere,
– countries whose lubricants or fuels do not conform to our recommendations.
Recommendations:
– replace the air filter every 24,000 miles (40 000 km) for petrol engines and every 27,000 miles (45 000 km) for diesel
engines,
– to replace the timing belt: contact a PEUGEOT dealer.
PEUGEOT SERVICING
24
This manual suits for next models
1
Table of contents
Other PEUGEOT Automobile manuals

PEUGEOT
PEUGEOT RCZ User manual

PEUGEOT
PEUGEOT 4008 Setup guide

PEUGEOT
PEUGEOT 406 Coupe User manual

PEUGEOT
PEUGEOT 504 User manual

PEUGEOT
PEUGEOT 2008 User manual

PEUGEOT
PEUGEOT RCZ User manual

PEUGEOT
PEUGEOT 308 User manual

PEUGEOT
PEUGEOT 207 Spider Owner's manual

PEUGEOT
PEUGEOT Expert Tepee User manual

PEUGEOT
PEUGEOT 207 Spider User manual

PEUGEOT
PEUGEOT 308 User manual

PEUGEOT
PEUGEOT Expert User manual

PEUGEOT
PEUGEOT 206 CC User manual

PEUGEOT
PEUGEOT 807 User manual

PEUGEOT
PEUGEOT 3008 User manual

PEUGEOT
PEUGEOT 308 User manual

PEUGEOT
PEUGEOT Boxer User manual

PEUGEOT
PEUGEOT 807 User manual

PEUGEOT
PEUGEOT 3008 2024 User manual

PEUGEOT
PEUGEOT 208 T16 User manual