Pevino EVO PE46S User manual

- 1 -
WINE COOLER
USER MANUAL
Model:
PeVino EVO PE46S
PeVino EVO PE46D
PeVino EVO PE22S
(Dansk version – Side 13)
WWW.PEVINO.COM

- 2 -
THANK YOU FOR PURCHASING A PEVINO WINE COOLER.
BEFORE USE, PLEASE READ AND FOLLOW ALL SAFETY RULES AND
OPERATING INSTRUCTIONS.
WARNING!
IMPORTANT SAFETY INSTRUCTIONS
READ ALL INSTRUCTIONS BEFORE USING THE WINE COOLER.
• DANGER / WARNING •
• Risk of child entrapment! Discarded or abandoned appliances are dangerous. Even if
they will “just sit in the garage a few days”.
• Before discarding your old wine cooler: remove the door completely.
• Never allow children to operate, play with, or crawl inside the appliance.
• Never clean appliance with flammable fluids. The fumes can create a fire hazard or
explosion.
• Do not store or use any other flammable liquids in the vicinity of this or any other
appliance. The fumes can create a fire hazard or explosion.
- KEEP THESE INSTRUCTIONS FOR ANY FUTURE USE -
~
WARNING
~
To reduce the risk of fire, electrical shock, or
injury when using your appliance, follow these
basic precautions.
To prevent damaging the door gasket, make sure to have the door all the way opened
when pulling shelves out of the rail compartment.
The appliance must be positioned so that the plug is accessible. Release the electric cord.
Move your cabinet to its final location. Do not move your cabinet while loaded with wine.
If the power cord is damaged, it must be replaced by the manufacturer’s service agent or
a similarly qualified person in order to avoid a hazard.
This wine cooler is only for storage of wine.

- 3 -
Before using your wine cooler
• Remove the exterior and interior packaging.
• Before connecting the wine cooler to power source, let it stand upright for
approximately 6 hours. This will reduce risk of a malfunction in the cooling system
from handling during transportation.
• Clean interior surface with lukewarm water by using a soft cloth.
• When replacing the illuminating lamp, please select a lamp similar to the original.
Shut off the power supply before replacing the lamp.
Installation of your wine cooler
• Place your wine cooler on a surface strong enough to support it when fully loaded.
Level your wine cooler by adjusting the levelling legs at the bottom front of the wine
cooler.
• Place the wine cooler away from direct sunlight and sources of heat (stove, heater,
radiator, etc.). Direct sunlight may affect the acrylic coating and heat sources may
increase energy consumption.
• Extreme cold ambient temperatures may also cause the unit not to perform properly.
• Avoid locating the unit in moist areas.
• Plug the wine cooler into a properly installed wall outlet. Any questions concerning
power should be directed toward a certified electrician or an authorized products
service center.
Pay attention to this
• Store wine in sealed bottles.
• Do not overload the wine cooler.
• Do not open door unless needed.
• Do not cover shelves with aluminium foil or any other material that may prevent air
circulation.
• Should the wine cooler be stored unused for a longer period of time, it is advised,
after a good cleaning, to leave the door ajar to allow air to circulate inside the cabinet
in order to avoid possible formation of condensation, mold or odours.
• The carbon filter should be cleaned and dried at least once a year.

- 4 -
REVERSING THE DOOR OPENING OF YOUR WINE COOLER
The door of this appliance can be opened from either left or right side. The unit is delivered
to you with the door opening from left side (right-hinged).
Pevino recommend that reversing the door is done by a professional.
If you wish to reverse the door by yourself, please follow these instructions.
Notice: All parts being removed during this process is to be reused (except the top bracket)
(1) Remove the plastic plugs and keep them. They are to be reused on the other side.
(There are spare plugs in the supplied bag.)
(2) Remove the screws from the top hinge and lift the door from the bottom hinge. (carefully
put the door on a cloth to avoid scratching the glass).
(3) Remove the screw from the lower hinge and bring it to the opposite side.
(4) Now mount the door on the opposite side, using the EXTRA supplied bracket.
(5) After mounting the door, the top bracket must be adjusted back and forth in its clearance
to fit the door. The door must sit perfectly in level and flush with the cabinet. There must
be the same space in the top, bottom and sides.
(6) If the door's rubber gasket is not fitted tightly to the cabinet all around, the entire rubber
gasket can be completely removed, turned over and put back again.
(7) In rare cases, the rubber gasket may be so rigid that it needs to be massaged a little in
order to fit. Massage the rubber gasket outward while gently pulling the rubber gasket a
few millimetres. A hair dryer can be used to soften the rubber for increased flexibility.

- 5 -
ADJUSTMENT OF WINE CABINET FEET
NOTICE!
The wine cooler must be perfectly plumb and level.

- 6 -
ACTIVATED CARBON FILTER
1. Appearance:
2. Function:
This item is intended for cleaning the air and getting rid of odours inside the
cabinet.
3. Maintenance:
Take it out of the cabinet in every three months and expose it to the sun for a
few hours before putting it back. It can be used repeatedly.
4. How to place it:
The filter can be put on any position between two shelves.

- 7 -
STRUCTURE AND FUNCTIONS
1. Door hinge
2. LCD - Control panel
3. LED - light
4. Shelf for wine storage
5. Door frame
6. Safety lock
7. Supporting feet

- 8 -
OPERATING INSTRUCTIONS
You are recommended to place the cabinet in a dry space with a surrounding temperature
ranging from 0-35°C
!
(32-95°F). Please notice that the working conditions of the wine cooler
is affected by surrounding room temperatures and ventilation conditions around the cabinet.
Recommended temperature inside the wine cooler: All types of wine are best stored at 12-
16°C (53-61°F).
CONTROL PANEL FOR SINGLE ZONE WINE COOLER:
POWER: Turn on or off the whole cooling system.
°C/°F: Switch from Fahrenheit to Celsius and vice versa.
CHAMBER: Indicates the measured temperature in the cabinet (0-37°C)
▲/▼: Increase or decrease of temperature setting.
SET CHAMBER: Shows the select temperature from 5-22°C (40-72°F).
When the temperature has been selected, the digit will flash.
RUN: Indicator of power supply.
: Turn on or off the light.
COLOUR: Change of colour of LED lighting.
STRENGTH: LED lighting intensity control.
The cooling system will keep on refrigerating until set temperature is reached. The system
will work around the pre-set temperature within a range of ± 2°C.
Under circumstances such as power stop or cutting off in the process of normal operation,
the last set temperature is automatically memorized by the system.

- 9 -
Control requirement for cooling circulation system:
When cooling system inside the cabinet meet the setting of the temperature, the
compressor will stop working. When temperature inside the cabinet rises up to the level
which requires compressor to start, it will enter the process of re-starting. ≥ 5 minutes is
required each time for stopping of the compressor. If operating the button POWER to
control cooling system of the whole cabinet, a 5 minutes delay as protection is required to
re-start the compressor.
CONTROL PANEL FOR DUAL ZONE WINE COOLER:
Dual-zone temperature control system is characterized by dividing the cabinet into two
temperature-controlled compartments (upper chamber and lower chamber).
POWER: Turn on or off the whole cooling system.
°C/°F: Switch from Fahrenheit to Celsius and vice versa.
SET + LOWER CHAMBER:
Button and display for setting temperature in the lower chamber.
LCD-display show the select temperature from 12-22°C (54-72°F).
When the temperature has been selected, the digit will flash.
SET + UPPER CHAMBER:
Button and display for setting temperature in the upper chamber.
LCD-display show the select temperature from 5- 12°C (40-54°F).
When the temperature has been selected, the digit will flash.
RUN: Indicator of power supply.
: Turn on or off the light.
COLOUR: Change of colour of LED lighting.
STRENGTH: LED lighting intensity control.

- 10 -
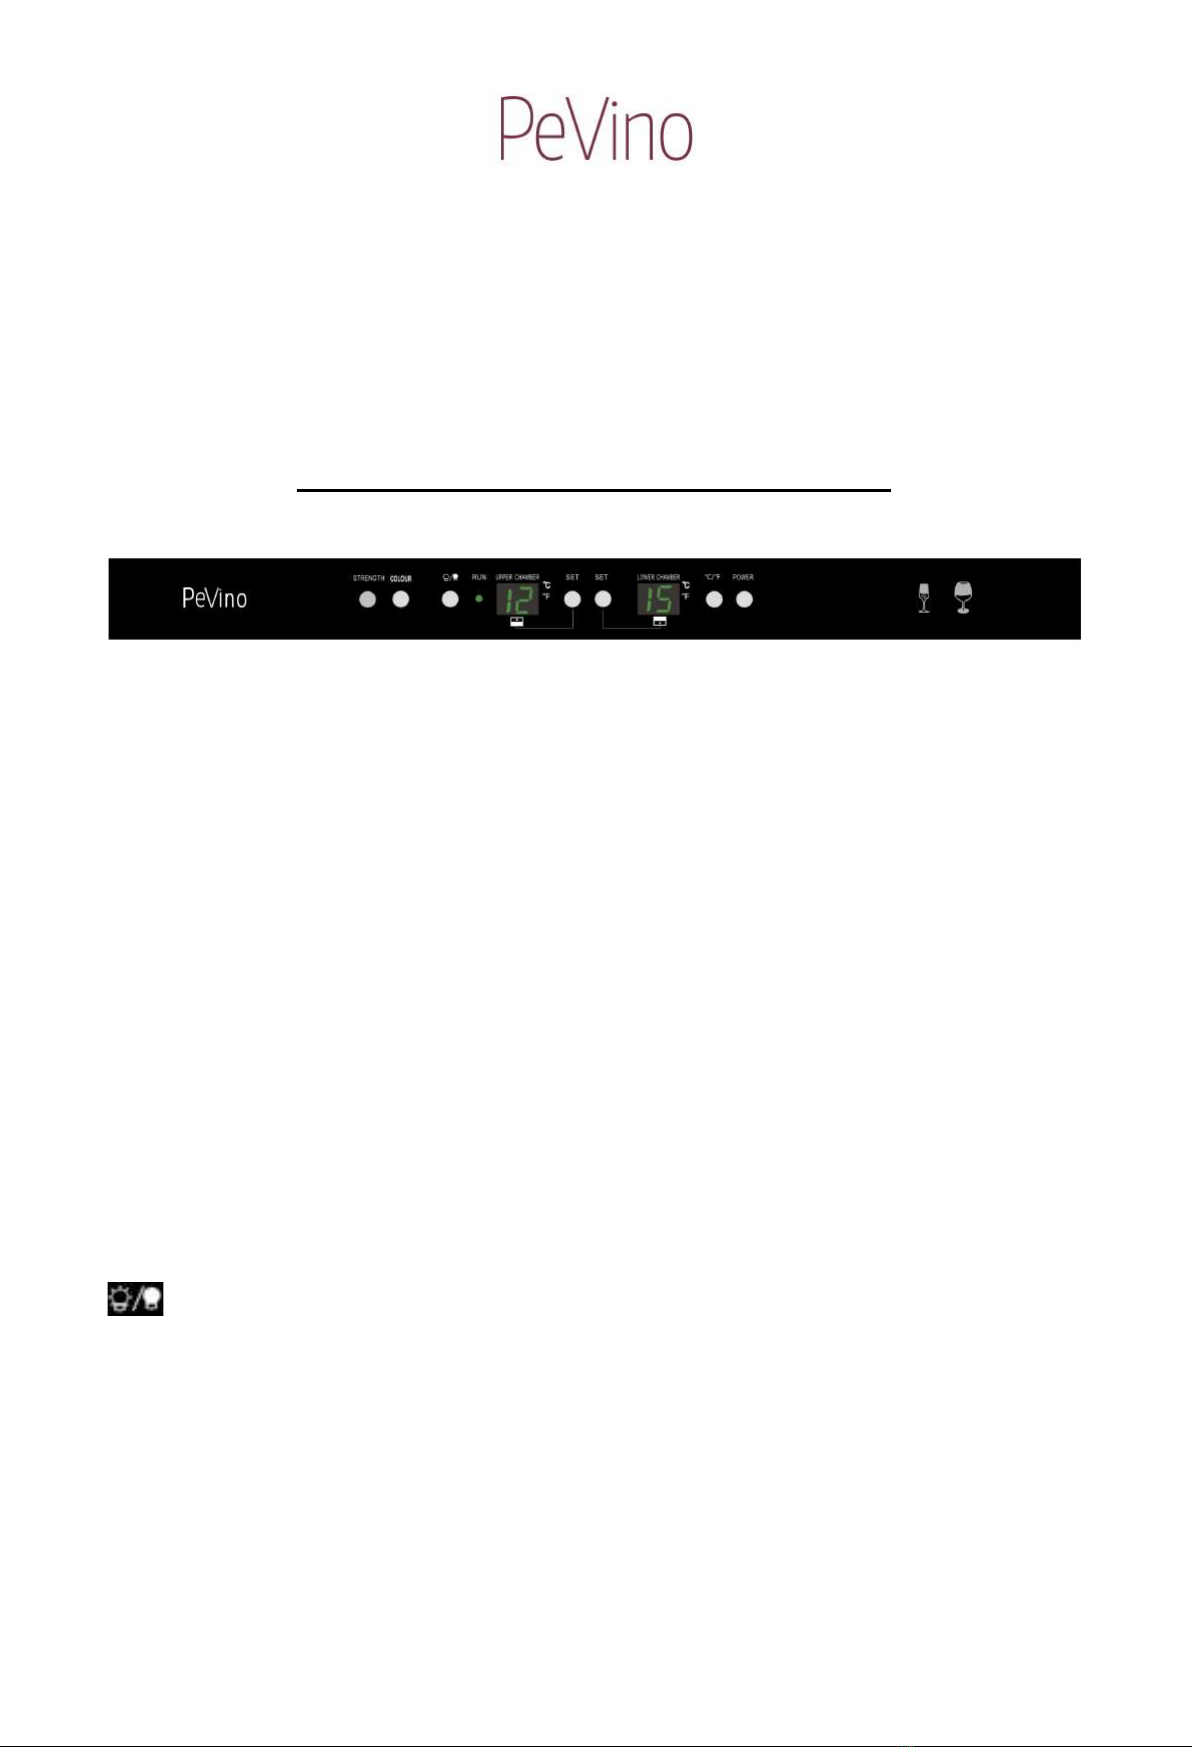
NOTICE: It is strongly advised to maintain a difference of 7-8°C between the two
temperature zones in order to allow the temperature sensors to operate properly.
After the wine cooler is plugged in, the temperature will be set automatically as 5°C (40°F)
for upper chamber and 12°C (54°F) for lower chamber.
The last set temperature will be memorized automatically by the system in the process of
normal operation in the event of power supply cutting.
After set temperature is locked, it will flash for 3 seconds, indicating the actual temperature
inside the cabinet. Afterwards, temperature inside the cabinet will reach the set
temperature, fluctuating around ± 2°C of set temperature which is regarded as normal.
Alarm system:
When faults of cooling system occur and temperature inside the cabinet elevates to ≥ 30°C
(86°F) for more than 2 hours, the alarm system will start, the cooling system will be
automatically shut off with the buzzer buzzing intermittently.
INSTALLATION INSTRUCTIONS
Notes before installation.
• Remove all the packing materials inside and outside the wine cooler.
• The wine cooler must stand upright in a vertical position for at least 6 hours prior to
power connection, in order to avoid and prevent harm to the cooling system.
• Clean the exterior of the cabinet with soft cloth soaked in warm water.
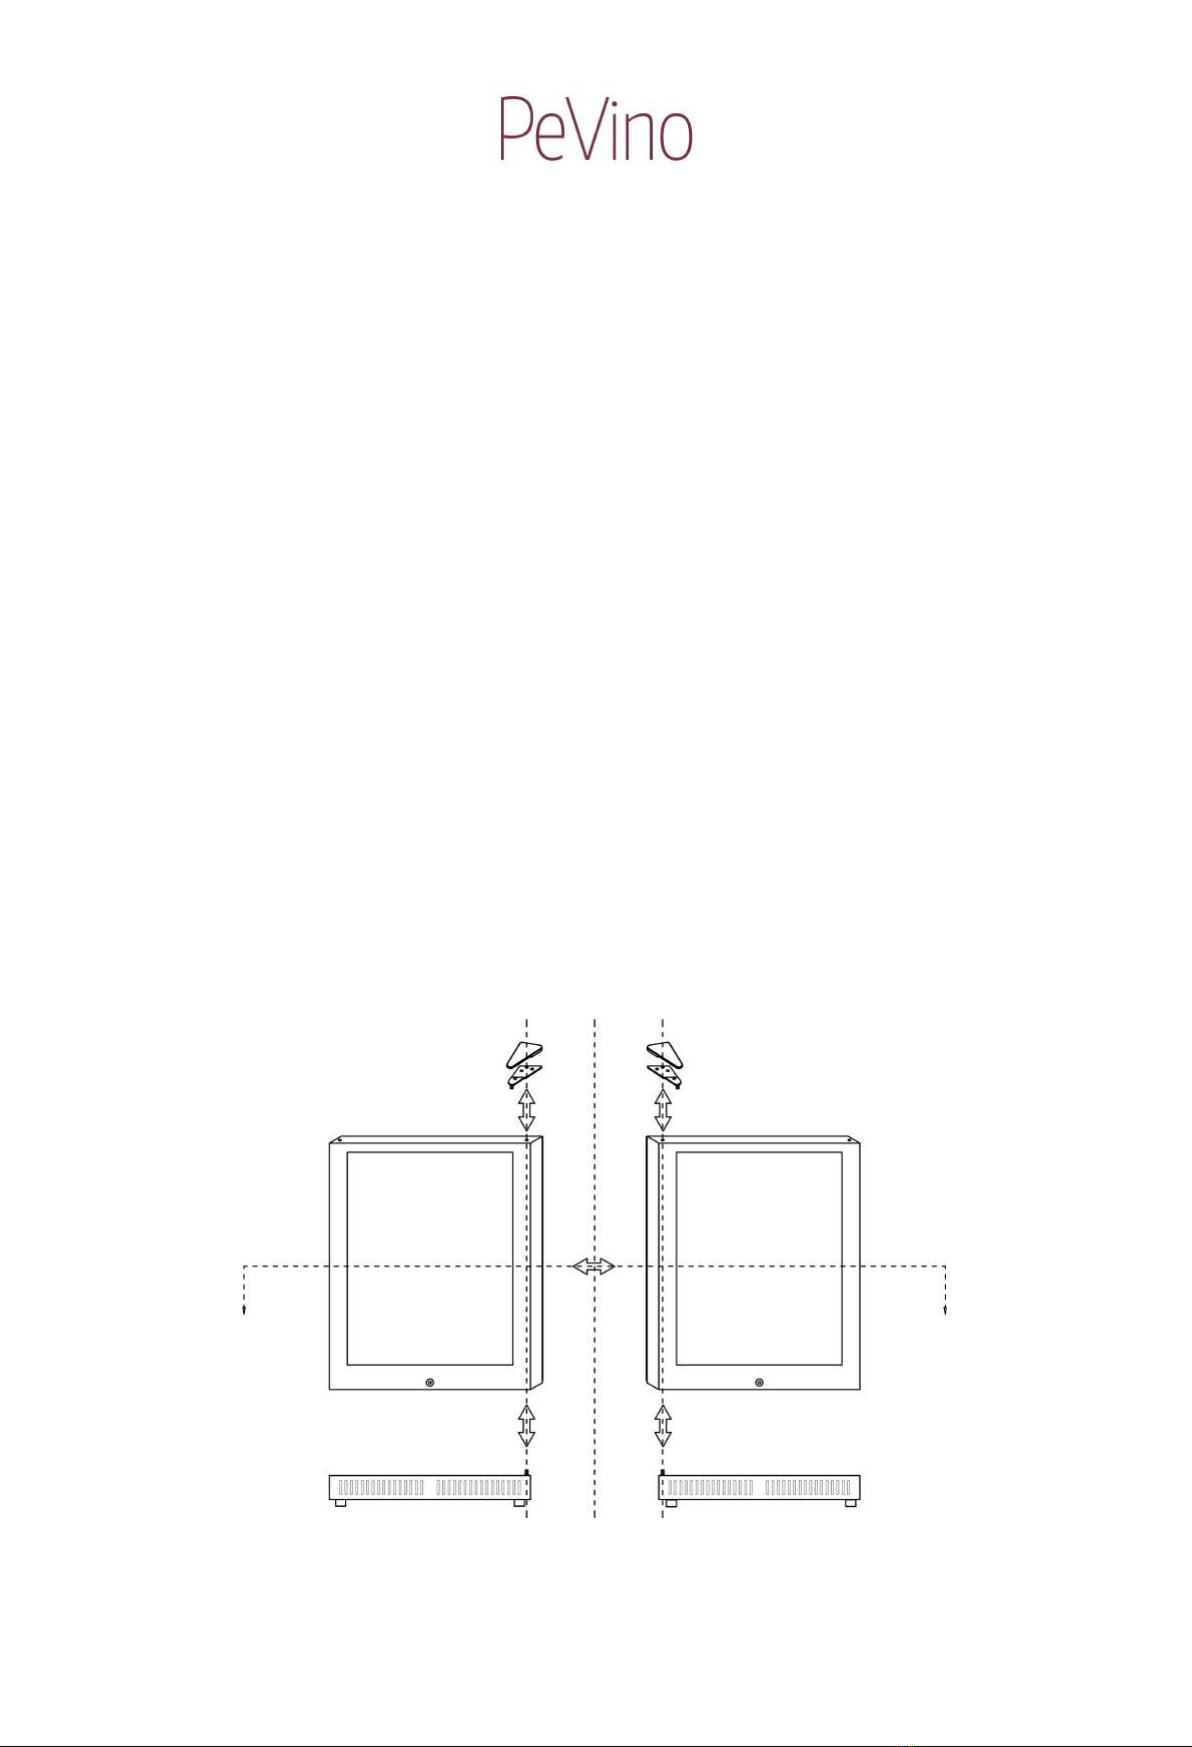
Attention points for installation.
• This wine cooler is designed for free-standing or as built-in.
• Please place the wine cooler on a solid ground suitable to support full load of wines.
• Adjust the two supporting feet on the front of the wine cooler to make the cabinet at
perfect plumb and level.
• Please do not place your cabinet close to heating appliances such as furnace, stove
and radiator. These items will increase power consumption of the cabinet.
• Avoid installing the wine cooler in a damp and humid environment.
• The more ventilation available around the wine cooler, the better the performance.

- 11 -
BUILT-IN DIAGRAM
Please follow this diagram if you want to insert the wine cooler into any solid structure.
It is important that the ventilation grille at the bottom front of the wine cooler is never
covered. If a plinth is to be mounted in front of the cabinet, make sure to drill holes or install
a ventilation grille to ensure proper ventilation.
Ensure a minimum of 2 cm. of free air from the top of the wine cabinet to the underside of
any item on top.
It is very important that the wine cooler can get rid of the heat, it produces. It is therefore
recommended to ensure additional space behind the cabinet than the approx. 2 cm from
the mounted grille on the backside of the cabinet. It is advised to allow min. 5 - 7 cm. of free
space between wine cabinet and back wall.
Keep in mind that the door must be able to open and close after installation. Make a space
of at least 1 cm. in the side for the opening door.

- 12 -
CLEANING AND MAINTENANCE
EXTERIOR CLEANING
Please cleanse the exterior and the door sealing of your cabinet with soapy water before
drying off with a soft cloth. Do not use concentrated or abrasive detergents and scratching
tools.
INTERIOR CLEANSING
Un-plug before removing all wines from the cabinet. Then cleanse the interior with water
and wipe dry with a soft cloth.
STANDBY TIME
For short term, specifically, within less than three weeks, you can keep the cabinet in
working conditions.
For long term, more than a few months, unplug the unit. Keep the interior of the cabinet
clean to avoid generating odour and mold. Please keep the door of cabinet slightly open.
TIPS FOR ENERGY-SAVING
Place the cabinet in an area with the lowest temperature in the room and keep clear from
electric heating appliances and avoid exposure to sunshine.
INSTRUCTIONS FOR MINOR PROBLEMS
Problem
Cause
No power
Socket unconnected.
Short circuit or fuse burnt out.
When temperature inside the
cabinet is not low enough
Check up the set temperature.
Too frequent opening of the door.
Door not closed tightly.
Improper sealing.
Lamp not illuminated
Is the light switched on?
Socket unconnected.
Short circuit or fuse burnt out.
Lamp broken.
Vibrating
Check if the cabinet is in level.
Door cannot be closed tightly
Cabinet not in level.
Door not correctly installed.
Sealing broken.
Wooden shelf too close to the door.
Odour inside the cabinet
Remove the articles sending off odour.

- 13 -
VINKØLESKAB
BRUGSANVISNING
Model:
PeVino EVO PE46S
PeVino EVO PE46D
PeVino EVO PE22S
WWW.PEVINO.COM

- 14 -
TAK FOR DIT KØB AF ET PEVINO VINKØLESKAB.
VENLIGST LÆS OG FØLG ALLE SIKKERHEDSREGLER OG
BETJENINGSINSTRUKTIONER FØR BRUG.
ADVARSEL
VIGTIGE SIKKERHEDSINSTRUKTIONER
Læs alle instruktioner, før du bruger vinkøleskabet.
• Advarsel!
IKKE børnevenligt. Kasserede eller efterladte apparater kan være farlige for børn, og du
bør derfor bortskaffe det forsvarligt efter endt brug.
• Før du smider dit gamle vinkøleskab væk:
Tag døren af, så børn ikke nemt kan klatre inde i det.
• Tillad aldrig børn at betjene, lege med, eller kravle ind i apparatet.
• Rengør aldrig dele af apparatet med brændbare væsker. Dampene kan udgøre en brand-
eller eksplosionsrisiko.
• Opbevar eller brug ikke brændbare væsker i nærheden af dette eller andre apparater.
Dampene kan udgøre en brand- eller eksplosionsrisiko.
- GEM DENNE MANUAL -
~
ADVARSEL
~
For at mindske risikoen for brand, elektrisk chok
eller skader, når du bruger dit apparat, bedes
du følge disse basale forholdsregler.
For at undgå at skade dørtætningen skal du sikre, at døren er helt åben, når hylderne trækkes
ud på skinnerne.
Apparatet skal være placeret således, at stikket er tilgængeligt. Frigør ledningen. Flyt dit skab
til dets endelige placering. Flyt ikke dit skab, mens det er fyldt med vin.
Hvis ledningen er beskadiget, skal den udskiftes af producenten eller en autoriseret
elinstallatør.
Dette vinkøleskab er kun beregnet til opbevaring af vin.

- 15 -
INSTALLATIONS-INSTRUKTIONER
Før du bruger dit vinkøleskab
• Fjern den ydre og indre emballage.
• Før du tilslutter vinkøleskabet til strømkilden, skal du lade det stå lodret i cirka 6 timer.
Dette vil reducere muligheden for en funktionsfejl i kølesystemet.
• Rengør de indre overflader med en blød klud og lunkent vand.
• Ved udskiftning af lyskilden, vælg en lyskilde som passer med samme fatning, watt og
mærkespænding som den eksisterende lyskilde. Sluk strømforsyningen, før du skifter
lyskilden.
Installation af dit vinkøleskab
• Placér dit vinkøleskab på et gulv eller overflade, der er stærkt nok til at bære det, når
det er fuldt læsset. Sørg for at vinkøleskabet står helt i vater, ved at justere benene
under bunden.
• Placér vinkøleskabet væk fra direkte sollys og varmekilder (brændeovn, varmeapparat,
radiator, osv.). Direkte sollys kan påvirke akrylovertrækket, og varmekilder kan forøge
det elektriske forbrug.
• Ekstremt kolde omkringliggende temperaturer kan også forårsage, at enheden ikke
virker ordentligt.
• Undgå at placere enheden i fugtige områder.
• Tilslut vinkøleskabet til en stikkontakt. Ethvert spørgsmål angående el bør rettes til en
autoriseret elinstallatør.
Vær opmærksom på følgende
• Opbevar vin i lukkede flasker.
• Overbelast ikke skabet.
• Åbn ikke døren, medmindre det er nødvendigt.
• Tildæk ikke hylder med aluminiumfolie eller andre hyldematerialer, som kan forhindre
luftcirkulation.
• Skulle vinkøleskabet stå ubrugt i længere perioder, foreslås det, efter en grundig
rengøring, at lade døren stå på klem for at lade luften cirkulere inde i skabet for at
undgå mulige dannelser af dug, mug eller lugt.
• Det medfølgende filter med aktivt kul (fjerner mug- og lugtgener), bør afmonteres mindst
en gang om året og lægges til tørring / udluftning og gerne i solen.

- 16 -
SÅDAN VENDER DU SKABSDØREN
Vinkøleskabet er i stand til at åbnes fra enten venstre eller højre side. Enheden er leveret
med døren åbnet fra venstre side (højre-hængslet).
Pevino anbefaler, at vending af døren foretages af en tekniker.
Hvis du vil ændre døråbningen fra den ene side til den anden, følg venligst nedenstående.
Bemærk: Alle dele, der fjernes, skal bruges igen (undtaget tophængsel).
(1) Plastikpropperne skal afmonteres og genbruges i den anden side. (Der er
reservepropper i den medfølgende pose.)
(2) Fjern skruerne fra tophængslet, og løft døren af (læg forsigtigt døren på et klæde for
ikke at ridse glasset).
(3) Fjern skruen fra det nederste hængsel, og tag den med over til den anden side.
(4) Monter nu døren på modsatte side, med det NYE medfølgende hængsel.
(5) Efter montering af dør skal topbeslaget justeres frem og tilbage i frigangen for at
centrere døren. Døren skal sidde perfekt i lod og flugte med kabinettet. Der skal
være lige meget luft i top, bund og til siderne.
(6) Såfremt dørens gummipakning ikke slutter helt tæt til kabinettet hele vejen rundt, kan
hele gummipakningen tages helt ud, vendes og sættes tilbage igen.
(7) I sjældne tilfælde kan gummipakningen være så stiv, at den skal masseres lidt på
plads.
Massér gummipakningen udad mens man eventuelt nænsomt trækker få millimeter i
gummipakningen. Til hjælp kan bruges en hårtørrer for at blødgøre gummiet, så det
arbejder bedre.

- 17 -
HØJDEJUSTERING AF BEN
BEMÆRK!
Vinskabet skal stå i perfekt lod og vater
for at fungere optimalt.
AKTIVT KULFILTER
1. Udseende:
2. Funktion:
Kulfilteret er til for at mindske
lugtgener i skabet.
3. Vedligehold:
Tag filteret ud 1-2 gange om året
og lad det tørre i solen.
4. Placeres mellem hylderne, eller i
bunden af skabet.

- 18 -
OPBYGNING OG FUNKTIONER
1. Dørhængsel
2. LCD-kontrolpanel
3. Led lys
4. Opbevaringshylde
5. Glasdør
6. Lås
7. Justerbare ben

- 19 -
BETJENINGSVEJLEDNING
Det anbefales at vinkøleskabet stilles i et tørt rum med temperaturer fra 0-35°C. Bemærk
venligst, at skabets arbejdstemperatur og strømforbrug er afhængig af rumtemperatur og
ventilationsforholdene omkring skabet.
Foreslået skabstemperatur: Al slags vin opbevares bedst ved 12-16°C.
KONTROLPANEL FOR SKAB MED EN KØLEZONE
POWER: Tænd/sluk knap
°C /°F: Knap til valg af visning af temperatur i Celsius/Fahrenheit
CHAMBER: Angiver den faktiske temperatur i skabet fra 0-37°C.
▲/▼: Justering af temperaturen.
SET CHAMBER: Angiver den valgte temperatur fra 5-22°C.
Når temperaturen er valgt, blinker lyset.
RUN: Indikatorlys for tændt skab.
: Tænd og sluk for lys.
COLOR: Kontrolknap til farvevalg. Tryk en gang for hvert farveskift.
STRENGTH: Styring af lysstyrke i LED. Tryk en gang for at justere lysstyrken.
Køleskabet vil blive ved med at køle, til skabet har nået den valgte temperatur (±2°C).
Ved strømsvigt vil den senest valgte temperatur blive husket.
Alarm system:
Hvis kølesystemet ikke fungerer, og skabets temperatur er ≥30°C i mere end to timer, vil
alarmen starte og kølesystemet automatisk blive slukket.

- 20 -
KONTROLPANEL FOR SKAB MED TO KØLEZONER
De to kølezoner er opdelt ved hjælp af dobbelt cirkulationskølesystem samt rumadskillelse
mellem de to zoner.
POWER: Tænd/sluk knap
°C /°F: Knap til valg af visning af temperatur i Celsius/Fahrenheit
SET + LOWER CHAMBER:
Knap og display til indstilling af temperaturen i nedre zone.
LCD-display angiver den valgte temperatur fra 12-22°C.
Når temperaturen er valgt, blinker lyset.
SET + UPPER CHAMBER:
Knap og display til indstilling af temperaturen i øvre zone.
LCD-display angiver den valgte temperatur fra 5-12°C.
Når temperaturen er valgt, blinker lyset.
RUN: Indikatorlys for tændt skab.
: Tænd og sluk for lys.
COLOR: Kontrolknap til farvevalg. Tryk en gang for hvert farveskift.
STRENGTH: Styring af lysstyrke i LED. Tryk en gang for at justere lysstyrken.
BEMÆRK:
Det anbefales at man holder en forskel i temperaturen på 7-8°C mellem de to zoner, for at
sensorerne kan arbejde optimalt.
Køleskabet vil blive ved med at køle, til skabet har nået den valgte temperatur (±2°C). Ved
strømsvigt vil den senest valgte temperatur blive husket.
Når skabet er tilsluttet strøm, og hvis der ikke vælges temperatur, vil temperaturen
automatisk blive sat til 5°C for øverste zone og 12°C for nederste zone.
This manual suits for next models
2
Table of contents
Languages:
Other Pevino Wine Cooler manuals

Pevino
Pevino PG300S-B User manual

Pevino
Pevino PM248D-HHB Operating and maintenance manual

Pevino
Pevino P168S User manual

Pevino
Pevino PN7S User manual

Pevino
Pevino EVO PE168S User manual

Pevino
Pevino PM248S-HHB-1 User manual

Pevino
Pevino PBI58S-EE User manual

Pevino
Pevino PI106SK User manual

Pevino
Pevino P80S User manual

Pevino
Pevino P22S User manual