Philco PCH/AG-MF Series Quick start guide

ΟΔΗΓΙΕΣ ΧΡΗΣΕΩΣ
PCH/AG-MF

2 PHILCO
Θερμαντικό σώμα υψηλής
απόδοσης
Οδηγίες χρήσεως σειράς
PCH/AG-MF
Συγχαρητήρια για την
επιλογή σας
Επιλέξατε ένα κορυφαίο προϊόν
της PHILCO και ελπίζουμε να
το απολαύσετε. Η PHILCO
σας προτείνει μια σειρά από
προϊόντα υψηλής ποιότητας
που θα κάνουν τη ζωή σας πιο
άνετη. Παρακαλούμε διαβάστε
προσεκτικά τις παρακάτω
οδηγίες για τη σωστή χρήση του
θερμαντικού σας.
Περιεχόμενα
Εισαγωγή 3
Περιγραφή Συσκευής 3
Σύντομες Οδηγίες 4
Εγκατάσταση Συσκευής 5
Αντιμετώπιση προβλημάτων 8
Προδιαγραφές 8
Συντήρηση 9
Περιεχόμενα συσκευασίας 9
Αποκομιδή 9
Η κάλυψη της εγγύησης
προϋποθέτει την τήρηση των
όρων που περιγράφονται σε αυτή
για τη σωστή λειτουργία της
συσκευής.
ΘΑ ΒΡΕΙΤΕ ΣΤΟΙΧΕΙΑ ΤΟΥ
ΕΞΟΥΣΙΟΔΟΤΗΜΕΝΟΥ ΚΕΝΤΡΟΥ
ΤΕΧΝΙΚΗΣ ΥΠΟΣΤΗΡΙΞΗΣ ΤΗΣ
ΠΕΡΙΟΧΗΣ ΣΑΣ ΣΤΗΝ ΙΣΤΟΣΕΛΙΔΑ
WWW.SERVICEWORLD.GR Ή
ΣΤΟ ΤΗΛΕΦΩΝΟ 210-6203838.

Θερμαντικό σώμα υψηλής απόδοσης 3
Εισαγωγή
Παρακαλούμε διαβάστε
τις παρακάτω οδηγίες και
ακουλουθήστε τις προσεκτικά
ακόμα και αν είστε σίγουροι για
τη λειτουργία της συσκευής.
Αποθηκεύστε το εγχειρίδιο σε
μέρος όπου θα μπορείτε να το
βρείτε και να ανατρέξετε σε αυτό.
Σκοπός της συσκευής
Το θερμαντικό σώμα προσφέρει
θέρμανση για οικιακή χρήση.
Περιγραφή συσκευής
Γενική όψη
1
2
3
4
5
Εικόνα 1
1. Πίνακας ελέγχου
2. Εξαγωγή αέρα
3. Εισαγωγή αέρα
4. Ρόδες κύλισης
5. Αντιστατικό φίλτρο σκόνης
Πίνακας ελέγχου
1. O διακόπτης ισχύος βρίσκεται
στην πλαϊνή πλευρά της συσκευής.
Από αυτόν μπορείτε να σβήσετε
τη συσκευή και να ελέγξετε την
θερμιδομετρική ισχύ που μπορεί να
είναι μέγιστη (ΙΙ) ή μισή (Ι).
a
b
c
α) Ανάψτε το θερμαντικό στη μισή
ισχύ για οικονομία
β) Σβήστε το θερμαντικό
γ) Ανάψτε το θερμαντικό σε πλήρη
ισχύ για απόδοση
2. Ο θερμοστάτης βρίσκεται στο
πάνω μέρος του πίνακα ελέγχου
της συσκευής
132
4
Εικόνα 2
1. Ένδειξη λειτουργίας.
2. Οθόνη LED
3. Επιλογέας ισχύος (ολόκληρη/
μισή).
4. Πλήκτρο εκκίνησης/
χρονοδιακόπτη (μόνο στα
ηλεκτρονικά μοντέλα).
5. Πλήκτρα ρύθμισης
θερμοκρασίας/χρονοδιακόπτη
(μόνο στα ηλεκτρονικά μοντέλα).

4 PHILCO
Σύντομες οδηγίες
Προετοιμασία
• Αφαιρέστε προσεκτικά τη
συσκευή από το κουτί.
• Πριν από τη χρήση αφαιρέστε
την προστατευτική ταινία στο
μπροστινό μέρος της συσκευής.
• Πριν ξεκινήσετε βεβαιωθείτε ότι
η συσκευή είναι κλειστή.
• Όταν το θερμαντικό ανάψει για
πρώτη φορά μπορεί να νιώσετε
μια μυρωδιά καμμένου. Είναι
φυσιολογικό και θα φύγει μετά
από λίγο.
• Σταθεροποιήστε τη συσκευή
σύμφωνα με τις οδηγίες χρήσης.
• Συστήνουμε να μην συνδέσετε
το θερμαντικό μαζί με άλλες
συσκευές σε πολύπριζο για να
μην υπερφορτώσετε τη γραμμή
ρεύματος.
Άναμμα
Συνδέστε τη συσκευή στην πρίζα.
Θα ακουστεί ένας θόρυβος και ο
πίνακας ελέγχου θα φοτιστεί με
μπλε LED. Η συσκευή
είναι σε λειτουργία αναμονής και
δεν θερμαίνει. Πιέστε τον διακόπτη
ισχύος στη θέση “I” ή “ΙΙ” (μισή ή
ολόκληρη
θερμιδομετρική ισχύς), γυρίστε
το θερμοστάτη δεξιόστροφα για
να ξεκινήσει η συσκευή. Εαν η
θερμοκρασία του χώρου
είναι υψηλότερη από την
επιλεγμένη, η συσκευή σβήνει
αυτόματα, μπαίνει σε λειτουργία
αναμονής και ξεκινάει μόνο
όταν η θερμοκρασία πέσει κάτω
από την επιλεγμένη θερμοκρασία.
Τεχνολογία καθαρισμού αέρα
Air Gate
Το θερμαντικό διαθέτει το
ενσωματομένο σύστημα
καθαρισμού εισερχόμενου αέρα
Air Gate.
Σύστημα φίλτρων
Στη συσκευή περιλαμβάνεται ένα
αντιστατικό φίλτρο σκόνης και μια
σειρά τριών συμπληρωματικών
φίλτρων – NANO-φίλτρο,
κατεχίνων και φίλτρο άνθρακα.
Για να τοποθετήσετε τα
συμπληρωματικά φίλτρα,
αφαιρέστε το αντιστατικό φίλτρο
από τη συσκευή τραβώντας το
χερούλι και τοποθετήστε τα φίλτρα
όπως φαίνεται στην εικόνα.
Additional filters
Antistatic dust filter

Θερμαντικό σώμα υψηλής απόδοσης 5
Είναι απαραίτητο να πλένετε
τακτικά το αντιστατικό φίλτρο με
νερό βρύσης, τουλάχιστον μια
φορά το μήνα για να μην μειωθεί
η απόδοση της συσκευής. Μετά
από κάθε πλύση, αφήστε το φίλτρο
να στεγνώσει. Η αντικατάσταση
των συμπληρωματικών φίλτρων
συστήνεται κάθε 3 εώς 6 μήνες
ανάλογα με τη χρήση της συσκευής
και τις συνθήκες λειτουργίας.
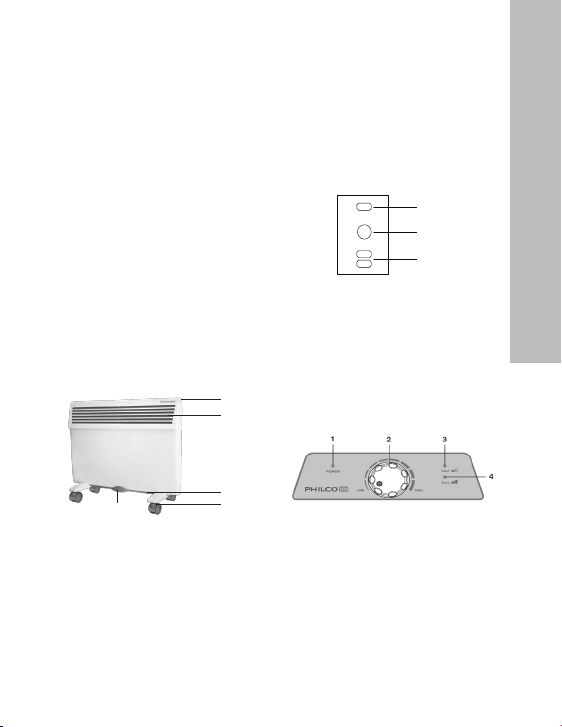
Ρύθμιση θερμοκρασίας
Για να επιλέξετε την επιθυμητή
θερμοκρασία και να τη διατηρήσετε
σταθερή μέσα στο χώρο, ανάψτε τη
συσκευή και
γυρίστε το θερμοστάτη
δεξιόστροφα στη μέγιστη θέση.
Όταν η θερμοκρασία του χώρου
είναι σε ικανοποιητικά επίπεδα,
γυρίστε τον θερμοστάτη
αριστερόστροφα μέχρι το σημείο
όπου θα ακουστεί ένας ήχος
(“κλικ”) που υποδεικνύει το
σβήσιμο της συσκευής. Έτσι,
η συσκευή αποθηκεύει την
επιλογή σας και θα διατηρήσει τη
θερμοκρασία που επιλέξατε
αναβοσβήνοντας αυτόματα τη
συσκευή.
Η διαφορά μεταξύ της
ενδεικτικής και της
πραγματικής θερμοκρασίας
του χώρου μπορεί να
μεταβληθεί μεταξύ 0.1 εως
3 βαθμών ανάλογα με τον
όγκο και τη μόνωση του
δωματίου. Εαν η συσκευή
χρησιμοποιείται σε μεγάλους
χώρους ή σε χώρους με κακή
θερμομόνωση, συστήνουμε
να ρυθμίσετε τη θερμοκρασία
στους 2-3 βαθμούς πάνω
από την επιθυμητή για πιο
αποτελεσματική λειτουργία.
Λειτουργία προστασίας από
υπερθέρμανση
Το θερμαντικό διαθέτει θερμοστάτη
ασφαλείας που ενεργοποιείται όταν
ανέβει η θερμοκρασία στο μέγιστο
όριο. Σε περίπτωση υπερθέρμανσης
η συσκευή σβήνει για λόγους
ασφαλείας.
Εγκατάσταση Συσκευής
Προτεινόμενη εγκατάσταση
Το θερμαντικό πρέπει να
εγκατασταθεί έτσι ώστε η
παραγόμενη θερμότητα να
αναμείξει το μέγιστο όγκο αέρα.
Η σύνδεση πρέπει να γίνει
σύμφωνα με τις προδιαγραφές.
Ο πίνακας ελέγχου και τα άλλα
ηλεκτρονικά μέρη δεν πρέπει
να έρχονται σε επαφή με νερό
ή ανθρώπους που κάνουν
μπάνιο. Δεν πρέπει να ψεκάζετε
με νερό το θερμαντικό. Εαν η
συσκευή καλυφθεί με πετσέτα
ή άλλα ρούχα υπάρχει κίνδυνος
υπερθέρμανσης. Απαγορεύεται
να καλύπτετε ή να βουλώνετε

6 PHILCO
τις εισαγωγές και εξαγωγές του
αέρα καθώς υπάρχει κίνδυνος να
προκληθεί ατύχημα ή βλάβη της
συσκευής. Μην τοποθετείτε το
θερμαντικό πίσω από κουρτίνες,
πόρτες ή κάτω από αεραγωγούς.
Διατηρείτε τις ελάχιστες
απαστάσεις εγκατάστασης από
τον τοίχο, τα έπιπλα και το
πάτωμα. (Εικόνα 3).
Dimensions in mm
100 min.
100 min.
100 min.
100 min.
Εικόνα 3
Εγκατάσταση στον τοίχο:
• Αφαιρέστε το μεταλλικό
στήριγμα εγκατάστασης
σύμφωνα με τις παρακάτω
οδηγίες:
– ξεβιδώστε τις δύο βίδες
σύσφιξης από το πάνω μέρος
του;
– πιέστε ταυτόχρονα τα δυο
μεταλλικά μάνδαλα και τραβήξτε
το στήριγμα προς τα πίσω (Εικ.
4);
fasteners
Εικόνα 4
• Χρησιμοποιήστε το στήριγμα
για να μαρκάρετε τη θέση
εγκατάστασης στον τοίχο;
• Ελέγξτε την οριζόντια θέση του
στηρίγματος και στη συνέχεια
μαρκάρετε τις τρύπες και ανοίξτε
τις με ένα τρυπάνι;
• Τοποθετήστε το στήριγμα στο
τοίχο και βιδώστε το (Εικ. 5);
• Το θερμαντικό τοποθετείται
στο στήριγμα όπως παρακάτω
(Εικ. 6):
– Ακουμπήστε το θερμαντικό στο
στήριγμα τοποθετώντας τις
τρύπες που βρίσκονται στο κάτω
μέρος του θερμαντικού στη
βάση στήριξης (Εικ.6, α);
– κρατώντας το θερμαντικό
ασφαλίστε τις πλαστικές
τιράντες (Εικ. 5) της βάσης
στήριξης στις τετράγωνες πάνω
τρύπες της συσκευής (Εικ. 6, β);
– ασφαλίστε το πάνω μέρος του
θερμαντικού στη βάση στήριξης
ασφαλίζοντας τα μάνδαλα στη
συσκευή (Εικ. 6, γ);
– σφίξτε τις βίδες σύσφιξης στα
μάνδαλα της βάσης στήριξης

Θερμαντικό σώμα υψηλής απόδοσης 7
(προαιρετικά).
flexible braces
a
b
c
Εικόνα 5 Εικόνα 6
Εγκατάσταση στο πάτωμα
Στη συσκευή μπορούν να
προσαρμοστούν ρόδες για
μετακίνηση στο χώρο.
Οι ρόδες εγκαθίστανται ως εξής:
• Γυρίστε το θερμαντικό ανάποδα
(Εικ. 7);
• Πάρτε ένα από τα πλαστικά
στηρίγματα με τις ρόδες;
• Τοποθετήστε το στήριγμα
στο σημείο σύνδεσης με το
θερμαντικό έτσι ώστε να
ταιριάζουν οι βίδες στο σώμα
(Εικ. 8);
• Βιδώστε τις βίδες στο θερμαντικό
και σφίξτε τις ρόδες με ένα
κλειδί (περιλαμβάνεται στη
συσκευασία).
Εικόνα 7 Εικόνα 8
Διάγραμμα καλωδίωσης
LN
LO
HI
N1
HI
LO
COM
L1
I/II
KSD-термостат
Индикатор
Регулировочный
термостат
Переключатель
мощности Нагревательный элемент
Индикатор питания
Εικόνα 9
L / N – φάση/ουδέτερος
• Μην καλύπτετε το
θερμαντικό όταν λειτουργεί.
Μη στεγνώνετε ρούχα και
πετσέτες πάνω στη συσκευή.
Μπορεί να προκαλέσει
υπερθέρμανση, βλάβη ή
ατύχημα σε εσάς και την
περιουσία σας. (ΠΡΟΣΟΧΗ!
Αυτού του τύπου οι βλάβες
δεν καλύπτονται από την
εγγύηση).
• Μην αφήνετε τις συσκευές
χωρίς έλεγχο, ειδικά όταν
κοντά σε αυτές βρίσκονται
μικρά παιδιά. Βεβαιωθείτε
ότι τα παιδιά δεν ακουμπούν
με τα χέρια τη συσκευή.
Η συσκευή έχει υψηλή
θερμοκρασία.
• Πριν μετακινήσετε ή
αποθηκεύσετε τη συσκευή
βεβαιωθείτε ότι το περίβλημα
και οι αντιστάσεις έχουν

8 PHILCO
Προδιαγραφές
Μοντέ
λο
Ισχύς,
W
Τάση Διαστάσεις,
(LxWxH),
mm
Βάρος,
kg
Τρόπος
τοποθέ
τησης
Προστασία
από
υγρασία
Έντα
ση,
A
PCH/
AG-1000
MF
1000/
500
~220–240
V / 50 Hz
460х78х400 3,25 Επιτοίχιο/
Ελεύθερο
IP24 4,3
PCH/AG-
500 MF
500/
250
~220–240
V / 50 Hz
460х78х400 3,25 Επιτοίχιο/
Ελεύθερο
IP24 2,2
Αντιμετώπιση προβλημάτων
Πρόβλημα Αιτία Λύση
Νεκρό- Δεν
ξεκινάει
1) Το καλώδιο είναι εκτός πρίζας.
2) Η συσκευή είναι σε λειτουργία
αναμονής.
3) Η θερμοκρασία του χώρου
είναι ψηλότερα από τη
θερμοκρασία του θερμοστάτη.
1) Συνδέστε το καλώδιο.
2) Πιέστε το κουμπί εκκίνησης.
3) Επιλέξτε τη σωστή θερμοκρασία
λειτουργίας.
Μυρίζει καμμένο
στην πρώτη φορά
Είναι φυσιολογικό Η μυρωδιά θα φύγει μετά από λίγα
λεπτά
Εαν συνεχίζετε και έχετε πρόβλημα, επικοινωνήστε με το κέντρο τεχνικής υποστήριξης..
κρυώσει.
• Η συσκευή δεν πρέπει
να τοποθετείται κοντά
σε εύφλεκτα ή άλλα
αντικείμενα που μπορεί να
παραμορφωθούν από την
θερμότητα.
• Μη χρησιμοποιείτε τη
συσκευή σε ανοικτούς ή
υπαίθριους χώρους.
• Για σωστή λειτουργία της
συσκευής, βεβαιωθείτε ότι
η τάση του ρεύματος είναι
επαρκής και οι τεχνικές
προδιαγραφές συμφωνούν με
την σήμανση που βρίσκεται
κολλημένη στο πλαϊ της
συσκευής.
• Σε περίπτωση βλάβης
επικοινωνήστε με το

Θερμαντικό σώμα υψηλής απόδοσης 9
πλησιέστερο κέντρο τεχνικής
υποστήριξης για συμβουλές
και επισκευή (περισσότερες
πληροφορίες θα βρείτε στην
ιστοσελίδα www.service-
world.gr).
• Μην αποσυναρμολογείτε τη
συσκευή.
• Αφαιρέστε το θερμαντικό
από την πρίζα όταν δε
λειτουργεί ή πριν από τον
καθαρισμό του.
Συντήρηση
Το θερμαντικό δε χρειάζεται
ιδιαίτερη συντήρηση.
Πριν από κάθε έλεγχο αφαιρέστε
το από την πρίζα.
Καθαρίζετε τακτικά το
θερμαντικό με ένα μαλακό
πανί, στεγνό ή βρεγμένο. Μη
χρησιμοποιείτε ξύστρες, μεταλλικά
σφουγγαράκια, χημικά και
καθαριστικά.
Αν θέλετε, μπορείτε εύκολα
να καθαρίσετε το πίσω μέρος
της συσκευής όταν είναι
τοποθετημένη στον τοίχο. Πιέστε
τα δύο μάνδαλα (Εικ. 4) στο
πίσω μέρος του θερμαντικού και
τραβήξτε το προς τα εμπρός για
να καθαρίσετε.
Μετά τον καθαρισμό πιέστε το
προς τα πίσω ώστε κουμπώσουν
τα μάνδαλα και να επανέλθει στη
θέση του.
Προτεινόμενη θερμοκρασία και
υγρασία χώρου:
α) Για λειτουργία:
Από -25 εως +30°С, υγρασία από
40 εώς 90%;
β) Για αποθήκευση:
Από -20 εώς +80°C, υγρασία από
40 εώς 90%.
Περιεχόμενα συσκευασίας
• Θερμαντικό σώμα
• Επιτοίχια βάση στήριξης.
• Βίδες τοποθέτησης.
• Βάσεις με ροδάκια.
• Οδηγίες χρήσεως.
• Εγγύηση συσκευής (παραδίδεται
ξεχωριστά στο κατάστημα).
• Σετ συμπληρωματικών φίλτρων.
• Κλειδί για την τοποθέτηση των
τροχών.
Το θερμαντικό διατίθεται με
ένα αυτοκόλλητο κολλημένο
στην μπροστινή όψη.
Αφαιρέστε το πριν την έναρξη
της λειτουργίας για να μην
λιώσει από τη θερμότητα.
Αποκομιδή
Στο τέλος του χρόνου ζωής
της, η συσκευή αυτή πρέπει να
ανακυκλωθεί. Επικοινωνήστε με
τον δήμο ή το κατάστημα αγοράς
της συσκευής που θα φροντίσουν
για την απόσυρσή της.

10 PHILCO
Χώρα κατασκευής: Κίνα
Η ημερομηνία κατασκευής
αναγράφεται στο
αυτοκόλλητο σήμανσης της
συσκευής.
Εισαγωγή:
ΛΩΖΟΣ Α.Ε.,
17 χλμ. Ε.Ο. Αθηνών-Λαμίας,
Κηφισιά, 145 10
Ο κατασκευαστής έχει το δικαίωμα
να αλλάξει τις προδιαγραφές και
τη σχεδίαση της συσκευής εφόσον
κριθεί απαραίτητο.

Θερμαντικό σώμα υψηλής απόδοσης 11
Electric Convector Heater
PCH/AG-MF Series
Operational Manual
Welcome to PHILCO world
You selected the first-rate product
from PHILCO and we hope that
you will really enjoy it in the future.
PHILCO strives to propose the
widest range of high-quality
products which can make your life
more comfortable. You can see
some examples on the cover page
of this Manual. Please, carefully
read this manual to correctly use
your new convector heater and
enjoy its advantages. We guarantee
that it will make your life much
more comfortable as it is really
user-friendly. Good Luck!
Table of Contents
Introduction 12
Overview of Device 12
Brief Opeation Manual 12
Installation of Device 14
Maintenance 16
Troubleshooting 17
Specifications 17
Items 18
Recovery 18
Warranty services are provided
in accordance with warrantee
obligations specified in Warrantee
Certificate.
YOU CAN FIND ADDRESSES OF
SERVICE CENTERS AT OUR WEB-
SITE WWW.SERVICEWORLD.GR
OR CONTACT YOUR DEALER.

12 PHILCO
Introduction
Please, carefully read this manual
and strictly follow the instructions
provided in this Care and Operation
Manual even if you believe that your
are familiar with this equipment.
Please, store this manual in proper
place where you can readily find
and use it.
Purpose of device
Electric convector heater is a
domestic electric heater designed
for heating premises of any type.
Overview of Device
General view
1
2
3
4
5
Figure 1
1. Control unit.
2. Ventilation outlets.
3. Ventilation inlets.
4. Foot kit.
5. Antistatic dust filter.
Control Unit
1. The power button is located on the
sidewall of the device. Calorific power,
which may be full (II) or half (I), is regu-
lated through this button as well.
a
b
c
a) Turn on the heater at half power.
b) Turn off the heater.
c) Turn on the heater at full power.
2. The control unit is located on the
upper panel of the device:
132
4
Figure 2
1. Power indicator.
2. LED display.
3. Power selector button (full/half).
4. On/Off/Timer button.
5. Temperature adjustment/timer
setting buttons.
Brief Operation Manual
Preparation
• Carefully remove device from
cardboard box.
• Before operation it is neces-
sary to remove protective film

Θερμαντικό σώμα υψηλής απόδοσης 13
attached to the front panel of
convector.
• Before turning it on make sure
that convector is turned off.
• When convector is turned on
for the first time certain smell is
possible that will disappear after
convector starts to run.
• Secure device in stable position
in accordance with the installa-
tion instructions.
• It is not recommended to use the
same socket for connection of
this heater and other high power
electrical equipment at the same
time to prevent overloading of
your power line.
Turn On the Device
Put the plug into the socket, the
light in the electric power supply
indicator will turn on and will con-
tinue to burn constantly. Move
the power button on the sidewall
of the device into “I” or “II” mode
(half or full calorific power), turn the
thermostat adjustment knob on the
upper panel to the right to make the
device work, so you can reach the
necessary heating temperature.
If the ambient air temperature is
lower than the set temperature,
the convector starts to work; if the
ambient air temperature becomes
higher than the set one, the device
turns off automatically and switches
to standby mode, then it turns on
again when the temperature drops.
Air Gate air care system
This convector is provided with Air
Gate air care system that includes
a system of integrated filtration of
intake air.
Air Filtration System
The device is provided with main
antistatic dust filter and a set of
additional filters – NANO-filter, cate-
chin and coal filter.
To operate filtration system remove
antistatic filter from the device by
pulling the handle and install addi-
tional filters into the heater from the
kit as shown on Figure.
Additional filters
Antistatic dust filter
It is necessary to regularly wash
antistatic dust filter in flowing water
(at least once a month). After wash-
ing the filter should be dried. The
service life of additional filters ranges
from 3 to 6 months depending on
operating conditions.

14 PHILCO
Temperature Setting
To set the required heating tem-
perature and to maintain a fixed air
temperature in the room, turn on
the device and turn the thermostat
adjustment knob to the right up to
the maximum value. When the tem-
perature in the room is comfortable
for you, start to turn the thermostat
adjustment knob slowly to the left
until you hear a click. Thus the device
will memorize the temperature which
is comfortable for you and it will
maintain this temperature by turning
on and off automatically.
The difference between On/Off
temperature for defined area
can range from 0.1 to 3 degrees
depending on volume and ther-
mal insulation of area. When the
device is used in large rooms
susceptible to fast cooling we
recommend to set the temper-
ature at 2-3 degrees above the
desired level for efficient opera-
tion of the heater.
Overheating Protection Function
Device is provided with a circuit
breaker that is triggered when
the maximum temperature limit is
reached. In case of overheating the
device turns off automatically.
Installation of Device
Recommended Installation
The convector shall be installed so
that produced heat will mix maxi-
mum volume of air. The convector
should be attached in accordance
with applicable requirements. The
switch and other mechanisms
should be away from a person
who takes bath or shower. The
device should not be exposed to
water splashes. If the device is
covered there is a risk of over-
heating. It is strictly forbidden to
cover or plug inlets and outlets (air
grids) as it can cause an accident
or damage the device. Do not
place the convector behind cur-
tains, doors, under wall opening
or ventilation hole. Keep minimum
distance required for installation
on floor, surface, near furniture,
etc. (Figure 3).
Dimensions in mm
100 min.
100 min.
100 min.
100 min.
Figure 3
Floor Mounting:
• Remove the wall bracket from the
convector as follows:

Θερμαντικό σώμα υψηλής απόδοσης 15
– unscrew two locking screws from
the latches on the bracket;
– press the latches and pull the
bracket pushing two latches (Fig. 4);
fasteners
Figure 4
• Use the bracket to mark installa-
tion dimensions by attaching it to
the wall;
• Check horizontal position of the
bracket and then mark and drill holes;
• Place the bracket on the wall and
fasten it (Fig. 5);
• The device is attached to the
bracket as follows (Fig. 6):
– put the lower part of the convec-
tor to the bracket using special
holes at the bottom of the con-
vector (Fig.6, a);
– holding the convector by hand
secure the flexible braces (Fig.
5) provided on the bracket in
special rectangular holes on the
convector (Fig. 6, b);
– put the upper part of the convector
on the bracket securing it by the
latches on the bracket (Fig. 6, c);
– tighten the lock screws in the
latches on the bracket.
flexible braces
a
b
c
Figure 5 Figure 6
Floor Mounting of Device
The device can be mounted on
special legs enabling to move it in
the room.
Support foots are attached as
follows:
• Turn the convector upside down
(Fig. 7);
• Take one of support foots with
rollers;
• Place the plate of the support
foot to the attaching point on
the convector so that the dome-
shaped part of the plate will be
tightly attached to the convector
close to its rear panel, the screw
holes should match (Fig. 8);
• Tighten the support foots with
the screws in parts kitting.
Figure 7 Figure 8

16 PHILCO
Wiring Diagram (Fig. 9)
LN
LO
HI
N1
HI
LO
COM
L1
I/II
KSD-термостат
Индикатор
Регулировочный
термостат
Переключатель
мощности Нагревательный элемент
Индикатор питания
Figure 9
L / N – phase/neutral
• Do not cover the device when
it runs. Do not dry clothes
and other fabric or materials
on the device. It can result
in overheating, breakdown
or damage to your health
and/or property. (Attention!
Manufacturer considers that
such breakdown is not cov-
ered by warrantee).
• Any electrical appliance
should not be left unattended
especially if children are not
kept away from it. Make sure
that children do not touch the
device by hands.
• Before removing the device
and packing it for long
storage make sure that the
housing of the device and its
heating element are cooled.
• The device should be kept
away from flammable or easi-
ly deformable items.
• Do not use device in open
outdoor areas.
• For normal operation of the
device, the mains should
have sufficient voltage and its
technical parameters should
comply with technical spec-
ifications marked on body of
the device.
• In case of any failures apply
to the nearest authorized
service center of manufac-
turer for advice and repair
(addresses of service centers
are provided in warrantee
certificate or on our web-site
www.serviceworld.gr).
• Do not disassemble the
device.
• Unplug the device when it is
not use or before washing.
Maintenance
The convector does not require any
special maintenance.
Before service operations (mainte-
nance) it is necessary to unplug the
convector.
From time to time it is necessary to
clean the device with soft wipe or
wet sponge. Do not use abrasive,
foam detergents and solvents.
It is not difficult to clean of the
place behind the heater mounted
on the wall. Press two latches (Fig.
4) on the rear panel of the heater

Θερμαντικό σώμα υψηλής απόδοσης 17
Specifications
Model Rated
power,
W
Rated
voltage
Dimensions,
(LxWxH),
mm
Weight,
kg
Manner
of
fastening
Dust and
moisture
protection
Cur-
rent,
A
PCH/
AG-1000
MF
1000/
500
~220–240
V / 50 Hz
460х78х400 3,25 Wall/ floor
installation
IP24 4,3
PCH/AG-
500 MF
500/
250
~220–240
V / 50 Hz
460х78х400 3,25 Wall/ floor
installation
IP24 2,2
Troubleshooting
Defect Symptom Cause Troubleshooting
Does not work 1) The power cable is poorly
plugged.
2) The convector is in standby
mode.
3) The actual temperature in room
exceeds the thermostat setting.
1) Properly plug the cable.
2) Set the convector in operating
mode.
3) Set operating temperature of the
convector.
Burnt dust
smell when the
convector is first
started
It is not a defect Smell disappears when the convector
runs for several minutes
If the problem persists after all attempts to remove shortcomings, contact an authorized service
center in your region or sales representative.
and pull the heater forward. The
heater is removed it is possible to
wash the wall.
After cleaning install the heater in
its normal operating position.
Recommended room temperature
and humidity:
а) for operation:
From -25 to +30°С, humidity from
40 to 90%;
b) for storage: From -20 to +80°C,
humidity from 40 to 90%.

18 PHILCO
Items
• Heater (convector)
• Wall mounting bracket.
• Fastening bolts.
• Foots with rollers.
• Manual.
• Warrantee service coupon in
Manual.
• Set of additional filters.
• Key for installation of rollers.
The convector is provided with
a label attached to the front
panel.
Remove this label before oper-
ation.
Recovery
Upon expiry of service life the
device should be recovered. Please,
contact the representative of local
authorities for detailed information
about recovery of this device.
Made in China
The manufacturing date is indi-
cated in the label of the device.
The manufacturer reserves the
right to change design and specifi-
cations of the device.

Θερμαντικό σώμα υψηλής απόδοσης 19

www.philco.gr
www.serviceworld.gr
Η εταιρία δεν ευθύνεται για γραμματικά
λάθη, λάθη συμβόλων ή παραλήψεις του
φυλλαδίου.
Οι προδιαγραφές και η γκάμα των προϊόντων
μπορεί να αλλάξουν χωρίς προηγούμενη
προειδοποίηση.
«PHILCO is a registered trademark used
under license from PHILCO INTERNATΙONAL
COMPANY»,PITTSBURGH,U.S.A.
This manual suits for next models
2
Table of contents
Languages:
Other Philco Heater manuals