© 2010 Koninklijke Philips Electronics N.V.
All rights reserved.
CEM2000_51_QSG_V1.0
Русский
Установка автомобильной
аудиосистемы 1
aОсновное устройство
bКорпус
cПередняя панель
dСтандартный разъем ISO
eНакладная панель
fРезиновая прокладка
gИнструменты для разборки
hВинты x 4 шт.
Выбор страны/региона
1Нажмите чтобы включить устройство.
2Поверните регулятор для выбора
параметра:
[USA] (США)•
[LATIN] (Латинская Америка)•
[Europe] (Западная Европа)•
[ASIA] (АТР)•
[Mid-East] (Средний Восток)•
[Russia] (Россия)•
3Нажмите для подтверждения.
Подключение
Внимание
•
Убедитесь, что все незакрепленные провода
изолированы с помощью изоляционной ленты.
для автомобилей, оснащенных разъемами ISO
234
1Извлеките разъемы ISO из приборной
панели и подключите их к большому гнезду
прилагаемого стандартного разъема.
2Подключите другой конец прилагаемого
стандартного разъема к устройству.
3При необходимости подключите
антенну и усилитель, как показано ниже.
Автомобильную аудиосистему можно
подключить к усилителю с помощью
кабелей RCA-RCA (не входят в комплект).
Разъем Подключить к
1 ANTENNA Антенна
2 FRONT LINE
OUT R (разъем)
Передний правый
динамик
3 FRONT LINE
OUT L (разъем)
Передний левый
динамик
4 REAR LINE
OUT R (разъем)
Тыловой правый
динамик
5 REAR LINE
OUT L (разъем)
Тыловой левый
динамик
6 САБВУФЕР Сабвуфер
для автомобилей, не оснащенных разъемами
ISO 45
Внимание
• Сначала подключите черный провод
заземления.
1При необходимости подключите антенну
и усилитель, как показано ниже.
2Отрежьте конец большего размера
прилагаемого стандартного разъема.
3Внимательно проверьте кабели
автомобиля, затем подключите их к
стандартному разъему.
4Подключите прилагаемый стандартный
разъем к аудиосистеме.
1 Зеленый/черный
кабель
Левый динамик
(тыловой)
2 Белый/черный
кабель
Левый динамик
(фронтальный)
3 Серый/черный
кабель
Правый динамик
(фронтальный)
4 Сиреневый/
черный кабель
Правый динамик
(тыловой)
e Красный Ключ зажигания +12 В
постоянного тока (работа в
положениях ключа ON/ACC)
f Синий Кабель релейного управления
электроантенной/антенной с
приводом/кабель релейного
управления усилителем
g Черный Заземление
h Желтый Автомобильный аккумулятор
+12 В (постоянно работает)
Установка на приборную панель 6
1Если у автомобиля отсутствует бортовой
автомобильный или навигационный
компьютер, отключите отрицательный
вывод автомобильного аккумулятора.
Если аккумулятор будет отключен•
в автомобиле с бортовым
автомобильным или навигационным
компьютером, информация в памяти
компьютера может быть удалена.
Если автомобильный аккумулятор•
не отключен, для предотвращения
замыкания убедитесь, что оголенные
кабели не касаются друг друга.
2Извлеките два винта из верхней части
устройства.
3С помощью инструментов для разборки,
входящих в комплект поставки, снимите
корпус устройства.
4Установите корпус в приборную панель и
отогните язычки наружу, чтобы закрепить
корпус.
5Установите входящую в комплект
резиновую прокладку на конец
монтажного болта.
6Вставьте устройство в приборную панель
до щелчка.
7Подключите отрицательный вывод
автомобильного аккумулятора.
Крепление передней панели 6
1Присоедините накладную панель.
2Установите панель правой стороной в
раму, пока она не встанет на место долж-
ным образом.
3Надавите на левую сторону панели, чтобы
механизм встал на место.
Включение
1Нажмите , чтобы включить
аудиосистему.
Чтобы отключить аудиосистему,•
нажмите и удерживайте кнопку
более 3 секунд.
Установка часов.
1Нажмите MENU.
2Нажимайте или , пока не появятся
значения времени.
3Поверните регулятор по часовой
стрелке для настройки значения часов.
4Нажмите для подтверждения.
5Поверните регулятор против часовой
стрелки для настройки значения минут.
6Нажмите для подтверждения.
Просмотр часов
1Нажмите и удерживайте кнопку OPTIONS
до тех пор, пока не отобразятся часы.
Прослушивание радио
1Нажимайте SOURCE для выбора радио.
2Нажмите кнопку или , чтобы выбрать
диапазон: [FM1], [FM2], [FM3], [AM1], или
[AM2] .
3Нажимайте кнопку или , чтобы
настроить радиостанцию вручную.
Начнется трансляция радиостанции.•
Чтобы автоматически найти•
радиостанцию, нажмите и
удерживайте кнопку или более
3 секунд.
English
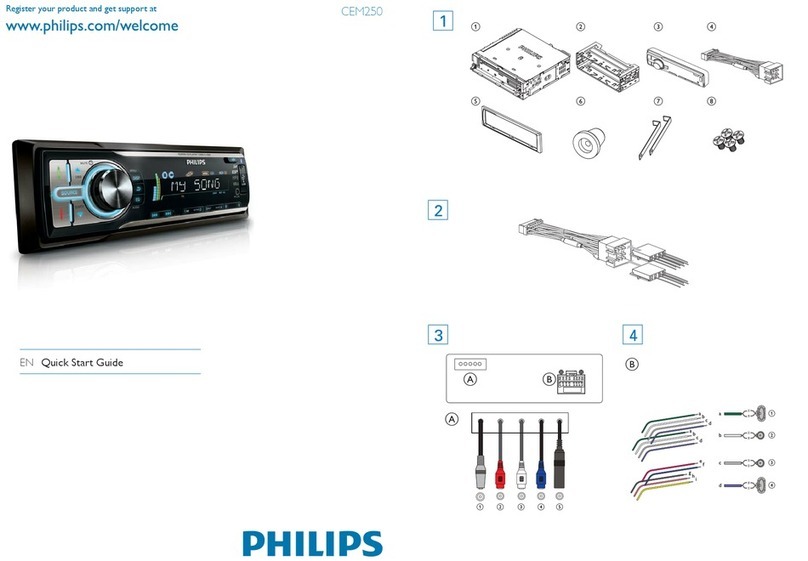
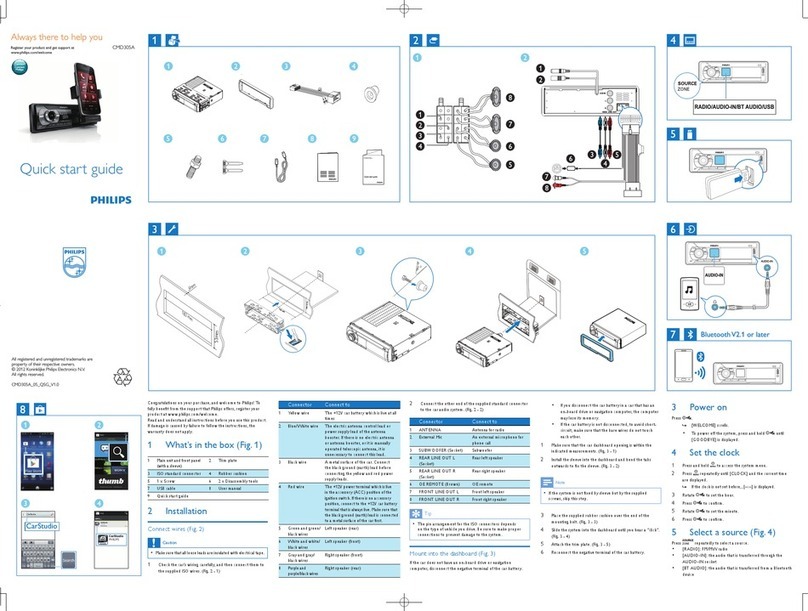
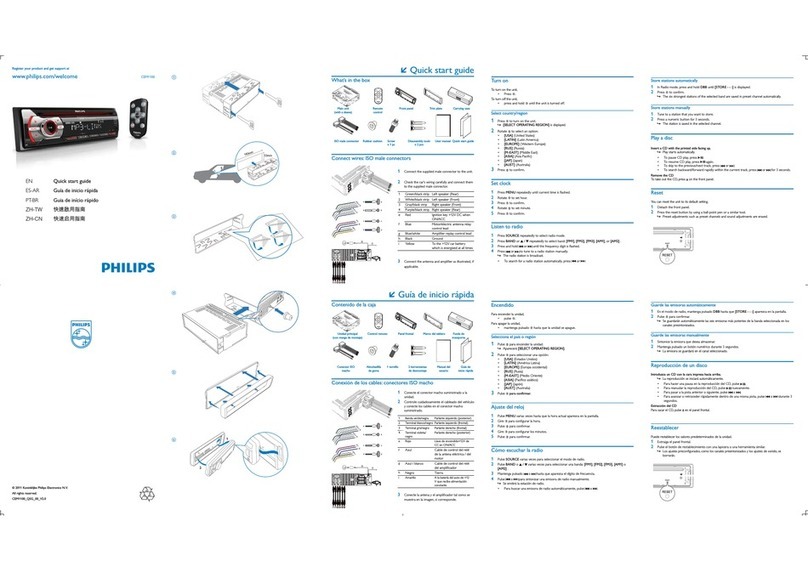
Overview of parts 1
aMain unit
bSleeve
cFront panel
dStandard ISO connector
eTrim plate
fRubber cushion
gDisassembly tools
hScrews (4 pieces)
Select country/region
1Press to turn on the unit.
2Rotate to select an option:
[USA] (United States)•
[Latin] (Latin America)•
[Europe] (Western Europe)•
[ASIA] (Asia Pacific)•
[Mid-East ] (Middle East)•
[Russia] (Russia)•
3Press to confirm.
Connection
Caution
• Ensure that all loose leads are insulated with
electrical tape.
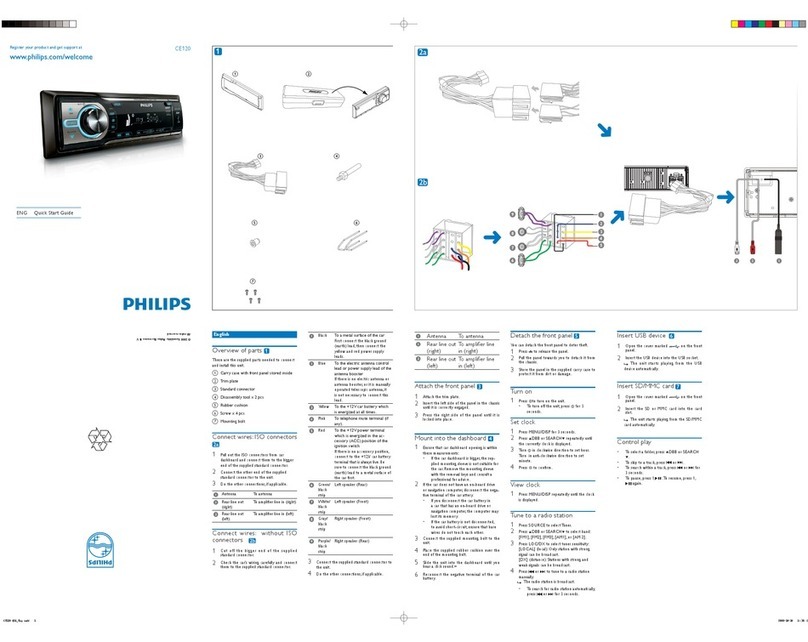
For cars with ISO connectors 234
1Pull out the ISO connectors from car dash-
board and connect them to the bigger end
of the supplied standard connector.
2Connect the other end of the supplied stan-
dard connector to the unit.
3Connect the antenna and amplifier as il-
lustrated, if applicable.You can connect the
car audio to the amplifier through RCA-TO-
RCA cables (not supplied).
Connector Connect to
1 ANTENNA Antenna
2 FRONT LINE
OUT R (Socket)
Front right speaker
3 FRONT LINE
OUT L (Socket)
Front left speaker
4 REAR LINE
OUT R (Socket)
Rear right speaker
5 REAR LINE
OUT L (Socket)
Rear left speaker
6 SUBWOOFER Subwoofer
For cars with ISO connectors 45
Caution
• Be sure to connect the black ground (earth)
lead first.
1Connect the antenna and amplifier as illus-
trated, if applicable.
2Cut off the bigger end of the supplied stan-
dard connector.
3Check the car’s wiring carefully and connect
them to the supplied standard connector.
4Connect the supplied standard connector to
the unit.
1 Green/black strip Left speaker (Rear)
2 White/black strip Left speaker (Front)
3 Gray/black strip Right speaker (Front)
4 Purple/black strip Right speaker (Rear)
e RED Ignition key +12V DC when
ON/ACC
f BLUE Motor/electric antenna relay
control lead/Amplifier relay
control lead
g BLACK Ground
h YELLOW To the +12V car battery
which is energized at all times
Mount in the dashboard 6
1If the car does not have an on-board drive or
navigation computer, disconnect the negative
terminal of the car battery.
If you disconnect the car battery in a car•
that has an on-board drive or navigation
computer, the computer may lose its
memory.
If the car battery is not disconnected,•
to avoid short-circuit, ensure that bare
wires do not touch each other.
2Remove the two screws on the top of the
unit.
3Remove the mounting sleeve with the sup-
plied disassembly tools.
4Install the sleeve into the dashboard and
bend the tabs outward to fix the sleeve.
5Place the supplied rubber cushion over the
end of the mounting bolt.
6Slide the unit into the dashboard until you
hear a click sound.
7Reconnect the negative terminal of the car
battery.
Attach the front panel 6
1Attach the trim plate.
2Insert the right side of the panel in the chas-
sis until it is correctly engaged.
3Press the left side of the panel until the
mechanism locks it into place.
Turn on
1Press to turn on the unit.
To turn off the unit, press• for over 3
seconds.
Set clock
1Press MENU.
2Press or repeatedly until currently time
is displayed.
3Tu r n clockwise to set hour.
4Press to confirm.
5Tu r n anti-clockwise to set minute.
6Press to confirm.
View clock
1Press and hold OPTIONS repeatedly until
the clock is displayed.
Listen to radio
1Press SOURCE repeatedly to select Tuner.
2Press or to select band: [FM1], [FM2],
[FM3], [AM1], or [AM2] .
3Press or to tune to a radio station
manually.
The radio station is broadcast.•
To search for a radio station automati-•
cally, press or for over 3 seconds.


