1Connect 2Set up
Start with the ‘Basic Connection.’
If you have a VCR, follow the instructions for ‘Connection with a VCR or similar device’.
Your Philips recorder is now ready for use!
3Enjoy
About the Time Shift Buffer
(TSB)
Once you switch on this recorder, the currently
selected TV program will be stored in a temporary
storage called the ‘Time Shift Buffer’(TSB). The TSB can
store up to 6 hours of recordings temporarily.
Press DISPLAY once to display the Time
Shift video bar.
09:15:36 AM
08:30:45 AM
03:15:36 AM
CH003
(The TSB in playback mode)
Start time
of program
Program stored
in TSB
Shows TV channel or
video input source
TSB
status icon
in playback
Time of current
screen playback
Current
time
The contents on the time shift buffer will be erased
once you press P +/ -or if you switch to
another mode: SOURCE ,
USB/DV , DVD REC .
Instant Replay
While watching a live TV program, you can press left
Wto jump back 10 seconds upon every single press for
instant replay.
To return to live broadcast, press and hold right X.
Pause ‘live’ TV
At times, you may be interrupted while
watching your favourite program. Now
you can PAUSE it, as if you were in
control of the broadcast.
APress PAUSE LIVE TV while
watching any live TV program to suspend it.
BPress PAUSE LIVE TV to continue.
CTo return to live broadcast, press and hold
right X.
To jump forward playback, press right Xonce for
every 30 seconds.
PAUSE LIVE TV
(DIGITALAUDIO)
VIDEO(CVBS)
S-VIDEO(Y/C) AUDIO
~
MAINS
OUTPUT
ANTENNA-IN
TV-OUT
TOTV- I/O
EXT1
AUX-I/O
EXT2
COAXIAL
R
L
SCART IN
Television (rear)
To antenna
or set-up
box
Philips recorder
(rear)
To AC
power
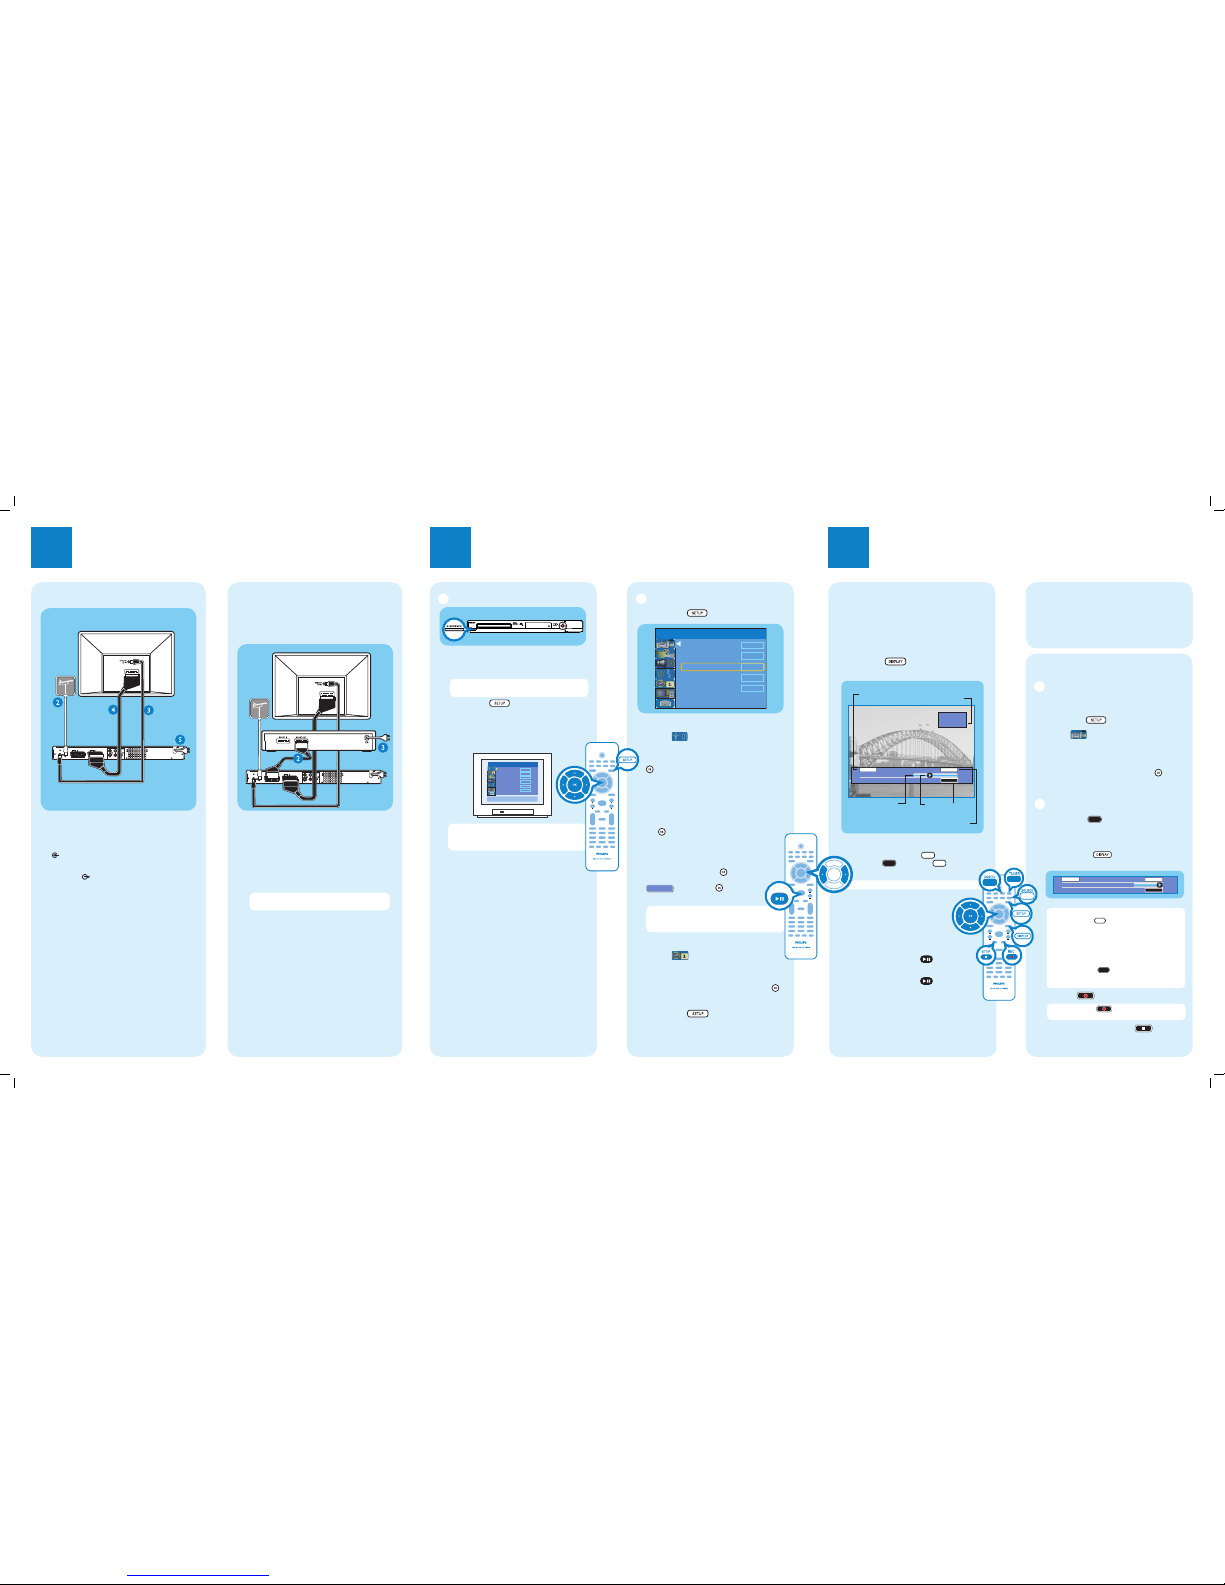
Basic Connection
ABefore connecting, unplug the antenna cable that is
currently connected to your TV.
BConnect the antenna cable to the ANTENNA-IN
jack on the recorder.
CUse the supplied RF coaxial cable to connect the
TV-OUT jack on this recorder to the Antenna
In jack on the TV.
DUse the SCART cable to connect the EXT1 TO
TV-I/O socket on this recorder to the
corresponding SCART input socket on the TV.
EConnect the power cable from the recorder to
an AC power outlet.
(DIGITALAUDIO)
VIDEO(CVBS)
S-VIDEO(Y/C) AUDIO
~
MAINS
OUTPUT
ANTENNA-IN
TV-OUT
TOTV- I/O
EXT1
AUX-I/O
EXT2
COAXIAL
R
L
SCART IN
Philips recorder
(rear)
VCR or similar
device (rear)
AFollow the steps under ‘Basic Connections’ before
you proceed to step Bbelow.
BUse another SCART cable (not supplied) to connect
the EXT2 AUX-I/O SCART socket on this
recorder to the SCART OUT socket on the VCR.
CConnect the power cable from your VCR to an AC
power outlet.
Note In this setup, the VCR cannot record TV
programmes.
For additional connection diagrams, see
the accompanying User Manual.
Connection with a VCR or
similar device
Your new Philips recorder replaces the VCR for your
recording needs. First, unplug all the connections from
your VCR.
To AC
power
Television (rear)
To antenna
or set-up
box
A
Finding the viewing channel
Philips recorder (front panel)
APress STANDBY-ON on the recorder
BTurn on the TV.
Note If connected to your VCR, make sure it is
switched off or in standby mode before proceeding.
CPress SETUP .
DPress ‘0’ on the TV’s remote control, then press
the Channel Down button repeatedly until you see
the { SETUP MENU - GENERAL } page. This is
the correct viewing channel for the recorder.
To exit, press [SETUP].
TV Shape
Auto Program
Manual Program
4:3 LB
Search
Edit
Sort
OK
Menu Language
English
SETUP MENU - SETUP
Country Selection
Austria
Note You may press the AV or SELECT button on
the TV’s remote control (if available) to select the
correct viewing channel. See your TV’s user manual.
B
Initial Installation
APress SETUP on the remote control.
Record Quality
Auto Program
Manual Program
SP
Search
Edit
Sort
OK
Auto ChapterMarker
5min.
SETUP MENU - GENERAL
BSelect the OSD language.
Highlight and press right X.
Select { Menu Language } and press right Xto
access the options.
– Select the desired language option and press OK
to confirm your selection.
CSelect the country of your residence
Press down Tkey to select { Country
Selection } and press right Xto access the
options.
– Select the country of your residence and press
OK to confirm your selection.
DSetup and install TV channels.
Use up S/ down Tto select { Auto
Program } and press OK .
A warning message will appear. Select
and press OK to start
automatic TV channel search.
Note If no channels were found, check the
antenna connection and start the channel
search again.
ESet the date and time
Highlight and press right X.
Select { Date-Time Programme } and press
right Xto access the options.
Select the desired broadcast channel to
automatically set the date/time and press OK
to confirm.
F
Press SETUP to finish the installation.
Start Recording
A
Before recording to hard disk
You can preset the recording quality for content
recorded to the time shift buffer.
APress SETUP on the remote control.
BHighlight and press right X.
Press down Trepeatedly until you highlight
{ Record Quality } and press right X.
CUse up S/ down Tkeys to select the preferred
mode of recording quality and press OK to
confirm.
B
Record to hard disk
APress TUNER to switch to tuner mode.
BPress
P +/ -to go to the TV program channel
you wish to record.
CPress DISPLAY to display the time shift
video bar.
09:15:36 AM
LIVE
03:15:36 AM
Note To record from a connected external device,
press SOURCE repeatedly to cycle through
video input sources from:
{ CAM 1 } : VIDEO jack on the front
{ CAM 2 } : S-VIDEO jack on the front
{ EXT 1 } : VIDEO (CVBS) EXT1 jack on the rear
{ EXT 2 } : S-VIDEO (Y/C) EXT2 jack on the rear
or Press USB/DV to record from a DV
camcorder connected via the DV IN jack on the
recorder.
DPress REC to start recording.
Note Press REC repeatedly to extend 30
minutes increments per single press.
ETo stop recording, press STOP .


