English
Introduction
Congratulations on your purchase and welcome to Philips! To fully benefit
from the support that Philips offers, register your product at
www.philips.com/welcome.
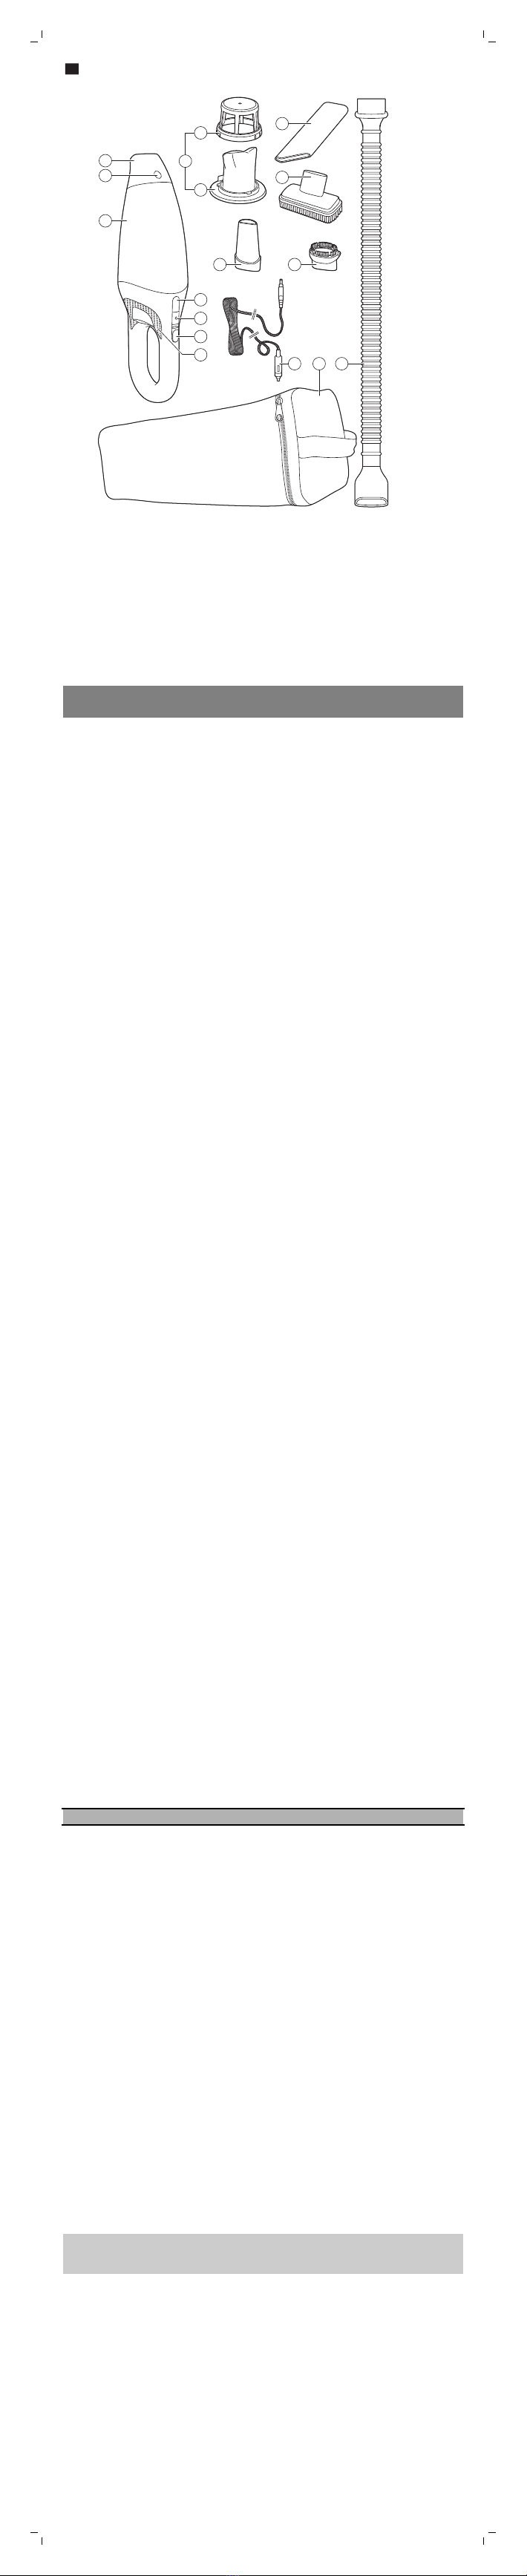
General description (Fig. 1)
1 Detachable nozzle
2 Nozzle release button
3 Dust compartment
4 Dust compartment release button
5 Power light
6 On/off slide with 1 speed
7 Exhaust air openings
8 Filter unit
9 Outer filter
10 Inner filter with filter holder
11 Long crevice tool
12 Large brush tool
13 Crevice tool
14 Brush tool
15 Car cord with car plug
16 Storage bag
17 Hose
Important safety information
Read this important information carefully before you use the appliance and
save it for future reference.
Danger
- Never vacuum up water or any other liquid. Never vacuum up flammable
substances and do not vacuum up ashes until they are cold.
- Never immerse the appliance in water or any other liquid.
Warning
- Do not use the appliance if it is damaged.
- This appliance is not intended for use by persons (including children)
with reduced physical, sensory or mental capabilities, or lack of
experience and knowledge, unless they have been given supervision or
instruction concerning use of the appliance by a person responsible for
their safety.
- Children should be supervised to ensure that they do not play with the
appliance.
- Keep the appliance and its cord out of the reach of children.
- The plug must be removed from the socket-outlet before cleaning or
maintaining the appliance.
Caution
- Always switch off the appliance after use.
- Never block the exhaust air openings during vacuuming.
- Always use the vacuum cleaner with the filter unit assembled.
- Noise level: Lc = 81 dB(A)
Electromagnetic fields (EMF)
This Philips appliance complies with all applicable standards and
regulations regarding exposure to electromagnetic fields.
Using the appliance
1 Push the on/off slide forwards to switch on the appliance (Fig. 2).
2 Push the on/off slide backwards to switch off the appliance (Fig. 3).
Accessories
The appliance comes with the following accessories:
- a small and large brush tool to clean delicate surfaces;
- a long and short crevice tool to vacuum corners or narrow gaps;
- a car cord with car plug for unlimited runtime;
- a hose for extended reach;
- a storage bag to store the appliance in your car.
1 Attach the accessory you want to use to the nozzle of the appliance (Fig.
4).
Hose
This appliance comes with a hose and tube for extended reach during
vacuum cleaning.
1 Insert the appliance end of the hose into the nozzle of the appliance
(Fig. 5).
2 Attach the brush tool or the crevice tool to the attachment end of the
hose for extended reach during vacuum cleaning (Fig. 6).
Cleaning
Danger: Never immerse the appliance in water or any other liquid.
1 Clean the outside of the appliance with a damp cloth.
Emptying and cleaning the dust compartment
Make sure you empty and clean the dust compartment regularly.
Quick cleaning
To empty the dust compartment quickly:
1 Press the nozzle release button (1) and take the detachable nozzle off
the appliance (2). Then shake the contents of the dust compartment out
into a dustbin (Fig. 7).
Thorough cleaning
1 Hold the appliance over a dustbin, press the dust compartment release
button (1) and remove the dust compartment (2) (Fig. 8).
2 Remove the filter unit from the dust compartment and empty the dust
compartment by shaking it with your free hand (Fig. 9).
3 If necessary, clean the dust compartment with a damp cloth and clean
the filter unit (see 'Cleaning the filter unit ').
4 To reattach the dust compartment, align the slot on the dust
compartment with the projection on the appliance. First attach the
bottom of the dust compartment (1). Then push the top of the dust
compartment towards the appliance (2) until it locks into place (‘click’)
(Fig. 10).
Cleaning the filter unit
Make sure you clean the filter unit regularly.
1 Turn the outer filter anticlockwise (1) and remove it from the filter holder
(2) (Fig. 11).
Leave the inner filter attached to the filter holder.
2 Clean the inner filter and the outer filter with a brush or with a normal
vacuum cleaner if they are very dirty.
Note: If necessary , you can clean the inner filter and the outer filter in
cold or lukewarm water. Dry the inner and outer filter thoroughly before
you use the filter unit again.
3 Place the outer filter back onto the filter holder (1) and turn it clockwise
to attach it (2). Put the filter unit back into the dust compartment (Fig. 12).
Storage
1 You can store the appliance and the accessories in the storage bag (Fig.
13).
Replacement
We advise you to replace the inner filter after a prolonged period of use or if
you can no longer clean it properly.
Replacing the inner filter
1 Remove the filter unit from the dust compartment. Turn the outer filter
anticlockwise (1) and remove it from the filter holder (2) (Fig. 14).
2 Gently turn the inner filter anticlockwise (1) and remove it from the filter
holder (2). Place a new inner filter on the filter holder (1) and turn it
clockwise to attach it (2) (Fig. 15).
1
2
3
4
10
9
5
6
7
8
11
12
13 14
15 16 17


