PhoneSuit Journey chargeur tout-en-un
Le chargeur tout-en-un PhoneSuit Journey est une batterie de
secours puissante, ultra fine et compacte pour votre
smartphone, tablette ou autre. Grâce à une technologie de
pointe, il possède une batterie interne de 3500mAh, un câble
Lightning, un câble Micro-USB, un chargeur mural AC et un port
de sortie USB. La polyvalence du PhoneSuit Journey en fait le
parfait compagnon que vous soyez chez vous ou en
déplacement.
Charger votre iPhone, iPod et iPad avec le câble Lightning
Le Journey peut charger votre iPhone, iPod ou iPad compatible
grâce à son câble Lightning intégré. Pour charger votre appareil,
connectez simplement l’embout du câble Lightning du Journey
au port de charge Lightning de votre appareil pour le connecter.
Puis, appuyez sur le bouton de mise en marche sur le côté du
Journey pour l’activer. Votre appareil doit désormais indiquer
qu’il est en charge. Pour retirer le câble et arrêter le
chargement, déconnectez-le doucement de votre appareil.
Charger votre smartphone, tablette ou autres appareils
Le Journey est compatible avec la majorité des smartphones et
des appareils se chargeant avec un câble USB. Pour vous
assurer de la compatibilité avec le Journey, vérifiez le manuel
d’utilisation de votre smartphone ou de votre appareil.
Charger des appareils compatibles avec le Micro-USB: Connectez
l’embout du câble Micro-USB du Journey au port de chargement
de votre appareil. Puis appuyez sur le bouton de mise en
marche sur le côté du Journey pour l’activer. Votre appareil doit
indiquer qu’il est en cours de chargement.
TM
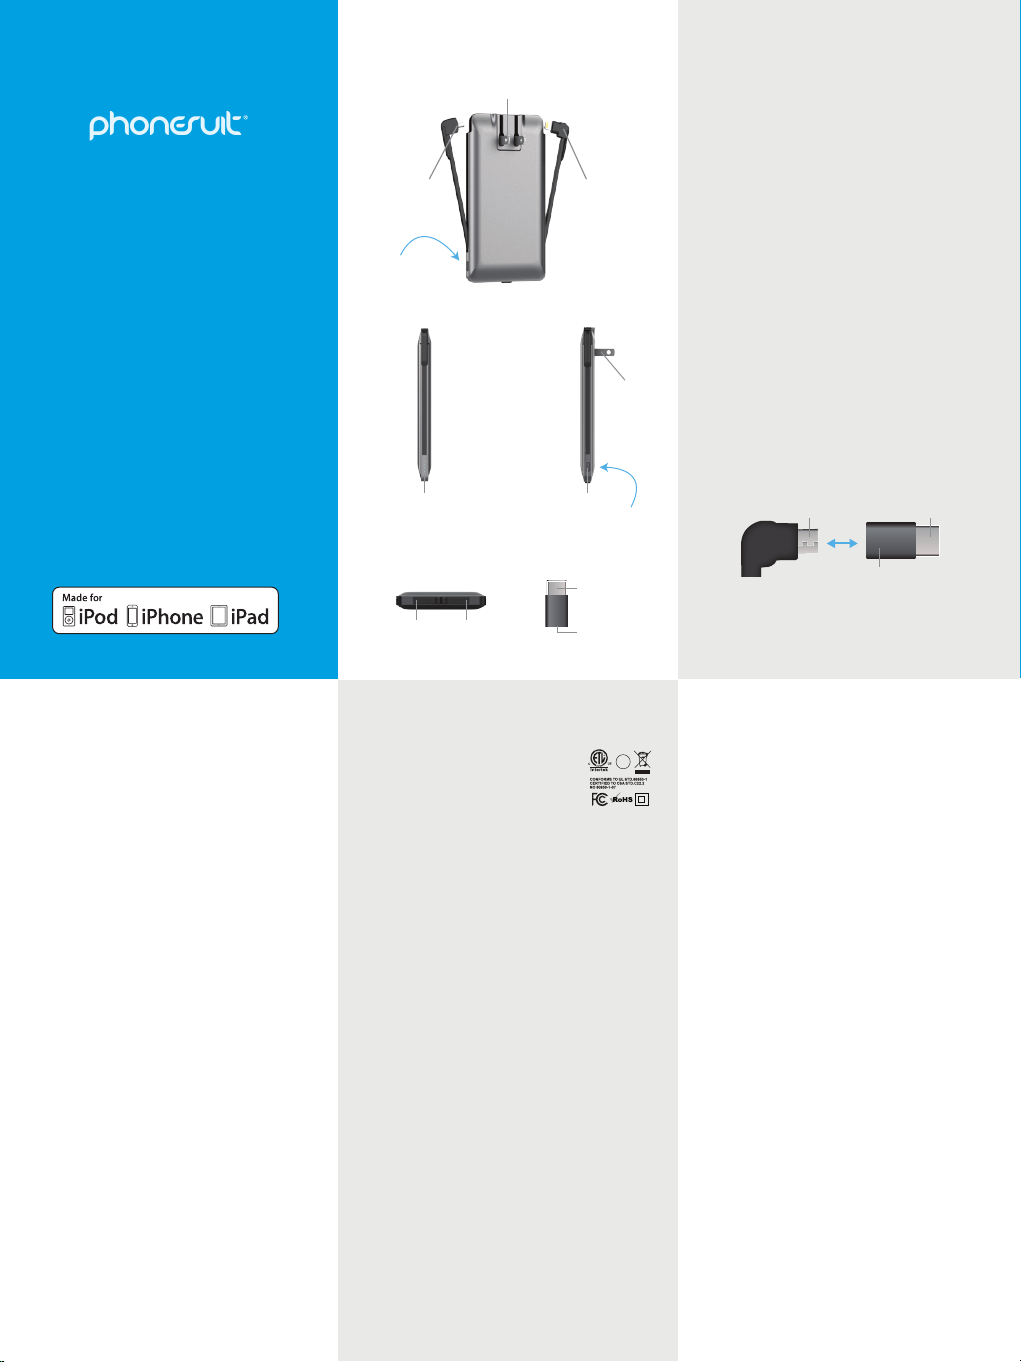
Chargeur All-In-One Journey
Micro USB
Câble
Lightning
Câble
CÔTÉ DROIT
BAS
CÔTÉ GAUCHE
Pliable
Mur AC
Prongs
Pliable
Mur AC
Prongs
JOURNEY
ALL-IN-ONE
CHARGER
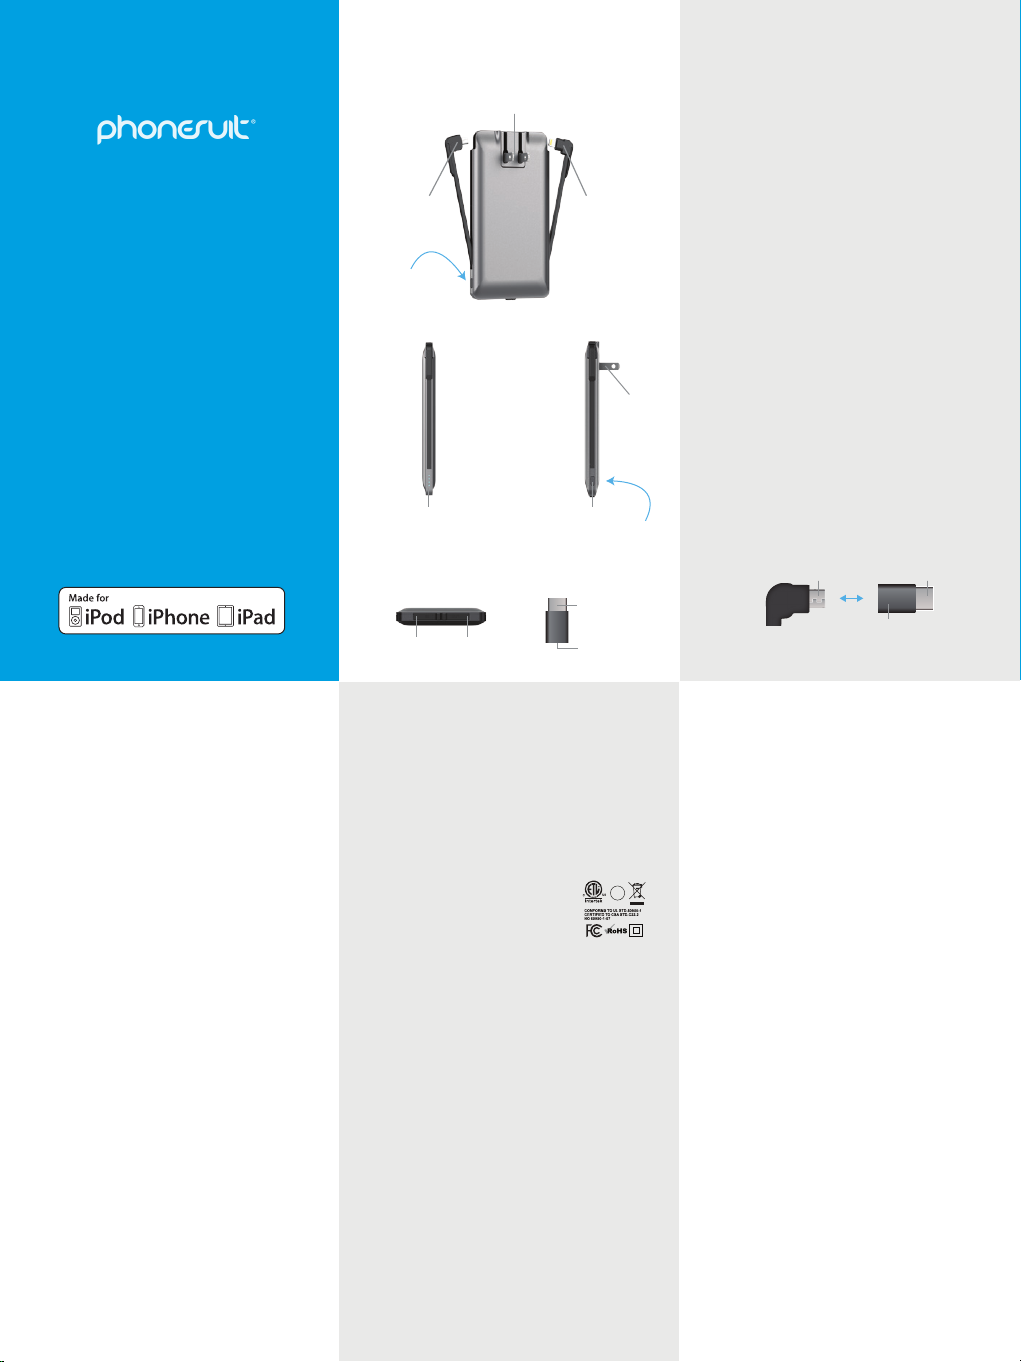
TYPE-C ADAPTATEUR
Se connecte à la pointe du câble
Micro-USB
Charger des appareils compatibles de Type C: Connectez le
adaptateur de Type C à l’embout du câble Micro-USB du Journey
Jusqu'à ce qu'il soit bien connecté. Connectez ensuite l’embout
de Type C au port de chargement de votre appareil. Puis
appuyez sur le bouton de mise en marche sur le côté du Journey
pour l’activer. Votre appareil doit indiquer qu’il est en cours de
chargement.
Charger des appareils compatibles avec un câble USB:
Connectez le câble USB de votre appareil au port de SORTIE
USB inférieur. Connectez ensuite l’embout opposé du câble
au port de chargement de votre appareil. Puis appuyez sur le
bouton de mise en marche sur le côté du Journey pour
l’activer. Votre appareil doit indiquer qu’il est en cours de
chargement.
PhoneSuit support produit
Si vous avez des questions concernant le produit, des commentaires ou même
des suggestions, n’hésitez pas à nous contacter. Envoyez-nous un email ou
appelez le service client pour toute assistance.
• Téléphone : +1-877-886-SUIT (7848) ou +1-310-774-0282
Garantie PhoneSuit
PhoneSuit se démarque par la qualité de ses produits. Nous fournissons une
garantie d’un an pour la réparation ou le remplacement d’un Journey. S’il y a un
défaut de fabrication sur le matériel ou de confection sur votre Produit, vous
pouvez nous l’envoyer pour le réparer pendant un an à partir de la date d’achat.
Pour que la garantie s’applique vous devez avoir acheté le produit dans un
magasin PhoneSuit ou chez un distributeur agréé de PhoneSuit. Vous devez
aussi avoir effectué votre inscription sur le site PhoneSuit.com. Veuillez
contacter le service client pour plus d’information.
Informations de sécurité importantes
Veuillez lire toutes les informations de sécurité et les instructions d’utilisation
avant d’utiliser le Produit de batterie PhoneSuit. Une mauvaise utilisation du
produit peut provoquer une surchauffe, un incendie, une explosion, un choc
électrique, des fumées toxiques ou d’autres blessures ou dommages. Une
mauvaise utilisation du produit entrainera l’annulation de la garantie.
Caractéristiques
Modèle : PS-JOURN-35
Capacité : 3500mAh @ 3,7V / 12,95WH
Entrée AC : AC 100V6240V, 50/60Hz, 300Ma
Entrée Micro-USB : 5V @ 2,1A
Sortie : 5V @ 2,1A, Sortie AC : 5V @ 2,4A
Indicateurs LED du chargement de la batterie
Le PhoneSuit Journey possède 4 indicateurs LED du
chargement de la batterie affichant le niveau de charge
restante de la batterie interne. L’avancement de la charge
s’affiche tous les 25%. Les indicateurs de charge se trouvent
sur le côté inférieur du Journey et le bouton de mise en
marche est sur le côté droit. Pour activer les indicateurs de
chargement de la batterie, appuyez sur le bouton de mise en
marche.
Charger le PhoneSuit Journey
Charger par prise murale AC: Pour charger le Journey avec
une prise AC, dépliez les branches AC situées à l’arrière de
l’appareil jusqu’à ce qu’elles soient droites. Mettez
maintenant les branches dans une prise au mur AC
américaine standard, compatible pour charger l’appareil. Les
4 voyants LED d’état de la batterie afficheront la progression
du chargement tous les 25%. Quand les 4 voyants d’état de
chargement sont allumés sans clignoter, alors la batterie
interne est complètement chargée. Une fois terminé,
déconnectez-le de la prise et repliez les branches AC sur le
Journey pour le ranger.
Charger par câble Micro-USB: Vous pouvez également charger
le Journey avec le câble Micro-USB fourni. Utilisez le câble
fourni et connectez le plus petit embout du câble Micro-USB
au port d’entrée en-dessous du Journey. Connectez l’embout
USB plus grand du câble au port de chargement USB
compatible. Pour charger le Journey plus vite, utilisez un port
de chargement high output 1.5 Amp USB. Les 4 voyants LED
d’état de la batterie afficheront la progression du
chargement tous les 25%. Quand les 4 voyants d’état de
chargement sont allumés sans clignoter, alors la batterie
interne est complètement chargée. Une fois terminé,
déconnectez-le de la prise et repliez les branches AC sur le
Journey pour le ranger.
Fonctionnalité Smart Power & chargement pass-through
Le PhoneSuit Journey possède de nombreuses
fonctionnalités de puissance. Le chargement Pass-through
1.Ne placez ou ne rangez pas le produit dans un environnement sujet aux
fortes températures, comprenant l’exposition prolongée au soleil ou à la
chaleur. Ne mettez pas le Produit dans un feu.
2.Faites attention aux chutes, aux coups, aux abrasions ou à d’autres impacts
sur le Produit. S’il y a un quelconque dommage sur la batterie comme des
bosses, des trous, des déchirures, des déformations ou de la rouille, dus à
n’importe quelle cause, arrêtez immédiatement de l’utiliser et contactez le
service de support produit PhoneSuit.
3.Ne désassemblez pas le Produit. N’essayez pas de réparer ou de modifier le
Produit de quelque manière que ce soit. N’essayez pas de remplacer un
composant du Produit.
4.N’exposez pas le Produit à un environnement humide et ne le plongez pas
dans un liquide. Maintenez la batterie sèche à tout moment.
5.N’essayez pas de charger le Produit avec une autre méthode qu’expliquée
dans ce manuel. Utilisez uniquement le câble fourni pour charger le Produit.
Pour toutes questions ou instructions sur comment correctement charger le
Produit, référez-vous à ce manuel d’utilisation ou contactez le service client.
6.Le Produit est uniquement à usage des adultes. Si des mineurs utilisent le
Produit, ils doivent être sous la surveillance d’un adulte. Le Produit ne doit
jamais être utilisé par des petits enfants.
7.Tous les produits ont subi une inspection complète d’assurance qualité
pour tester leur bon fonctionnement. Si vous trouvez que votre Produit ne
fonctionne pas correctement, arrêtez tout de suite de l’utiliser. Si le Produit
émet une chaleur excessive ou une odeur, s’il est déformé de quelconque
manière, cassé, coupé, s’il a connu ou connait un phénomène anormal,
arrêtez tout de suite d’utiliser le Produit et contactez le service client
PhoneSuit.
8.Si vous souhaitez ranger le Produit pendant une longue durée, chargez-le
d’abord pendant une heure.
9.N’utilisez pas le Produit quand vous êtes dans un environnement
potentiellement explosif. Des étincelles dans un tel environnement peuvent
causer une explosion ou un incendie, provoquant des blessures graves ou
même la mort.
10.Si vous voulez vous séparer du Produit, débarrassez-vous de la batterie
d’une manière appropriée en fonction des régulations fédérales ou des états.
Parce que le Produit contient des composants électroniques et une batterie, il
ne peut pas être jeté avec les déchets ménagers.
BC
5001689
Liste des marques déposées et informations légales
iPhone 7, iPhone 6s, iPhone 6, iPhone 7 Plus, iPhone 6s Plus, iPhone 6s Plus,
iPhone SE, iPhone 5S, iPhone 5C, iPhone 5, iPad Pro (9,7 inch), iPad Pro (12,9
inch) iPad Air 2, iPad Air, iPad mini 4, iPad mini 3, iPad mini 2, iPad mini, iPad
(4ème génération), iPod touch (6ème génération), iPod touch (5ème
génération), iPhone, iPod et iPad sont des marques déposées d’Apple Inc.,
enregistrées aux Etats-Unis et dans d’autres pays. « Made for iPod », « Made
for iPhone » et « Made for iPad » signifie qu’un accessoire électronique a été
conçu pour se connecter spécialement à un iPod, iPhone ou iPad,
respectivement, et a été certifié par le fabricant pour s’accorder avec les
standards de performance d’Apple. Apple n’est pas responsable du
fonctionnement de cet appareil ou des normes de sécurité et de standards
de régulation. Veuillez noter que l’utilisation de cet accessoire ave un iPod,
iPhone ou iPad peut affecter les performances sans fil. Le temps de
chargement, la performance et les résultats peuvent varier en fonction de
plusieurs facteurs dont l’utilisation de l’appareil. Ce produit est destiné à un
usage exclusivement avec d’autres appareils mobiles appropriés. Veuillez
vous référer à l’emballage de votre appareil pour déterminer si le produit est
compatible avec votre appareil en particulier. PhoneSuit n’est pas
responsable des dommages sur quelconques appareil mobile ayant eu lieu
lors de l’utilisation de ce produit. PhoneSuit ne sera aucunement responsable
pour vous ou pour un tiers de quelconque dommage dont vous ou un tiers
aient pu souffert lors d’une utilisation, prévue ou non, ou d’une mauvaise
utilisation de ce Produit. Copyright © 2017 PhoneSuit. Tous droits réservés.
Manuel D'utilisation TYPE-C ADAPTATEUR
MICRO-USB CÂBLE
Micro-USB Entrée
Type-C SortieMicro-USB Sortie
vous permet de charger vos appareils en même temps que la
batterie du Journey. Branchez le Journey pour qu’il se charge par
prise AC ou par le port d’entrée et connectez le câble de
chargement aux appareils que vous souhaitez charger. Une fois
le chargement fini, tous vos appareils et le Journey seront
complètement chargés. Le chargement priorisé chargera
d’abord vos appareils connectés puis la batterie interne du
Journey. Le Journey possède aussi la fonctionnalité d’arrêt
automatique du chargement qui éteindra la batterie interne
quand il détectera que les appareils sont chargés à 100%.
Bouton De Mise en
Marche
Appuyez pour activer
Micro-USB Entrée USB Sortie Micro-USB Entrée
Type-C Sortie
Bouton De Mise en
Marche
Appuyez pour activer
Indicateur LED
De Chargement