manuals.online logo
Brands
  1. Home
  2. •
  3. Brands
  4. •
  5. PHYWE
  6. •
  7. Accessories
  8. •
  9. PHYWE Cobra SMARTsense Acceleration User manual

PHYWE Cobra SMARTsense Acceleration User manual

1
www.phywe.com, © All rights reserved 12907-00 / 4318
Operating
instructions
Cobra SMARTsense Acceleration ± 8 g
12907-00
PHYWE Systeme GmbH & Co. KG
Robert-Bosch-Breite 10
D–37079 Göttingen
Telefon +49 (0) 551 604–0
Fax +49 (0) 551 604–107
E-mail [email protected]
Internet www.phywe.com
The unit complies
with the applicable
EC-
g
uidelines
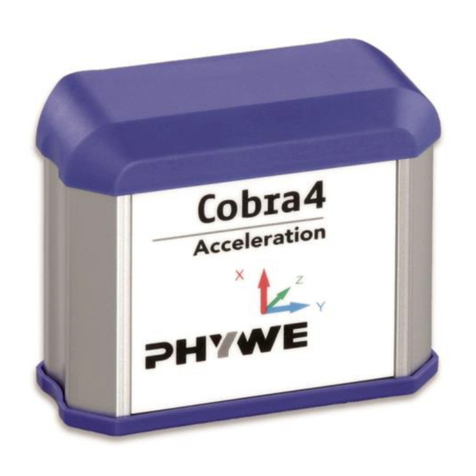
Fig. 1: 12907-00 Cobra SMARTsense Acceleration ± 8 g
TABLE OF CONTENTS
1SAFETY PRECAUTIONS
2PURPOSE AND CHARACTERISTICS
3FUNCTIONAL AND OPERATING ELEMENTS
4NOTES ON OPERATION
5 HANDLING
6TECHNICAL DATA
7SCOPE OF DELIVERY
8ACCESSORIES
9DISPOSAL
1 SAFETY PRECAUTIONS
Carefully read these operating instructions completely
before operating this instrument. This is necessary to
avoid damage to it, as well as for user-safety.
Only use the instrument for the purpose for which it was
designed.
Only use the instrument in dry rooms in which there is no
risk of explosion.
Protect the instrument from dust, moisture and vapours.
Use a slightly moist lint-free cloth to clean the instrument.
Do not use aggressive cleaning agents or solvents.
Take care that no liquid penetrates in through the hous-
ing openings, as such penetration would result in dam-
age to Sensor.
Do not open the unit.
2 PURPOSE AND CHARACTERISTICS
The sensor is used for measuring the the acceleration in all
three spatial directions x, y and z.
The measured values are transferred to a terminal device,
e.g. to a table computer, smartphone, etc., via Bluetooth.
Caution!
2
www.phywe.com, © All rights reserved 12907-00 / 4318
3 FUNCTIONAL AND OPERATING ELEMENTS
3.1 Operating elements
The sensor has an on-button and two LEDs for indicating the
Bluetooth and battery charge status.
On-button
Press the on-button for more than 3 seconds to switch the
sensor on and off
Bluetooth-LED
Flashing red every 2 seconds Not connected
Flashing green every 2 seconds Connected to the ter-
minal device
Flashing green every 4 seconds Running measurement
Battery charge LED
Flashing red every 2 seconds Low battery
Illuminated red Active charging process
Illuminated red Charging process
completed
3.2 Measurement input
The acceleration sensor is located at the front of the sensor.
The alignment of the sensor in the x-, y- and z-direction is
illustrated on the device.
3.3 USB port
The battery, which is permanently installed in the sensor, is
charged via the type C USB port.
4 NOTES ON OPERATION
This Cobra SMARTsense Acceleration fulfils all of the techni-
cal requirements that are compiled in current EC guidelines.
The characteristics of this product qualify it for the CE mark.
This instrument is only to be put into operation under special-
ist supervision in a controlled electromagnetic environment in
research, educational and training facilities (schools, universi-
ties, institutes and laboratories).
This means that in such an environment, no mobile phones
etc. are to be used in the immediate vicinity. The individual
connecting leads are each not to be longer than 2 m.
The instrument can be so influenced by electrostatic charges
and other electromagnetic phenomena (HF, bursts, indirect
lightning discharges) that it no longer works within the given
specifications. Carry out the following measures to reduce or
eliminate the effect of such disturbance: Ensure potential
equalization at the PC (especially with Laptops). Use screen-
ing. Do not operate high frequency emitters (e.g. radio
equipment or mobile radiotelephones) in the immediate vicini-
ty. When a total failure of the instrument occurs, unplug it and
plug it back in again for a reset.
5 HANDLING
This section describes the start-up of the sensor and the re-
cording of measurement data. Please read this section thor-
oughly in order to avoid failures or operating errors.
5.1 Charging process
Use a USB-C cable to connect the sensor to a computer or
USB charger (not included).
During the charging process, the battery charge LED lights
up red. When the charging process is complete, the battery
charge LED lights up green. The charging time for a com-
pletely discharged battery is 3 hours maximum.
Disconnect the charger at the latest four hours af-
ter the completion of the charging process. Other-
wise, the service life of the battery may be nega-
tively affected.
5.2 Start-up
Switch the sensor on by pressing the on-button for more than
3 seconds. The Bluetooth LED lights up red. Start the
measureApp application and select the sensor.
There is a four-digit code on the back of the sensor. This
code corresponds to the last four digits of the sensor name in
the measureApp application. This enables the precise as-
signment of the sensors within the measureApp application.
After the sensor has been selected in the measureApp appli-
cation, the LED lights up green, thereby signalling that the
connection has been correctly established.
If the sensor is switched on, but not connected, it will switch
off automatically after five minutes.
6 TECHNICAL DATA
Operating temperature range: 5 - 40°C
Rel. humidity < 80%
Measuring range
Resolution
± 8 g
0.01 g
Max. date rate
Battery capacity
Dimensions (length x width x height)
100 Hz
250 mAh
30 m
Dimensions (length x width x height) 65 x 38 x 20 mm
Weight 21 g
7 SCOPE OF DELIVERY
The extent of delivery is as follows
Cobra SMARTsense Acceleration 12907-00
Operating instructions
Acceleration sensor
3
www.phywe.com, © All rights reserved 12907-00 / 4318
8 ACCESSORIES
The following accessories are available:
USB-charger 07934-99
USB connecting cable type C 07935-00
Free measureApp available from supplier portals
iOS
Android
9 DISPOSAL
The packaging mainly consists of environmentally-friendly
materials that should be returned to the local recycling sta-
tions.
PHYWE Systeme GmbH & Co. KG
Abteilung Kundendienst
Robert-Bosch-Breite 10
D–37079 Göttingen
Telefon +49 (0) 551 604-274
Fax +49 (0) 551 604-246
Do not dispose of this product with normal
household waste. If this unit needs to be
disposed of, please return it to the address
that is stated below for proper disposal

Other PHYWE Accessories manuals

PHYWE Cobra4 Oxygen User manual

PHYWE

PHYWE Cobra4 Oxygen User manual

PHYWE Cobra SMARTsense Skin Resistance User manual

PHYWE

PHYWE Cobra SMARTsense Skin Resistance User manual

PHYWE Cobra4 User manual

PHYWE

PHYWE Cobra4 User manual

PHYWE Cobra SMARTsense Rotary Motion User manual

PHYWE

PHYWE Cobra SMARTsense Rotary Motion User manual

PHYWE Cobra SMARTsense ORP User manual

PHYWE

PHYWE Cobra SMARTsense ORP User manual

PHYWE Cobra SMARTsense User manual

PHYWE

PHYWE Cobra SMARTsense User manual

PHYWE Cobra SMARTsense CO2 User manual

PHYWE

PHYWE Cobra SMARTsense CO2 User manual

PHYWE Cobra4 User manual

PHYWE

PHYWE Cobra4 User manual

PHYWE Cobra SMARTsense Energy User manual

PHYWE

PHYWE Cobra SMARTsense Energy User manual

PHYWE Cobra4 Sensor-Unit Electricity User manual

PHYWE

PHYWE Cobra4 Sensor-Unit Electricity User manual

PHYWE Cobra4 User manual

PHYWE

PHYWE Cobra4 User manual

PHYWE Cobra4 Junior-Link User manual

PHYWE

PHYWE Cobra4 Junior-Link User manual

PHYWE Cobra SMARTsense Humidity User manual

PHYWE

PHYWE Cobra SMARTsense Humidity User manual

PHYWE Cobra SMARTsense Pressure User manual

PHYWE

PHYWE Cobra SMARTsense Pressure User manual

PHYWE Cobra4 User manual

PHYWE

PHYWE Cobra4 User manual

PHYWE Cobra SMARTsense User manual

PHYWE

PHYWE Cobra SMARTsense User manual

PHYWE Cobra4 Sensor-Unit Energy User manual

PHYWE

PHYWE Cobra4 Sensor-Unit Energy User manual

Popular Accessories manuals by other brands

Binder KB ECO Series operating manual

Binder

Binder KB ECO Series operating manual

Fishman CONCERT PICKUPS installation guide

Fishman

Fishman CONCERT PICKUPS installation guide

Samsara PB2 user guide

Samsara

Samsara PB2 user guide

3B SCIENTIFIC 1000553 instruction sheet

3B SCIENTIFIC

3B SCIENTIFIC 1000553 instruction sheet

Trigano Auvents Panoramic 300 Erection Instructions

Trigano

Trigano Auvents Panoramic 300 Erection Instructions

VETEC D100X/4-L Connection details, scaling and general information

VETEC

VETEC D100X/4-L Connection details, scaling and general information

LG AN-TP200 User information

LG

LG AN-TP200 User information

SICK LMS1 Series operating instructions

SICK

SICK LMS1 Series operating instructions

Moog Tritech Super SeaKing 700 V7 Series product manual

Moog

Moog Tritech Super SeaKing 700 V7 Series product manual

Vega VEGASON 61 operating instructions

Vega

Vega VEGASON 61 operating instructions

woundwo TRENDLINE SMARTBOX Instructions for use

woundwo

woundwo TRENDLINE SMARTBOX Instructions for use

Ellia AWAKEN ARM-530 quick start guide

Ellia

Ellia AWAKEN ARM-530 quick start guide

Salus SS912ZB Installation & quick start guide

Salus

Salus SS912ZB Installation & quick start guide

Sportplus SP-SB-301 operating instructions

Sportplus

Sportplus SP-SB-301 operating instructions

Micsig DP10013 user manual

Micsig

Micsig DP10013 user manual

ON Semiconductor XGS 12000 manual

ON Semiconductor

ON Semiconductor XGS 12000 manual

NeuLog NUL-216 Guide

NeuLog

NeuLog NUL-216 Guide

Elkay EFA25 1D Series Installation, care & use manual

Elkay

Elkay EFA25 1D Series Installation, care & use manual

manuals.online logo
manuals.online logoBrands
  • About & Mission
  • Contact us
  • Privacy Policy
  • Terms and Conditions

Copyright 2025 Manuals.Online. All Rights Reserved.