-3- -4-
AVERTISMENT!
• A se utiliza sub supravegherea unei persoane adulte.
• A se asambla de o persoană adultă
• Nu lăsaţi jucăriile în apropierea surselor de căldură!
• Ştergeţi cu o cârpă umedă pentru a îndepărta murdăria de pe jucărie, nu folosiţi apă sau solvenţi.
• A se utiliza cu echipament de protecție. A nu se utiliza în trafic. (cască, mănuși, genunchiere, cotiere etc.).
• Jucăria trebuie să se folosească cu prudență de către utilizator sau terți, pentru că aceasta necesită îndemânare
în utilizare în vederea evitării accidentelor prin cădere sau coliziune.
• Piesele mobile şi conectorii trebuie verificate periodic de un adult, aveţi grijă ca, copiii să nu introducă mâinile,
degetele în aceste piese.
• Nu lăsaţi pungile de plastic la îndemâna copiilor, pentru a evita riscul de sufocare.
• Jucăria este destinată utilizării de un copil per dată. Nu permiteţi utilizarea lui de mai mulţi copii în acelaşi timp.
• Protejaţi produsul de factorii externi precum ploaie, soare, ninsoare. Aceşti factori externi pot duce la decolorar-
ea culorii şi deteriorarea produsului.
• Nu utilizaţi produsul în spaţii cu risc de cădere (pantă, piscină, scări. etc.)
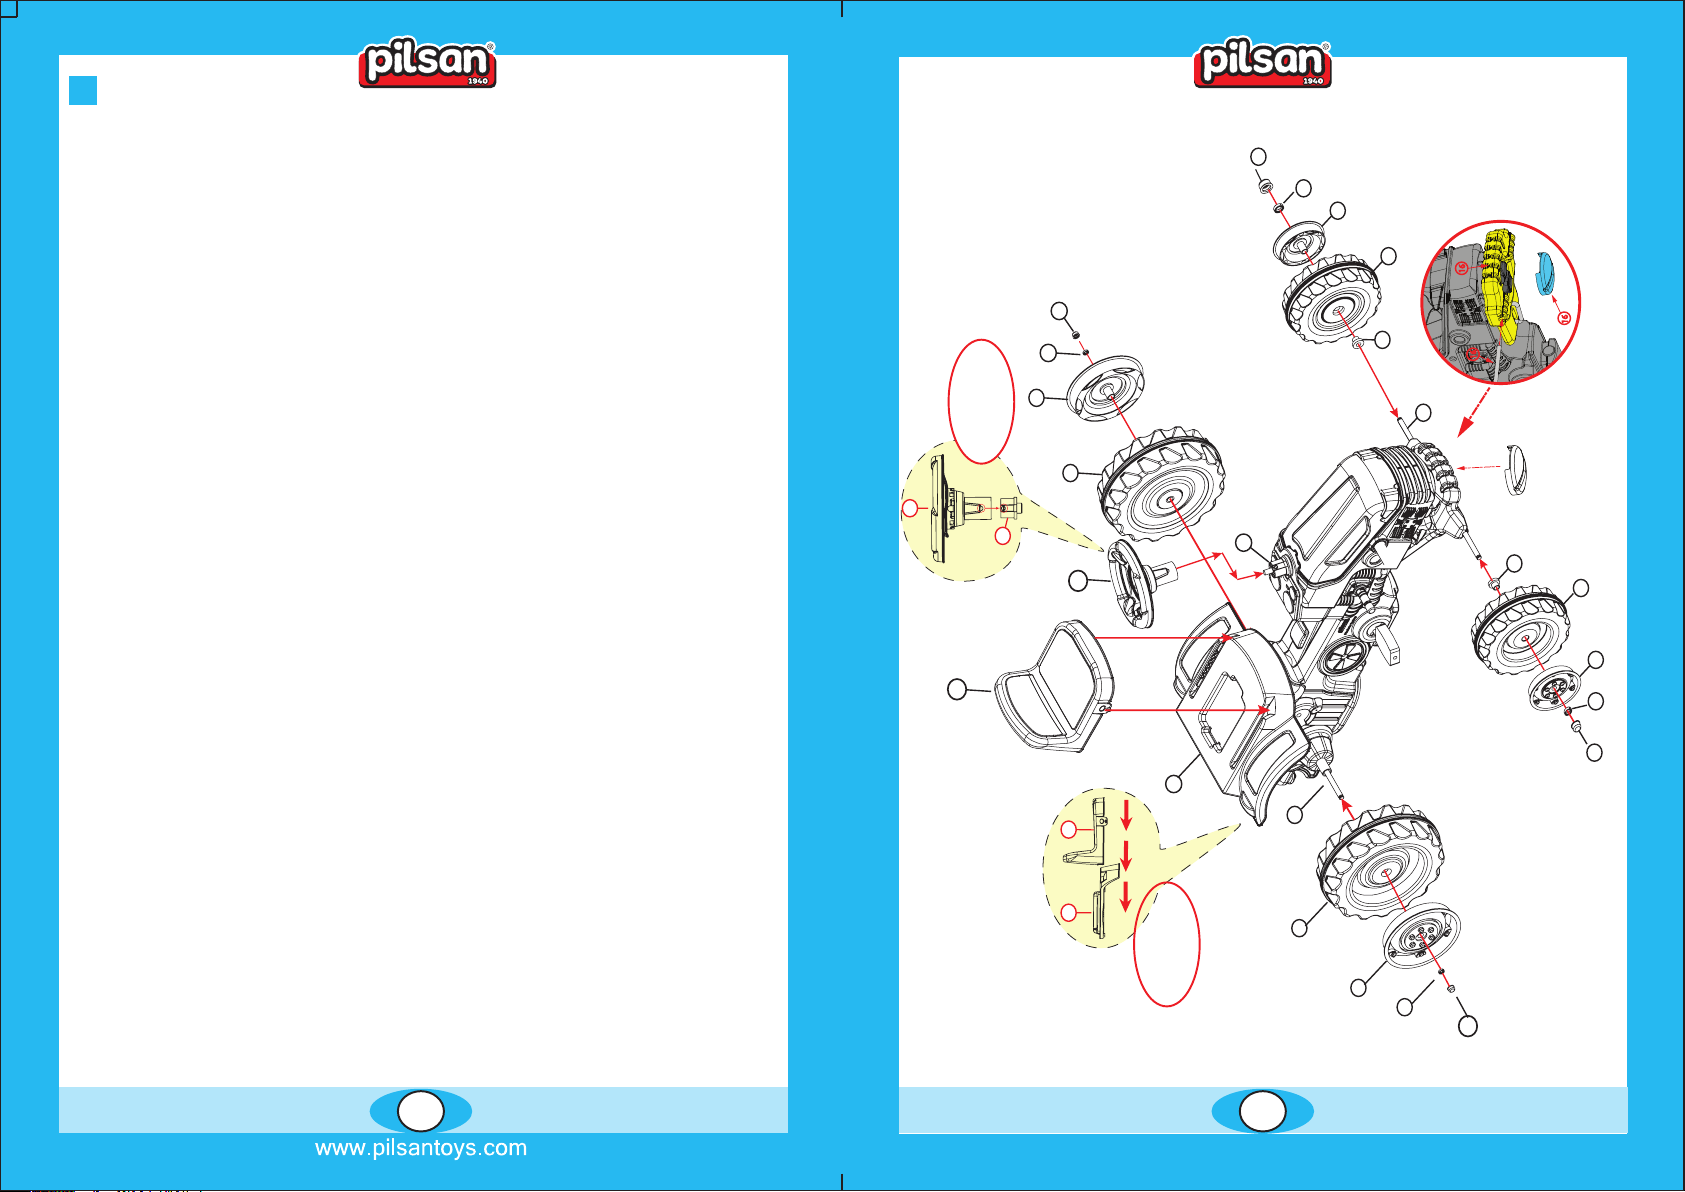
ASAMBLARE
Avertisment! A se asambla de o persoană adultă.
1.Înainte de a efectua pasul 1 de asamblare asiguraţi-vă că, capacul nr 16 este fixat şi continuaţi asamblarea.
2.Asamblarea roţilor din faţă: ataşaţi garnitura nr. 2, roata din faţă (ataşata la anvelopă) nr. 3, janta roţii nr. 4,
precum este indicat în imaginea 1. Pe axul roţii şi fixaţi capsula nr. 5 pe gaura nr. 6 pe ax şi ataşaţi capsula 8
împingând. Imaginea 1
3.Asamblarea roţilor din spate: ataşaţi roata din spate nr. 8, janta roţii nr. 9, pe axul roţii nr. 7 precum este indicat
in imaginea 1, şi fixaţi capsula 12 (nr. 10) pe gaura nr. 11 pe ax şi ataşaţi capsula 12 împingând. Imaginea 1
4.Asamblarea volanului: Potriviţi găurile de sub volan nr. 12 cu capsele de pe marginea volanului nr 13 de pe
cadru, apăsaţi până se blochează. Imaginea 2
5.Asamblarea scaunului: Potriviţi capsele de pe ambele laturi ale scaunului nr. 15 cu găurile de pe cadru şi
apăsaţi până când se fixează. Imaginea 3
*Atenţie! Asiguraţi-vă că piesele componente sunt corect asamblate înainte de a utiliza produsul şi după
finalizarea asamblării.
Funcţii
Produsul este o jucărie mecanică pentru copiii mai mari de 3 ani.
Instrucţiuni de utilizare
Înaintarea se face cu ajutorul pedalelor. Direcţia la stânga la dreapta se face de la volan. Pentru frânare copilul
trebui să îşi menţină picioarele pe pedale din cauza sistemului cu lanţ / viteze.
Specificaţii Tehnice
Model : Tractor cu pedale pentru copii
Nr. cod: 07- 314
Mişcare: pedale cu lanţ
WARNING!
• The product should be used under the supervision of an adult.
• The product must be assembled by an adult.
• Don’t leave the toys near sources of heat!
• Wipe clean with a damp cloth to clean the product. Do not use solvents.
• It shoundn't be used in the traffic. User should wear protective equipment. (Helmet, kneepad etc.)
• The product requires a proficiently usage. Otherwise, accidents such as rollover, collision with third persons may
happen.
• Moving parts and connecting places of the product should be regularly controlled by an adult, it should be paid
attention that children do not put their limbs such as arms, fingers in these areas and this should be taught to the
child.
• Keep plastic packages away from children against the risk of suffocation.
• The tractor is designed for the use of only one child. More than one child is not allowed on the tractor.
•Protect product from external factors such sun, rain, snow. These external factors may lead to color fading and
damage on the product.
ACTIVE TRACTOR DIGGER- ASSEMBLY
Warning! The assembly of the product should be done by an adult.
1) Before applying step 1 of the installation make sure that the axle cap is on axle no 16 and continue with the
installation.
2) Assembly of the front tyres: Respectively attach the disc (no2), the front tyres (It is delievered as attached to
the tyre) (no.3), front tyre rim (no.4) as in (Figure 1) to the front tyre shaft and place the capsule of 8 (no.5) into
the hole (no.6) in the shaft and attach the capsule of 8 by pushing. (Figure 1)
3) Assembly of the back tyre: Respectively attach the back tyre (no.8) and back tyre rim (no.9) to the back tyre
shaft (no.7) as in Figure 1. and place the capsule of 12 (no.10) into the hole (no.11) in the shaft and attach the
capsule of 12 by pushing. (Figure 1)
4) Assembly of the Wheel: Place the holes under the Wheel (no.12) on the grips which are on Wheel wedge
(no.13) on the body, by pushing until they are locked. (Figure 2)
5) Assembly of the seat: Push the grips which are on both sides of the seat (no.15) inwards. Place it by pushing
backward from the front part of the seat connection hole on the mudguard (no.14). (Figure 3)
* Attention! Make sure that the assembly parts are in their appropriate places before using the product after
finishing assembly.
Functions
The product is a mechanical toy used by getting on it for girls / boys at the age of 3+.
Instructions Of Use
The child moves and accelerates the vehicle by putting the feet on the pedals. Turning to left - right is done by
controlling the steering wheel. For breaking, the child must keep the feet still on the pedals because of the chain /
gear system.
Technical Specifications
Model : Actıve Tractor with Pedal
Code No : 07- 314
Movement : Pedals with chains
RO GB
• Culorile pot varia de la cele indicate în imagine. Accesoriile nu sunt incluse. Vă rugăm să utilizaţi piese de rezervă
aprobate de producător. • The colors might differ from the picture of the product.The accessories are not included.Please use original
PİLSAN spare parts in case of any fault.
•This product should not be used in areas where there is a risk of falling (slopes, poolside, steps, etc.).