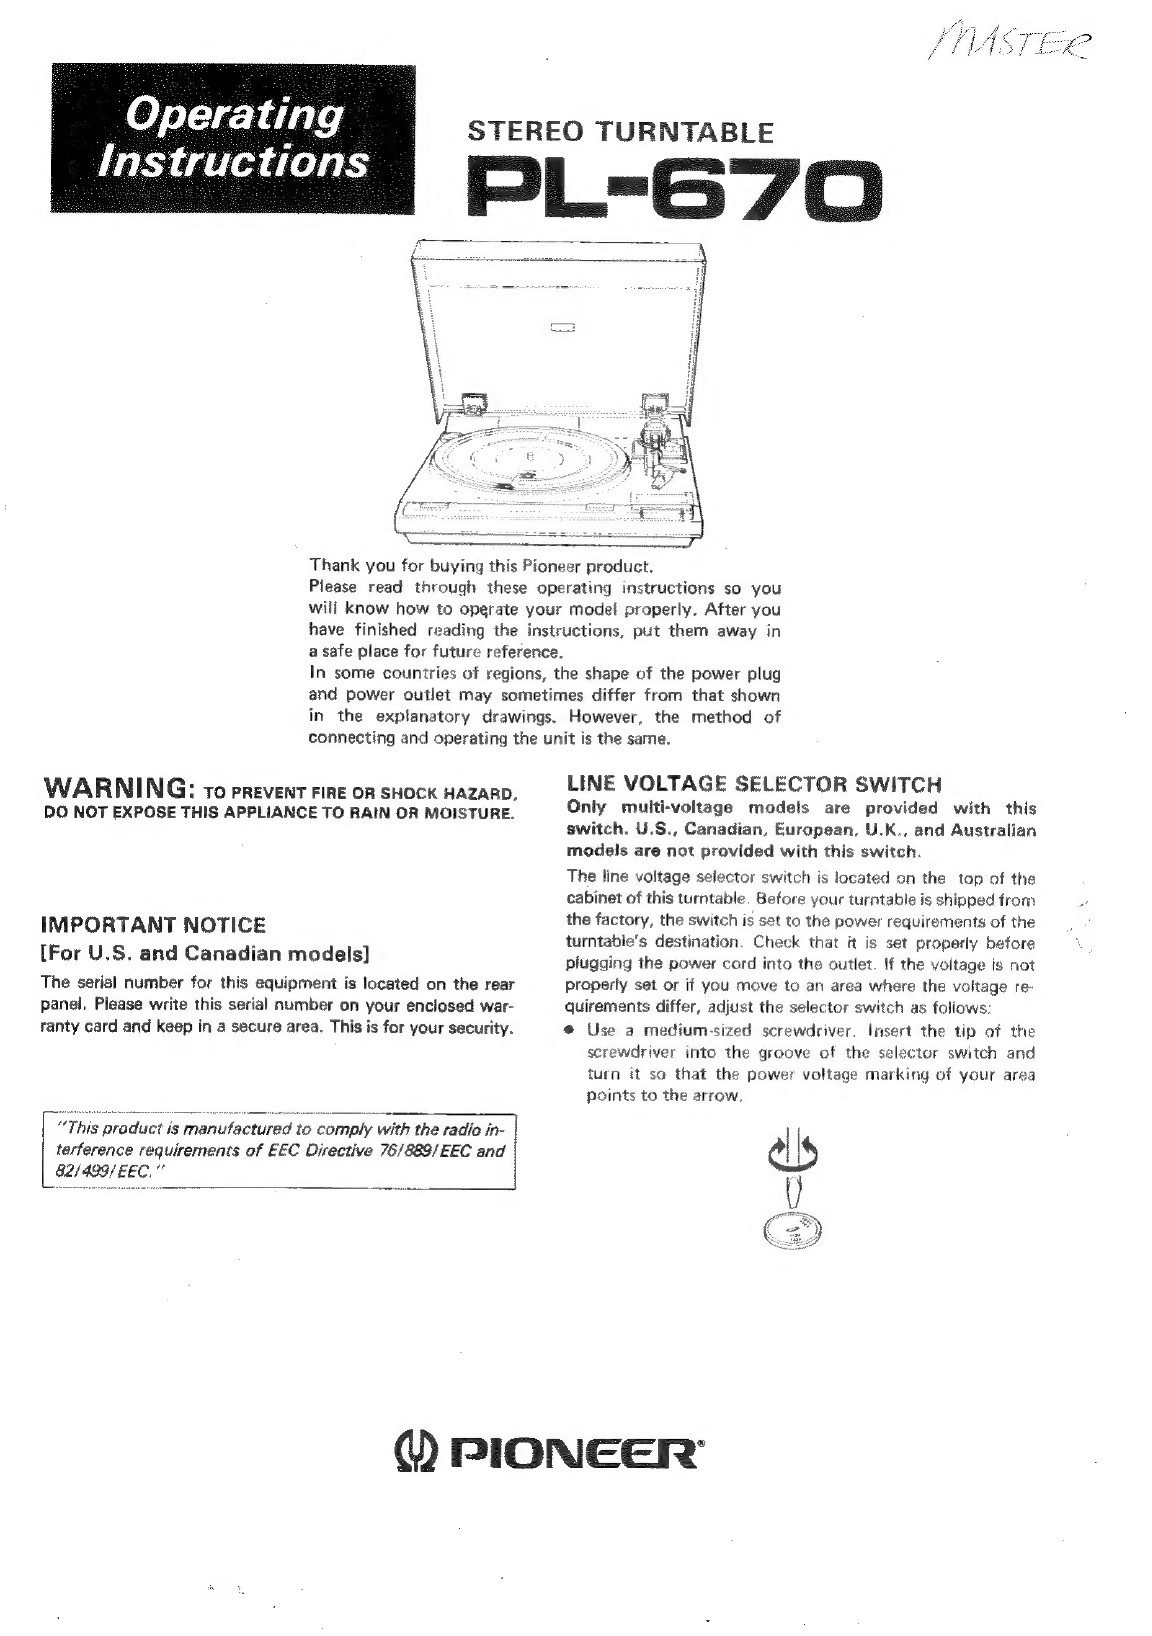
Pioneer PL-670 User manual

Operating
Instructions
STEREO
TURNTABLE
L-6
Thank
you
for
buying
this
Pioneer
product.
Please
read
through
these
operating
instructions
so
you
will
know
how
to
operate
your
mode!
properly.
After
you
have
finished
reading
the
instructions,
put
them away
in
a
safe
place
for
future
reference.
In
some
countries
of
regions,
the
shape
of
the
power
plug
and
power
outlet
may
sometimes
differ
from
that
shown
in
the
explanatory
drawings.
However,
the
method
of
connecting
and
operating
the
unit
is
the
same.
WARNING:
to
prevent
Fine
OR
SHOCK
HAZARD,
DO
NOT
EXPOSE
THIS
APPLIANCE
TO
RAIN
OR
MOISTURE.
IMPORTANT
NOTICE
[For
U.S.
and
Canadian
models]
The
serial
number
for
this
equipment
is
located
on
the
rear
panel,
Please
write
this
serial
number
on
your
enclosed
war-
ranty
card
and
keep
in
a
secure
area.
This
is
for
your
security.
“This
product
is
manufactured
to
comply
with
the
radio
in-
terference
requirements
of
EEC
Directive
76/889/EEC
and
82/499/
EEC.”
LINE
VOLTAGE
SELECTOR
SWITCH
Only
multi-voltage
models
are
provided
with
this
switch.
U.S.,
Canadian,
European,
U.K.,
and
Australian
models
are
not
provided
with
this
switch.
The
line
voltage
selector
switch
is
located
on
the
top
of
the
cabinet
of
this
turntable.
Before
your
turntable
is
shipped
from
the
factory,
the
switch
is
set
to
the
power
requirements
of
the
turntabie’s
destination.
Check
that
it
is
set
properly
before
plugging
the
power
card
into
the
outlet.
If
the
voltage
is
not
Properly
set
or
if
you
move
to
an
area
where
the
voltage
re-
quirements
differ,
adjust
the
selector
switch
as
follows:
@
Use
a
medium-sized
screwdriver.
tnsert
the
tip
of
the
screwdriver
into
the
groove
of
the
selector
switch
and
turn
it
so
that
the
power
voltage
marking
of
your
area
points
to
the
arrow,
®
PIONEER’

READ
INSTRUCTIONS
—
Ail
the
safety
and
operating
instructions
should
be
read
before
the
appliance
is
operated.
RETAIN
INSTRUCTIONS
—
The
operaung
instry
tions
should
be
retained
for
future
veference.
HEED
WARNING
—
All
warnings
on
the
appliance
and
in
the
operating
instructions
shouid
be
adhered
10
FOLLOW
INSTRUCTIONS
—
Ail
operating
and
use
instructions
should
be
followed.
WATER
AND
MOISTURE
—
The
appliance
should
not
be
used
near
water
—
for
example,
near
a
bathtub,
washbow!,
kitchen
sink,
faundry
tub,
in
a
wet
basement,
or
near
a
swimming
pool,
etc.
LOCATION
—
The
appliance
should
be
installed
in
a
stable
location.
WALL
OR
CEILING
MOUNTING
—
The
appliance
should
not
be
mounted
to
4
wall
or
ceiling.
VENTILATION
—
The
appliance
should
be
situated
so
that
its
location
or
position
does
not
interfere
with
its
proper
ventilation,
For
example,
the
appliance
should
not
be
situated
on
a
bed,
sofa,
rug,
or
similar
surface
that
may
block
the
ventilation
open-
ings;
or,
placed
in
a
built-in
installation,
such
as
a
bookcase
or
cabinet
that
may
impede
the
flow
of
air
through
the
ventilation
openings.
HEAT
—
The
appliance
should
be
situated
away
from
heat
sources
such
as
radiators,
heat
registers,
stoves,
or
other
appliances
(including
amplifiers}
that
produce
heat.
POWER
SOURCES
~
The
appliance
should
be
con-
nected
to
a
power
supply
only
of
the
type
descri
ed
in
the
operating
instructions
or
as
marked
on
the
appliance
POWER-CORD
PROTECTION
~
Power-supply
cords
should
be
routed
so
that
they
are
not
likely
to
be
walked
on
of
pinched
by
items
placed
upon
or
against
them,
paying
particular
attention
to
cords
at
plugs,
convenience
receptacles,
and
the
point
where
they
exit
from
the
appliance.
POLARIZATION
—
It
your
purchased
product
is
pro-
vided
with
4
polarized
power
plug,
please
read
the
following
instructians.
This
product
is
equipped
with
a
polarized
alternating
current
line
plug
(2
plug
having
wne blade
wider
than
the
other).
This
plug
will
fit
into
the
power
outlat
only
one
way.
This
is
a
safety
feature
If
you
are
unable
to
insert
the
plug
fully
inta
the
outler,
Wy
vevarsing
the
plug.
If
the
phag
should
stilt
fail
to
fit.
contact
your
sleetrician
to
replace
yout
obsolete
outlet,
Do
not
defeat
the
safety
nursase
of
the
polarized
plug.
CLEANING
~
The
appliance
should
be
cleaned
only
with
a
pobsting
clath
or
a
soft
dey
cloth.
Never
clean
with
furniture
war,
benaine,
msecticides
or
other
volatile
Lquids
since
they
may
corrode
the
cabinet
SAFETY
INSTRUCTIONS
POWER
LINES
—
An
fox
NONUSE
PERIODS
—
Tre
power
cord
of
the
ap.
pliance
should
be
unplugged
from
the
outlet
when
lef:
unused
for
a
long
peciod
of
time.
OBJECT
AND
LIQUID
ENTRY
—
Care
should
be
taken
so
that
objects
do
not
fall
and
liquids
are
nat
spilied
inte
the
enclosure
through
openings.
DAMAGE
REQUIRING
SERVICE
—
The
appliance
should
be
serviced
by
Pioneer
authorized
service
center
or
qualified
service
personnel
when:
*
The
power-supply
cord
or
the
plug
has
been
damaged;
or
*
Objects
have
falien,
or
liquid
has
been
spilled
into
the
appliance,
or
‘The
appliance
has
been
exposed
to
rain:
or
‘The
appliance
does
not
appear
to
operate
normally
or
exhibits
2
marked
change
in
performance;
or
*
The
appliance
has
been
dropped;
or
the
enclosure
darnaged
SERVICING
—
The
user
should
not
attempt
to
service
the
appliance
beyond
that
described
in
the
operating
instructions.
For
all
other
servicing,
con
tact
the
nearest
Proneer
authorized
service
center.
POWER
LINES
seavice
ENTRANCE
conoucTors
+
GROUND
wanes,
Grou
SERVICE
ENTRANCE
canes
Eouiewent
‘RODE
SYSTEM
s1ano.oFe
ground
wires
to
house
with
NSULA
ORS
|
antenva
Teao
Nae
nhere
Jeadn
enters
house
TOATERWAL
ANTENNA,
TERMUNAGS
OF
PRODUCT
ANTENNA
DISCHARGE
Unit
QBTONAL
ANTENNA
GAOUNOWG
ELEC*AOOE
Boncnc
HL,
_
DRIVEN
8
FEEY
4am
Someena
UIT
thE
eat
iF
Wo
Reouaeo
ee
Hh
LOCAL
FE
FIG.A
WB
NEC
SECTION
816
21
OUTDOOR
ANTENNA
GROUNDING
~
Pan
outside
antenna
ys
connected
to
the
antenna
terminal,
be
sure
the
antenna
syst
grounded
$0
as
to
provide
some
protecnon
aganst
voltage
surges
ard
built
ug
stanc
anges
in
the
U
S
A.
section
819
of
the
Nauonal
Elec
trical
Code,
ANSL
NEPA
No
70.1984,
ora
vides
information
with
respect
to
proper
grounding
of
the
mas:
and
supnorting
struc
ture,
grounding
af
the
lead
in
wire
to
an
anter
na
discharge
unit,
size
of
grounding
conduc
tors,
iacation
of
anienna
discharge
unit,
con
nection
t
giounding
electrodes.
and
re
quirements
tor
the
grounding
eiectrade.
See
Fig.
A.
as
a)
Use No.
10
AWG
(5.3
mm*?
copper,
No.
8
AWG
(8.4
mm’)
aluminum,
No.
17
AWG
(1.0
mm?
copper
clad
steel,
bronze
wire,
oF
largex
as
ground
wire
b)
Secure
antenna
lead:
and
stand-off
insulators
spaced
from
4
feat
(1.22
meters)
to
6
feet
(1
89
meters)
apart
¢}
Mount
antenna
discharge
.
unr,
as
closely
as
possible
to
d)
Use
jumper
wire
not
srriatler
than
No.6
AWG
13.9
mm
copper
or
equivalent
when
separate
antenna
ground
ing
alectvade
15
used
IMPORTANT
1
The
fightning
flash
with
arrowhead,
within
an
equilateral
triangle,
1s
intended
to
alert
the
user
of
the
presence
of
uninsulated
“dangerous
voltage”
within
the
product’s
enclosure
that
may
be
of
sufficient
magnitude
to
constitute
a
stsk
of
elects
shock
to
persons.
IMPORTANT
2
Hf
the
apparatus
is
fitted
with
AC
mains
power
outiet(s,
see
REAR
PANEL
FACILITIES
for
convenient
connec-
tion
of
additional
Hi-Fi
component(s}.
Make
all
connec-
tions
to
the
AC
outlet(s)
and
the
signal
terminals
first.
Connect
the
plug
to
the
wall
socket
last,
make
sure
that
the
power
switch
is
off,
Disconnect
the
wall
plug
when
the
equipment
is
not
in
(regular)
use,
e.g.
when
on
vacation,
‘The
power
switch
is
secondary
connected
and
therefore
does
not
separate
the
unit
from
mains
power
in
STAND-BY
{tone
arm
is
on
the
rest}
position,
Se
<PRB-320>
CAUTION
RISK
OF
ELECTRIC
SHOCK
OO
NOT
OPEN
CAUTION
TO
PREVENT
TME
RISK
OF
ELECTRIC
SHOCK,
DO
NOT
REMOVE
COVER
(OR
BACK).
NO
USER-
SEAVICEABLE
PARTS
INSIDE.
REFER
SERVIC.
ING
TO
QUALIFIED
SERVICE
PERSONNEL.
FOR
USE
IN
THE
UNITED
KINGDOM
WARNING:
This
plug
must
only
be
connected
to
electronic
apparatus
equipped
with
suitable
sockets.
If
not,
cut
off
the
plug
and
fit
an
appropriate
type
in
accordance
with
the
instructions
below.
The
cut-off
plug
must
be
disposed
of
as
an
elec-
trical
shock
hazard
could
exist
if
connected
to
a
socket
outlet.
The
exclamation
point
vathin
an
equilateral
viangh
intended
to
alert
the
user
ct
the
presence
of
enpartant
operating
and
maintenance
servicing)
instructions
i
the
lierature
accompanying
the
appliance
The
wires
in
this
mains
lead
are
coloured
in
accordance
with
the
following
code:
Biue:
Neural
Brown:
Live
As
the
colours
of
the
wires
in
the
mains
lead
of
this
ap.
paratus
may
not
correspond
with
the
coloured
marking
identifying
the
terminals
in
your
phig
proceed
as
follows:
The
wire
which
is
coloured
blue
must
be
conmested
to
the
terminal
which
is
marked
with
the
letter
Nor
cot
oured
black.
The
wire
which
is
coloured
brown
must
be
connected
to
the
terminat
which
is
marked
with
the
letter
Lor
col
oured
red.

|
ae
eS
ook
Features...
Cautions
Re
Before
Ope
garding
Ha
andling.
ting
Turntable.
How
io
Play
Records.......
‘
fasnasd
Maintenance
Aq
Troubleshooting
|...
12
Specifications
00.0...
v.44
FEATUR
ES
A
fully
automatic
turntable
with
excellent
cost
performance.
A
light
equivalent
mass
tonearm
with
high
trackability
DRA
(Dynamic
Resonance
Absorber).
Axle
with
high
performance
DC
servo
motor
and
SH
rotor,
giving
S/N
ratio
of
78
dB,
and
flutter
of
0.035%
(DIN).
Easy
cartridge
replacement
with
the
plug-in
cartridge.
CAUTIONS
REGARDING
HANDLING
LOCATION
Install
turntable
in
a
well
ventilated
location
where
it
will
not
be
exposed
to
high
temperature
or
humidity.
Do
not
install
the
turntable
in
a
location
which
is
exposed
to
the
direct
rays
of
the
sun,
or
near
to
stoves
or
radiators.
Excessive
heat
can
adversely
affect
the
cabinet
and
internal
components.
Also,
installation
of
the
turntable
in
a
damp
or
dusty
en-
vironment,
may
result
in
malfunction
or
accident.
(Also
avoid
installation
near
cookers
etc.,
where
the
turntable
may
be
exposed
to
smoke
from
oil,
steam
or
heat.)
PRECAUTIONS
REGARDING
INSTALLATION
Install
this
turntable
as
far
as
possible
from
tuners
and
TV
sets.
A
turntable
installed
in
close
proximity
to
such
equipment,
may
cause
noise
or
degradation
of
the
picture.
Such
noise
may
be
particularly
noticeable
when
an
indoor
antenna
is
us
h
a
case,
make
use
of
an
outdoor
antenna,
or
turn
off
power
to
the
turntable.
CONDENSATION
When
the
turntable
is
brought
into
a
warm
roorn
from
previously
cold
surroundings
or
when
the
room
temperature
is
suddenly
increased,
conden-
sation
may
form
inside
and
the
turntable
may
not
be
able
to
attain
its
full
performance.
In
cases
like
this,
use
the
turntable
after
allowing
it
to
stand
for
about
an
hour
or
after
raising
the
room
temper-
ature
gradually
CARE
OF
RECORDS
gUse
good
quality
cleaner.
H
use
is
mace
of
a
dry
type
cleaner
(velvet
or
nylon
brush
etc),
this
can
result
in
racords
becorning
charged
with
static
electricity
which
can
result
in
occurrence
of
noise.
We
recommend
ithe
use
of
damp
type
cleaners
and
anti-static
sprays
which
aiso
effectively
remove
dust
FRB-320>

CAUTIONS
REGARDING
HANDLING
REPLACING
THE
STYLUS
[Only
models
supplied
with
cartridge]
@
The
life
of
the
stylus
which
comes
with
the
supplied
cartridge
is
800
to
1,000
hours.
(As
a
rough
guide,
if
the
turntable
is
used
for
1
to
2
hours
every
day,
the
stylus
should
last
1
to
2
years.)
if
the
life
of
the
stylus
is
exceeded,
or
use
is
made
of
a
damaged
stylus,
the
record
may
be
damaged.
and
the
playback
sound
may
be
distorted.
Please
take
care
to
replace
the
stylus
ahead
of
time.
@
For
the
replacement
stylus,
make
sure
to
purchase
and
use
a
Pioneer
PN-295T.
The
cartridge
installed
in
the
turntable,
is
a
unit
which
was
developed
by
Pioneer.
For
this
reason,
use can
only
be
made
of
the
special
replacement
stylus,
so
please
purchase
the
required
stylus
from
a
shop
dealing
in
Pioneer
products.
a@
For
the
replacement
stylus,
make
sure
that
you
use
a
stylus
that
is
a
genuine
Pioneer
product.
If
you
use
a
replacement
stylus
that
is
manufac-
tured
by
any
other
company,
there
can
be
no
guarantee
with
respect
to
degradation
of
per-
formance
or
breakdown,
so
please
make
sure
to
use
the
specified
Pioneer
stylus.
Genuine
Pioneer
styluses
are
marked
with
the
Qmoneen
mark,
so
please
make
sure
that
this
mark
is
present.
CARTRIDGE
MOUNTING
AND
REPLACEMENT
The
[JaP)
mark
is
a
standard
mark
indicating
a
|
plug-in
connector
type
unit.
Products
with
this
mark
are
mutually
compatible
and
can
be
used
for
the
same
applications.
After
removing
the
screw
securing
the
old
car-
tridge,
replace
it
with
the
new
cartridge,
and
secure
the
new
cartridge
in
place
with
the
screw
Screw
securing
cartridge
Cartridge
BEFORE
OPERATING
TURNTABLE
CONFIRM
SUPPLIED
ACCESSORIES.
Rubber
mat
4
<PRB-320>
———
S
EP
adaptor
{The
EP
adaptor
is
fastened
on
top
of
the
platter.)

BEFORE
OPERATING
TURNTABLE
ASSEMBLE
THE
UNIT
1
Removing
the
dust
cover
Gi;
Open
the
dust
cover
as
far
as
it
will
go.
(2)
Hold both
sides
of
the
dust
cover
and
remove
it
from
the
cabinet
by
pulling
It
up
NOTE:
Take
care
not
to
mark
or
scratch
the
dust
cover
which
you
have
now
removed.
Dust
cover
2
Removing
the
transit
screws
Using
a
Phillips
head
screwdriver,
rotate
the
transit
screws
(2)
in
the
direction
of
the
arrow
in
the
figure
and
remove
the
platter
and
the
platter
cushions
Transit
screw
3
Install
the
platter
and
the
platter
mat.
(1)
Place
the
platter
over
the
platter
spindle.
(2)
Place
the
platter
mat
onto
the
platter
Rubber
mat
voone
Platter
Align
the
hole
in
the
rubber
mat
with
this
part
4
Remove
the
plastic
band
securing
the
tone
arm.
5
Remove
the
stylus
cover.
Stylus
cover
6
Mounting
the
dust
cover
()
Hold
both
sides
of
the
dust
cover
and
slide
the
hinges
into
the
cabinet's
hinge
holders.
(2)
Push
down
until
the
dust
cover
goes
no
farther.
Hinge
holder
By
S
<OPRB-3200

CONNECTIONS
|
Turntabie
Amplifier
Connect
the
Ground
Lead
Attach
the
metal
fitting
to
the
amplifier
ground
ter-
minal
(GND)
ae
“=D
y
&
>
Connect
the
Output
Cords
Connect
the
plugs
of
the
cords
to
the
input
terminals
of
the
amplifier.
(Always
connect
to
the
MM
terminals.)
®
Connect
the
white
plug
to
the
left
(L)
channel
and
the
red
piug
to
the
right
(R)
channel.
@
Make
sure
plugs
are
pushed
fully
into
the
terminals.
White
L
@u
:
yl
R
cp
Ca
PHONO
Red
Connect
the
Power
Cord
Insert
the
power
cord
plug
into
the
auxiliary
power
outlet
(AC
OUTLET)
of
your
amplifier
unit,
or
into
a
household
wail
outlet.
Ss
<PRB-320>
AFTER
COMPLETING,
READ
THE
FOLLOWING
ITEMS
AND
CONFIRM
THAT
YOU
HAVE
DONE
EVERYTHING CORRECTLY.
aWrong
connections
and
placement
can
resuit
in
malfunction.
@
lf
connections
are
made
incorrectly,
this
can
result
in
“no
sound
output”.
Also,
if
the
plugs
of
the
output
leads
are
not
fully
inserted
or
ground
leads
are
not
properly
connected,
this
can
result
in
“hurn
noise”
{emission
of
a
humming
or
buzzing
sound
from
the
speakers).
@
if
the
turntable
ts
tilted,
this
can
result
in
the
symptoms
“sound
ts
distorted”,
and
“tone
arm
slides
across
the
record’.
If
vibration
is
conducted
to
the
turntable,
this
can
result
in
the
symptoms
“stylus
jumps”,
“sound
is
un-
stable’.
and
“howling”
(howling
or
thumping
sounds
produced
by
the
speaker).
gAlways
connect
to
the
amplifier
input
termi-
nails
jor
MM
use
(PHONO
MM
terminals).
Only
models
supplied
with
carindge
gw
Allow
connecting
leads
to
be
slack.
After
making
connections,
make
sure
that
con-
necting
leads
are
not
pulled
tight.
Ileads
are
tight
this
can
result
in
breakage
of
leads
and
howling.
wThe
supplied
cartridge
matches
a
load
re-
sistance
of
50kQ.
If
your
stereo
amplifier
has
a
cartridge
load
re-
sistance
selector
switch,
piease
set
it
to
the
above
value.

NAMES
AND
USE
OF
PARTS
EP
Adaptor
When
playing
a
record
with
a
doughnut
hole,
place
this
over
the
platter
spindle.
Dust
Cover
=
Platter
Spindle
|.
Platter
Mat
|
Platter
-——__r"
Only
models
supplied
SPEED
Selector
Switch
Set
this
switch
to
the
rotation
speed
of
the
record
which
you
intend
to
play.
On
[45]
—
For
45
rpm
records
On
[33]
—
For
33-1/3
rpm
records
ABM
ELEVATION
Switch
]
@
Use
to
perform
manual
play.
@
Use
to
temporarily
stop
playing.
@
Use
to
change
tracks
in
the
middle
of
play.
On
[UP]
position
--
To
elevate
the
tone
arm.
(The
stylus
is
lifted
off
the
record.)
On
[DOWN]
position
—
To
lower
the
tone
arm.
When
changed,
the
tone
arm
moves
up
or
down,
[>
(The
stylus
is
lowered
onto
the
record.)
|
with
cartridge
START/STOP
switch
Press
to
start
auto
play
mode,
and
to
stop
play.
7
<PRB-3202>

HOW
TO
PLAY
RECORDS
PROCEDURES
BEFORE
PLAYING
Open
the
dust
cover.
Place
a
record
on
the
platter.
Set
the
SPEED
selector
switch
[45
or
33
rpm].
Uniock
the
tone
arm
from
the
arm
rest.
Pon
5
Close
the
dust
cover.
6
Set
your
stereo
amplifier
for
playing
a
record.
For
details
refer
to
the
operating
instructions
for
your
stereo
amplifier.
OPERATIONS
FOR
NORMAL
PLAY
(AUTO
PLAY)
Automatic
play
of
all
tracks,
from
the
first
track
to
the
last
track.
1
Carry
out
“PROCEDURES
BEFORE
PLAY-
ING”.
2
Lower
the
tone
arm
with
the
ARM
ELEVA-
TION
switch
at
[DOWN]
position.
3
Press
the
START/STOP
switch
to
start
play.
NOTE
@
This
unit
automatically
distinguishes
between
records
with
a
30
cm
and
17
cm
size,
the
tone
arm
moves
across
to
the
lead-in
groove
of
the
record
and
the
record
is
played.
®
The
stylus
will
not
descend
on
the
proper
place
with
records
which
do
not
measure
30
cm
or
17
cm.
Such
records
should
therefore
be
played
in
the
manual
mode.
8
<PRB-320>
4
Adjust
the
volume
and
tone
controls
of
the
stereo
amplifier.
After
the
last
track
has
been
played,
the
tone
arm
will
return
and
the
platter
will
stop
automatically
|

HOW
TO
PLAY
RECORDS
OPERATIONS
FOR
MANUAL
PLAYING
Use
these
operations
for
the
following
purposes.
w
To
start
playing
from
part
way
through
a
track.
When
the
record
is
not
a
standard
size
(not
the
same
as
the
mat
size),
and
cannot
be
played
normally.
1
Carry
out
“PROCEDURES
BEFORE
PLAY-
ING”.
2
Elevate
the
tone
arm
with
the
ARM
ELE-
VATION
switch
at
[UP]
position.
3
Move
the
tone
arm
over
the
record
track
to
be
played.
OPERATIONS
TO
STOP
PLAYING
Lower
the
tone
arm
with
the
ARM
ELEVA-
TION
switch
at
[DOWN]
position.
Adjust
the
volume
and
tone
controls
of
the
stereo
amplifier.
(After
the
last
track
has
been
played,
the
tone
arm
will
return
automatically.)
—
=
Press
the
START/STOP
switch.
Several
seconds
after
pressing
the
switch,
the
tone
arm
will
automatically
return,
and
the
platter
will
stop
rotating
=e
[st
TART!
(STOP
switch
|
3
<PRB-320°>

HOW
TO
PLAY
RECORDS
OPERATIONS
TO
TEMPORARILY
INTERRUPT
PLAYING
ARM
ELEVATION
switch
2
To
resume
playing,
set
the
ARM
ELEVATION
switch
to
[DOWN]
position.
The
stylus
will
be
lowered
onto
the
record,
and
playing
will
be
resumed.
1
Set
the
ARM
ELEVATION
switch
to
[UP]
position.
This
will
cause
the
stylus
to
be
lifted
off
the
record,
and
playing
will
be
interrupted
(the
platter
will
con-
tinue
rotating).
STYLUS
ADJUSTMENT
In
the
auto
play
mode,
if
the
stylus
does
not
land
on
the
outer
groove
correctly,
adjust
it
by
the
procedure
below.
During
adjustment,
be
careful
not
to
let
the
stylus
scratch
the
record.
1
Follow
steps
1
to
4
in
“Procedure
Before
6
Playing.”
By
following
the
procedure
below,
turn
the
adjustment
screw
with
a
small
screwdriver
410
(Put
a
30
cm
LP
record
on
the
platter.)
Press
the
START/STOP
switch
to
start
auto
play
mode.
During
this
step,
see
how
many
millimeters
the
stylus
swerves
inward
or
outward
of
the
record
groove.
Press
the
START/STOP
switch
to
return
the
tone
arm.
-
Elevate
the
stylus
with
the
ARM
ELEVATION
switch
at
[UP]
position.
Move
the
tone
arm
by
hand
to
the
record’s
outer
groove.
<PRB-320>
according
to
the
direction
and
degree
of
stylus
swerve.
(When
turning
the
adjustment
screw,
hold
the
tone
arm
with
the
other
hand.)
@
Ahalf-
turn
of
the
screw
will
adjust
the
stylus
landing
point
by
about
12
mm.
@
lf
the
stylus
swerves
outward...
Turn
the
screw
clockwise.
@
If
the
stylus
swerves
inward...
Turn
the
screw
counterclockwise.
Return
the
tone
arm
to
the
arm
rest
by
hand.
Confirm
correct
adjustment.
After
the
adjustment,
press
the
START/STOP
switch
and
see
if
the
stylus
properly
stops
over
the
outer
groove
of
the
record.
If
it
is
still
not
right,
repeat
steps
(3)
to
(8).

MAINTENANCE
STYLUS
REPLACEMENT
PROCEDURE
{Only
models
supplied
with
cartridge]
Please
carry
out
these
operations
after
setting
the
stereo
amplifier
to
minimum
volume.
1
Remove
the
stylus
from
the
cartridge.
Grip
the
stylus
holder,
and
carefully
pull
in
the
direction
of
the
arrow
™
Stylus
holder
2
Install
a
new
stylus
holder
(replacement
stylus)
into
the
cartridge.
CARE
OF
THE
STYLUS
g
Use
a
soft
brush
Remove
dust
and
iint
from
the
point
of
the
stylus
by
moving
the
brush
in
the
forward
direction.
Attempting
to
remove
dust with
fingers
may
result
in
damage.
@
When
dirt
cannot
be
removed
with
a
brush
When
dirt
cannot
be
removed
with
a
brush,
remove
it
with
a
commercially
available
stylus
cleaner
etc.
Spillage
of
the
cleaning
fluid
onto
plastic
parts
or
onto
the
rubber
of
the
stylus
damper,
may
soften
or
dissolve
these
parts
and
result
in
degradation
of
performance,
so
please
use
the
cleaning
fluid
with
care.
11
<PRB-320>

TROUBLESHOOTING
Incorrect
operations
are
often
mistaken
for
trouble
and
malfunctions.
If
you
think
that
there
is
something
wrong
with
this
component,
check
the
points
below.
Sometimes
the
trouble
may
lie
in
another
component.
Investigate
the
other
components
and
electrical
appliances
being
used.
If
the
trouble
cannot
be
rectified
even
after
exercising
the
checks
listed
below,
ask
your
nearest
PIONEER
authorized
service
center
or
your
dealer
to
carry
out
repair
work.
Symptom
Probable
Cause
Remedy
i
Platter
does
not
rotate.
®
Power
plug
is
disconnected
from
outlet.
@
The
turntable
is
plugged
into
an
auxiliary
power
outlet
operated
by
the
power
switch
of
the
stereo
amplifier
(SWITCHED
outlet),
and
the
power
switch
of
the
stereo
amplifier
is
turned
OFF,
@
Insert
plug
into
stereo
amplifier
or
wall
outlet
®
Turn
on
the
power
switch
of
the
stereo
amplifier
No
sound
Noise
and
scratch
sounds
are
produced.
(Clicking
sounds
etc.
are
produced.)
Sound
jumps,
sound
is
distorted.
Output
cords
are
not
connected
properly.
®
Cartridge
and/or
stylus
are
not
installed
properly.
as
ag
as
>
cpa
Incorrect
operation
of
stereo
amplifier.
@
Make
proper
connections
between
the
turntable
and
stereo
amplifier.
®
Properly
install
the
cartridge
and
stylus.
Se
-
®
The
record
is
warped
or
scratched.
®
Output
lead
pin
plugs
and/or
stereo
amplifier
input
terminals
are
dirty.
®
Dust
or
dirt
on
the
point
of
the
cartridge
stylus.
©
The
point
of
the
cartridge
stylus
is
worn.
®
Replace
the
record,
ary
A
oe
NN
;
/
NX!
Y
\
@
Clean
away
dirt.
©
Clean
the
point
of
the
stylus
with
a
brush,
Howing
occurs
{When
the
volume
is
increased
when
a
record
is
being
played,
a
howling
sound
is
produced
by
the
speaker
system.)
®
Vibrations
from
the
speaker
system
are
being
con-
ducted
from
the
floor
to
the
record
and
cartridge.
®
Sound
waves
from
the
speaker
system
are
being
transmitted
directly
to
the
cartridge.
®@
Move
the
turntable
further
away
fram
the
speaker
system.
©
Place
the
turntable
on
a
firm
foundation
ete,
©
Change
the
place
of
installation
of
the
turntable.
12
<PRB-320>
|
|
|
|
|
|

TROUBLESHOOTING
Symptom
Probable
Cause
Remedy
Hum
noise
{A
humming
or
buzzing
noise
is
produced
by
the
speaker
system.)
®
Output
leads
and/or
ground
leads
are
not
making
Proper
contact.
®
Cartridge
and/or
stylus
are
not
properly
installed.
®
Interference
is
being
picked
up
from
leakage
of
magnetic
flux
from
stereo
amplifier
power
trans-
former
etc.,
or
froma
TV
set.
@
Make
proper
connections
between
the
turntable
and
stereo
amplifier
@
Property
install
the
cartridge
and
stylus
@
Try
changing
the
places
of
installation
of
the
stereo
amplifier,
TV
set
or
turntable
Abnormal
sound
tempo
®
The
setting
of
the
speed
selector
switch
does
not
match
the
record
speed.
4
®
Set the
switch
to
the
position
which
matches
the
record
speed
(33
or
45)
When
playing
a
record,
the
stylus
is
nat
lowered
onto
the
correct
position.
®
You
are
playing
an
unusual
type
of
record.
®
The
stylus
landing
position
swerves
outward
or
inward.
@
Play
the
record
manually.
@
Adjust
the
styfus
landing
position
3
<PRB-320>

SPECIFICATIONS
PHONOGRAPH
MOTOR
AND
PLATTER
Motor
type...
eeeesececcsessesteecececeenseces
DC
servo
motor
Drive
system
Direct
drive
system
Speed
of
rotation..
speeds:
33-1/3,
45
rom
Wow
and
Flutter...
-Less
then
“0.012%
(WRMS)
0.025%
(WRMS)
+0.035%
WTD
Peak
(DIN)
Values
marked
with
an
‘*’
designate
the
wow
and
flutter
for
the
motor,
and
do
not
include
the
cartridge
or
tonearm
load.
S/N
ratio
Platter...
78
dB
(DIN-B)
Diameter
304
mm,
aluminium
die
cast
TONE
ARM
SUPPLIED
CARTRIDGE
(PC-295T)
Type...
Replacement
stylus..
Stylus
0.6
mil
“diamond
Output
voltage
2.6
mV
(1
kHz,
5
cm/s
LAT
Peak)
Suitable
stylus
pressure
occ
1-15
g
(optimum
value
1.25
g)
10
Hz
-
30,000
Hz
Frequency
response.
Load
resistance..
14
<PRB-320>
FUNCTIONS
PROVIDED
Auto
lead-in,
auto
return,
auto
cut,
arm
elevation,
manual
play,
quick
play,
free
stop
hinges
POWER
SUPPLY,
OTHER
Power
requirements
European,
U.K.,
Australian
models
............-..
AC
220
V.—
240
V
~,
50/60
Hz
U.S.,
Canadian
models...
AC
120
V,
60
Hz
Other
destination
models
........
AC
110
V
120
V/220
V
—
240
VV
~
(switchable),
50/60
Hz
Power
consumption
European,
U.K.,
Australian
models
..
:
US.,
Canadian
models
.
Other
destination
modeis...
;
‘
External
eo
420(W)
x
118(H)
x
365(D)
mm
oe
x4
AL
)
x
14-3/8(D)
in
wA7
kg
(10
Ib
6
oz)
Net
weight...
SUPPLIED
ACCESSORIES
EP
adaptor...
.
Operating
instructions.
NOTE:
Specifications
and
design
subject
to
possible
modification
without
notice,
due
to
improvements,

PIONEER
ELECTRONIC
CORPORATION
44.
Meguro
1-Chome,
Meguro-ku,
Tokyo
153,
Japan
PIONEER
ELECTRONICS
[USA]
INC.
5000
Ajrcort
Pleze
Drive
P.C.
Box
1720,
Long
Beach,
California
90801-1720
U.S.A.
PIONEER
ELECTRONIC
[EUROPE]
N.V.
Keetberglean
1,
2740
Beveren,
Belgium
TEL:
03/775
PIONEER
ELECTRONICS
AUSTRALIA
PTY.LTD.
176-184
Soundary
oad.
Sraesice,
Victoria
TEL:
[03]
S80-s911
<86CO6FEQ01>
Printed
in
Japan
<PRB-320-A>
3:08
S.
Austraiia
Table of contents
Other Pioneer Turntable manuals

Pioneer
Pioneer PL-5 User manual

Pioneer
Pioneer PL-55X User manual

Pioneer
Pioneer PL-51A User manual

Pioneer
Pioneer PL-630 User manual

Pioneer
Pioneer PL-560 User manual

Pioneer
Pioneer PL-X420 User manual

Pioneer
Pioneer PL-55X User manual

Pioneer
Pioneer N-30AE User manual

Pioneer
Pioneer PL-A45D User manual

Pioneer
Pioneer PL-514 User manual

Pioneer
Pioneer CDJ-2000NXS User manual

Pioneer
Pioneer PL-600 User manual

Pioneer
Pioneer PL-12E PV User manual

Pioneer
Pioneer pl-930 User manual

Pioneer
Pioneer PL-518 KUT User manual

Pioneer
Pioneer CDJ-2000nexus Instruction Manual

Pioneer
Pioneer PL-512 User manual

Pioneer
Pioneer PL-450 User manual

Pioneer
Pioneer PL-6 User manual

Pioneer
Pioneer PL-05 User manual