pleasant hearth L32-50 User manual

1
Evoke LCD Wall-Mount
Electric Heater
with Flame Effect
MODEL #L32-50
Questions, problems, missing parts? Before returning to your retailer, call our customer
service department at 1-877-447-4768, 8:30 a.m. – 4:30 p.m., CST, Monday – Friday.
C US
INSTALLER: Leave this manual with the appliance.
CONSUMER: Retain this manual for future reference.
WARNING!
IF THE INFORMATION IN THIS MANUAL IS NOT FOLLOWED EXACTLY,
AN ELECTRICAL SHOCK OR FIRE MAY RESULT
CAUSING PROPERTY DAMAGE, PERSONAL INJURY OR LOSS OF LIFE.
IMPORTANT INSTRUCTIONS
PLEASE READ THIS MANUAL BEFORE INSTALLING AND USING APPLIANCE
Français p. 18
Español p. 36
ATTACH YOUR RECEIPT HERE
Serial Number ________________________________ Purchase Date _________________________________
20-10-131
Warming Your Home. Warming Your Heart.

2
IMPORTANT: Read all instructions and warnings carefully before starting installation.
Failure to follow these instructions may result in a possible electric shock, injury to
persons, re hazard and will void the warranty.
Please read the Installation & Operating Instructions before using this appliance.
TABLE OF CONTENTS
Safety Information ............................................................................................................................3
Package Contents ............................................................................................................................6
Appliance Dimensions......................................................................................................................7
Preparation.......................................................................................................................................8
Installation Instructions.....................................................................................................................9
Operating Instructions .................................................................................................................... 11
Care and Maintenance ...................................................................................................................12
Electric Wiring Diagram.................................................................................................................. 14
Troubleshooting..............................................................................................................................15
Warranty ......................................................................................................................................... 16
Replacement Parts.........................................................................................................................17

3
Please read and understand this entire manual before attempting to assemble, operate or install
the product.
1. Read all instructions before using this appliance.
2. This appliance is hot when in use. To avoid burns, do not let bare skin touch hot surfaces.
If provided, use handles when moving this appliance. Keep combustible materials, such as
furniture, pillows, bedding, papers, clothes and curtains at least 3 ft. (914 mm) from the front
of this appliance.
3. CAUTION: Extreme caution is necessary when any heater is used by or near
children or invalids and whenever the heater is left operating unattended.
4. If possible always unplug this appliance when not in use.
5. Do not operate any heater with a damaged cord or plug or after the appliance malfunctions,
has been dropped or damaged in any manner.
6. Anyrepairstothisapplianceshouldbecarriedoutbyaqualiedserviceperson.
7. Undernocircumstancesshouldthisappliancebemodied.Partshavingtoberemovedfor
servicing must be replaced prior to operating this appliance again.
8. Do not use outdoors.
9. This heater is not intended for use in bathrooms, laundry areas and similar indoor locations.
Never place this appliance where it may fall into a bathtub or other water container.
10. Do not run cord under carpeting. Do not cover cord with throw rugs, runners or the like.
Arrangecordawayfromtrafcareasandwhereitwillnotbetrippedover.
11. To disconnect this appliance, turn controls to the off position, then remove plug from outlet.
12. Connect to properly grounded outlets only.
13. This appliance, when installed, must be electrically grounded in accordance with local codes,
with the current CSA C22.1 Canadian Electrical codes or for USA installations, follow local
codes and the National Electric Code, ANSI/NFPA No. 70.
14. Do not insert or allow foreign objects to enter any ventilation or exhaust opening as this may
causeanelectricshock,reordamagetotheappliance.
15. Topreventpossiblere,donotblockairintakesorexhaustinanymanner.Donotuseonsoft
surfaces, like a bed, where openings may become blocked.
16. This appliance has hot and arcing or sparking parts inside. Do not use it in areas where
gasoline,paintorammableliquidsareusedorstored.Thisapplianceshouldnotbeusedas
a drying rack for clothing, nor should Christmas stockings or decorations be hung on or near it.
17. Use this appliance only as described in this manual. Any other use not recommended by the
manufacturermaycausere,electricshockorinjurytopersons.
18. Always plug heaters directly into a wall outlet/receptacle. Never use with an extension cord or
relocatable power tap (outlet/power strip).
19. SAVE THESE INSTRUCTIONS.
SAFETY INFORMATION SAVE THESE INSTRUCTIONS

4
G R O U N D I N G
PIN
METAL SCREW
GROUNDING
MEANS
COVER OF GROUNDED
OUTLET BOX
ADAPTER
(A)
(B)
(C)
(D)
GROUNDING
PIN
SAFETY INFORMATION
Electrical Connection
Grounding Instructions
A 15 Amp, 120 volt, 60 Hz circuit with a properly grounded outlet is required.
Preferably, the appliance will be on a dedicated circuit as other appliances on the
same circuit may cause the circuit breaker to trip or the fuse to blow when the heater
is in operation. The unit comes standard with a 6 ft. (1.8 m) long, three-wire cord,
exiting the right side of the appliance. Plan the installation to avoid the use of an
extension cord. Always plug heaters directly into a wall outlet/receptacle. Never use
with an extension cord or relocatable power tap (outlet/power strip).
Electrical outlet wiring must comply with local building codes and other
applicableregulationstoreducetheriskofre,electricalshockandinjury
to persons.
Do not use this appliance if any part of it has been under water. Immediately
callaqualiedservicetechniciantoinspecttheapplianceandreplaceanypart
of the electrical system which has been under water.
This heater is for use on 120 volts. The cord has a plug as shown at (A) in the diagram
below. An adaptor as shown at (C) is available for connecting three-blade grounding-
type plugs to two-slot receptacles. The green grounding lug extending from the adaptor
must be connected to a permanent ground such as a properly grounded outlet box.
The adaptor should not be used if a three-slot grounded receptacle is available.
NOTE: Adaptors are NOT
for use in Canada.
DANGER
ADAPTOR

5
SAFETY INFORMATION
Remote Control
ELECTRICAL, PLUMBING OR GAS LINES MAY BE IN WALL.
Before cutting, drilling or hammering, verify their location. If needed, contact your
electrician, plumber or service person.
PRODUCT DAMAGE MAY OCCUR.
Never attempt to disassemble or alter the product in any way not instructed by this manual.
This equipment generates, uses, and can radiate radio frequency energy and, if not installed
and used in accordance with the instruction manual, might cause harmful interference to radio
communications.
However, there is no guarantee that interference will not occur in a particular installation. If this
equipment does cause harmful interference to radio or television reception, which can be determined
by turning the equipment off and on, the user is encouraged to try to correct the interference by one
or more of the following measures:
• Reorientorrelocatethereceivingantenna.
• Increasetheseparationbetweentheequipmentandreceiver.
• Connecttheequipmentintoanoutletonacircuitdifferentfromthattowhichthereceiver
is connected.
• Consultthedealeroranexperiencedradio/TVtechnicianforhelp.
The remote control requires 1 Lithium Coin Cell Battery (size CR2025), which is included.
DO NOT mix old and new batteries.
DO NOT use rechargeable silver oxide cell batteries with remote control unit.
DO NOT mix alkaline, standard (Carbon-Zinc), or rechargeable (Nickel-Cadmium) batteries.
DONOTdisposeofbatteriesinre.Improperdisposalmaycausebatteriestoleakorexplode.
CAUTION:Changesormodicationsnotexpresslyapprovedbythemanufacturerand
CSA could void user's authority to operate this equipment.
WARNING
CAUTION

6
PART No:
DESC:
ISS.
SCALE:
DATE: MATL:
FIN:
A
B
C
D
123 4
DATECHANGE & ACTIONED BY
DRWN:
CHKD:
ISS
LOC.
ALL DIMS IN MM
DO NOT SCALE
ALL COMPONENTS TO BE FREE FROM SILICONE CONTAMINATION AND BURRS.
TOLERANCES +/- 0.5 UNLESS OTHERWISE STATED. ORIGINAL PAGE SIZE A3
ALL INFORMATION REMAINS THE PROPERTY OF FOCAL POINT FIRES PLC.
THE COPYING AND DISSEMINATION TO ANY OTHER PARTIES IS NOT
PERMITTED WITHOUT EXPRESS PERMISSION OF THE ABOVE.
USED ON
A
AVON TRADING
PARK
REID STREET
CHRISTCHURCH
DORSET BH23 2BT
SHEET 2 OF 2
PACKAGE CONTENTS
A
A Glass Facia 1
B Heater Body 1
C Wall Plate (pre-assembled) 1
D Remote Control 1
PART DESCRIPTION QUANTITY
B
D
C

7
Fireplace Dimensions
15.75 in./400mm
16.5 in./421mm
13.75 in./350mm
17 in./431mm
19 in./480mm
10.5 in./269mm
31.5 in./800mm
20 in./503mm
6 in./154mm
1 in./21mm
AA BB
HARDWARE CONTENTS (shown actual size)
APPLIANCE DIMENSIONS
AA Screw 4
BB Wall Plug 4
PART DESCRIPTION QUANTITY
TECHNICAL SPECIFICATIONS
VOLTAGE 120V AC
FREQUENCY 60 Hz
MAX. AMPS 12A
HEATER RATING 1,350W
LCD SCREEN RATING 40W

8
CLEARANCE TO COMBUSTIBLES
Sides 4 in. (101.6 mm)
Floor 4 in. (101.6 mm)
Top 36 in. (914 mm)
Front 36 in. (914 mm)
Rear 0 in. (0 mm)
• Outofdirectsunlight
• Notsusceptibletomoisture
• Awayfromuninsulatedoutsidewalls
• Atleast36in.(914mm)fromdrapery,furnitureandothercombustibles
The appliance should be located in an area:
PREPARATION
Open the unit and check carefully for visible damage. If you have any problems with installation,
operation, missing parts, or damage, please call 877-447-4768 for service.
DO NOT dispose of packaging until you are satised with your heater.
DO NOT return unit to store before calling 877-447-4768 for service.
Before beginning assembly of product, make sure all parts are present. Compare parts with package
contents list and hardware contents list. If any part is missing or damaged, do not attempt to
assemble the product.
Estimated Assembly Time: 30 minutes
Tools Required for Assembly (not included)
Drill
Drill Bits
Level
Pencil
Phillips Screwdriver
3/16" (5mm) hexagon key
Thisappliancemustnotbemountedatoorlevel.Allowaminimumclearanceof4in.(100mm)to
theoor.

9
INSTALLATION INSTRUCTIONS
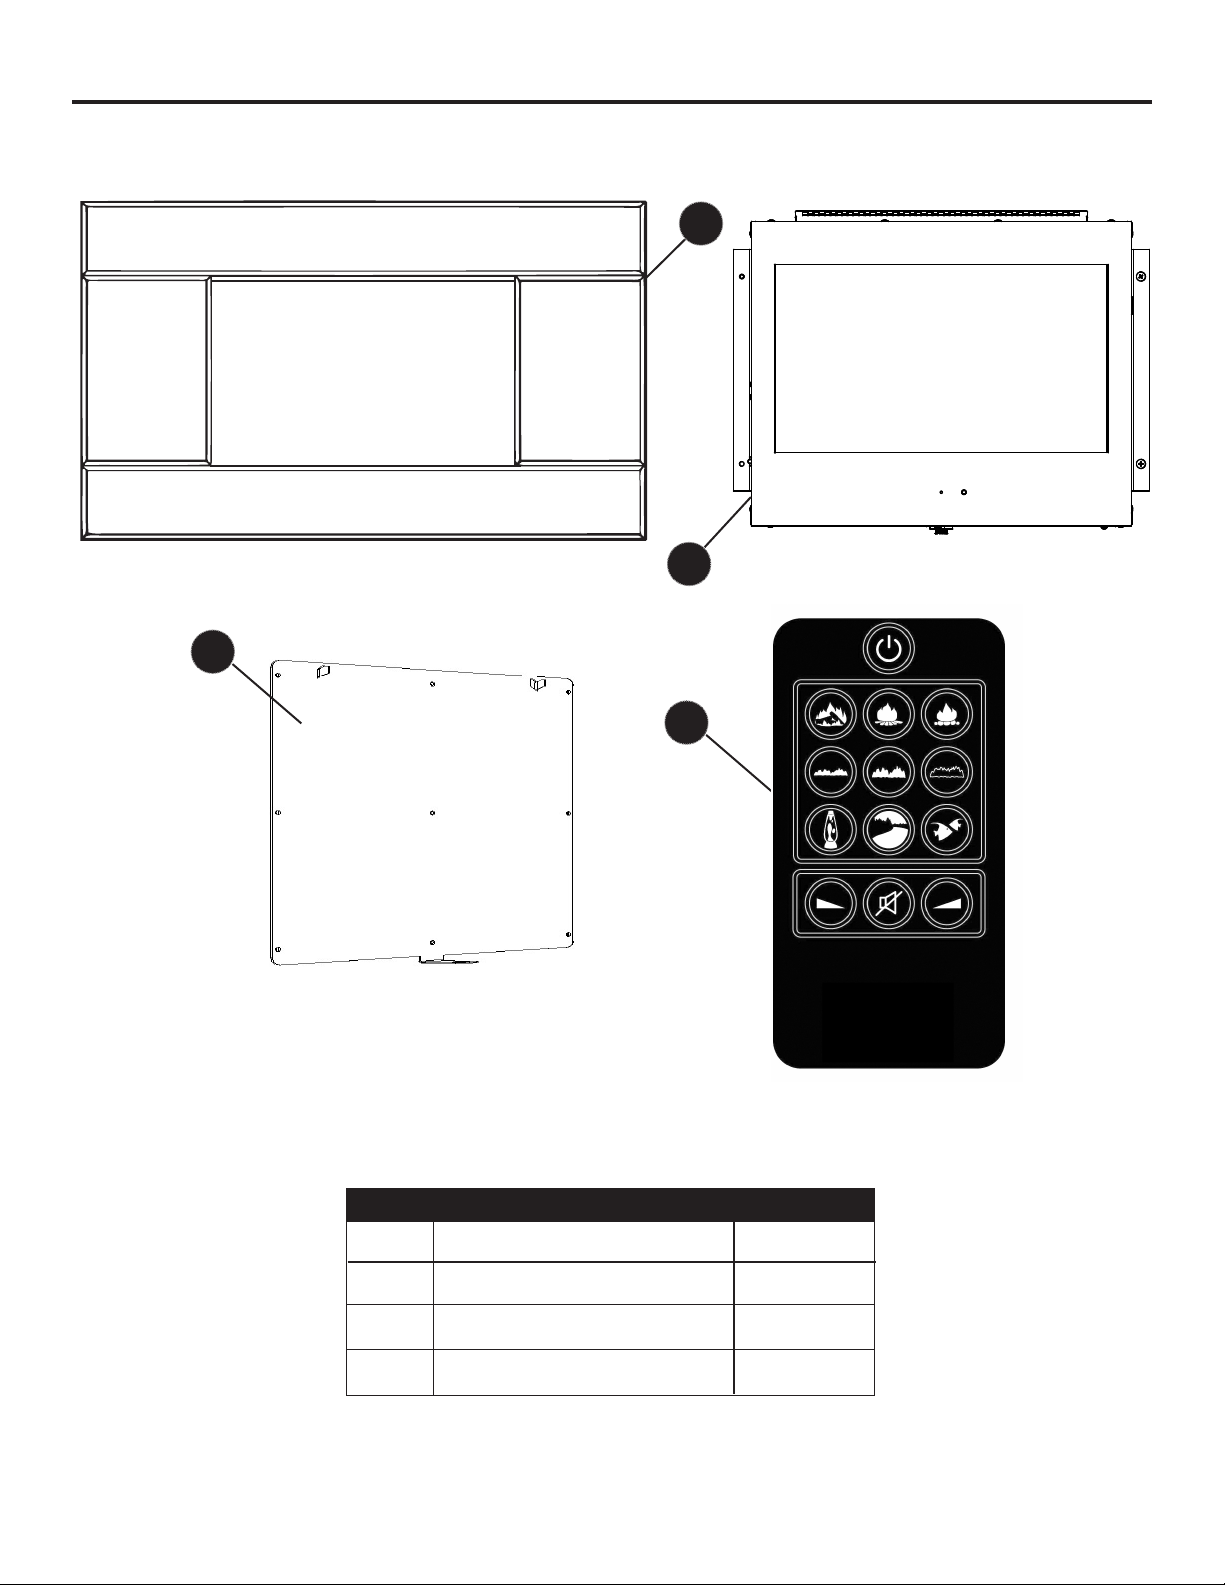
DO NOT connect the appliance to the electric
supply at this stage. Remove the single socket
screw from the middle of base panel of the heater
body (B) using a 3/16 in. (5 mm) hexagon key, then
remove the wall plate (C). After having selected the
nalmountingpositionoftheappliance,takinginto
account the size and clearance requirements, the
electrical connection, and the strength of the wall,
the wall plate (C) may be secured to the wall.
CAUTION - The wall where the appliance is to
be installed must be capable of long-term support of
the total load of the appliance.
If the appliance is to be mounted on an inside brick
or solid masonry wall, then the wall plugs (BB) and
screws (AA) provided should be used. Wall plugs
(BB) are not necessary when mounting on a drywall
or plaster wall. However, screws (AA) should be
installed into a wooden stud in at least two positions
vertically. If this is not possible, then the wall should
be strengthened with additional studs or cross
members.
If there is no alternative to mounting directly on wall-
board, then wallboard anchors will be required (not
included). These should be metal, not plastic, and the
type indicated in Fig. 2.
1.
2.
1
2
NOTE: The manufacturer assumes absolutely no responsibility for injuries and damages that may
occur due to improper installation or handling. The appliance should not be installed until all wet
plastering and/or drywall sanding and wall painting has been completed. Do not block the ventilation
holes of the appliance. The wall onto which the appliance is installed must be at. Install only on a
vertical surface. Avoid sloped surfaces. Installation onto anything other than a vertical wall may result
in re, damage or injury.
Using a level to check correct horizontal alignment,
hold the wall plate (C) in the desired position and
use a pencil to mark the position of the mounting
holes on the wall. Remove the wall plate (C) from
the wall. For masonry, drill four holes using a 5/16
in. (8.0 mm) masonry bit to a depth of 1-1/2 in.
(43 mm) and insert the included wall plugs (BB).
For wallboard, drill four holes and insert wallboard
anchors (not included). Make sure the plugs or
anchorsareushtothewall.Ifinstallingdirectly
into studs, drill holes using a 1/8 in. (3.175 mm)
Continued on next page
3. 3
BC
C
socket screw

10
INSTALLATION INSTRUCTIONS
wood bit to a depth of 1-1/4 in. (31.75 mm). Using
the screws (AA) provided, secure the wall plate (C)
tothewall.Makesurethewallplate(C)isrmly
attached to the wall.
With the wall plate (C) secured in position the
heater unit can be hung onto the wall plate (C).
Ensure the two hooks at the top of the wall plate
(C) fully engage the keyhole shaped holes in the
brackets at the top of the back of the heater body
(B) as shown in Fig. 4.
4. 4
1/16 in. space
(2 mm)
Re-install the socket screw to the base panel of
the heater body (B) through the tab at the bottom
of the wall plate (C) and tighten using a 3/16 in.
(5 mm) hexagon key. This secures the heater
to the wall plate (C) and will prevent the heater
from falling off the wall plate (C) in the event it is
accidentally bumped, for example.
5. 5
When the heater unit is in position on the wall,
remove the decorative glass facia (A) from the
packaging and mount on the heater. The four
keyhole shaped holes on the back of the frame of
the glass facia (A) mount directly onto the four M6
screws on the front of the heater body (B). Make
sure the screws have a 1/16 in. (2 mm) space
behind the head as shown. NOTE: Make sure the
frameisttedcorrectlyandtheremotecontrol
infrared sensor can be seen through the hole in
the middle of the lower glass panel. If not, the
appliance will not receive signals from the remote
control (D).
Plug the power cord into a 15 Amp/120 volt outlet.
The heater is now ready to use.
6. 6
CAUTION: Make sure that the unit is installed so that the power cord is not compressed
against or caught on the unit or the mantel and that it has an unobstructed path to the
grounded outlet.
C
BC
BA
B

11
OPERATING INSTRUCTIONS
Read All Instructions Before Use
Check that the heater outlet grill, mounted at the top of the appliance, is not covered or obstructed in
anyway, and make sure the power to the unit is switched on.
The appliance features conveniently separate controls for ame effect and for heater control. This
allows you to operate the unit in two (2) different modes:
• As a full-featured unit - both ame effect and heater are on. This mode allows you to enjoy the
look of the re along with the heat output of a heater.
• As a visual effect - only the ame effect is on, the heater is off. We recommend this mode for warm
weather application, when you want the ambiance of a re without any heat output.
Controlling the unit functions
2
1
This switch controls the main power to the unit
and switches on the LCD display panel. This
feature can be used independently of the heating
features.
This switch operates the fan heater. When the
fan heater is in operation, a red indicator light will
light up in the lower center of the glass frame.
To use the heat function, the main power switch
(1), must also be in the “on” position.
To turn off the heater, press the (2) button again.
To turn off the heater and the LCD display, press
the (1) button.
1
2
This appliance has a safety cut-out system which will activate if the air inlets or heater outlets are obstructed.
For safety reasons the heater WILL NOT switch on again automatically.
NOTE: The LCD display panel will remain operational if the cut-out is activated. Only the fan heater elements
are prevented from operating.
The following procedure must be carried out before the heater can be operated again:
1. Unplug the power supply cable at the outlet socket and set all appliance switches to OFF.
2. Leave the heater OFF for a period of no less than 10 minutes, ensuring any obstructions are removed.
3. Plug in the power supply cable at the outlet socket, then switch the appliance to ON.
If an attempt to switch on the appliance is made before the safety cut-out has reset, the heaters may cut-out
for a further period of time. If the sequence has been followed correctly and the heaters still fail to function,
check that the power supply cable plug is plugged in at the outlet socket. If this is not the cause, call an
electrician.
The unit can be switched off at any time, no matter what mode is selected, by simply switching
the rst switch on the right side of the heater to the “OFF” position.
If possible, unplug the power cord when not in use.

12
Exceptforperiodicdusting,therearenospecicrequirementsforcare,otherthanregularcleaningof
thegeneralappliance.Wipingwithadryclothisnormallysufcient.DONOTuseabrasivecleaners
astheycandamagethenish.Makesuretheheateroutletgrill(locatedonthetoppanel)andtheair
inlet mesh grills (located on the sides and base panel) are kept clear of dirt, dust, and pet hair. These
should be vacuum cleaned periodically using a brush attachment.
GLASS FACIA PANEL - This should only be cleaned using a non-abrasive glass cleaner. Test on a
smallarearst.
CARE AND MAINTENANCE
Before attempting ANY maintenance:
1. Turn off power to the unit.
2. Unplug the power cord from outlet.
3. Let the appliance cool if it has been operating.
OPERATING INSTRUCTIONS
LCD on/off control: The LCD display may be
switched on and off indepenently of the heater
functions by using the LCD on/off button as shown
on the remote control.
Scene select buttons: The appliance is pre-
programmed with nine different scenes as shown.
These scenes have been specially edited to run in
a seamless loop. When the appliance is switched
on,thelogrescenewillautomaticallyrun.To
select a different scene, press the appropriate
scene select button to choose the desired scene.
During normal operation the footage may occasionally
appear to ‘freeze’ for a fraction of a second. This
happens as the scene is recycled to loop again.
This is perfectly normal and should be no cause for
concern.
Volume up, down and mute button: Some of the
LCD scenes include sound effects. These buttons
raise and lower the volume. The mute button mutes
the speakers. While the speakers are muted, a
symbol will be displayed on screen.
Press again to de-activate.
Logre
Gasre
(medium)
Abstract
scene
Twigre
Gasre
(high)
Nature
scene
Coalre
Gasre
(Blue Flame)
Aquarium
scene
1
2
3
2
1
3

13
CARE AND MAINTENANCE
CLEANING THE FAN - WARNING: UNPLUG UNIT BEFORE CLEANING. Over time, a build-up of
lint, dust and other airborne matter such as pet hair can accumulate on the fan. This can cause the
safety cut-out system to operate. Remove the decorative glass facia and remove the appliance from
the wall (to remove the glass facia, follow Installation Steps 4 and 5 in reverse). Using a Phillips
screwdriver, remove the four screws (indicated) from the back of the appliance and remove the fan
cover to access the fan rotor. Using a clean, dry soft brush, very gently remove any build-up of dust
from the fan blades, cleaning the inside of the blades as well as the outside. Use a vacuum cleaner
nozzle to collect the dust.
IMPORTANT: THE FAN IS A VERY DELICATE COMPONENT AND EXTREME CARE SHOULD
BE TAKEN NOT TO DAMAGE THE FAN BLADES. DO NOT TOUCH THE FAN BLADES EXCEPT
WITH THE BRUSH.
Re-assembletheapplianceandtbackonthewall.
IMPORTANT: DO NOT OPERATE THE HEATER WITHOUT THE FAN COVER FITTED.
Except the fan, which can be cleaned, there are no internal user serviceable parts.
Check regularly that wall mount is secure and screws are tight. Also check the main power cord
and connections. If the power cord becomes damaged, it must be replaced by a licensed electrician
in accordance with national and local codes.
Use only genuine manufacturer's replacement parts available from your supplier.

14
Disconnect power before servicing.
Anyelectricalre-wiringofthisappliancemustbedonebyaqualiedelectrician.
This wiring must be done in accordance with local codes and/or in Canada with
the current CSA C22.1 Canadian Electrical Code, and for US installations, the
National Electrical Code ANSI/NFPA NO 70.
If repairing or replacing any electrical component or wiring, the original
wire routing, color coding and securing locations must be followed.
DANGER
Any electrical repairs or rewiring of this unit should be carried out by a licensed electrician in
accordance with national and local codes.
ELECTRIC WIRING DIAGRAM
E L N
HEATER BLOWER
HEATER
SWITCH 1
ON/OFF & BULBS
SWITCH 2
BLOWER
1350W HEATER &
PILOT LIGHT
LCD DISPLAY
CONNECTOR
MAINS IN
IEC CONNECTOR
PILOT LIGHT
LIVE
NEUTRAL
GROUND

15
TROUBLESHOOTING
If you have any questions regarding the product, please call customer service at 1-877-447-4768,
8:30 a.m. – 4:30 p.m., CST, Monday – Friday.
PROBLEM POSSIBLE CAUSE CORRECTIVE ACTION
Appliance does
not operate.
Power light is ON
but the LCD display
is not visible.
Excessive noise
when the heater
is operating.
Heater is not
operating.
1. The appliance is not
plugged in.
2. A circuit breaker is tripped
or a fuse blown.
3. Defective ON/OFF switch.
4. Loose wiring.
1. Incorrect operation.
2. LCD not functioning.
3. Loose wiring.
1. Dirty or clogged fan.
2. Defective heater assembly.
1. Incorrect operation.
2. Defective heater switch.
3. Defective heater assembly.
4. Loose wiring.
5. Dirty or clogged vents.
1. Make sure the appliance is plugged in
to a standard 120V outlet.
2. Check additional appliances on the
circuit; ideally the appliance should be
on a dedicated 15 Amp circuit.
3. Call customer service.
4. Call customer service.
1. Refer to operating instructions.
2. Call customer service.
3. Call customer service.
1. Refer to Cleaning the Fan in
Care and Maintenance.
2. Call customer service.
1. Refer to operating instructions.
2. Call customer service.
3. Call customer service.
4. Call customer service.
5. Unplug the unit. Clear vent area of dust
and debris. Wait ten minutes, plug the
unit in again and turn on the heater.

16
The manufacturer warrants that your new electric heater is free from manufacturing and material
defects for a period of one year from date of purchase, subject to the following conditions and
limitations.
This electric heater must be installed and operated at all times in accordance with the instructions1.
furnished with the product. Any alteration, willful abuse, accident, or misuse of the product shall
nullify this warranty.
This warranty is non-transferrable and is made to the original owner, provided that the purchase2.
was made through an authorized supplier of the manufacturer.
This warranty is limited to the repair or replacement of part(s) found to be defective in material3.
or workmanship, provided that such part(s) have been subjected to normal conditions of use and
service,aftersaiddefectisconrmedbythemanufacturer’sinspection.
The manufacturer may, at its discretion, fully discharge all obligations with respect to this warranty4.
by refunding the wholesale price of the defective part(s).
Any installation, labor, construction, transportation, or other related costs/expenses arising from5.
defective part(s), repair, replacement, or otherwise of same, will not be covered by this warranty,
nor shall the manufacturer assume responsibility for same. Further, the manufacturer will not be
responsible for any incidental, indirect, or consequential damages, except as provided by law.
All other warranties - expressed or implied - with respect to the product, its components and6.
accessories, or any obligations/liabilities on the part of the manufacturer are hereby expressly
excluded.
The manufacturer neither assumes nor authorizes any third party to assume, on its behalf,7.
any other liabilities with respect to the sale of this product.
The warranties as outlined within this document do not apply to non-manufacturer accessories8.
used in conjunction with the installation of this product.
This warranty is void if:
a) The appliancehasbeenoperatedinatmospherescontaminatedbychlorine,uorineorother
damaging chemicals.
b) The appliance is subjected to prolonged periods of dampness or condensation.
c) Any alteration, willful abuse, accident, or misuse of the product.
IF WARRANTY SERVICE IS NEEDED . . .
1) Contact customer service at 1-877-447-4768, 8:30 a.m. – 4:30 p.m., CST, Monday – Friday.
Make sure you have your warranty, your sales receipt, and the model/serial number
of your product.
2) DO NOT ATTEMPT TO DO ANY SERVICE WORK YOURSELF.
WARRANTY
GHP Group, Inc.
8280 Austin Avenue
Morton Grove, IL.
60053-3207
Focal Point Fires plc.
Avon Trading Park, Reid Street
Christchurch, Dorset
BH23 2BT

17
REPLACEMENT PARTS LIST
For replacement parts, call our customer service department at 1-877-447-4768, 8:30 a.m. – 4:30
p.m., CST, Monday – Friday.
PART DESCRIPTION PART #
1 POWER CORD F930303
2 FAN F930218
3 HEATING ELEMENT F930183
4 WALL PLATE F711436
5 ON/OFF SWITCH F930121
6 HEATER SWITCH F930123
7 SHOULDER BOLT F760086
8 REMOTE HANDSET F960020
9 FRAME BRACKET F711444
10 M6 X 12 SCREW F760076
11 LCD DISPLAY PANEL F930151
12 DECORATIVE FRAME F820442
Printed in UK

18
Evoke radiateur
électrique mural à
écran ACL avec
effet de amme
MODÈLE #L32-50
20-10-131
REMARQUE À L’INTENTION DE L’INSTALLATEUR : Veuillez laisser ce manuel au propriétaire.
REMARQUE À L’INTENTION DU CLIENT : Veuillez conserver ce manuel pour vous
y référer ultérieurement.
AVERTISSEMENT!
RESPECTEZ SCRUPULEUSEMENT LES DIRECTIVES DU PRÉSENT MANUEL
POUR PRÉVENIR LES CHOCS ÉLECTRIQUES, LES INCENDIES, LES
DOMMAGES AINSI QUE LES BLESSURES GRAVES OU MORTELLES.
CONSIGNES IMPORTANTES
VEUILLEZ LIRE CE MANUEL AVANT D’INSTALLER OU D’UTILISER LE FOYER.
Des questions, des problèmes, des pièces manquantes? Avant de retourner l’article au détaillant,
communiquez avec notre service à la clientèle au 1 877 447-4768, entre 8 h 30 et 16 h 30, HNC, du
lundi au vendredi.
C US
JOIGNEZ VOTRE REÇU ICI
Numéro de série _______________________________ Date d’achat ________________________________
Warming Your Home. Warming Your Heart.

19
IMPORTANT : Lisez attentivement toutes les directives et tous les avertissements avant
de procéder à l’installation. Le non-respect de ces directives peut provoquer un choc
électrique, des blessures et un incendie, et annule la garantie.
Veuillez lire les directives d’installation et d’utilisation avant d’utiliser ce foyer.
TABLE DE MATIÉRES
Consignes de sécurité....................................................................................................................20
Contenu de l'emballage..................................................................................................................24
Dimensions de l’appareil ................................................................................................................. 25
Préparation.....................................................................................................................................26
Directives d'Installation................................................................................................................... 27
Directives d’utilisation..................................................................................................................... 29
Entretien .........................................................................................................................................30
Schéma de câblage........................................................................................................................ 32
Dépannage.....................................................................................................................................33
Garantie.......................................................................................................................................... 34
Liste des pièces de rechange......................................................................................................... 35

20
Veuillez vous assurer de lire et de comprendre l’intégralité de ce manuel avant d’assembler, d’utiliser
ou d’installer ce produit.
1. Lisez toutes les directives avant d’utiliser ce foyer.
2. Cefoyerestchaudlorsqu’ilestenfonction.And’éviterlesbrûlures,netouchezpasaux
surfaces chaudes. Si le foyer est muni de poignées, servez-vous des poignées pour le
déplacer. Assurez-vous que les matières combustibles, telles que les meubles, les oreillers,
la literie, le papier, les vêtements et les rideaux, se trouvent au moins 914 mm (3 pi)
de l’avant du foyer.
3. MISE EN GARDE : Faites preuve d’une extrême prudence lorsqu’un radiateur
est utilisé par ou à proximité des enfants ou des personnes handicapées et
lorsque vous laissez le radiateur en fonction sans surveillance.
4. Dans la mesure du possible, débranchez toujours ce foyer lorsqu’il n’est pas utilisé.
5. N’utilisezpasunradiateurmunid’uncordonoud’unecheendommagé,quiadéjàsubiune
défaillance, qui est déjà tombé ou qui a été endommagé de quelque façon que ce soit.
6. Coneztouteréparationdecefoyeràuntechnicienqualié.
7. Nemodiezjamaiscefoyer.Remettezenplacelespiècesquidoiventêtreretiréespour
l’entretien avant d’utiliser le foyer de nouveau.
8. N’utilisez pas ce foyer à l’extérieur.
9. Le radiateur n’est pas conçu pour être utilisé dans une salle de bains, une salle de lavage
ou tout autre endroit humide semblable. Ne placez jamais ce foyer à un endroit où il pourrait
tomber dans une baignoire ou un autre contenant rempli d’eau.
10. Évitez d’acheminer le cordon sous un tapis. Ne couvrez pas le cordon avec une carpette, un
tapis de passage ou un autre article semblable. Placez le cordon dans un endroit peu passant
et où il ne pourra pas être accroché.
11. Pourdébranchercefoyer,tournezlescommandesenpositiond’arrêt,puisretirezlache
de la prise.
12. Branchez le cordon uniquement sur une prise correctement mise à la terre.
13. Lors de l’installation, veillez à ce que le foyer soit mis à la terre conformément aux codes locaux,
à la plus récente version du Code canadien de l’électricité, CSA C22.1 ou, dans le cas des
installations aux É.-U., aux codes locaux et au code national de l’électricité, ANSI/NFPA Nº 70.
14. N’insérez jamais un objet, quel qu’il soit, dans les ouvertures de ventilation ou de sortie d’air
dufoyerandeprévenirlesdommagesainsiquelesrisquesdechocélectriqueetd’incendie.
15. Andeprévenirlesrisquesd’incendie,nebloquezjamaislesprisesd’entréeoudesortied’air
de quelque façon que ce soit. Ne placez pas le foyer sur une surface molle, comme un lit, car
les ouvertures pourraient se bloquer.
CONSIGNES DE SÉCURITÉ CONSERVEZ CES DIRECTIVES
Table of contents
Languages:
Other pleasant hearth Electric Heater manuals
Popular Electric Heater manuals by other brands

Intertec Data Systems
Intertec Data Systems SL BLOCKTHERM DB.A operating instructions

HeatQ
HeatQ NEX APP user manual

Ventair
Ventair MANROSE CAPRI installation instructions

Munters
Munters RPL Neutro 7L 2 kW instruction manual

Dimplex
Dimplex Obsidian OBS20 user manual

Ecostrad
Ecostrad GH-20F-APP instruction manual

Cadet
Cadet The Perfectoe UC072 owner's guide

Elnur Gabarron
Elnur Gabarron TBC-8 Installation instructions and user guide

Intertec Data Systems
Intertec Data Systems CP FLATTHERM DC.A HI operating instructions

Thermoval
Thermoval T19 1000 WiFi manual

Endless Summer
Endless Summer EWTR720B owner's manual

Fanmaster
Fanmaster PESH15 instruction manual