Install the product in an appliance box or on a bracket
(MNT-01, not provided) on a DIN rail or wall.
REL-02 has two relays with a 16 A breaking capacity for
resisve loads and a total breaking capacity of up to 16 A
(e.g., 10 A+6 A). Dierent loads have dierent input current
when switching on and voltage spikes when switching o.
The preceding table is recommended for dierent types
of lighng loads in order to minimise the risk of reducing
service life.**
Maximum current 16 A.
Based on normal cable lengths and commonly
available light xtures on the market.
**
Distributed on both outputs.*
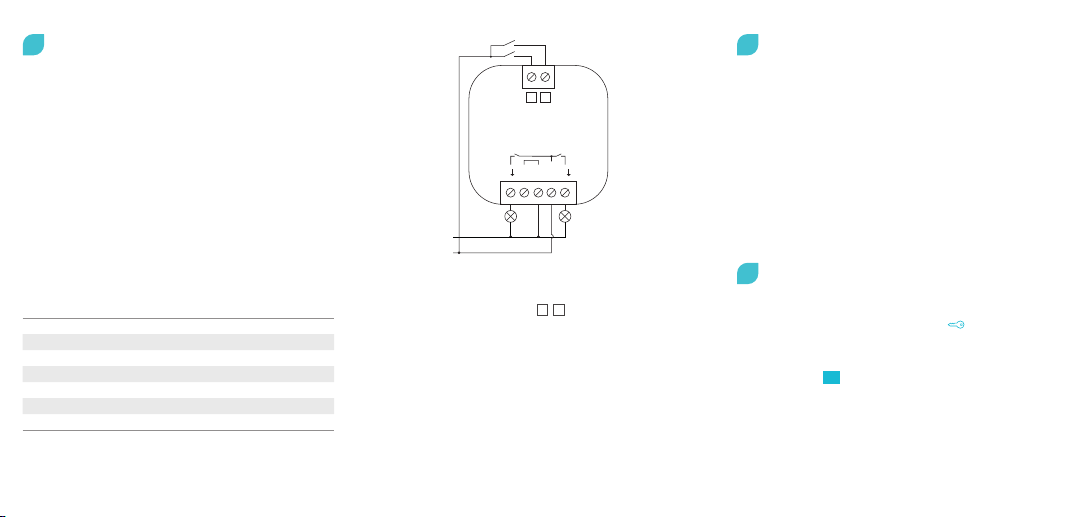
Connect the product
1
Control inputs 1 and 2 can be used for control using e.g.
- Push-buon (preset so that inputs 1 and 2 control
respecve outputs 1 and 2)
- Light switch
- Moon sensor (with neutral conductor)
The inputs can also be used to wirelessly control one
or more products from Plejd. A double click can be used
to acvate lighng scenarios.
The sengs are easy to adjust in the app.
Control via control inputs 1 2
Last PF Rated output* VA* A*
Halogen (230V) 1 3 500W 3 500 16
LED loads 0,9 800W 1 000 4
Fluorescent tube uncompensated 0,3 700W 2 300 10
Fluorescent tube compensated 0,85 1 500W 1 750 8
Low voltage halogen electronic 0,8 1 500W 1 750 8
Low voltage halogen convenonal 0,95 1 200W 1 200 5
Low-energy bulbs 0,6 500W 800 4 Support
Download the Plejd app via the App Store or Google Play.
Aer supplying power to the unit based on one of the
wiring diagrams, you can use the app to install the lighng.
This requires Internet connecvity and Bluetooth® on your
phone/tablet. You do not need any addional equipment
to get started.
With the help of the app, it’s simple to congure all
relevant sengs. The app can be used to schedule
the lighng using the astronomical clock or mer, control
lighng, and wirelessly sync control switches and scenarios.
Download the app and follow the instructions
Hand over the Plejd system
Hand over the Plejd system to your customer by wring
the system code on the included scker . You’ll nd the
code in the app once you have completed the installaon.
Place the scker in the distribuon box and give the
welcome folder to the customer.
2
3
In the event of any technical quesons, please contact
Plejd customer services.
HI!
12
L
N
N
NL L
1L2


