Plum Axe Plus Z403 User manual

User Manual
1
Axe PLUS
User Manual
Brand Name: plum
Model Name: Z403
FCC ID: Y7WPLUMZ403

User Manual
2
Contents
1.APPEARANCE AND KEYPAD OPERATIONS .......................... 3
2.USING MEMORY CARD AS U DISK ........................... 4/5/6
3.WIFI .................................................... 7
4.BLUETOOTH................................................ 8
5.MAIL .................................................... 9
5.1 GMAIL ...................................................................................................................... 9
5.2 EMAIL .......................................................................................................................... 10
6.DIALLING ........................................ 11/12/13/14
7.MESSAGING..........................................15/16/17
8. CONTACTS ..........................................18/19/20
9. INTENET EXPLOR .......................................... 21
10.RECORDER............................................... 22
11.CLOCK ................................................. 23
12. CACULATOR.............................................. 24
13.CAMERA ............................................. 25/26
13.1 IMAGE MODE.................................................................................................................. 25
13.2 VIDEO MODE ................................................................................................................. 26
14.IMAGES ...........................................27/28/29
15.MUSIC .............................................. 30/31
16. CALENDER............................................... 32
17. FM RADIO............................................... 33
18. SETTINGS....................................... 34/35/36/37
19. NOTICES FOR THE USE OF PHONE ............................ 38

User Manual
3
1 . Appearance and Keypad Operations
Keys
Functions
Home
Long press it to open recently opened application window.
menu
Press it to start the menu,which allows you to perform actions in the current
interface or options’ menu.
back
Press it to return to the previous interface,or to close dialog box 、
options’ menu、notification panel or the keypad.
up
Press it to increase the volume
Press it to turn the phone to vibration mode from the silent mode.
down
Press it to decrease the volume.
Power key
Power on/off the phone via long press the power key
Cover it, and then the phone’s backlight will turn off
2. Using Memory Card as U Disk
If you want to send music, pictures or other files to the phone’s memory card from the computer,you should set memory card as u
disk first.
Set memory card as u disk
1) Connect the phone to the computerwithUSB cable. The notification icon will appear in thestatus box.
2) Use USB mobile transmission line will connected to the computer
3) In the notificationpanel, touchUSB isconnected ,thentouch“Open the USB StorageDevice”
Uninstall the U Disk from computer

User Manual
4
The Methods as the same as connection, see the following picture:
1)cell phone connections media equipment (MTP)
2)In the Settings, developers in closed USB debugging options.
3)Use USB mobile transmission line will connected to the computer
4)In the notification panel, the choice of "media equipment (MTP)" connection mode, can be in the PC for SD card
Notice:If you in the cell phone connections to the computer playing media equipment, the mobile phone will
not be able to identify memory CARDS. You will not be able to use some of the mobile phone applications, like

User Manual
5
camera.
The phone connection camera (PTP)
1)Using the USB mobile transmission line will connected to the computer. You don't have to shut down USB
debugging, see below. Only under the camera view images
2)After the connection can be directly in the PC check images captured on camera。
Notice: different PC operating system to how to operate to normal use the U disk.
1)WIN7 Can directly use

User Manual
6
2)XP update windows media player to 11
3)Install wpdmtp.inf driver
4)Vista Unconfirmed
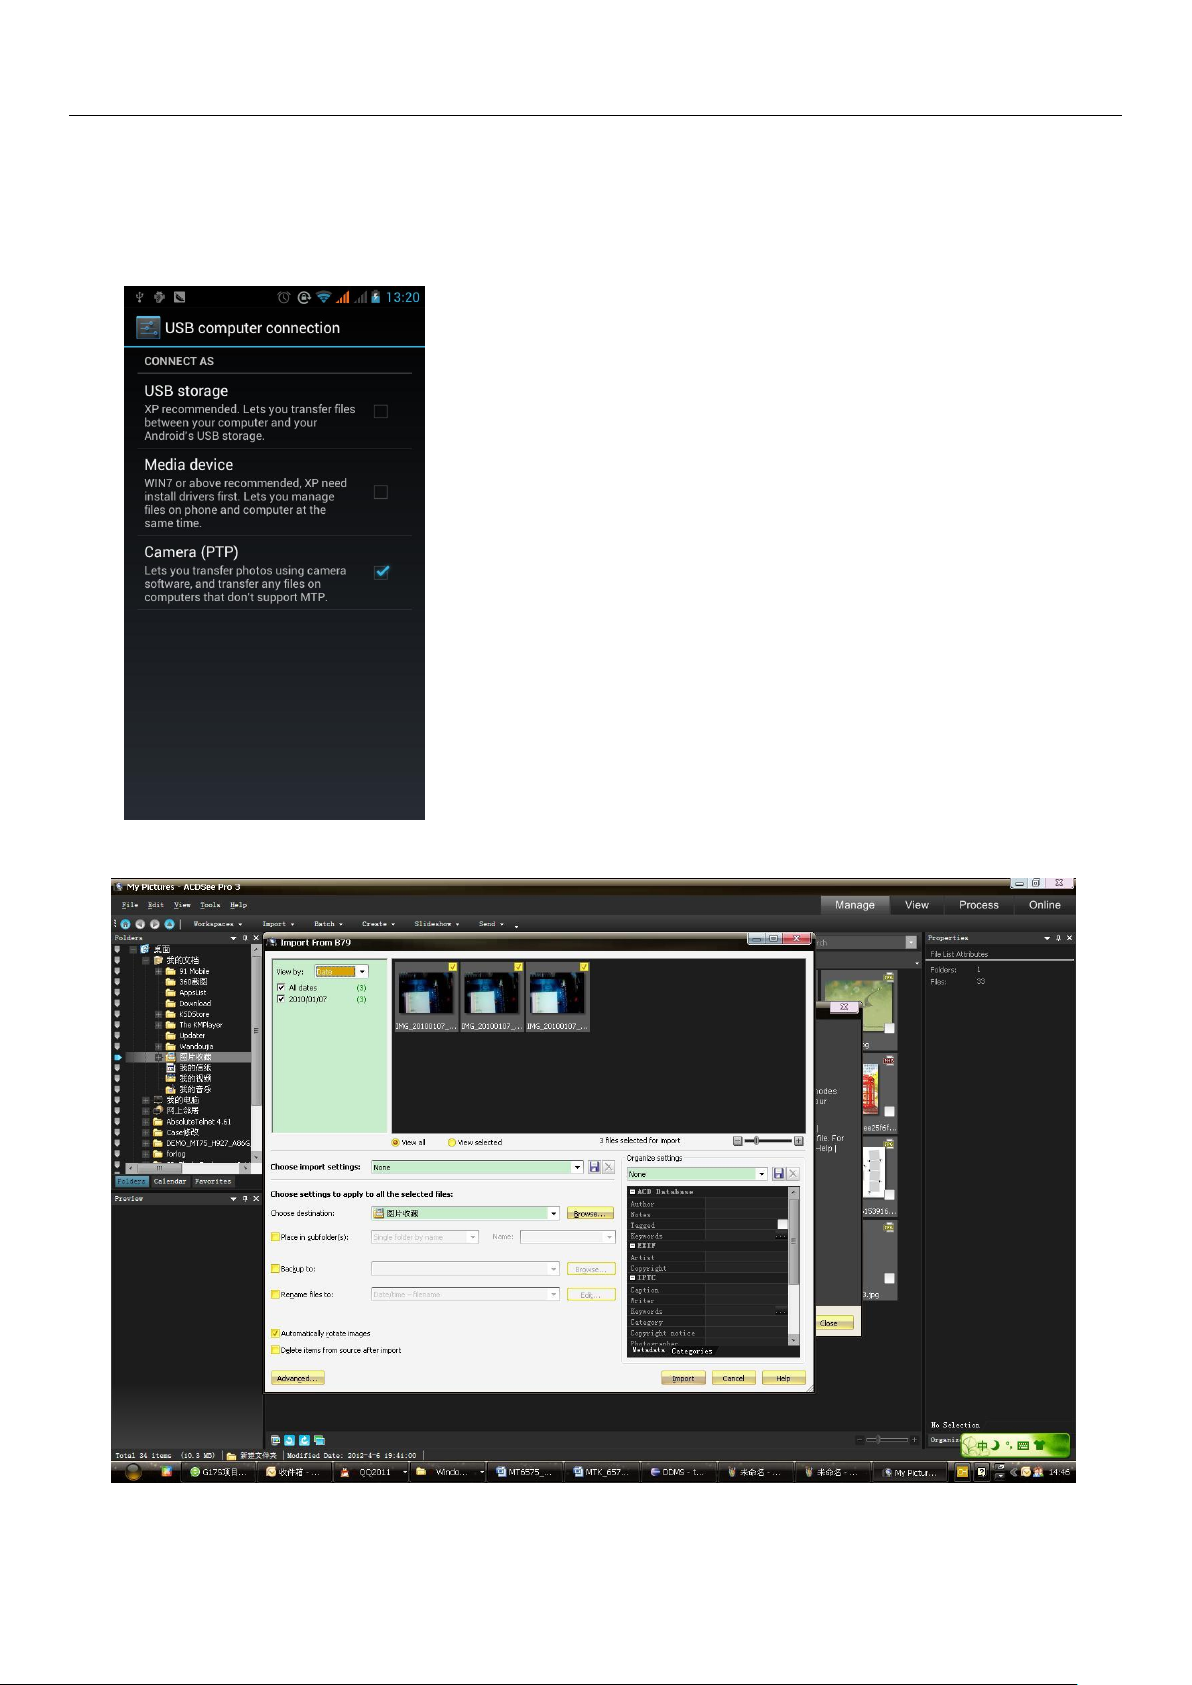
Notice :On the PC operation assistant tool such as mobile phone, Must be open the USB debugging.
3.WIFI
Wi-Fi provides as far as300feet (100M) range of wireless network access. If you use cell phoneto connect wifi, youshouldconnectto
thewireless access point or 「hot spots」.
Notices:The availability and coverage of Wi-Fi signal depend on the number, infrastructure and other objects
penetrated by the signal.
Open Wi-fi and to connect to the wireless network
1) Press home>menu,then touch settings>wifi and internet
2) Select the wi-fi box,to open Wi-Fi. Phone will automatically scan for availablewireless networks.
3) Touch Wi-Fi settings. Then a list of Wi-Fi network will show the founded network name and security settings. (open
network or WEP、WPA/WPA2 with password).If you enablethe notificationin Wi-Fi settings, The status box will show this
icon ( ) when open available wireless network founded.
4) Touch one of the Wi-Fi choices to connect the network. When you choose open network, phone will connect
to it automatically. If you choose WEP、WPA/WPA2 with password, you should type the password first, then
touch to connect it.
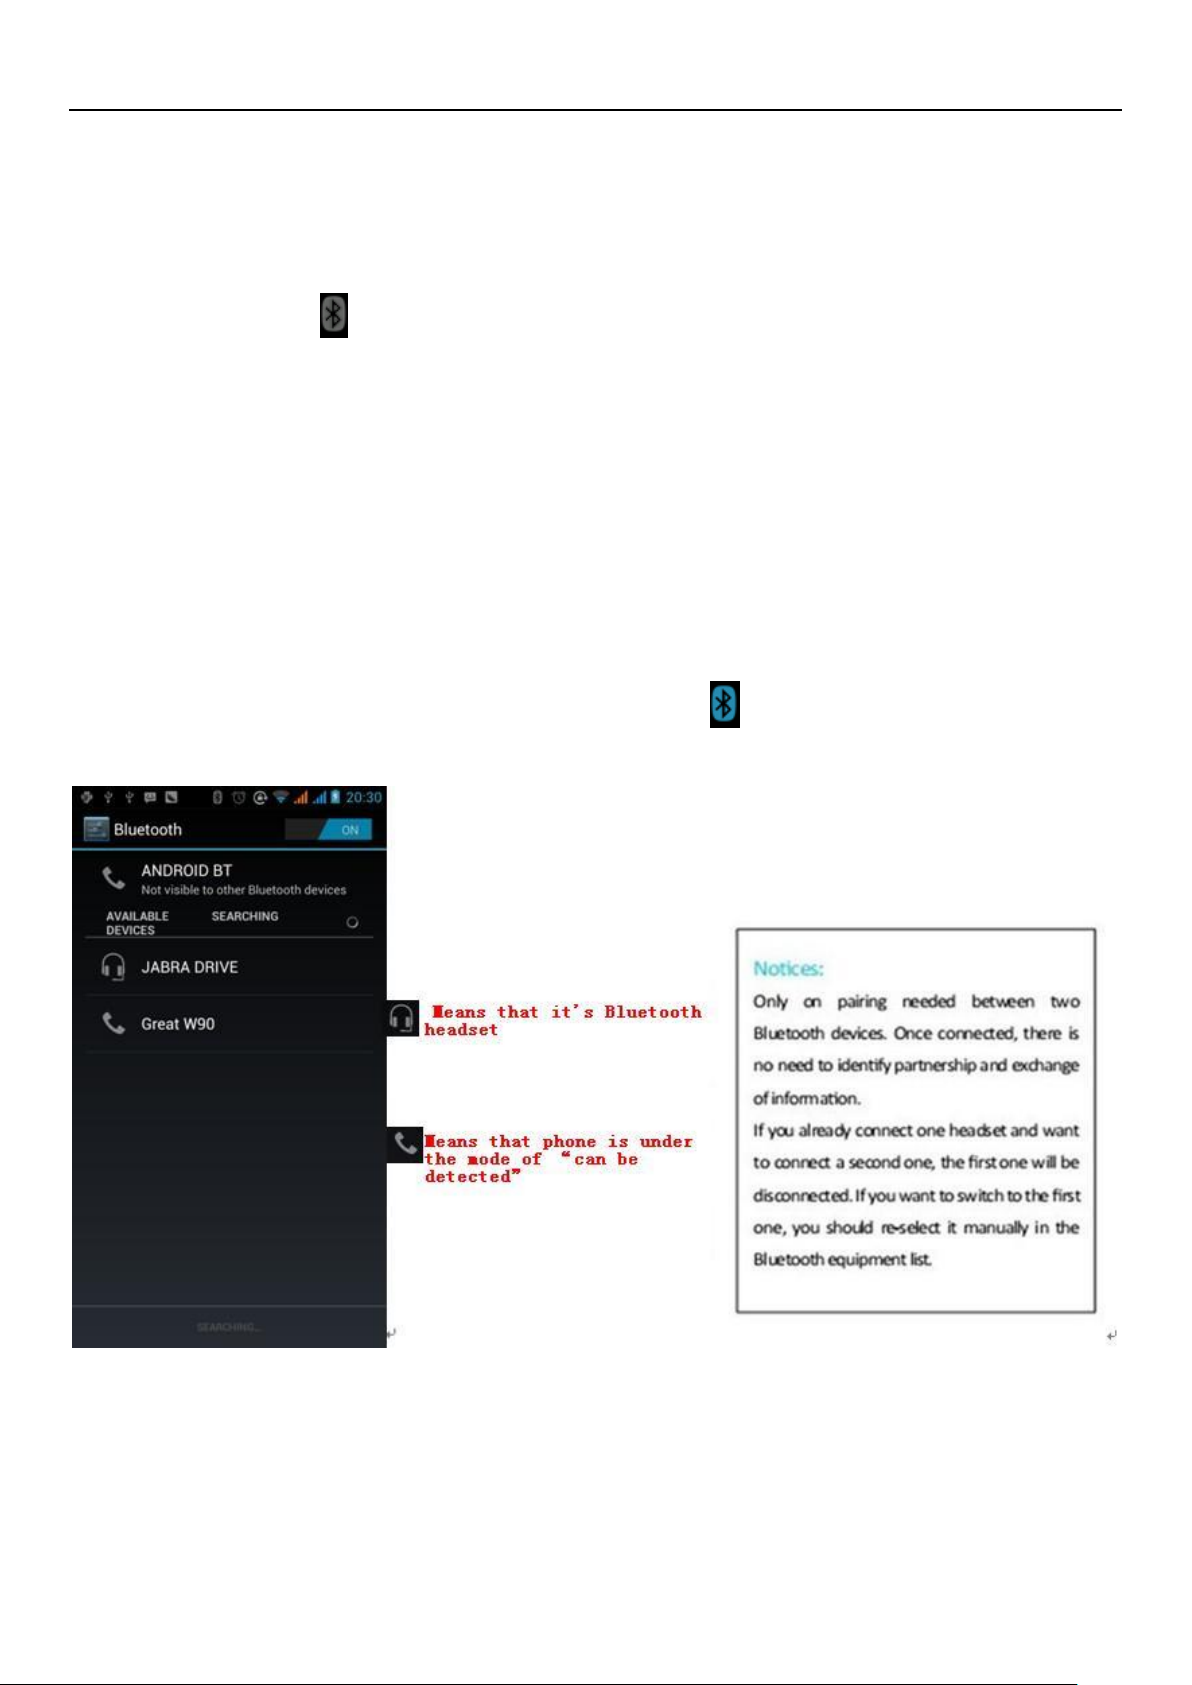
Notices:when the phone is connected to the wireless network,
The status box will show this Wi-Fi icon( ),andthe approximate
signal strengthen (the number of lit bars).Iftouch the connected
network,will displaythe nameofWi—Fi network,status, speed, signal,
strength, security,informationand IP address.
If you want to delete the wireless settings, please touch “not reserve”
as inthe right picture. If youwant to connect to this network, you
should re-enter these settings.
Notices:
Unless you choose not to reserve the network, otherwise,thereis no need to re-enter the corresponding password when next time
connecting to the previously encrypted wireless network. Wi-Fi will search automatically, that is, phone needn’t to perform additional
stepstoconnect Wi-Fi networks.
Notices:
Unless you choose not to reserve the network with password, otherwise, there is no need to re-enter the corresponding password
when next time connecting to the previously encrypted wireless network. Wi-Fi will search automatically, that is, phone needn’t to
performadditional steps to connectWi-Fi networks.
Connect tootherWi-Fi networks
1) In the interface of wireless and network, touch Wi-Fi settings. The founded Wi-Fi networks will show on the Wi-Fi
network list.
2) Touch other Wi-Fi networks, andthenyou canconnect tothis network.
Notices:in addition, you can surf the internet via GPRS. We default that the GPRS in SIM1 is opened after started,

User Manual
7
users can select manually ,the specific location is “settings>wireless and internet>data connection”, touch
“SIM1、SIM2、no data connection”, when the dot turns green, it’s already opened.。

User Manual
8
4. Bluetooth
Turn onBluetooth or set the phone can be detected
1) Presshome>menu,the touchsettings.
2) Touch wireless and internet, then choose Bluetooth box to open the Bluetooth function. After started, the status box will
show thisicon ( ). Touch “scan for devices”the it startsto scan for all deviceswithin range.
3) Touch Bluetooth settings, all the devices founded will display in the list under the icon.
(select the box “can be detected”, set it to be detected, the other Bluetooth devices will be able to find the phone.)
important:the maximum detecting time of the phone is 2 minutes.
Pairing and connection of Bluetooth headset
1) Press home>menu, then touch settings.
2)Touch wireless and internet>Bluetooth settings, then select Bluetooth box, then your phone will scan for the
Bluetooth devices within range ,and show the founded devices in the list under the icon.
Tips:
a. If the list can’t find your equipment, touch scanning equipment to re-scan it.
b. Make sure that the devices wanted are under the detected mode.
3) Touch headset in the equipment list to finish the connection.
Notices:generally Bluetooth devices need password to be paired, often use「0000」as the default password.4)The
pairing and connecting status will show under the headset in the Bluetooth devices list. When the headset
connected to your phone, the status box will show this icon( )means connected. Then you can use the
headset to make or receive callings.
Cut the connection to the Bluetooth
1) Press home>menu>settings>wireless and internet>Bluetooth settings.
2) In the list of Bluetooth equipment, touch or tap and hold the connected hand-free headset.
3) Press and select “cancel the pairing”.
Bluetooth proximity sensor
After pairing the two device,you can test out the signal is strong or weak by the Bluetooth proximity sensor device

User Manual
9
5.Mail
5.1 Gmail
Create an electronic mail account
Select mail> settings. You can activate or edit existing e-mail accounts as well as create a new e-mail account.
a. Select mail, Google account setting interface appears. Then touch‘next step’> create account>enter name,last
name and e-mail account.
b. Google servers determine whether the name can be used, if so, new interface appears prompting enter
password, then judge the password’ security, users who doesn’t meet the requirements need to re-enter the
password.
c. Successfully register a new Gmail account, a messenger created automatically for testing.
Loading mail account
a. Open Gmail skip introduction screen>loading interface appears >select load
b. Enter name, password then load
E-mail account initialization ,prompting “login successful” All Google accounts will be synchronized.
Creating and sending ,mails
When creating mails, select mail > creating mails. Enter the address(recipient)、theme and contents. Press MENU you
could ‘append’、‘Add Cc/Bcc’, select send or discarded.
Receive mails
There is tone for new mails, in the status box will show this button ,Press Menu >‘refresh’, refresh and
update the number of the unread mails in a proper way.
Delete mails
When loading a mail account,if you want to delete it,you need to restore factory settings . When loading a second
one,you could press the menu button to delete it.
Notices:many functions depend on Gmail Account,for example:Electronic Market、Google Talk、Sync Contact and
Calendar.

User Manual
10
5.2 Email
Load Email.
c. Open network connection,
d. In setting the account interface, input the correct email address and password and click next mobile
phone automatically complete the sending and receiving server Settings. Pop-up mail find
frequency, and user Settings interface, complete Settings, click next.
e. For account creation name, the editor of the law that email user name, and click next. Complete set,
synchronous mailbox.
Create and send Email
When creating mails, select mails > create mails. Enter the address(recipient)、theme and contents.
Press MENU you could „append‟、„Add Cc/Bcc‟, select send or discarded or save as draft.
Check the Email files
Click on the bottom folder options, list all folder options

User Manual
11
6.Dialling
When the icon of internet server appears in the screen, you could dial or receive callings. The signal bar on the top
right corner show the strength of network signal (the maximum with 4 signal bars) .
Start dialing
Open application’s main menu>dial. You could choose SIM1 or SIM2 to do the dialing.
Dialling
At the dialing Keboard ,enter the phone number,and then click the dialing key , after that,you should choose
one SIM card or internet call. If needed to call the extension,you could click the “dial pad” in the bottom of the screen
to open the interface or press menu key to select “delay 2 seconds”,and then enter the number of the extension.
The dialup keyboard input number, click Menu can IP dial-up or speed dial
Video call: video call usually refers to the Internet and mobile Internet based on (3 G Internet) end, through
the phone between the speech of the real-time transmission and image (user of bust, photographs, items, etc.)
of a way to communicate. Only 3 G to support this function. Input a number click video dial-up, each other
answers the phone after both can through camera for video calls.
Telephone calls in the call log
Every telephone number called and received in“SIM1、SIM2”will reserved in phone’s menu of call log. On the top
left of every call record will show“SIM1 or SIM2”
All numbers in the call log can be dialed by clicking the button ”dial” on the right side of the screen.
When number list appearing,click it to catch details;press it for long you could dial via “SIM1 or SIM 2”, meanwhile
you can edit, delete, save the number or do other operations.

User Manual
12
Receive callings
When calling comes(top left will show from which SIM card)press“Answer”and slide towards right until the middle
button, then you can receive callings.
Proximity sensor
According to the distance between phone and human body,it will adjust automaticallythe switch of the backlight.
During the call, close the phone to the ear, the backlight will turn off automatically,which could save batteries
and prevent inadvertently touching.
Refuse to answer the phone
a. When standby, calling comes,press“refuse”button and slide towards left side until the middle button, then
you could refuse the calling.
b. When using,calling comes,click on the “refuse”button to refuse the calling.
Two-way call/multiparty call(conference call)
Notices:this function needs that SIM card open multiparty call features.
1) Already exist a call in the phone
2) Click“Add calls”, dial another call(or receive another call,phone default open ”call waiting”
(settings–dialing settings–other dialing settings), after both connected,could view the status of
calling.
3)select“combine call”–you can combine two calls into one way.
4)after multiparty call connected ,you could separate the calls or hang up one of them via“the small
arrow of conference call”.
Telephone recording
During the call,more>start record,you could record the dialog of the call.

User Manual
13
1)settings>set other functions of the call in the dialing settings,for example:Call Transfer–after all the
settings finished and turned on,you could transfer the call to a certain number.
2)In settings>dialing settings >other dialing settings,open “call waiting”.After turned on,you can receive
another call when already exist one,The answering and rejecting functions are just like the ordinary phone.
Video call
When you use video call,ensure to install 3G SIM card. in the dialing interface,enter numbers ,then press the
symbol ,so that complete the video call.
The second way to use video call
Open the menu of applications>contacts, press one contact of the contacts,then press long the phone
number,and select the”video call”.

User Manual
14
Call settings
Voice Call
1)Voice Mail:The voice mailbox in setting in the input voicemail number.
2) IP prefix number:Setting the different of SIM cards IP prefix numbers
3)Call forwarding:Can set respectively 2 a SIM card, the line is busy, and no one has to receive,
not be connect four connecting way
3) Call barring:Can set respectively two to the SIM card call restrictions
4) Additional Settings:a.My phone number b.Call waitting。
Video Call
1)Local video replacement:Set a picture to display when camera off use.
2) Display peer video:Display picture for replacing peer video when it is unavailable.
3)Peer video replacement:Set a picture to display when peer video unavailable.
4)Enable back camera:Available to switch cameras if turn on.
5) Bigger Peer video:Turn on to make peer video bigger than local video.
6)Auto drop back:Drop back to voice call connecting automatically
7)Outgoing video call:Display local video when make a video call.
8) Incoming video call:Display local video when accept an incoming video call.
9) Other settings:a. Call forwarding b.Call barring c.Additional settings
Internet call
1) Account
2) Use Internet calling
Other Settings
1)Fixed Dialing Numbers
2)Minute Reminder:Turn on minute reminder at 50s of every minute.
3)Quick Response:Can edit the text messages rejected by the information when content.

User Manual
15
7. Messaging
Important:the message title of this phone is the phone number,will be reserved in s similar for of dialog,
instead of the usual folder structure. Messages with blue background are those received, and messages with
white background are those sent.
Send SMS to certain phone number
1) Press home>messaging,touch“new messages”.
2) In the interface of “edit”:
a.Click “recipient”box to start input method,you can also click“enter”box to start input method,in that
way you can enter characters.
b.Click the button of “send from SiM1 or SIM2”to start sending.
Send MMS to certain phone number
When creating message,it was defaulted as SMS,it will be turned to MMS when following operations were done. You
can send MMS via clicking “send” after editing.
1) In the interface of “edit”,Click the button of “Menu”:
2) Click “append”, you can spend the following attachments,then it will be turned to MMS automatically.

User Manual
16
Notices:
a, If you want send MMS with many pages, you should select
“append PPT” in the “append” interface.
b, You can append 10 pictures, with the form of GIF, JPEG.
c, Click “adding themes”, the box of “theme” will appear under
the box of “recipient”, meanwhile it is turned to MMS
automatically.
Send messages to multiple numbers
Enter multiple numbers in the box of entering,each number is divided by the comma in English.
Click on the right side of the head with the receiver plus icon, can choose contact group in the address book

User Manual
17
Notices:For now this phone can mass messages to almost 20 numbers,the correct number depends on the
characters,you can only enter 312 characters in the box of“recipient”.
When a message is sent or sent again,a little yellow letter will appear. The number 1 or 2 on the letter refers to SIM1 or
SIM2.
When message sending failed,a red triangle with exclamation will appear.
when editing information other functions of Menu button

User Manual
18
8. Contacts
Open the menu of applications>contacts
Default display phone contacts and SIM card contacts, sort contacts by first letter of alphabet.
2)Click Search Icons,You can enter the contact search interface.
a.To enter the Numbers or letters and the list of names of the agreement, which will be shown in the search
results.
b.If it were not so search to match of the contact, interface will appear 'not find any contact.
3)Click“Add Contact”Icons,Can create New Contacts

User Manual
19
Select save contacts to phone or a a SIM card, into contact editing interface.
You can edit contact head, name, telephone number, group, save to and more, and then click "finish".
4)In contact interface, click on the Menu button
a. Menu >Delete contacts
Can “All”Icons checked, click the delete button, delete all the contact person, including cell phone and SIM
card of contact.
Can separate check one or more contacts, click the delete, delete the selected all contacts.
b. Menu> To display of the contact
You can choose all contact, one a SIM card of contact, the mobile phone contacts
c. Choose from the definition, but also on a SIM card and cell phone choice whether or not to show that all the
lone contacts.
d. Menu >Import/export
In the mobile phone can local, SIM card and SD card three parties achieve contact information of the copy
each other.
First choose the "copy source" and then select the next step, selecting copy contact to, can complete the
contact's copy.
e. Menu >Accounts
Account and synchronization set routine synchronous Settings, can choose background data and automatic
synchronization.
f. Menu >Share visible contacts
All contacts can be imported into the SD card, or through bluetooth, email, text message or MMS share

User Manual
20
Open the application interface >Contact,change to the group.
1)Click“Add group”Icons can create new group,Just to be saved in a cell phone group
2)In "the group name" column input group name, in "type in the contact's name" column input contact key word, can
be in all of contact search, and added to the group. Finally click "finish".
3) In a group, click on the Menu button, Menu functions
a. Menu>Update
You can modify the group name, delete or add group of contacts
b. Menu >Delete
You can delete the group, and will not delete the contact itself.
c. Menu >Send messaging by group.
Automatic new information, and the group added to contact the address bar recipients
d. Menu >Send Email by group
If contact group have the same email address, the automatic new mail, and E-mail address in the address
bar add to the receiver
Table of contents
Other Plum Cell Phone manuals

Plum
Plum Sync X210 User manual

Plum
Plum Z306 User manual

Plum
Plum A104 Ram 3G User manual

Plum
Plum X350 Sync 3.5 User manual

Plum
Plum Z513 User manual

Plum
Plum Ram E200 User manual

Plum
Plum S107 Installation and operation manual

Plum
Plum Trigger Plus Z305 User manual

Plum
Plum genius p200 User manual

Plum
Plum Gator plus User manual