manuals.online logo
Brands
  1. Home
  2. •
  3. Brands
  4. •
  5. Plustek
  6. •
  7. Scanner
  8. •
  9. Plustek OpticFilm 8300i User manual

Plustek OpticFilm 8300i User manual

Other Plustek Scanner manuals

Plustek SmartOffice PS396 User manual

Plustek

Plustek SmartOffice PS396 User manual

Plustek OpticBook 3600 User manual

Plustek

Plustek OpticBook 3600 User manual

Plustek SmartPhoto F50 User manual

Plustek

Plustek SmartPhoto F50 User manual

Plustek SmartOffice PS188 User manual

Plustek

Plustek SmartOffice PS188 User manual

Plustek PS506U Owner's manual

Plustek

Plustek PS506U Owner's manual

Plustek OpticFlim 8300i User manual

Plustek

Plustek OpticFlim 8300i User manual

Plustek MobileOffice H100 User manual

Plustek

Plustek MobileOffice H100 User manual

Plustek OPTICPRO ST64 User manual

Plustek

Plustek OPTICPRO ST64 User manual

Plustek OpticBook A300 Plus Quick start guide

Plustek

Plustek OpticBook A300 Plus Quick start guide

Plustek Optic Slim 2600 User manual

Plustek

Plustek Optic Slim 2600 User manual

Plustek SmartOffice PS4080U User manual

Plustek

Plustek SmartOffice PS4080U User manual

Plustek SmartOffice PS30D User manual

Plustek

Plustek SmartOffice PS30D User manual

Plustek MobileOffice D412 User manual

Plustek

Plustek MobileOffice D412 User manual

Plustek OpticFilm 135 User manual

Plustek

Plustek OpticFilm 135 User manual

Plustek eScan A350 User manual

Plustek

Plustek eScan A350 User manual

Plustek OpticFilm 135 Series User manual

Plustek

Plustek OpticFilm 135 Series User manual

Plustek SmartOffice PS286 Plus User manual

Plustek

Plustek SmartOffice PS286 Plus User manual

Plustek BookReader V100 User manual

Plustek

Plustek BookReader V100 User manual

Plustek OpticFilm 8200i SE User manual

Plustek

Plustek OpticFilm 8200i SE User manual

Plustek MobileOffice D430 User manual

Plustek

Plustek MobileOffice D430 User manual

Plustek OpticFilm 8200i Ai User manual

Plustek

Plustek OpticFilm 8200i Ai User manual

Plustek Smart Office SN8016U User manual

Plustek

Plustek Smart Office SN8016U User manual

Plustek SmartOffice PS396 User manual

Plustek

Plustek SmartOffice PS396 User manual

Plustek OpticFilm 120 Pro User manual

Plustek

Plustek OpticFilm 120 Pro User manual

Popular Scanner manuals by other brands

Radio Shack PRO-433 quick start guide

Radio Shack

Radio Shack PRO-433 quick start guide

Atid AT911N series user guide

Atid

Atid AT911N series user guide

Siemens RUGGEDCOM WiN5100 Faq

Siemens

Siemens RUGGEDCOM WiN5100 Faq

Canon CanoScan LiDE 20 Specifications

Canon

Canon CanoScan LiDE 20 Specifications

Epson 4180 - Perfection Photo Product support bulletin

Epson

Epson 4180 - Perfection Photo Product support bulletin

Radio Shack PRO-72 owner's manual

Radio Shack

Radio Shack PRO-72 owner's manual

Lanier 5622 Operator's guide

Lanier

Lanier 5622 Operator's guide

Faro Freestyle 2 user manual

Faro

Faro Freestyle 2 user manual

Kramer VS-16N user manual

Kramer

Kramer VS-16N user manual

Z/I Imaging PhotoScan 2001 instructions

Z/I Imaging

Z/I Imaging PhotoScan 2001 instructions

Renkforce DS100-5M operating instructions

Renkforce

Renkforce DS100-5M operating instructions

Canon imageFORMULA CR-120N user manual

Canon

Canon imageFORMULA CR-120N user manual

Fujitsu FI-4860C2 Specifications

Fujitsu

Fujitsu FI-4860C2 Specifications

HPc9861a 4400c Setup and support guide

HPc9861a

HPc9861a 4400c Setup and support guide

Kodak i5800 Scanner Brochure & specs

Kodak

Kodak i5800 Scanner Brochure & specs

Kodak i7300 user guide

Kodak

Kodak i7300 user guide

Revopoint POP user manual

Revopoint

Revopoint POP user manual

Fujitsu fi-4860C installation guide

Fujitsu

Fujitsu fi-4860C installation guide

manuals.online logo
manuals.online logoBrands
  • About & Mission
  • Contact us
  • Privacy Policy
  • Terms and Conditions

Copyright 2025 Manuals.Online. All Rights Reserved.

Unpack and Connect
● Auspacken und anschließen
● Desempaque y conecte
Installing Scanner Driver
● Scanner Treiber installieren
● Instalando el controlador del escáner
Install the scanner driver by the following path:
Installieren Sie den Scannertreiber über den folgenden Pfad:
Instale el controlador del escáner mediante la siguiente ruta:
Mac OS X: OPTICFILM >Mac > Plustek OpticFilm 8300i > Setup.dmg
Windows OS: OPTICFILM > Windows > Plustek OpticFilm 8300i > Setup.exe
Attention
You may download the latest version driver from our ocial
website plustek.com/of8300i
Sie können die neueste Version des Treibers von unserer
oziellen Webseite plustek.com/of8300i.
Puede descargar la última versión del controlador desde
nuestro sitio web ocial plustek.com/of8300i.
OpticFilm 8300i Quick Start Guide ● OpticFilm 8300i Kurzanleitung
● OpticFilm 8300i Guía de inicio rápido
Insert the Film Holder
● Filmhalter einschieben
● Insertando el sujeta películas
● Mounted Film Holder
● Halter für gerahmte Dias
● Sujeta Diapositivas Montadas
● Strip Film Holder
● Filmstreifenhalter
● Sujeta Películas
10 11
11
10
B
C
Film info Film info
F
MountedFllmHolder
F
Mounted Fllm Holder
F
Attention
● The lm holder should be able to be inserted
into the scanner smoothly. Do not push the
lm holder hard.
●Always keep this side up for correct scan
results.
● Der Filmhalter muss vorsichtig und ohne
festes Drücken in den Scanner eingeschoben
werden.
●Zum ordnungsgemäßen Scannen muss diese
Seite immer nach oben zeigen.
● El sujeta películas se debería insertar en el
escáner con suavidad. No apriete el sujeta
películas con dureza.
● Mantener siempre este lado hacia arriba para
unos resultados de escaneado correctos.
Scan with QuickScan Plus
● Scannen mit der QuickScan Plus
● Digitalizar con la QuickScan Plus
31
2
4
Adjust scan settings, click [Scan] button to start your
scanning job.
Passen Sie die Scaneinstellungen an, klicken Sie auf
die Schaltäche [Scannen], um Ihren Scanauftrag zu
starten.
Ajustar la conguración de escaneo, haga clic el botón
[Digitalizar] para comenzar el trabajo de escaneo.
You may click [ Scan ] button to scan more
images.
Sie können auf die Schaltäche [ Scannen]
klicken, um weitere Bilder zu scannen.
Puede hacer clic en el botón [ Digitalizar] para
escanear más imágenes.
Click on the [Edit] button to edit scanned images.
Klicken Sie auf die Schaltäche [Editieren], um
gescannte Bilder zu bearbeiten
Haga clic en el botón [Editar] para editar las imágenes
escaneadas.
[View] screen
Der [Ansicht] Bildschirm
Pantalla [Ver]
[Scan] screen
Der [Scannen] Bildschirm
Pantalla [Escanear]
[Edit] screen
Der [Editieren] Bildschirm
Pantalla [Editar]
[Preference] settings
[Einstellungen]
Ajuste las preferencias
Reset to default
Auf Standard
Reajustar al default
Attention
Please refer to the User Guide for detailed information.
Detaillierte Informationen nden Sie im Benutzerhandbuch.
Consultar la Guía del usuario para obtener información detallada.
* OpticFilm 8300i Ai only
* Nur für OpticFilm 8300i Ai
* Sólo lo para OpticFilm 8300i Ai
Technical Support
● Technischer Kundendienst
● Soporte técnico
USA/CA
+1 714-670-7713
9am to 5:30pm, Pacic Time, Monday through Friday
For detailed information, please visit product website.
United Kingdom
0125-674-1513
9am-16pm, Monday through Friday
For detailed information, please visit product website.
Germany
+49 (0)4102 - 8913 - 130
Mo. – Do. von 09:00 – 12:30 Uhr und 13:00 - 17:00
Uhr, sowie Fr.: 09:00 – 12:30 Uhr und 13:00 - 15:00 Uhr.
Für detaillierte Informationen besuchen Sie bitte
unsere Produktwebseite
SilverFast Installation Operating the Scanner FAQ
● SilverFast installieren ● Umgang mit dem Scanner
● Instalando SilverFast ● Utilizar el escáner
You can install SilverFast from your MySilverFast portal or from USB stick:
Sie können SilverFast von Ihrem MySilverFast portal oder von einem USB-
Stick installieren:
Se puede instalar SilverFast desde su MySilverFast portal o desde una
memoria USB:
Mac OS
Windows OS
1
2
 [IntelliScan] button: Launch SilverFast software
 [QuickScan] button: Launch QuickScan Plus software
 [IntelliScan]-Taste: Benutzung des SilverFast Launchers
 [QuickScan]-Taste: Benutzung des QuickScan Plus Launchers
Botón [IntelliScan]: Usando el Ejecutable SilverFast
Botón [QuickScan]: Usando el Ejecutable QuickScan Plus
1. Why can’t I start the SilverFast software?
Check if the Image Source is blank, if it is blank:
a. Make sure the USB cable and power cord are connected properly.
b. Check if your scanner is properly listed under [Imaging Devices] in [Device Manager].
2. How to do the SilverFast software reset?
a. Click [Service Dialog] in the SilverFast welcome screen.
b. Select [Software reset] resets this software to the factory settings. (All saved settings will be lost as well.)
3. Is the iSRD function not available on B/W lm?
iSRD can be used with conventional colour negatives (developed using the C41 process), colour slides (developed using the E6 process) and paper proofs.
Due to the silver content in conventional black and white negatives and slides, these can’t be retouched using iSRD.
1. Warum kann ich die SilverFast-Software nicht starten?
Überprüfen Sie, ob die Bildquelle leer ist, wenn sie leer ist:
a. Stellen Sie sicher, dass das USB-Kabel und das Netzkabel richtig angeschlossen sind.
b. Überprüfen Sie, ob Ihr Scanner unter [Bildverarbeitungsgeräte] im [Geräte-Manager] richtig aufgeführt ist.
2. Wie können die Einstellungen von SilverFast vollständig zurückgesetzt werden?
a. Klicken Sie im SilverFast-Willkommensbildschirm auf [Service].
b. Wählen Sie [Software-Reset], um diese Software auf die Werkseinstellungen zurückzusetzen. (Alle gespeicherten Einstellungen gehen ebenfalls verloren.)
3. Ist iSRD (Infrarotscan) geeignet für Schwarzweißlm?
Nein, iSRD sollte nur bei Farbnegativen (entwickelt nach C-41-Prozess) oder bei Farbdias (entwickelt nach E-6-Prozess) angewendet werden. Der Silberanteil
in der Emulsion handelsüblicher Schwarzweißlme führt zu einer Streuung der Infrarotstrahlen, weshalb sich im Scanergebnis Artefakte bilden können. Wir
empfehlen daher Schwarzweißlm nicht mit iSRD, sondern mit SRDx zu scannen.
1. ¿Por qué no puedo iniciar el software SilverFast? Compruebe si el origen del imagen está en blanco, si está en blanco:
a. Asegúrese de que el cable USB y el cable de alimentación estén conectados correctamente.
b. si. Compruebe si su escáner se encuentra en la lista correcta en [Dispositivos de imágenes] en [Administrador de dispositivos].
2. ¿Cómo restablecer el software SilverFast?
a. Haga clic en [Diálogo de servicio] en la pantalla de bienvenida de SilverFast.
b. si. Seleccione [Restablecer software] restablece este software a la conguración de fábrica. (Todos los ajustes guardados también se perderán).
3. ¿La función iSRD no está disponible en película B / W?
iSRD se puede usar con negativos de color convencionales (desarrollados usando el proceso C41), diapositivas de color (desarrolladas usando el proceso E6)
y pruebas en papel. Debido al contenido de plata en negativos y diapositivas en blanco y negro convencionales, estos no se pueden retocar con iSRD.
SilverFast Activation ● SilverFast Aktivierung ● Activación de SilverFast
Attention
●It takes about 10 mins to install SilverFast software.
●You have to create and login with a MySilverFast account.
●Please make sure there is internet connection.
● Die Installation der SilverFast Software dauert etwa 10 Minuten.
●Sie müssen ein MySilverFast Konto erstellen und sich mit diesem
anmelden.
● Bitte stellen Sie sicher, dass eine Internetverbindung besteht, während Sie
die SilverFast Software installieren.
●Lleva unos 10 minutos para instalar el software SilverFast.
●Es necesario crear una cuenta de MySilverFast y acceder a ella.
● Por favor, asegúrese de que hay conexión a Internet mientras instala el
software SilverFast.
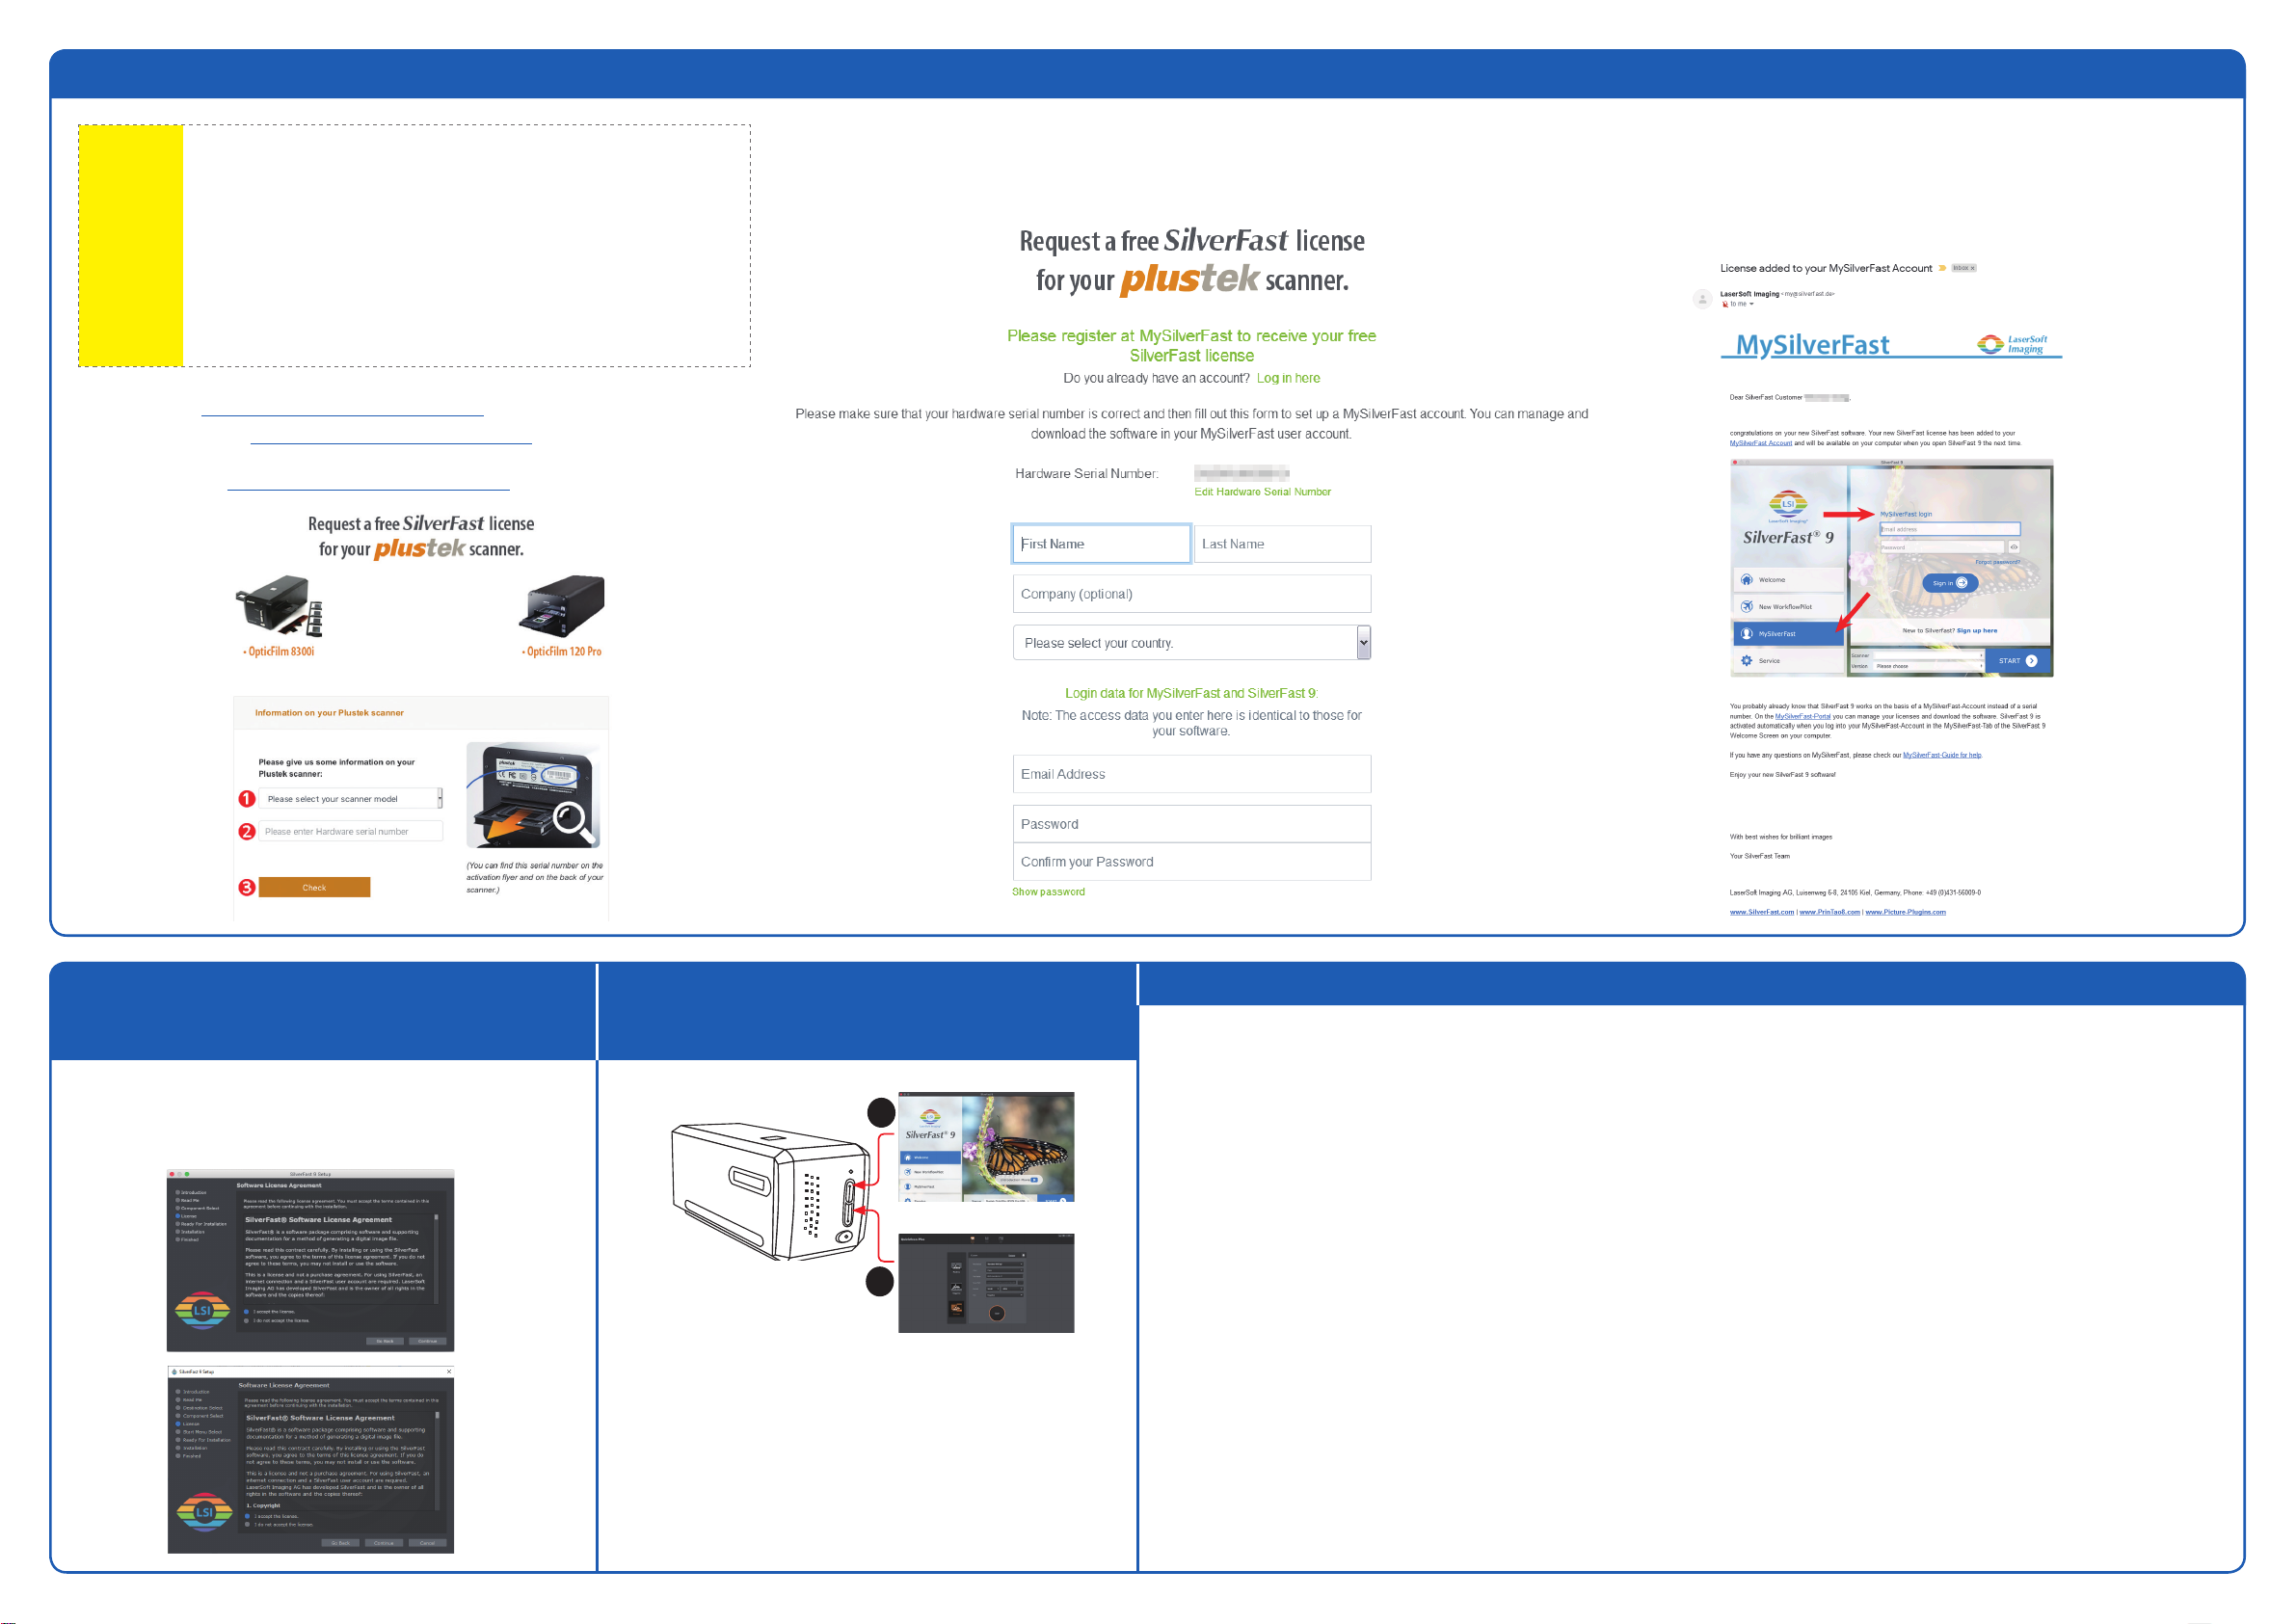
1. Visit the website www.silverfast.com/activation-plustek to request license.
1. Rufen Sie die Webseite www.silverfast.com/activation-plustek auf und folgen Sie den
Anweisungen.
1. Visite la página web www.silverfast.com/activation-plustek y siga las instrucciones.
2. Enter the necessary information to create a MySilverFast account.
2. Geben Sie die die notwendigen Informationen ein, um ein MySilverFast Konto zu erstellen.
2. Ingrese la información necesaria para crear una cuenta MySilverFast.
3. You will receive an email to inform you that the license has already been added to your
MySilverFast account.
3. Wenn die Registrierung abgeschlossen ist, erhalten Sie eine E-Mail, die Sie darüber informiert,
dass die Lizenz bereits zu Ihrem MySilverFast Konto hinzugefügt wurde.
3. Si se ha completado el registro, recibirá un correo electrónico para informarle de que la licencia
ya se ha añadido a su cuenta de MySilverFast.