PNI Escort P04 A User manual

PNI Escort P04 A
User manual / Manual de utilizare / Használati utasítás / Instrukcja obsługi / Manuale dell’utente

EN
2
PNI Escort P04 A includes 4 ultrasonic sensors and the main unit. This system detects the distance between
the vehicle and the back obstacles by the ultrasonic sensors installed on the rear bumper.
MAIN FEATURES:
• Alarm sound
• Close-tting installation
• Insert-in ultrasonic sensors
• Left-right obstruction identication
TECHNICAL SPECIFICATIONS:
• Power voltage: 10.5 ~ 16 Vc.c.
• Rated current: 20 ~ 200mA
• Detection range: 0.3 ~ 2.5m
• Ultrasonic frequency: 40KHz
• Working temperature: -26°C ~ +60°C
DETECTION RANGE:
Top view Side view
ALARM MODE:
Stages Distance Awareness Display Alarm sound Color
1> 2.0m Safe -- Silence -
22.5 - 1.6m Safe 2.5 - 1.6m Silence Green
3 1.5 - 1.0m Safe 1.5 - 1.0m Bi ... bi ... bi Yellow
40.9 - 0.5m Alarm 0.9 - 0.5m Bi bi bi Red
5<0.4m Danger <0.4m Biiii... Red
SENSORS INSTALLATION:
Recommended locations for mounting the sensors:
Bumper Bumper
Pull the
sensors
wire
Bumper
Drill
With label up
Sensor
Side view after installation
2 sensors 4 sensors

EN
3
CONNECTION DIAGRAM:
INSTALLATION AND TEST:
1. After the installation of sensors, adjust the axis and the direction, the arrange the wires in good order
2. Connect the power wire of the control box with the reversing light correctly
3. Connect the digital display to the control box
4. Put the shift lever to reverse gear; radix point in the display should be lighted, it indicates the system is under
detectino status
Test:
a. Id the display show nothing, please check the polarity and the power voltage (>10.5V). Check the display
connection, too.
b. If the displayed distance is wrong or 0.0 is shown or a long beep can be heard, please unplug the system
and try again to insert the gear lever in the reversing mode. If the problem persists, the main unit might be
defective.
c. When testing the sensors, if the display emits a continuous tone or displays 0.0, please check if some parts
of the car or other objects are within the range of the sensors, if the sensor is inadequately mounted or the
sensor is under the inuence of strong sources of interference (such as exhaust pipes, other wires)
d. If a number is shows on the display but there is no obstacle in front of the sensors, please check the position
and direction of the sensors. The sensors must be mounted horizontally. If they are mistakenly mounted, the
sensors can detect the registration number, the spare wheel or the rear spoiler.
e. If the problems can not be solved after the tests, the sensors can be considered defective or do not match
the control unit. The whole system should be replaced.
f. For security reasons, the display will only show 0.0, instead of 0.3-0.1, when it detects something within 0.0-
0.4 m depending on the software. In this situation, the driver must stop immediately. When the distance is 0.5
m, the alarm sound will sound and it will last for 1 second. Please be careful during maneuvers.
NOTES:
• Be aware of the size of the sensor mounting hole
• During installation of the system, the engine of the car must be switched o
• System performance can be altered in the following cases: heavy rain, paved road, uneven road,
vegetation, extremely hot weather, wet or cold, snow, mud or ice on sensors
• System operation may be aected by the presence of other ultrasonic waves, such as a 24 / 12V
converter
• The sensors should not be mounted too tightly or too lightly
• The metal bumper can aect the performance of the system
• Do not position the control unit near the exhaust pipe or other wires
• Test the system to make sure it works properly
• This system is designed to assist the driver in parking. The manufacturer does not take responsibility for
accidents after installation.
We recommend installing the system at an authorized service center.
Display
Sensor
Red wire - back lights connection
Black wire - ground connection
Main unit

ES
4
PNI Escort P04 A está compuesto por 4 sensores ultrasónicos y una unidad central. Este sistema detecta la
distancia entre el automóvil y el obstáculo detrás del automóvil con la ayuda de los sensores instalados en el
paragolpes.
CARACTERÍSTICAS PRINCIPALES:
• Sonido del alarma
• Instalación precisa
• Senzores con ultrasunidos incorporados
• Identicación de obstáculos de derecha a izquierda
ESPECIFICACIONES TÉCNICAS:
• Voltaje de alimentación: 10.5 ~ 16 VDC.
• Potencia nominal: 20 ~ 200mA
• Distancia de detección: 0.3 ~ 2.5m
• Frecuencia de ultrasonido: 40KHz
• Temperatura de funcionamiento: -26°C ~ +60°C
RANGO DE DETECCIÓN:
Vista superior Vista lateral
MODO ALARMA:
Estadiu Distancia Conciencia Visualización Sonido alarma Color
1> 2.0m Seguro -- Sin sonido -
22.5 - 1.6m Seguro 2.5 - 1.6m Sin sonido Verde
3 1.5 - 1.0m Seguro 1.5 - 1.0m Sonidos espaciados Amarillo
40.9 - 0.5m Alarma 0.9 - 0.5m Sonidos ininterrumpidos Rojo
5<0.4m Peligro <0.4m Sunet continuo Rojo
INSTALACIÓN DE LOS SENSORES:
Ubicaciones recomendadas para montar los sensores:
Parachoque Parachoque
ParachoqueTire del
cable de los
sensores
molino
Con etiqueta arriba
Sensor
Vista lateral después
de la instalación
2 sensors 4 sensors

ES
5
DIAGRAMA DE CONEXION:
INSTALACIÓN Y PRUEBA:
1. Después de instalar los sensores, ajústelos en la dirección correcta. Ordene los cable según las indicaciones
2. Conecte correctamente el cable de alimentación de la caja de control con la luz de marcha atrás
3. Conecte la pantalla digital a la caja de control
4. Coloque la palanca de cambios en marcha atrás; el punto de base en la pantalla debe estar iluminado,
indica que el sistema está bajo el estado de detección
Prueba:
a. Si no aparece nada en la pantalla, verique la polaridad y la tensión de alimentación (> 10.5V). Verique
que el enchufe de la pantalla esté bien conectado.
b. Si la distancia mostrada no coincide con la realidad o se visualiza 0.0 o se escucha un sonido constante,
desenchufe el sistema y vuelva a intentar insertar la palanca de cambio de velocidades. Si no se pueden
resolver los problemas, la unidad está dañada y debe cambiarse.
c. Al probar los sensores, si la pantalla emite un tono continuo o muestra 0.0, compruebe que algunas
partes de la máquina u otros objetos se encuentren dentro del alcance de los sensores, si el sensor está
mal montado o si el sensor está bajo la inuencia de fuertes fuentes de interferencia (como tubos de
escape, otros cables).
d. Si hay un número en la pantalla pero no hay ningún obstáculo para los sensores, asegúrese de que los
sensores estén colocados boca abajo; por favor verique la posición y dirección de los sensores. Los
sensores deben montarse horizontalmente. Si están montados por error, los sensores pueden detectar
el número de registro, la rueda de repuesto o el alerón trasero.
e. Si los problemas no pueden resolverse después de las pruebas, los sensores pueden considerarse
defectuosos o no coinciden con la unidad de comando.El sistema completo debería ser reemplazado.
f. Por razones de seguridad, la pantalla solo mostrará 0.0, en lugar de 0.3-0.1, cuando detecta algo dentro
de 0.0 --0.4 m dependiendo del software. En esta situación, el conductor debe detenerse de inmediato.
Cuando la distancia es de 0.5 m, el sonido de la alarma sonará y durará 1 segundo. Tenga cuidado
durante las maniobras.
NOTES:
• Tenga en cuenta el tamaño del oricio de montaje del sensor
• Durante la instalación del sistema, el motor del automóvil debe estar apagado
• El rendimiento del sistema puede verse alterado en los siguientes casos: lluvia intensa, camino
pavimentado, camino desigual, vegetación, clima extremadamente cálido, húmedo o frío, nieve, barro o
hielo en los sensores
• El funcionamiento del sistema puede verse afectado por la presencia de otras ondas ultrasónicas, como
un convertidor 24 / 12V
• Los sensores no deben montarse demasiado o muy ligeramente
• El parachoques de metal puede afectar el rendimiento del sistema
• No coloque la unidad de control cerca del tubo de escape u otros cables
• Pruebe el sistema para asegurarse de que funciona correctamente
• Este sistema está diseñado para ayudar al conductor a estacionar. El fabricante no se responsabiliza por
accidentes después de la instalación.
Recomendamos instalar el sistema en un centro de servicio autorizado.
Display
Sensor
Cable rojo - conexión de luces traseras
Cable negro - conexión a tierra
unidad principal

HU
6
A PNI Escort P04 A 4 ultrahangos érzékelőből és egy központi egységből áll. Ez a rendszer észleli az autó és
az autó mögötti akadályt a lökhárítóba beépített érzékelők segítségével
FŐBB JELLEMZŐK:
• Hangjelzés
• Pontos telepítés
• Ultrahangos integrált érzékelők
• Jobb-ball akadályok azonosítása
MŰKÖDÉSI ADATOK:
• Tápellátás : 10.5 ~ 16 Vc.c.
• Fogyasztás: 20 ~ 200mA
• Távolsági érzékelés: 0.3 ~ 2.5m
• Frekvencia ultrahang: 40KHz
• Üzemi hőmérésklet : -26°C ~ +60°C
RIASZTÁSI MÓD:
Fentről való nézet Oldalnézet
Riasztási mód:
Állapot Távolság Tudatosság Megjelenit Hangjelzés Szín
1> 2.0m Biztonságos -- Néma -
22.5 - 1.6m Biztonságos 2.5 - 1.6m Néma Zöld
3 1.5 - 1.0m Biztonságos 1.5 - 1.0m Ritka jelzés Sárga
40.9 - 0.5m Riasztás 0.9 - 0.5m Gyakori jelzés Piros
5<0.4m Veszély <0.4m Folyamatos jelzés Piros
Érzékelők telepítése:
Javasolt pozíciók a szenzorok felszereléséhez:
Rúd Rúd
Húzza az érzékelő
vezetékét
Rúd
Maró
A címkével felfelé
Érzékelő
Oldalnézet telepítés után
2 érzékelő telepítése 4 érzékelő telepítése

HU
7
Kapcsolati rajz:
Telepítés és teszt:
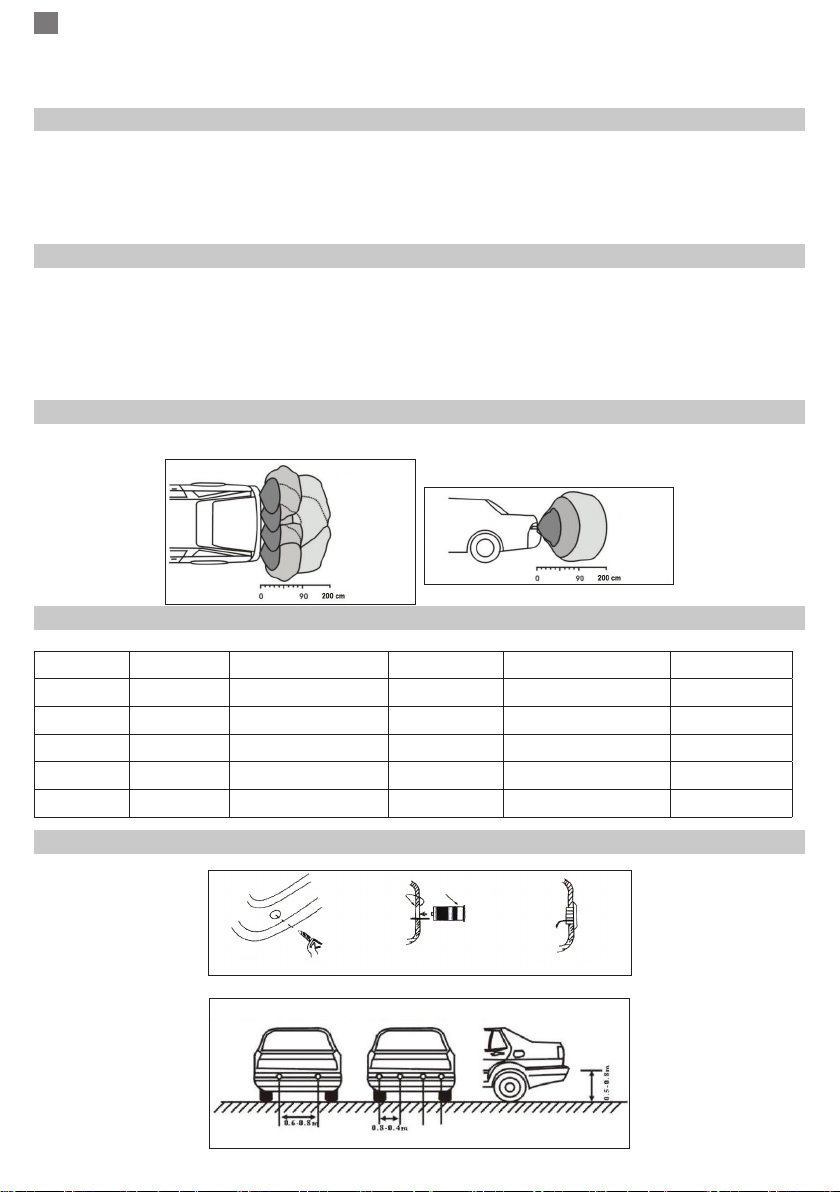
1. Az érzékelők telepítése után állítsa be a megfelelő irányba. Rendezze el a szálakat.
2. Csatlakoztassa a piros kábelt a központi vezérlőegységtől a pofa lámpa “+” -jéhez és a fekete kábelt a “-” -ig.
3. Csatlakoztassa az elektronikus kijelzőt a központi vezérlőegységhez.
4. Helyezze a kapcsolót a hátramenetelésre, hogy tesztelje, ha a kijelző működik.
Teszt:
a. Ha a kijelzőn semmi sem jelenik meg, ellenőrizze a polaritást és a tápfeszültséget(>10.5V). Ellenőrizze,
hogy a kijelző dugója jól van-e csatlakoztatva.
b. Ha a kijelzett távolság nem felel meg a valóságnak, vagy 0,0-es vagy állandó hang hallható, kérjük, húzza
ki a rendszert, és próbálja újra a sebességváltó kart. Ha a probléma nem oldható meg, az egység sérült, és
módosítani kell.
c. Az érzékelők tesztelésénél, ha a kijelző folyamatos hangjelzést ad le , vagy 0.0-et mutat, ellenőrizze, hogy az
autó egy részei vagy más objektumok egyes részei az érzékelők tartományán belül vannak-e, ha az érzékelő
helytelenül van felszerelve, vagy ha az érzékelő erős interferenciaforrások (például kipufogócsövek, egyéb
vezetékek) befolyása alatt van.
d. Ha van egy szám a kijelzőn, de nincs akadály az érzékelők számára, győződjön meg róla, hogy az érzékelők
rosszul vannak lefelé szerelve; ellenőrizze az érzékelők helyzetét és irányát. Az érzékelőket vízszintesen kell
felszerelni. Ha hibásan vannak felszerelve, az érzékelők felismeri a regisztrációs számot, a pótkereket vagy
a hátsó spoileret.
e. Ha a problémákat a tesztek után nem lehet megoldani, az érzékelők hibásnak tekinthetők, vagy nem
illeszkednek a vezérlőegységhez. Az egész rendszert ki kell cserélni.
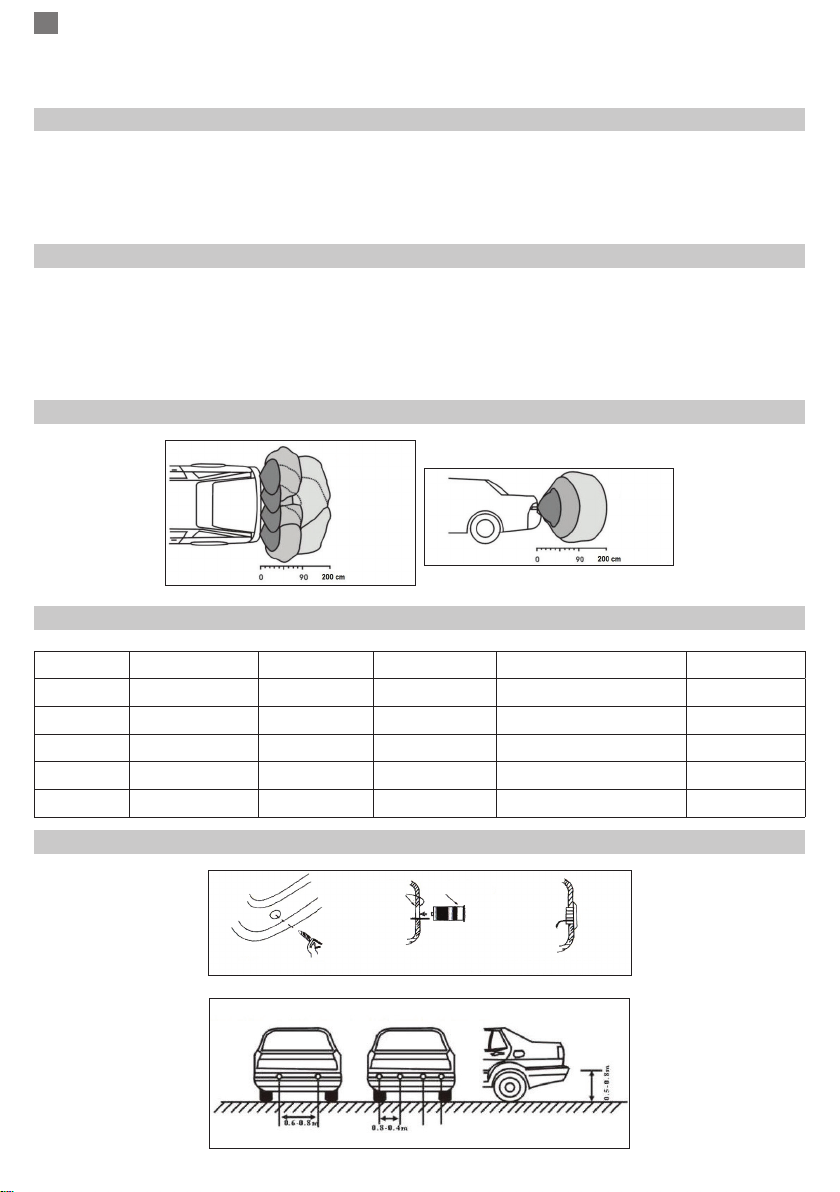
f. Biztonsági okokból a kijelző 0,0-0,4 m-nél, a szoftvertől függően 0,0-0,4 m-en belül észlel 0,0-0,0-t, a 0,3-0,1
helyett. Ebben az esetben a vezetőnek azonnal le kell állnia.
Ha a távolság 0,5 m, a riasztás hangjelzése hallatszik, és 1 másodpercet vesz igénybe. Legyen óvatos a
manőverek során.
MEGJEGYZÉS:
• Ügyeljen az érzékelő szerelési lyuk méretére
• A rendszer telepítése során a gép motorját ki kell kapcsolni.
• A rendszer teljesítménye a következő esetekben módosulhat: heves eső, aszfaltozott út, egyenetlen út,
növényzet, rendkívül forró időjárás, nedves vagy hideg, hó, sár vagy jég a szenzorokon
• A rendszer működését befolyásolhatják más ultrahanghullámok, például 24 / 12V átalakító
• Az érzékelőket ne szerelje túl szorosan vagy túl könnyűen
• A fém rúdja befolyásolhatja a rendszer teljesítményét
• Ne helyezze a vezérlőegységet a kipufogócső vagy egyéb vezetékek közelében
• Ellenőrizze a rendszert, hogy megbizonyosodjon arról, hogy megfelelően működik
• Ez a rendszer a parkolóban segítséget nyújt, és a gyártó nem vállal felelősséget a telepítés után
bekövetkezett balesetekért.
• Javasoljuk, hogy telepítse a rendszert egy hivatalos szervizközpontba.
• A szállító nem vállal felelősséget a hibás telepítés által okozott hibákért.
Javasoljuk, hogy telepítse a rendszert egy hivatalos szervizközpontba.
Display
Érzékelő
Piros vezeték - hátsó lámpa csatlakozás
Fekete vezetékes - földi csatlakozás
Fő egység

IT
8
PNI Escort P04 A è composto da 4 sensori ad ultrasuoni e l’unità centrale. Questo sistema rileva la distanza
tra l’auto e l’ostacolo dietro l’auto con l’aiuto dei sensori installati nel paraurti.
CARATTERISTICHE PRINCIPALI:
• Allarme sonoro
• Installazione precisa
• Sensori integrati ad ultrasuoni
• Identicazione dell’ostacolo da destra a sinistra
SPECIFICHE TECNICHE:
• Tensione di alimentazione: 10,5 ~ 16 VDC.
• Corrente nominale: 20 ~ 200mA
• Distanza di rilevamento: 0,3 ~ 2,5 m
• Frequenza ultrasonica: 40KHz
• Temperatura di esercizio: -26 ° C ~ + 60 ° C
CAMPO DI RILEVAMENTO:
Vista dall’alto Vista dal lato
MODALITÀ DI ALLARME:
Stadio Distanza Consapevolezza Display Allarme sonoro Colore
1> 2.0m In sicurezza -- Nessun suono -
22.5 - 1.6m In sicurezza 2.5 - 1.6m Nessun suono Verde
3 1.5 - 1.0m IIn sicurezza 1.5 - 1.0m Suoni rari Giallo
40.9 - 0.5m Alarme 0.9 - 0.5m Suoni frequenti Rosso
5<0.4m Pericolo <0.4m Suono continuo Rosso
INSTALLAZIONE DI SENSORI:
Posizioni consigliate per il montaggio dei sensori:
Paraurti Paraurti
Paraurti
Tirare
i li del
sensore
Freza
Montaggio 2 sensori Montaggio 4 sensori
Con etichetta
all’insù
Sensore
Vista laterale dopo l’installazione

IT
9
SCHEMA DI COLLEGAMENTO:
INSTALLAZIONE E TEST:
1. Dopo aver installato i sensori, regolarli nella direzione corretta. Disporre i li in ordine.
2. Collegare il cavo rosso dell’unità centrale al “+” della spia degli indicatori di direzione e il lo nero a “-”.
3. Collegare il display elettronico all’unità di controllo centrale.
4. Metti l’interruttore in marcia per vericare se il display sta funzionando.
Test:
a. Se sul display non appare nulla, controllare la polarità e la tensione di alimentazione (> 10,5 V). Controllare
che la spina del display sia ben collegata.
b. Se la distanza visualizzata non è conforme alla realtà o viene visualizzato 0.0 o si sente un suono costante,
scollegare il sistema e riprovare a inserire la leva del cambio. Se i problemi non possono essere risolti, l’unità
è danneggiata e deve essere cambiata.
c. Durante il test dei sensori, se il display emette un tono continuo o visualizza 0.0, vericare che alcune
parti della macchina o altri oggetti si trovino nel raggio di azione dei sensori, se il sensore non è montato
correttamente o se il sensore è sotto l’inuenza di forti fonti di interferenza (come tubi di scappamento, altri li).
d. Se sul display è presente un numero ma non vi sono ostacoli ai sensori, accertarsi che i sensori siano
posizionati correttamente verso il basso; si prega di controllare la posizione e la direzione dei sensori. I sensori
devono essere montati orizzontalmente. Se vengono montati erroneamente, i sensori possono rilevare il
numero di registrazione, la ruota di scorta o lo spoiler posteriore.
e. Se i problemi non possono essere risolti dopo i test, i sensori possono essere considerati difettosi o non
corrispondono alla centralina. L’intero sistema dovrebbe essere sostituito.
f. Per motivi di sicurezza, il display mostrerà solo 0.0, invece di 0.3-0.1, quando rileva qualcosa entro 0.0-0.4
m a seconda del software. In questa situazione, il conducente deve fermarsi immediatamente. Quando la
distanza è 0,5 m, il suono dell’allarme suonerà e durerà per 1 secondo. Si prega di fare attenzione durante le
manovre.
NOTE:
• Essere consapevoli delle dimensioni del foro di montaggio del sensore
• Durante l’installazione del sistema, il motore della macchina deve essere spento
• Le prestazioni del sistema possono essere modicate nei seguenti casi: pioggia intensa, strada asfaltata,
strada dissestata, vegetazione, clima estremamente caldo, bagnato o freddo, neve, fango o ghiaccio sui
sensori
• Il funzionamento del sistema può essere inuenzato dalla presenza di altre onde ultrasoniche, come un
convertitore 24 / 12V
• I sensori non devono essere montati in modo troppo stretto o troppo leggero
• La barra di metallo può inuire sulle prestazioni del sistema
• Non posizionare la centralina vicino al tubo di scarico o ad altri cavi
• Testare il sistema per assicurarsi che funzioni correttamente
• Questo sistema è progettato per assistere nel parcheggio e il produttore non si assume responsabilità per
incidenti vericatisi dopo l’installazione.
Si consiglia di installare il sistema presso un centro di assistenza autorizzato.
Display
Sensore
Filo rosso - collegamento retroilluminazione
Filo nero - collegamento a terra
Unita centrale

PL
10
PNI Escort P04 A składa się z 4 czujników ultradźwiękowych i jednostki centralnej. Ten system wykrywa
odległość między samochodem a przeszkodą za samochodem za pomocą czujników zamontowanych na
zderzaku.
CECHY GŁÓWNE:
• Dźwięk alarmu
• Precyzyjna instalacja
• Zintegrowane czujniki ultradźwiękowe
• Identykacja pezeszkody prawa-lewa strona
SPECYFIKACJE TECHNICZNE:
• Zasilanie: 10,5 ~ 16 VDC.
• Prąd znamionowy: 20 ~ 200mA
• Odległość wykrywania: 0.3 ~ 2.5m
• Częstotliwość ultradźwięku: 40KHz
• Temperatura pracy: -26°C ~ +60°C
ZASIĘG DETEKCJI:
Widok z góry Widok z boku
TRYB ALARMU:
Etap Dystans Świadomość Pokaz Dźwięk alarmu Kolor
1> 2.0m Bezpieczny -- Bez dźwięku -
22.5 - 1.6m Bezpieczny 2.5 - 1.6m Bez dźwięku Zielony
3 1.5 - 1.0m Bezpieczny 1.5 - 1.0m Rzadkie dźwięki Żółty
40.9 - 0.5m Alarm 0.9 - 0.5m Częste dźwięki Czerwony
5<0.4m Niebezpieczeństwo <0.4m Ciągły dźwięk Czerwony
INSTALACJA CZUJNIKÓW:
Zalecane miejsca montażu czujników:
Zderzak Zderzak
Zderzak
Pociągnij
przewód
czujników
Młyn
Z etykietą do góry
Czujnik
Widok z boku po instalacji
2 czujnik 4 czujnik

PL
11
WYKRES POŁĄCZEŃ:
INSTALACJA I TEST:
1. Po zainstalowaniu czujników, wyreguluj je we właściwym kierunku. Ułóż gwinty w kolejności.
2. Podłącz czerwony przewód z centralnej jednostki sterującej do światła “+” kierunkowskazu, a czarny
przewód do “-”.
3. Podłącz wyświetlacz elektroniczny do centralnej jednostki sterującej.
4. Przełącz przełącznik w marszu, aby sprawdzić, czy wyświetlacz działa.
Test:
a. Jeśli nic nie pojawia się na wyświetlaczu, sprawdź biegunowość i napięcie zasilania (> 10,5 V). Sprawdź,
czy wtyczka wyświetlacza jest dobrze podłączona.
b. Jeśli wyświetlana odległość nie jest zgodna z rzeczywistością, lub wyświetlany jest wskaźnik 0,0 lub słychać
stały dźwięk, odłącz system i spróbuj ponownie, aby włożyć dźwignię zmiany biegów. Jeśli problemów nie da
się rozwiązać, urządzenie jest uszkodzone i musi zostać zmienione.
c. Podczas testowania czujników, jeśli wyświetlacz emituje ciągły dźwięk lub wyświetla 0.0, sprawdź, czy
niektóre części maszyny lub inne przedmioty znajdują się w zasięgu czujników, czy czujnik jest nieprawidłowo
zamontowany lub czy czujnik znajduje się pod wpływem źródeł silne zakłócenia (takie jak rury wydechowe,
inne przewody).
d. Jeśli na wyświetlaczu pojawi się numer, ale czujniki nie są przeszkodą, upewnij się, że czujniki są źle
ustawione; proszę sprawdzić położenie i kierunek czujników. Czujniki muszą być zamontowane poziomo.
Jeśli zostaną one omyłkowo zamontowane, czujniki mogą wykryć numer rejestracyjny, koło zapasowe lub
tylny spoiler.
e. Jeśli problemów nie da się rozwiązać po testach, czujniki mogą być uznane za wadliwe lub niezgodne przez
jednostkę dowodzenia. Cały system należy wymienić.
f. Ze względów bezpieczeństwa na wyświetlaczu pojawi się tylko 0,0 zamiast 0,3-0,1, gdy wykryje ona wartość
w granicach 0,0 -0,4 mw zależności od oprogramowania. W tej sytuacji kierowca musi natychmiast zatrzymać
się. Kiedy odległość jest 0,5 m, rozlegnie się dźwięk alarmu i będzie trwał przez 1 sekundę. Zachowaj
ostrożność podczas manewrów.
UWAGA:
• Zwróć uwagę na rozmiar otworu montażowego czujnika
• Silnik samochodu musi być wyłączony podczas instalacji
• Wydajność systemu może zostać zmieniona w następujących przypadkach: intensywny deszcz, droga
asfaltowa, nierówna droga, roślinność, bardzo gorąca, mokra lub zimna pogoda, śnieg, błoto lub lód na
czujnikach
• Na działanie systemu może mieć wpływ obecność innych fal ultradźwiękowych, takich jak konwerter
24/12 V.
• Czujników nie wolno montować zbyt ciasno ani zbyt luźno
• Metalowy pasek może wpływać na działanie systemu
• Nie umieszczaj jednostki sterującej w pobliżu rury wydechowej lub innych przewodów
• Sprawdź system, aby upewnić się, że działa poprawnie
• System ten ma na celu pomóc w parkowaniu, a producent nie ponosi odpowiedzialności za wypadki po
instalacji
Zalecamy zainstalowanie systemu w autoryzowanym centrum serwisowym.
Display
Czujnik
Czerwony przewód -
połączenie podświetlenia tylnego
Czarny drut - połączenie z uziemieniem
Główna jednostka

RO
12
PNI Escort P04 A este compus din 4 senzori cu ultrasunete si unitatea centrala. Acest sistem detecteaza distanta
dintre masina si obstacolul din spatele masinii cu ajutorul senzorilor instalati in bara de protectie.
CARACTERISTICI PRINCIPALE:
• Sunet alarma
• Instalare precisa
• Senzori cu ultrasunete incorporati
• Identicare obstacol dreapta-stanga
SPECIFICATII TEHNICE:
• Tensiune de alimentare: 10.5 ~ 16 Vc.c.
• Curent nominal: 20 ~ 200mA
• Distanta de detectare: 0.3 ~ 2.5m
• Frecventa ultrasunete: 40KHz
• Temperatura de functionare: -26°C ~ +60°C
RAZA DE DETECTIE:
Vedere de deasupra Vedere laterala
MOD ALARMA:
Stadiu Distanta Constientizare Asaj Sunet alarma Culoare
1> 2.0m In siguranta -- Fara sunet -
22.5 - 1.6m In siguranta 2.5 - 1.6m Fara sunet Verde
3 1.5 - 1.0m In siguranta 1.5 - 1.0m Sunete rare Galben
40.9 - 0.5m Alarma 0.9 - 0.5m Sunete dese Rosu
5<0.4m Pericol <0.4m Sunet continuu Rosu
INSTALAREA SENZORILOR:
Locatii recomandate pentru montarea senzorilor:
Bara Bara
Trageti
rul
senzorului
Bara
Freza
Montare 2 senzori Montare 4 senzori
Cu eticheta
in sus
Senzor
Vedere laterala dupa
instalare

RO
13
DIAGRAMA DE CONEXIUNI:
INSTALARE SI TEST:
1. Dupa instalarea senzorilor, reglati-i in directia corecta. Aranjati rele in ordine.
2. Conectati cablul rosu de la dispozitivul central de control la „+”-ul lampii de marsarier si cablul negru la „-’’.
3. Conectati asajul electronic la dispozitivul central de control.
4. Puneti schimbatorul in marsarier pentru a testa daca asajul functioneaza.
Test:
a. Daca pe asaj nu apare nimic, va rugam sa vericati polaritatea si tensiunea de alimentare (>10.5V).
Vericati daca mufa asajului este bine conectata.
b. Daca distanta asata nu este conforma cu realitatea sau este asat 0.0 sau se aude un sunet continuu,
va rugam sa scoateti alimentarea sistemului si sa mai incercati inca o data sa introduceti maneta de viteze in
marsarier. Daca problemele nu pot rezolvate, unitatea este avariata si trebuie schimbata.
c. Cand testati senzorii, daca asajul emite un sunet continuu sau aseaza 0.0, va rugam sa vericati daca
unele parti ale masinii sau alte obiecte sunt in raza de actiune a senzorilor, daca senzorul este montat
necorespunzator sau daca senzorul este sub inuenta unor surse de interferente puternice (cum ar tevi de
evacuare, alte re).
d. Daca pe asaj apare un numar dar nu exista niciun obstacol in fata senzorilor, trebuie vericat daca senzorii
sunt montati gresit cu fata in jos; va rugam vericati pozitia si directia senzorilor. Senzorii trebuie montati
pe orizontala. Daca sunt montati gresit, senzorii pot detecta numarul de inmatriculare, roata de rezerva sau
spoiler-ul din spate.
e. Daca problemele nu pot rezolvat dupa teste, senzorii pot considerati defecti sau nu se potrivesc cu
unitatea de comanda. Tot sistemul ar trebui inlocuit.
f. Din motive de siguranta, asajul va arata doar 0.0, in loc de 0.3-0.1, cand va detecta ceva in distanta de 0.0
-0.4 m in functie de software. In aceasta situatie, soferul trebuie sa opreasca imediat. Cand distanta este de
0.5 m, sunetul alarmei va suna si va dura 1 secunda. Va rugam sa ti atenti in timpul manevrelor.
NOTE:
• Atentie la dimensiunea gaurii de montare a senzorului
• In timpul instalarii sistemului, motorul masinii trebuie sa e oprit
• Performantele sistemului pot alterate in urmatoarele cazuri: ploaie torentiala, drum pietruit, drum cu
denivelari, vegetatie, vreme extrem de calda, umeda sau rece, prezenta zapezii, noroiului sau a ghetii
pe senzori
• Functionarea sistemului poate afectata de prezenta altor unde ultrasonice, cum ar un convertor de
24/12V
• Senzorii nu trebuie montati prea strans nici prea lejer
• Bara din metal poate afecta performantele sistemului
• Nu pozitionati unitatea de comanda in apropierea tevii de esapament sau a altor re
• Testati sistemul pentru a va asigura ca functioneaza corespunzator
• Acest sistem este menit sa va asiste la parcare, iar producatorul nu isi asuma responsabilitatea pentru
accidentele survenite dupa instalarea acestuia.
Recomandam instalarea sistemului la un service autorizat.
Fir rosu - conexiune lamp mers inapoi
Fir negru - conexiune masa
Unitatea centrala
Asaj
Senzor

RO:
Declaratie UE de conformitate simplicata
SC ONLINESHOP SRL declara ca Senzori parcare auto PNI Escort P04 A este in conformitate cu Directiva
EMC 2014/30/EU. Textul integral al declarației UE de conformitate este disponibil la urmatoarea adresa de
internet:
https://www.mypni.eu/products/4938/download/certications
EN:
EU Simplied Declaration of Conformity
SC ONLINESHOP SRL declares that Parking sensors PNI Escort P04 A complies with the Directive EMC
2014/30/EU. The full text of the EU declaration of conformity is available at the following Internet address:
https://www.mypni.eu/products/4938/download/certications
HU:
Egyszerűsített EU Megfelelési Közlemény
SC ONLINESHOP SRL kijelenti azt, hogy a Parkoló szenzorok PNI Escort P04 A megfelel az EMC 2014/30/
EU. Az EU-megfelelőségi nyilatkozat teljes szövege a következő internetes címen érhető el:
https://www.mypni.eu/products/4938/download/certications
PL:
Uproszczona deklaracja zgodności UE
SC ONLINESHOP SRL oświadcza, że Czujniki parkowania PNI Escort P04 A jest zgodny z dyrektywą EMC
2014/30/EU. Pełny tekst deklaracji zgodności UE dostępny jest pod następującym adresem internetowym:
https://www.mypni.eu/products/4938/download/certications
ES:
Declaración UE de conformidad simplicada
SC ONLINESHOP SRL declara que el Sensores de aparcamiento PNI Escort P04 A cumple con la Directiva
EMC 2014/30/EU. El texto completo de la declaración de conformidad de la UE está disponible en la siguiente
dirección de Internet:
https://www.mypni.eu/products/4938/download/certications
IT:
Dichiarazione UE di conformità semplicata
SC ONLINESHOP SRL dichiara che il Sensori di parcheggio PNI Escort P04 è conforme alla direttiva EMC
2014/30/UE. Il testo completo della dichiarazione di conformità europea è disponibile al seguente indirizzo
Internet:
https://www.mypni.eu/products/4938/download/certications


Table of contents
Languages:
Other PNI Automobile Electronic manuals
Popular Automobile Electronic manuals by other brands

Audiovox
Audiovox Auto Security AS-GMDLT03 installation guide

Alpine
Alpine SIRIUS KCA-SC100 owner's manual

Keating Of Chicago
Keating Of Chicago Macro Switch Adjustment For Auto Top Side Head... Service instructions

Axxess
Axxess AX-ADDCAM installation instructions

HaWeKo
HaWeKo HYK280 installation manual

Ultra Start
Ultra Start KE-6 install guide

Firstech
Firstech MOMENTO C1 HD quick start guide

Waeco
Waeco MAGIC WATCH MWE-850-4XXL Installation and operating manual

Jacob Jensen
Jacob Jensen Electronic Parking Disc 3 user manual

Neo Car Audio
Neo Car Audio Neo Gateway VW1 owner's manual

Ecco
Ecco EC4204-SK installation instructions

iBeam
iBeam TE-PLGCRV manual