PNI HUNTING 480C User manual

PNI HUNTING 480C
Trail camera/Camera de vanatoare
EN User manual ............................................. 3
IT Manuale d’uso .......................................... 23
RO Manual de utilizare ................................... 43
ES Manual de usuario ................................... 63


3User manual
English
Warning:
You can remotely access the pictures captured by this trail camera only via de
dedicated mobile application, based on a prepaid Cloud account.
The prepaid Cloud function involves paying a credit in advance by bank card
or PayPall.
Prepaid credit is used to purchase a number of pictures.
Camera description
Antenna
PIR sensor
Led indicator
Light sensor
(day/night)
Lens
60 IR LEDs

User manual 4
English
SD card slot
DC in
Batteries
SIM slot
USB port
Navigation keys/ OK
LCD Display MENIU key
Batteries
compartment
ON/ OFF/ SETUP Test Mode

5User manual
English
Getting the camera ready
1. Insert the batteries according to the polarity. The PNI 480C camera can
be powered by 8 AA alkaline or rechargeable Ni-MH batteries. Note:
For a longer battery life, we recommend that you set the type of battery
used (Alkaline or Ni-MH) in the menu of your device.
2. Insert the SD card. Note: We recommend using a 32 GB card.
3. Insert the SIM.
4. Attach the antenna.
Compatible accessories:
Gel battery
12V/18Ah Battery power
cable for trail
camera
Turning the camera on. Basic configuration
1. Turn on the camera
Turn on the camera by moving the ON/SETUP/OFF switch to the ON
position.
In this mode, the camera enters the operation/monitoring/motion detection
mode. In ON mode the screen will not light up. If the default camera settings
meet your needs, then you can mount the camera directly in site. You can
find the default settings on page 11.
2. Camera settings
Move the ON/SETUP/OFF switch to the SETUP position. This mode allows
you to configure the camera. The screen will light up. Press the MENU key to
access the menu. Use the arrow keys to navigate the menu and the OK key to
confirm. Press the MENU key twice to return to the main interface.

User manual 6
English
Notes:
Read the manual and description of the menus carefully to fully understand each
setting.
Step by step test each setting made to check how it works.
Executing an unfamiliar setting can lead to improper operation of the camera.
You can return to the factory settings and resume the configuration, if the camera
behaves dierently after certain settings made by you.
After completing the settings, switch to the ON position again.
3. Network connection
A 4G SIM must be inserted in the camera. When you switch to the SETUP
position, the screen lights up and the camera automatically searches for
signal. Connecting to the GSM network can take 60-120 seconds.
Once the camera is connected to the network, the signal indicator will appear
on the screen.
Move to ON position to switch the camera to “motion detection” mode. For
a proper operation of the image sending process in case of motion detection,
the signal strength must have at least two bars.
If a pop-up with the message “SIM Auto Match failed” appears on the screen,
go to the 4G menu - SIM Auto Match. Select Manual. Then access the
4G-Manual setup menu and complete the APN of the GSM operator used.
The camera will connect to the network automatically after restarting.
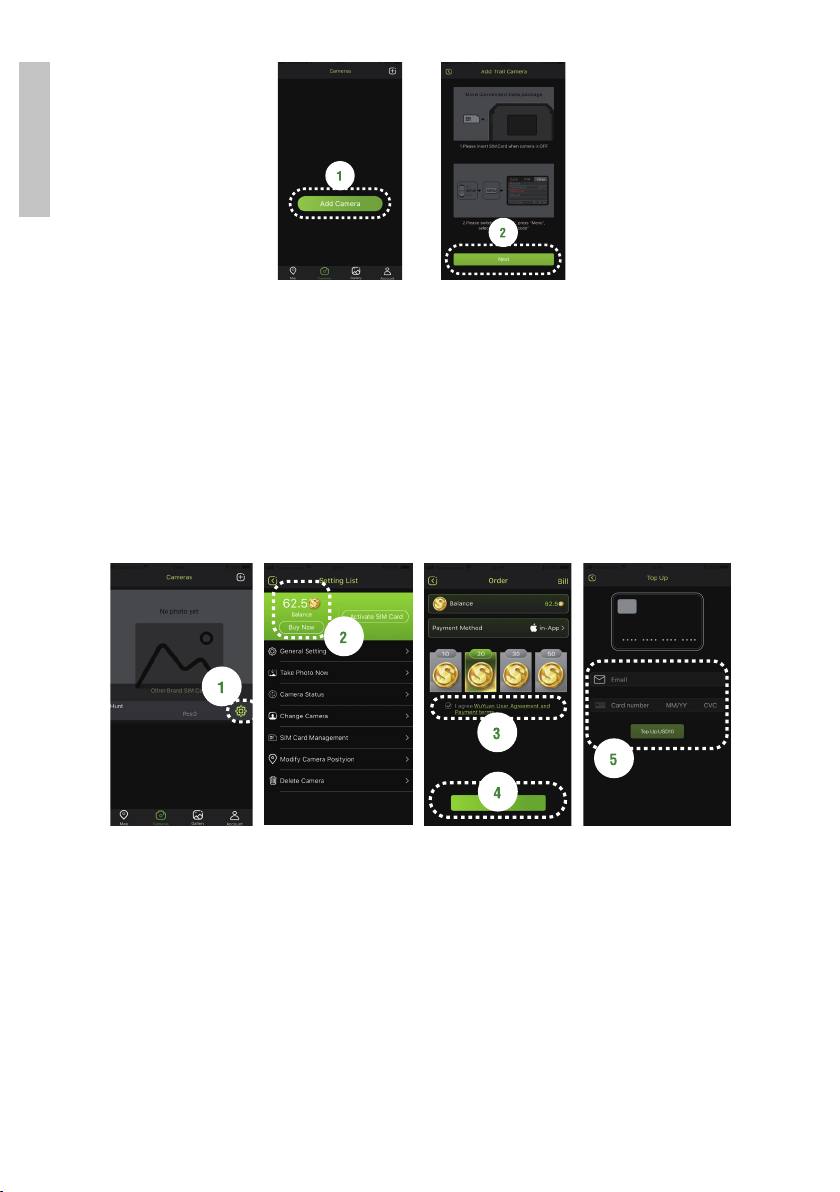
3.1 Network connection with the SIM card included in the box
To connect to the network with the SIM in the box, follow the instructions
from page 8.
3.2 Network connection with your own SIM card (Orange, Vodafone,
Telekom, Digi)
To connect to the network with your own SIM, follow the instructions from
page 9.

7User manual
English
Quick guide
Adding PNI Hunting 480C camera
in Trailcam Ace app
Add the trail camera in the app
1. Please scan the QR codes below to download the application Trailcam
Ace:
iOS Android
2. Register or create an account in the application using a valid email address.
Activate the account by following the instructions received by email from
trailcam@wuyuantech.net
3. Log in to your account
4. Install the camera antenna, insert the batteries, SD card and SIM card
5. Switch the ON/SETUP/OFF key on the camera to the SETUP position
and wait 10-15 seconds. Then access the Menu-Other-QR Code to get
the unique camera code.
6. In the application, click “+” or Add Camera-Next, scan the QR code of
the camera to add the camera in the application.

User manual 8
English
Choose the data plan (for the included SIM card)
1. In the application, enter the camera settings
2. Choose “Refill” between 10-50 EUR, follow the steps to make the
payment through one of the methods on the screen (PayPal, debit card,
credit card) then exit the camera settings. The second option is to log in
to pay.wuyuantech.com to fund your account. You will receive a payment
confirmation by email.
3. Click “Activate SIM Card” to choose your preferred data plan. Available
data plans:
Basic: 50 Mb, 1000 pictures 3.99 Euro;
Premier: 100Mb, 2000 pictures 5.99 Euro;
Elite: 250Mb, 5000 picture 8.99 Euro;
Supreme: 500Mb, 10.000 pictures 13.99 Euro;

9User manual
English
Get credit (fro your personal SIM card, not included)
Each camera comes with 1000 credits = 1000 free pictures (icons) that you
can see in the application-Account-Credits.
You can then charge your account with prepaid credit through the same
payment method as above.
Add
The camera will automatically connect to 4G after inserting your SIM card.
If a pop-up with the message “SIM Auto Match failed” appears on the screen,
go to the 4G menu - SIM Auto Match. Select Manual. Then access the
4G-Manual setup menu and complete the APN of the GSM operator used.
The camera will connect to the network automatically after restarting.
Trailcam Ace app menu
MAP: allows you to set the location where the camera is mounted on the
Google map;
Cameras: find the list of the cameras you added in the app.

User manual 10
English
Here you can find:
- Camera general settings (also present in the camera’s menu);
- Take Photo Now
- Camera Status - date, time of last update, IMEI, signal, temperature,
battery level, SD card capacity;
- Change camera name;
- Sim Card Management;
- Modify Camera Position;
- Delete Camera;
Gallery: find the photos saved locally in the phone from the Cloud (the
operation is done manually by the user from the Cameras menu)
Account: find information about your account, available credit, inserted SIM
card, settings, notifications etc.
Remotely control the trail camera using the mobile app
1. Turn o the camera, then move on SETUP position. Wait 10-15 seconds
until the 4G signal bars appear on the screen.
2. Press the OK key to take a picture. Wait 30 seconds. The picture will be
sent to the application.
3. Switch the camera to the ON position, the indicator light on the camera
will flash 5 times. The camera will enter automatic operation/monitoring
mode.
Indicator4G signal

11 User manual
English
Camera Menu
Note: Default settings of the camera are marked in red.
Cam PIR Other
Cam ID
OFF/ON
Cam Mode
Photo/Video/PIC+Video
Image size
8MP/12MP/24MP
Night Mode
Balanced
Min. Blur
Max Range
Multi-shot
IP/2P/3P/4P/5P
Video Size
FHD-1080P/HD-720P/WVCA
PIC+Video/Video ON
Video Length
05~59sec.
Sensitivity
High/Middle/Low
Delay
OFF/ON
Time Lapse
OFF/ON
Stamp
OFF/ON
Battery Type
Alkaline/NI-MH
Frequency
50Hz/60Hz
SD Cycle
OFF/ON
Reset
Yes/No
Password
OFF/ON (6 digits)
FW update
Software/Module
About
Ver:/IMEI:/MCU:
MOD:
QR Code
Timer 1
OFF/ON
Timer 2
OFF/ON
Language
English...
Flash LED
All/Part
PIR Switch
OFF/ON
Testing the picture sending function
(only after successfully adding the camera to the TrailCam Ace application;
please read on page 7)
To perform this test, when in SETUP mode, press the OK key twice to send
an image to the application. This operation can take between 35-45 seconds,
depending on the strength of the GSM signal. The message “Send successful”
should appear on the screen.

User manual 12
English
Using batteries to power the camera (alkaline or
rechargeable)
PNI Hunting 480C works with 8 AA alkaline or rechargeable Ni-MH
batteries. For better performance, we recommend using rechargeable Ni-
MH batteries. Set the type of battery inserted in the camera in the “Battery
type” menu.
Insert the batteries according to the polarity indicated on the housing. We
recommend changing the batteries when the “battery discharged” icon
appears on the camera screen.
Note: In order not to cause irreparable damage, do not introduce dierent types of
batteries in the camera, with dierent charge levels.
The number of photos that can be taken until the batteries are completely
discharged is variable and can be influenced by the following factors: settings
made in the camera, frequency of actions that trigger the camera, brand and
quality of batteries, environmental conditions, etc.
The table below shows an estimate of the images that can be taken with 8
AA alkaline batteries. Better performance can be achieved if rechargeable
Ni-MH batteries are used.
4G OFF
Pictures/day Time
Leduri IR ON
Maximum quality 100 pic. 45 days
Average quality 100 pic. 43 days
Maximum clarity 100 pic. 41 days
Leduri IR O
Pictures 100 pic. 56 days
Using solar panel to power the camera
PNI Hunting 400C works with most standard 12V/minimum 2A Lithium
batteries with solar panel.

13 User manual
English
External power supply - for video surveillance
You can also power the camera with an external 12V/2A DC adapter. When
using external power, we recommend that you remove the batteries from the
camera to avoid overcharging.
External power supply is recommended only in security video surveillance
situations.
You can also use an external battery of 12V/minimum 7Ah protected from
rain and snow.
The SD card
An SD card is required to use the camera. When the camera is turned on but
no card is inserted, the “No card” warning appears on the screen. The camera
supports a maximum of 32GB. In order not to lose the files saved on the card,
when inserting or removing the card, the camera must be turned o.
When the card is full, “Memory full” appears on the screen.
The table below shows the approximate number of photos that can be saved
on a card depending on the capacity of the card.
SD card
capacity 4GB 8GB 16GB 32GB
No. of pictures
8MP 2104 4238 8476 16952
12MP 1445 2910 5816 11632
24MP 735 1480 2957 5914
USB connection
When the camera is connected via a USB cable, “MSDC” appears on the
screen. Press the MENU key once, “MSDC” changes to “PC Cam”; you can
now use the camera as a webcam. Press the MENU key again, the camera
exits the PC camera mode.

User manual 14
English
Warnings
• Insert and remove the memory card and power supply only when the
camera is turned o.
• It is recommended to use good quality AA/R6 batteries to prevent
corrosion and acid leakage inside the camera.
• Use only a 12V/2A power supply to power the camera and do not reverse
the polarity when connecting the batteries.
• In test mode, the camera will turn o automatically in 3 minutes if no
button is pressed.
• Do not turn o the power to the device while the software update is in
progress. Our recommendation is to send the product to the seller for the
software update procedure, in order to eliminate the risk of irreparably
damaging the product.
• Remove branches or moving objects from the monitored area that may
cause false triggers and photos.
• Do not place the camera near equipment that emits heat, near fans, or
light sources to avoid taking false photos.
• The camera uses a 58 ° FOV lens and 60 IR LEDs. To ensure that the IR
LEDs give enough IR light, use only high-quality AA batteries that can
provide enough power and light constantly in dark environments.
• The camera works well if it is located at a distance of 10 - 15 cm from the
ground. If it is too close to the ground, the motion sensor will not work
properly. The motion sensor detects remotely and down.
Key functions
• Trigger time of only 0.4 seconds
• Lens 58 ° FOV, 52 ° PIR
• Selectable photo resolution 8/12/24 MP
• 60 IR LEDs that oer visibility of up to 20m (65 feet) at night
• Clear and quality images both during the day and at night
• Consecutive photos taken at a speed of 1 photo/second maximum 5
consecutive photos; Adjustable PIR sensitivity, programmable delay
between movements, Time Lapse, Timer, label on the picture (camera
ID, date/time, temperature, phase of the month)
• Working temperature: -26°C ~ +60°C

15 User manual
English
• 2.4 inch color screen
• With the 4G function the camera can send photos to the application
• Select photo size: 640x480 (small) or 2560x1920 (large). The default
setting is 640x480 and consumes approximately 45kb of data.
2560x1920 consumes approximately 300kb of data.
• Dedicated application Trailcam Ace (iOS & Android)
Operations
View saved photos
Switch to the SETUP position to enter the Test mode. Press the “↑” button to
enter the view of the saved files (Playback); press the “←” and “→” buttons
to select and “OK” to view the photo file.
Press “↑” again to return to the previous menu.
Press the MENU button to start the procedure of deleting files or formatting
SD card.
Press MENU again to exit.
Delete files
In file view mode press the “←” and “→” buttons to reach the desired file
then press the MENU button to display the file deletion menu or SD card
format.
Delete One: delete the selected photo file
Delete All: deletes all saved files
SD card formatting
Format No: cancels card formatting
Format Yes: format the SD card (delete everything saved on the card)
Press the “←” and “→” buttons to select, “Yes” to confirm, “No” to return
to the previous menu.
Automatic turn o
In test mode, the camera will turn o automatically if no key is pressed within

User manual 16
English
3 minutes.
Note: The camera will remain in “Test” mode if the menu appears on the
screen.
Menu
In Test mode, press the “MENU” button once to enter the camera settings
menu. To navigate the menu, press the “←”, “↑”, “→”, “↓” buttons, the “OK”
button to confirm and the MENU button to return to the previous menu.
Press the MENU key to switch between letters, numbers and symbols.
Note: For some functions (Cam ID, Delay, Time Lapse, Timer, Password), the user
must press the Menu key to save and exit the setup menu after pressing OK.
CAM
Settings Programmable options
Cam ID
Switch to “ON” and press OK to set a 12-digit/character
camera identification code. This function helps to identify
the camera that took and transmitted the pictures.
Image Size 8MP (3264x2448), 12MP (4032x3024), 24MP
(5632x4224)
Night Mode
Min. blur/Max range/Balanced
1. Min. Blur: short exposure time to get a clearer picture.
With this option, the IR radius is shorter.
2. Max. Range: longer exposure time for longer IR
distance; less clear image.
3. Balanced: the perfect combination of options 1. and 3.

17 User manual
English
Multi-shot 1-5 consecutive shots at each shot
PIR
Settings Programmable options
PIR Switch
OFF/ON
The 4G function can be deactivated. Thus, the
photos will no longer be transmitted.
Sensitivity
High/Middle/Low
The greater sensitivity to movement represents:
• Motion detection of small objects;
• Motion detection over longer distances;
• Easier for the sensor to detect the dierence
between the human body temperature and
the ambient temperature
• More frequent shots
If the ambient temperature is higher than the
human body temperature, it is more dicult to
detect movement, so we recommend setting the
camera to high sensitivity.
Delay
OFF/ON
Delay mean the preset motion sensor trigger
interval between 2 consecutive detections.
This interval prevents the camera from taking
too many pictures during continuous motion
detection.
Example: The camera will wait 1 minute before
taking the picture again at motion detection if the
time is set to 00:01:00
Configurable delay time from 3 seconds to 24
hours (00: 00: 03 ~ 23: 59: 59).
Caution: Do not activate the Delay and Time
Lapse functions simultaneously.

User manual 18
English
Time Lapse
OFF/ON
Select “ON” to set the trigger time interval; The
camera’s motion sensor will be turned o; the
camera will take photos only at the set interval.
Available interval: 5 seconds to 24 hours (00: 00:
05 ~ 23: 59: 59).
Caution: Do not activate the Delay and Time
Lapse functions simultaneously.
Timer 1
OFF/ON
Select “ON” to set the camera on and o time
(hour/minute); the camera will only work during
that time
Example: setting the interval 15:00 - 18:00, the
camera will work only between 15:00 and 18:00
Timer 2
OFF/ON
Select “ON” to set the camera on and o time
(hour/minute); the camera will only work during
that time
Example: setting the interval 20:00 - 24:00, the
camera will work only between 20:00 and 24:00
Max Num/Day
Unlimited/01...99
Default: unlimited
Optional: 1 ~ 99
Example: If the user chooses 50, then the cameras will
only send 50 photos each day. All other photos will be
stored on the SD card only.

19 User manual
English
Remote Ctrl
Delay:recommended setting to reduce battery
consumption.
You will be able to make settings in the camera and you
will be able to send instant photos remotely through
the application, at the movement detected. Otherwise,
the camera will execute commands based on the Delay
settings.
Delay options: 05.h, 1h, 2h, 3h, 4h, 6h, 12h, 24h.
Real Time. Recommended when the camera is powered
by an external power source. This function consumes a lot
of energy.
The camera remains permanently on standby; thus,
you will be able to make remote settings through the
application at any time and you will be able to send
commands (for example “take photo now”) which will take
eect immediately.
Other
Language English…
Battery Type Alkaline/ NI-MH
Select the type of batteries inserted in the camera.
Password
Select ON and press OK if you want to password protect
the camera. The password must contain a maximum of 6
characters.
Reset Return to factory settings.
Yes ; No
FW Update The firmware update file must be saved on the SD card.
About Firmware version (Version:/IMEI:/MCU:/MOD:)
Technical specifications
Image sensor 5 Mega Pixels Color CMOS
Resolution 2560x1920
Day/Night mode Yes

User manual 20
English
IR range 20m
IR LEDs 60
Memory SD card (max 32 GB) , not included
Operational keys 7
Lens F=3.0; FOV=58°; Auto IR-Cut-Remove (at
night)
PIR angle 52°
PIR range 20m (65feet)
LCD screen 2” TFT, RGB, 262k
Photo resolutions 8MP/12MP/24MP
Transmitted photo size: 640x480 or
2560x1920
Photo format JPEG
Successive photos 1-5
Trigger time 0.4sec.
Trigger interval 4-7sec.
Loop recording Yes. ON/OFF
Power supply Batteries: 8 x AA/R6
External power source: 12V
Battery type Alkaline or NiMH batteries
Consumption in stand-
by 0.135mA
Standby time 5~8 luni (6×AA~12×AA)
Automatic shut down In Test mode, the camera will turn o
automatically in 3 minutes if you do not touch
any key.
Interface USB/SD/DC
Operating temperature -26°C to 60°C
Waterproof IP66
Dimensions 128 x 96 x 76 mm
Weight 260g
APP Trailcam Ace iOS & Android
Table of contents
Languages:
Other PNI Scouting Camera manuals

PNI
PNI Hunting 400C User manual

PNI
PNI Hunting 350C User manual

PNI
PNI Hunting 550C User manual

PNI
PNI Hunting 3C / 300C User manual

PNI
PNI Hunting 250C User manual

PNI
PNI Hunting 400C User manual

PNI
PNI Hunting 550C User manual

PNI
PNI Hunting 3C User manual

PNI
PNI HUNTING 280C User manual

PNI
PNI Hunting 2C 8MP User manual