POLTI AROMA CATERING Parts list manual

COP-AROMA CATERING M0S07917 1O02 7 LINGUE:V_tto_1300cop.qxd 21/02/2008 10.58 Pagina 2

Aroma Catering M0S07917 1O02
12
11
Fig.A 3
2
1
14
13
15
4
4a
7
6
10
9
8
516
Fig.B Fig.C
COP-AROMA CATERING M0S07917 1O02 7 LINGUE:V_tto_1300cop.qxd 21/02/2008 10.58 Pagina 1

E
EN
NG
GL
LI
IS
SH
H
AROMA CATERING
26
This unit conforms with EC-directives 89/336 as amended by 93/68 (EMC) and 73/23 as
amended by 93/68 (low voltage).
LEGEND
1) Main switch
2) Switch for first unit
3) Switch for central unit
4/4a) Single cup switch
5) Three-cup switch
6) Function selector
7) Unit on indicator light
8) Three-cup indicator light
9) Low water indicator light
10) “Ready” indicator light
11) Capsule compartment
12) Capsule compartment lid
13) Steam/water dispenser
14) Water tank
15) Capsule/drip collection tray
16) Cup warmer
Polti S.p.A. reserves the right to change equipment or accessory specification without prior notice.
P
PR
RE
EC
CA
AU
UT
TI
IO
ON
NS
S
KEEP THESE INSTRUCTIONS
• Read these instructions for use carefully
before using the appliance. Any use which
does not comply with these instructions will
invalidate the warranty.
• The wiring system to which the appliance is
connected must always comply with the
laws in force.
• Before connecting the appliance, make
sure that the mains voltage is the same as
the voltage indicated on the data label of
the appliance and that the power outlet is
connected to earth.
• Always turn off the appliance at the on/off
switch before unplugging it.
• If the appliance is left unused, always dis-
connect it from the mains. Never leave the
appliance unattended with the cable
plugged into the mains.
• Always make sure the appliance is un-
plugged before performing maintenance
work of any kind.
• Do not pull the power cable out of the
socket, but grasp the plug itself to avoid
damage to the socket.
• Do not allow the power cable to be twisted,
crushed, stretched, or come into contact
with sharp or hot surfaces.
• Do not use the appliance if the power cable
or other important parts are damaged.
• Do not use electric extension leads that are
not authorized by the manufacturer, as they
may cause damage or fire.
• If it is necessary to replace the power sup-
ply cable, please refer to the nearest Polti
authorised service centre, since the use of
a special tool is necessary.
• Never touch the appliance with wet hands
or feet with the cable plugged into the
mains.
• Do not use the appliance when barefoot.
• Do not use the appliance near a bathtub,
shower or container full of water.
• Never immerse the appliance, the cable or
the plugs in water or another liquid.
• Use of the appliance in places where there
is a danger of explosions is prohibited.
• Do not use the product with toxic sub-
Read these instructions carefully before using the appliance.
AROMA CATERING M0S07917 1o02:A5 26/02/2008 11.07 Pagina 26

AROMA CATERING
27
E
EN
NG
GL
LI
IS
SH
H
stances.
• Do not lay the hot appliance on surfaces
sensitive to heat.
• Do not leave the appliance exposed to wind
or rain.
• Do not place the appliance near a live ele-
ment, an electric stove or any other source
of heat.
• Do not expose the appliance to extreme
temperatures.
• Never let children or people who are not fa-
miliar with how the appliance works use it.
• Do not press the buttons hard or with a
pointed object such as a pen.
• Always rest the appliance on a stable sur-
face.
• In case of accidental fall of the appliance it
is necessary to have it checked by an au-
thorized Service Centre as the internal
safety features may have been affected.
• In case of breakdown or malfunction switch
off the appliance and never attempt to dis-
assemble it, but refer to an authorized
Service Centre.
• In order to avoid prejudicing the safety of
the appliance, use only original spare parts
and accessories approved by the manufac-
turer.
• Do not wind the power cable around the ap-
pliance, especially when the appliance is
still hot.
• It is necessary to keep the unit in horizontal
position during operation.
• Check that there is water in the tank before
turning on the machine.
• Always fill the water tank with cold clean
water. Do not use mineral water, distilled
water, milk or any other liquid.
• During refilling with water, switch off and
disconnect the appliance from the mains.
• Do not wash coffee machine accessories in
the dishwasher.
• The presence of water in the capsules col-
lection drawer is normal and is due to emp-
tying of the circuit after making each cup.
• This appliance is not intended for use by
persons (including children) with reduced
physical, sensory or mental capabilities, or
lack of experience and knowledge, unless
they have been given supervision or in-
struction concerning use of the appliance
by a person responsible for their safety.
• Children should be supervised to ensure
that they do not play with the appliance.
C
CO
OR
RR
RE
EC
CT
T
U
US
SE
E
O
OF
F
T
TH
HE
E
P
PR
RO
OD
DU
UC
CT
T
This appliance is intended for home use in
accordance with the descriptions and instruc-
tions contained in this manual. Please read
the instructions carefully and keep them, as
they could be useful to you in the future.
Polti S.p.A declines liability for any damage
or accident derived from any use of this ap-
pliance which is not in conformity with the
instructions contained in this manual.
A
AT
TT
TE
EN
NT
TI
IO
ON
N
Directive 2002/96/EC (Waste Electrical and
Electronic Equipment - WEEE): information
for users
This product complies with EU Directive
2002/96/EC. The crossed-out wastebasket
symbol on the appliance means that at the
end of its useful lifespan, the product must be
disposed of separately from ordinary house-
hold wastes.
The user is responsible for delivering the ap-
pliance to an appropriate collection facility at
the end of its useful lifespan. Appropriate
separate collection to permit recycling, treat-
ment and environmentally compatible dis-
posal helps prevent negative impact on the
environment and human health and promotes
recycling of the materials making up the prod-
uct. For more information on available collec-
tion facilities, contact your local waste collec-
tion service or the shop where you bought
this appliance.
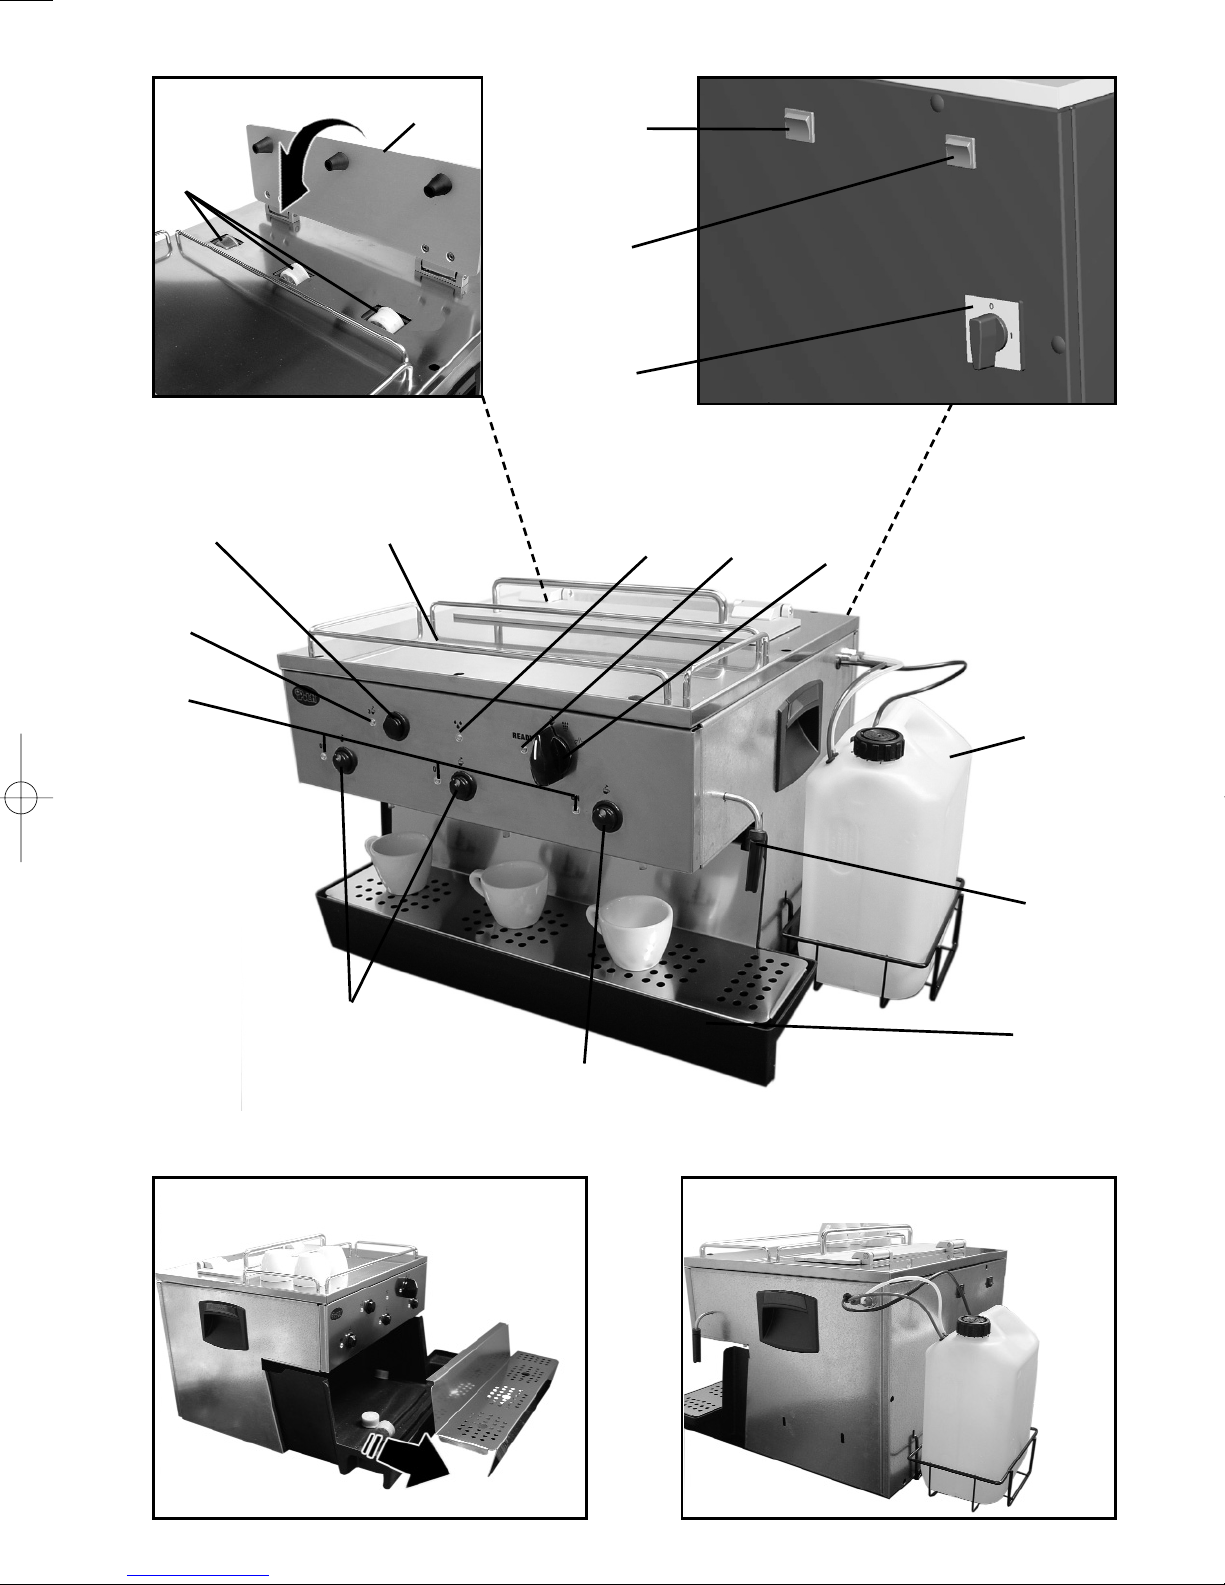
• WARNING: the capsule is automatically
pushed into the compartment when the
door (10) is closed, pushing it as far as
it will go. Never push the capsule in with
your fingers.
AROMA CATERING M0S07917 1o02:A5 26/02/2008 11.07 Pagina 27

E
EN
NG
GL
LI
IS
SH
H
AROMA CATERING
28
T
TH
HE
E
C
CA
AP
PS
SU
UL
LE
E
S
SY
YS
ST
TE
EM
M
The machine is designed exclusively for use
with the "Aroma Polti" capsule system. Each
capsule contains just the right amount and
just the right grind to obtain the best espresso
coffee in a few seconds. The wrapper on the
capsule is made of polypropylene, an excel-
lent material for use in contact with foodstuff.
It is hygienic, convenient, and very resistant to
high temperatures.
The capsule system is not only very convenient
and easy to use, it guarantees all the freshness
and aroma of freshly roasted coffee, so that
you can enjoy your favourite blend.
P
PR
RE
EP
PA
AR
RA
AT
TI
IO
ON
N
• Carefully remove the machine and all its
accessories from their packaging.
• Unscrew the cap on the tank (14).
• Fill the tank (14) with cold clean water only
and put the cap back on. Never fill the tank
with carbonated water or other liquids.
The water tank (14) may be positioned to
the side of the appliance or behind it. Put
the rack in place in the holes in the machine
and insert the tank in the rack (fig. C).
• Plug the removable cable into the panel
socket on the back of the appliance and
then plug it into a suitable earthed power
socket.
• Turn on the appliance by setting the main
switch (1) to the “I” position. When you do
this the third coffee unit will also come on
(on the right) and so will the corresponding
indicator light (7).
• To turn on the other two units, press
switches (2) and (3); the corresponding in-
dicator lights (7) will come on.
• Functions which may be selected using the
selector (6):
RECOMMENDATION: select the function you
want to use as soon as you turn on the appli-
ance, so that it can warm up to the optimal
temperature for your selected function.
M
MA
AK
KI
IN
NG
G
E
ES
SP
PR
RE
ES
SS
SO
O
C
CO
OF
FF
FE
EE
E
Preheat the espresso cup on the cup warmer
(16).
You can make a single cup of coffee or up to
three cups at a time.
• Place a cup in position under each coffee
dispenser to be used.
• Open the lid on the capsule compartment
(12) and place capsules in the compart-
ments (11), in the position suggested by its
shape (fig. A).
Insert one capsule for each cup of coffee
you want to make (up to three).
• Close the door again, pushing it as far as it
will go.
•CAUTION: the capsule will be automati-
cally pushed into the compartment when
you close the door (12) as far as it will go.
Never push the capsule in with your fingers.
• To make one cup of coffee, press the single
cup switch (4) corresponding to the com-
partment where you have inserted a ca-
psule; if you have inserted it in the third
unit, press the switch (4a).
Press the switch (4)/(4a) again to stop di-
spensing coffee.
• If you want to make three cups of coffee, in-
sert three capsules in the three compart-
ments (11) and press the three-cup button
(5). In this case the appliance will stop di-
spensing coffee automatically.
Caution: when you want to make three
cups of coffee, make sure the function se-
lector (6) is set to the position.
• The used capsule will automatically fall into
the tray (15) every time a new capsule is in-
serted in the compartment (11). The used
capsule tray must be emptied frequently to
prevent capsules from obstructing the exit
channel.
NOTE: before dispensing coffee, make sure
that you have inserted the capsule for the
beverage you wish to prepare, or the empty
MAKING CAPPUCCINO / USING THE
STEAM FUNCTION
HEATING WATER
MAKING COFFEE
AROMA CATERING M0S07917 1o02:A5 26/02/2008 11.07 Pagina 28

AROMA CATERING
29
E
EN
NG
GL
LI
IS
SH
H
29
capsule if you intend to clean the appliance. If
you have not inserted a capsule, water will
not come out of the coffee dispenser but fall
into the used capsule/drip tray (15).
H
HE
EA
AT
TI
IN
NG
G
W
WA
AT
TE
ER
R
Proceed as follows to heat water (for tea,
herbal teas, etc.):
Make sure that the function selector (6) is set
at the position and wait for the “ready” in-
dicator light (10) to come on.
• Place an empty container under the
steam/water dispenser (13).
• Press the dispenser switch (4a), then press
it again when you have obtained the desi-
red amount of water.
CAUTION: Use a tall, narrow container to
prevent spilling of hot water and scalding.
M
MA
AK
KI
IN
NG
G
C
CA
AP
PP
PU
UC
CC
CI
IN
NO
O/
/S
ST
TE
EA
AM
M
F
FU
UN
NC
CT
TI
IO
ON
N
• Cappuccino is an emulsified combination of
espresso coffee and milk.
• To obtain best results and prevent scalding
with steam and hot milk, steam the milk in a
tall, narrow container.
Caution: the metal parts of the steam wand
may become very hot during use of the appli-
ance and remain hot afterwards.
Make sure that the function selector (6) is set
to the position and wait until the “ready”
indicator light (10) comes on.
• Make espresso as described in the “making
coffee” section, using a cappuccino cup.
• Immerse the steam/water dispenser (13)
about 3 cm into the milk and work the di-
spenser switch (4a). Keep the dispenser at
least 3 cm under the surface of the milk
while foaming the milk, but do not allow it to
touch the bottom of the container as this
would stop steam from coming out, and
make sure that the little hole at the top of
the dispenser is free and not immersed in li-
quid.
• When you have finished foaming the milk,
press the switch (4a) again and remove the
dispenser from the milk.
Important! Do not remove the dispenser
from the milk until you have finished di-
spensing steam.
IMPORTANT: If you wish to make a cup of
espresso with the third unit immediately after
using the steam function, you must first let the
appliance cool down to the right temperature.
If you attempt to make coffee immediately af-
ter using steam, the appliance will not make
coffee until it has cooled down to the right
temperature for making coffee. You must
therefore wait a few minutes for the tempera-
ture to cool down or let the hot water out as
follows:
• Place a tall, narrow container under the wa-
ter/steam dispenser.
• Set the function selector (6) to water.
• Dispense hot water by pressing the switch
(4a); the “ready” indicator light (10) will start
flashing.
• As soon as the indicator light (10) stays on
steadily, you may make coffee if you set the
function switch (6) to coffee.
It is a good idea to clean the steam/water
dispenser (13) after each use as described
in the “maintenance” section.
IMPORTANT NOTES:
• If you use a function requiring a certain
operating temperature, and then switch to
another function requiring a lower operating
temperature, the “ready” indicator light (10)
will flash until the appliance reaches the ap-
propriate temperature for the selected func-
tion. Only at this point will the indicator light
stop flashing.
• It is important to turn off the switch (4a)
before switching from one function to
another.
L
LO
OW
W
W
WA
AT
TE
ER
R
If the water level in the tank is low, the indica-
tor light (9) will come on. To continue working,
fill it again as described in the “Preparation”
section.
AROMA CATERING M0S07917 1o02:A5 26/02/2008 11.07 Pagina 29

E
EN
NG
GL
LI
IS
SH
H
AROMA CATERING
30
M
MA
AI
IN
NT
TE
EN
NA
AN
NC
CE
E
• Always unplug the appliance before perfor-
ming any maintenance work.
• Clean the outside of the appliance with a
damp cloth. Do not use solvents or deter-
gents which could damage the plastic sur-
face.
•After each use session, use the empty
capsules provided in the package to
clean the infusion parts of the ap-
pliance. This must not be done with the
same capsule more than five times. When
you have used up all the capsules supplied
(about 10 cleaning cycles), you can use a
used coffee capsule, by simply removing
the paper seal and emptying and cleaning
the capsule. Cleaning operations are
performed in the same way as making cof-
fee, using the amount of water contained in
an espresso cup.
RECOMMENDATION: Place a container un-
der the outlet to collect the water.
• Periodically empty out the used
capsule/drip tray (15) and clean it, remo-
ving it from its housing (fig. B). Proceed as
described below to clean the steam/water
dispenser (13):
• Pull the plastic part of the steam dispenser
downward and remove it. Clean it, elimina-
ting residues of the beverage heated.
• Immerse the steam/water dispenser (13) in
a small amount of water in a tall, narrow
container.
• Dispense water as described in the “hea-
ting water” section, dispensing water for
about 5 seconds to clean the circuit inside
the machine.
• Check to see if the hole at the top of the di-
spenser and the water/steam hole are
blocked up. If so, free them with a needle.
CAUTION: Be very careful when cleaning
the steam/water dispenser, as its parts may
become very hot.
AROMA CATERING M0S07917 1o02:A5 26/02/2008 11.07 Pagina 30

NOTE
AROMA CATERING M0S07917 1o02:A5 26/02/2008 11.07 Pagina 31
Table of contents
Other POLTI Coffee Maker manuals

POLTI
POLTI CAPPUCCI User manual

POLTI
POLTI CAPRI User manual

POLTI
POLTI COFFEA CS150W User manual

POLTI
POLTI LUPIN THE 3rd User manual

POLTI
POLTI AROMA 850 Parts list manual

POLTI
POLTI Cosmo User manual

POLTI
POLTI @ESPRESSO Crema Parts list manual

POLTI
POLTI ESPRESSO 2000 Parts list manual

POLTI
POLTI aEspresso Crema User manual

POLTI
POLTI TRIS AROMA User manual