POLTI ESPRESSO 3000 Parts list manual


Espresso 3000 - Cod. M0S04159 - Edizione 1H10
2
6
7
9
14
10
3
4
5
15
8
16
18
13
12
11
17
1
19
20

ENGLISH Espresso 3000
Polti S.p.A. reserves the right to change equipment
or accessory specification without prior notice.
13) Grinding Regulator
14) Drip-Tray
15) Coffee Compress
16) Power Supply Cable
17) Filter Holder For Ground Coffee
18) Filter For One Cup
19) Filter For Two Cups
20) Holder for Coffee Bags (Optional)
1) Mains ON/OFF Switch
2) “ON” Indicator Light: Machine Switched On
3) “Out Of Water” Indicator Light
4) Coffee Dispenser Button
5) Steam Preparation Button
6) Steam Dispenser Handle
7) Steam Dispenser
8) Grinder Start Button
9) Water Heating Chamber
10) Top Cover
11) Water Reservoir
12) Coffee Granules Holder

Espresso 3000 ENGLISH
SS
SSAA
AAFF
FFEE
EETT
TTYY
YY
FF
FFII
IIRR
RRSS
SSTT
TT!!
!!
•Before using ESPRESSO 3000, please read the operating instructions carefully.
•Before connecting the appliance to the mains, ensure that the power supply
corresponds to that of the machine and that an earthed plug is fitted.
•Do not touch the appliance with wet hands or wet feet whilst the appliance is connected
to the mains, and do not put the appliance itself in water.
•Do not allow your ESPRESSO 3000 to be used by children or anyone not familiar with
the operating instructions.
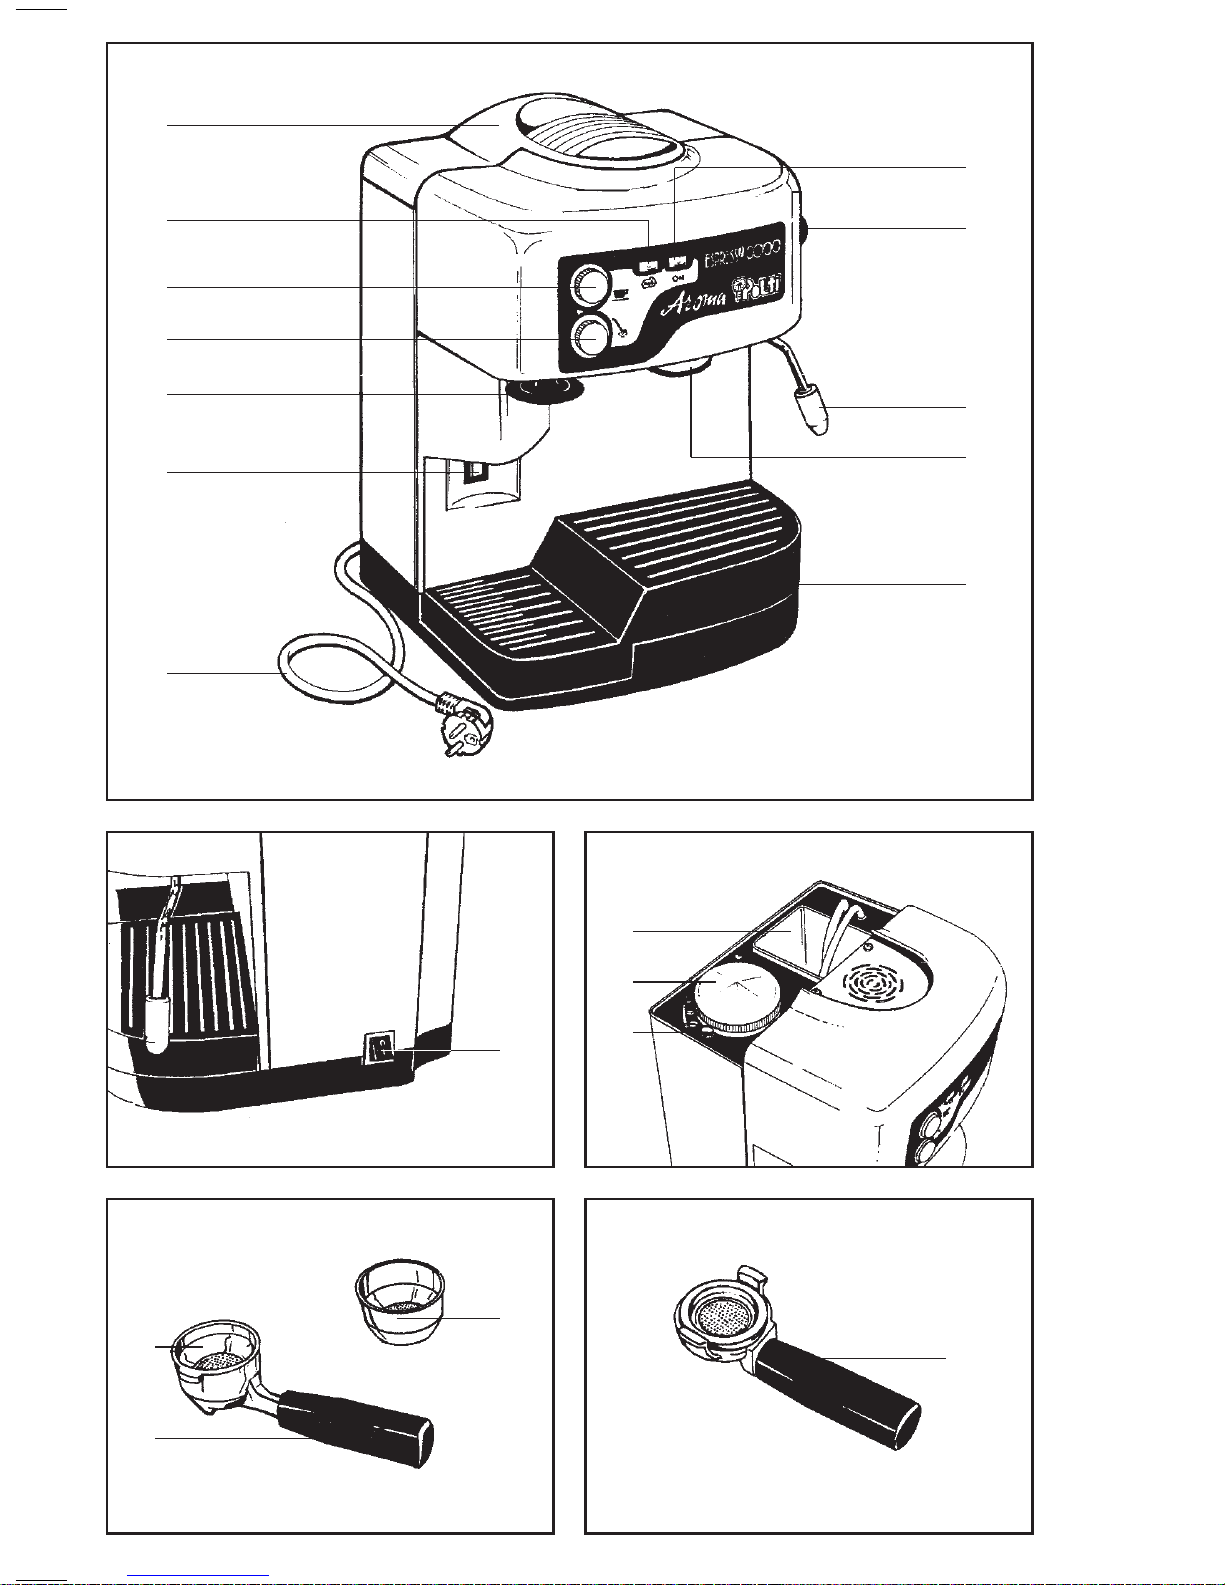
•Empty the drip-tray (14) periodically to avoid overflows.
•Never leave the appliance unattended with the cable plugged into the mains.
•If the ESPRESSO 3000 is left unused, always disconnect it from the mains.
•Do not lay the hot appliance on surfaces sensitive to heat.
•In case of breakdown or malfunction switch off the appliance and never attempt to disas-
semble it, but refer to an authorized service center.
•Do not leave the appliance exposed to wind or rain.
•Do not use electric extension leads that are not authorized by the manufacturer, as they
may cause damage or fire.
•If the appliance is accidentally dropped it is necessary to have it checked by an autho-
rized service center as the internal safety features may have been affected.
II
IIMM
MMPP
PPOO
OORR
RRTT
TTAA
AANN
NNTT
TT
•In the case of machine breakdown or malfunction, do not attempt to repair the machine
but contact your nearest Polti Service Centre.
•If you need to replace the power supply cable contact only a Polti Authorised Service
Centre or qualified electrician.
Polti declines liability for any damage or accident derived from any use of
ESPRESSO 3000 which does not comply with the instructions contained in this
booklet.
Dear Customer,
We wish to thank you for placing your trust in us and having chosen a Polti product.
ESPRESSO 3000 belongs to the “Aroma” range, a type of expresso machine which gua-
rantees the very best aroma and taste, from the very first cup.
ESPRESSO 3000 has been conceived and manufactured with the very best components,
to ensure top quality and absolute safety in use.
The technical features and high-quality materials used in production make ESPRESSO 3000
the machine which will give you years of trouble free usage.
Before using ESPRESSO 3000, please read carefully these operating instructions.

ENGLISH Espresso 3000
PP
PPRR
RREE
EEPP
PPAA
AARR
RRAA
AATT
TTII
IIOO
OONN
NN
FF
FFOO
OORR
RR
UU
UUSS
SSEE
EE
1) Remove the top cover (10) and fill the water reservoir
(11) taking care not to overfill above its 1.3 litre capacity
(fig. 1).
2) Remove the cover of the coffee container (12) and fill
with coffee granules (fig. 2). With ESPRESSO 3000 you
can vary the degree of coffee-grinding.
To do this, push the grinding regulator button (13) and
rotate the container (12) clockwise for finer grinding and
anti-clockwise for a coarser grade.
3) Switch on the general ON/OFF switch (1) on the side of
the appliance (fig. 3).
Check that the indicator lights “ON” (2) and “coffee
dispensing” light (4) have lit up.
When the coffee dispensing indicator light (4) goes out
ESPRESSO 3000 is ready to dispense coffee.
This indicator light subsequently goes on and off from
time to time, indicating that the appliance is maintaining
water at constant temperature. This is an entirely normal
function.
Before first use, or when the machine has not been
used for some time, we recommend that the water
reservoir (11) should be emptied and washed out.
Then commence a full operation so as to clean out the
entire system (do not drink the coffee from this
operation).
We recommend the use of a coffee bag or ground
coffee in this operation. This will guarantee the
wonderful aroma of your subsequent cups of coffee.
PP
PPRR
RREE
EEPP
PPAA
AARR
RRAA
AATT
TTII
IIOO
OONN
NN
OO
OOFF
FF
GG
GGRR
RROO
OOUU
UUNN
NNDD
DD
CC
CCOO
OOFF
FFFF
FFEE
EEEE
EE
1a) Insert the required filter for the number of cups (1 or 2)
in the filter holder.
2a) Locate the filter holder against the grinder start button
(8). By the filter holder pressing against this button,
the ground coffee will start to fall into the filter holder
(fig. 4).
3a) Once you have the desired amount of coffee, pull the
filter holder from the button and compress the coffee
provider on the compress (15) (fig. 5).
Fig. 1
Fig. 2
Fig. 3
Fig. 4
Fig. 5

Espresso 3000 ENGLISH
4a) Insert the filter holder under the water heating chamber
(9) and fix it there by rotating it from left to right until it
locks on (fig. 6).
5a) Locate a cup exactly under the filter holder, or 2 cups
one on the right and one on the left, corresponding with
the holes in the filter holder (fig. 7).
6a) Press the coffee dispenser button (4). In a few moments
the coffee will start to come through the filter holder.
When you have the desired quantity of coffee, press the
button (4) again to stop dispensing.
7a) Detach the filter holder by moving right to left and empty
the remains of the coffee. When not in use, we
recommend you dismantle the filter holder from the
machine to avoid any risk of mis-shaping.
NOTE: By varying the dosage quantity of coffee and the
degree of grinding with a stronger or less strong
pressing, you can vary the aroma of your
espresso. For the best flavour, we recommend
you preheat the coffee cups, and that you use
fine porcelain cups.
PP
PPRR
RREE
EEPP
PPAA
AARR
RRAA
AATT
TTII
IIOO
OONN
NN
OO
OOFF
FF
CC
CCAA
AAPP
PPPP
PPUU
UUCC
CCCC
CCII
IINN
NNOO
OO
1b) Switch on ESPRESSO 3000 as indicated in the “preparation for use” section. When
the coffee dispenser button (4) lights up, press the steam preparation button (5), the
button will glow red.
2b) Wait for the light (4) to go out (about 30 seconds).
3b) Move the steam dispenser (7) to above the drip-tray. Open briefly the steam dispenser
handle (6) to eliminate any remaining condensation from the tube (fig. 8).
4b) Move the steam dispenser to a position outside the machine, so that you can immerse
it in milk to a depth of about 3cm taking care not to hold it directly to the bottom of
the container which would impede the escape of steam.
NOTE: For the best frothing, we recommend you use very cold, skimmed milk.
Fig. 6
Fig. 7
Fig. 8

ENGLISH Espresso 3000
5b) At the end of the frothing close the handle again (6) and remove the dispenser from
the milk.
Important! Only remove the dispenser from the milk after you have closed the handle!
6b) Switch off the steam preparation button.
7b) Push the steam dispenser (7) back to its original position above the drip-tray.
8b) Press the coffee dispense button (4) until some water begins to escape from the
dispenser, so as to arrive again at the correct quantity of water in the boiler.
CC
CCAA
AARR
RREE
EE!!
!!
Before switching on the machine, make sure there is water in the reservoir (11). Lack of
water is also signalised by the indicator light (3) showing a red light.
The indicator light are pre-set to come into operation at the point where there is minimal
water in the tank. This is to ensure that ESPRESSO 3000 is never completely empty of
water.
FILLING THE TANK AFTER THE NO WATER SIGNAL
It is a fundamental principle to always switch off ESPRESSO 3000 at the general ON/OFF
switch (1) before refilling. Refill the appliance as described in the chapter "Preparation for
use" When the refilling operation is over, Espresso 3000 will be ready for use again within
a few seconds.
NOTE: On removing the water reservoir (11), a microswitch will operate. On replacing the
reservoir after emptying, exert a gentle pressure to allow the microswitch to
ascertain the replacement of the container.
OO
OOPP
PPEE
EERR
RRAA
AATT
TTII
IIOO
OONN
NN
WW
WWII
IITT
TTHH
HH
PP
PPRR
RREE
EEDD
DDOO
OOSS
SSEE
EEDD
DD
CC
CCOO
OOFF
FFFF
FFEE
EEEE
EE
BB
BBAA
AAGG
GGSS
SS((
((oo
oopp
pptt
ttii
iioo
oonn
nnaa
aall
ll))
))
ESPRESSO 3000 can be used also with predosed coffee bags by adding an optional
accessory. The pre-measured doses of coffee offer the following significant and exclusive
advantages:
Absolutely correct quantity, grinding and compression -indispensable for really successful
Italian style coffee; absolute guarantee of hygiene and cleanliness, no more will excess
coffee powder dirty your machine and its surroundings. The coffee comes to you ready
to release peak Italian aroma and taste from its sealed hygienic sachet.

Espresso 3000 ENGLISH
GG
GGEE
EENN
NNEE
EERR
RRAA
AALL
LL
MM
MMAA
AAII
IINN
NNTT
TTEE
EENN
NNAA
AANN
NNCC
CCEE
EE
•Empty and clean out the water container (11) periodically to avoid scale deposits
inside the tank.
NOTE: On removing the water reservoir (11), a microswitch will operate. On replacing
the reservoir after emptying, exert a gentle pressure to allow the microswitch
to ascertain the replacement of the container.
•Before carrying on any cleaning operation, disconnect the appliance from the mains.
•Clean ESPRESSO 3000 with a clean cloth and then dry the appliance. Never use
chemical substances to clean the appliance.
•In case of obstructions of the steam dispenser (7) holes, it's possible to use a needle
to clean the holes, please pay attention not to damage the special material the dispenser
is made of. Should you have any doubt, please contact the closest Assistance Centre.
•Periodically remove the drip-tray (14) from its housing and clean out.
•During cleaning and maintenance, ensure that no water or dampness is introduced into
the coffee container.
Other POLTI Coffee Maker manuals

POLTI
POLTI AROMA 850 Parts list manual

POLTI
POLTI ESPRESSO 2000 Parts list manual

POLTI
POLTI AROMA 1500DIGIT Parts list manual

POLTI
POLTI AROMA CATERING Parts list manual

POLTI
POLTI ESPRESSO User manual

POLTI
POLTI Aroma Rafaello User manual

POLTI
POLTI Cosmo User manual

POLTI
POLTI LUPIN THE 3rd User manual

POLTI
POLTI CREMA EXPRESS Parts list manual

POLTI
POLTI CAPPUCCI User manual