POLTI Aroma Rafaello User manual


AROMA RAFFAELLO
58
EE
EENN
NNGG
GGLL
LLII
IISS
SSHH
HH
This unit conforms with EC-directives 89/336 as amended by 93/68 (EMC) and 73/23 as amen-
ded by 93/68 (low voltage).
Dear Customer,
Thank you for choosing a Polti product.
With this coffee machine, you will enjoy full taste and aroma right from the first cup and
make creamy cappuccino as well as tea and other hot drinks.
AROMA RAFFAELLO is made with top quality components to ensure quality and per-
fect safety.
Please read these instructions carefully before using AROMA RAFFAELLO.
1. Display with symbols
2. On/off button
3. Knob for adjusting amount of water in cup
4. Coffee strength selector
5. 1 cup selector
6. 2 cup selector
7. S service button
8. Coffee dispensing nozzle with
adjustable height
9. Drip tray & grid
a. Grid
b. Drip tray
c. Coffee grounds container
d. Contacts
10. Steam preheating button
11. Steam/hot water button
12. Adjustable steam and milk frothing nozzle
13. Document holder pocket
14. Power cord compartment
15. Power on/off switch
16. Cup shelf
17. Removable water reservoir
18. Coffee bean container
19. Grind knob
20. Ground coffee compartment
21. Portafilter
22. Door for accessing infusion unit
23. Ground coffee measuring scoop
24. Filter assembly accessory
25. Water softening filter
26. Litmus paper
POLTI S.p.A., in accordance with its policy of continuous improvement, reserves the right to make any
technical and structural modifications without prior notice.
MACHINE CONTROLS AND COMPONENTS

AROMA RAFFAELLO
59
PP
PPRR
RREE
EECC
CCAA
AAUU
UUTT
TTII
IIOO
OONN
NNSS
SS
KEEP THESE INSTRUCTIONS
•Read these instructions for use carefully before
using the appliance.
•Use which does not comply with these instruc-
tions will invalidate the warranty.
•The wiring system to which the appliance is con-
nected must always comply with the laws in for-
ce.
•Before connecting the appliance, make sure
that the mains voltage is the same as the volta-
ge indicated on the data label of the appliance
and that the power outlet is connected to earth
•Always turn off the appliance at the on/off swit-
ch before unplugging it.
•If the appliance is left unused, always discon-
nect it from the mains. Never leave the applian-
ce unattended with the cable plugged into the
mains.
•Always make sure the appliance is unplugged
before performing maintenance work of any
kind
•Do not pull the power cord out of the socket,
but grasp the plug itself to avoid damage to the
socket.
•Do not allow the power cord to be twisted, cru-
shed, stretched, or come into contact with
sharp or hot surfaces.
•Do not use the appliance if the power cable or
other important parts are damaged.
•Do not use electric extension leads that are not
authorized by the manufacturer, as they may
cause damage or fire.
•If it is necessary to replace the power supply ca-
ble, please refer to the nearest Polti authorised
service centre, since the use of a special tool is
necessary.
•Never touch the appliance with wet hands or
feet with the cable plugged into the mains.
•Do not use the appliance when barefoot.
•Do not use the appliance near a bathtub,
shower or container full of water
•Never immerse the appliance, the cable or the
plugs in water or another liquid.
•Use of the appliance in places where there is a
danger of explosions is prohibited.
•Do not use the product with toxic substances.
•Do not lay the hot appliance on surfaces sensiti-
ve to heat.
•Do not leave the appliance exposed to wind or
rain.
•Do not place the appliance near a live element,
an electric stove or any other source of heat.
•Do not expose the appliance to extreme tempe-
ratures
•Never let children or people who are not familiar
with how the appliance works use it.
EE
EENN
NNGG
GGLL
LLII
IISS
SSHH
HH
Coffee ready
Coffee strength:
Light
Coffe strength:
Normal
Coffee strength:
Strong
Fill container
with coffee
beans
"flashing
Fill water reservoir
Ground coffee
Steam / Hot water
Water/Steam on/off
Coffee grounds con-
tainer/ Drip tray
needs emptying or is
not installed
Remove lime scale
from machine
Clean machine
Replace filter
Door open/ central unit
SS
SSYY
YYMM
MMBB
BBOO
OOLL
LLSS
SS

AROMA RAFFAELLO
60
•Do not press the buttons hard or with a pointed
object such as a pen.
•Always rest the appliance on a stable surface.
•In case of accidental fall of the appliance it is ne-
cessary to have it checked by an authorized
Service Centre as the internal safety features
may have been affected.
•In case of breakdown or malfunction switch off
the appliance and never attempt to disassemble
it, but refer to an authorized Service Centre.
•Inorder to avoid prejudicing the safety of the ap-
pliance, use only original spare parts and acces-
sories approved by the manufacturer.
•Do not wind the power cord around the applian-
ce, especially when the appliance is still hot.
•Always lay the appliance in horizontal position
•Position the machine on a horizontal surface.
•Do not use lime scale removers which are not
authorised by the manufacturer.
•Check that there is water in the reservoir before
turning on the machine.
•Always fill the water reservoir with cold clean
water. Do not use mineral water, distilled water,
milk or any other liquid.
•Do not use the appliance if the drip tray and the
grill are not in place.
•Do not wash coffee machine accessories in the
dishwasher.
•Do not direct the steam jet on electrical applian-
ces.
•Let the appliance cool down before cleaning the
hot water nozzle.
•If you will not be using the appliance for some ti-
me, do not replace the portafilter. This will result
in longer life for the filter seal.
•Do not remove the portafilter while the machine
is in operation, as the appliance is under pressu-
re at this time
•Never use beans treated with additives, such as
sugar or similar substances.
Important: Flipping the power switch (15) while
infusion is in progress may result in damage to
the appliance! Turn off the power only when
the on/off button (2) is set to off (stand-by mo-
de).
BURN HAZARD!
CC
CCOO
OORR
RRRR
RREE
EECC
CCTT
TT
UU
UUSS
SSEE
EE
OO
OOFF
FF
TT
TTHH
HHEE
EE
PP
PPRR
RROO
OODD
DDUU
UUCC
CCTT
TT
This appliance is intended for home use in accor-
dance with the descriptions and instructions contai-
ned in this manual. Please read the instructions ca-
refully and keep them, as they could be useful to
you in the future.
AA
AATT
TTTT
TTEE
EENN
NNTT
TTII
IIOO
OONN
NN
•This appliance is built according to current regu-
lations for recycling.
•Do not throw away the packing materials used
to protect the appliance during transportation,
but take them to relevant collecting centres.
•Use only original Polti spare parts.
•Polti declines liability for any damage or
accident derived from any use of this ap-
pliance which is not in conformity with the
instructions contained in this booklet.
II
IIMM
MMPP
PPOO
OORR
RRTT
TTAA
AANN
NNTT
TT
All Polti products undergo strict controls before lea-
ving the company
UU
UUSS
SSEE
EEFF
FFUU
UULL
LL
II
IINN
NNFF
FFOO
OORR
RRMM
MMAA
AATT
TTII
IIOO
OONN
NN
CHOOSING COFFEE
•True espresso coffee is recognisable by its dark
colour, typical “crema” and rich flavour.
•The flavour and aroma of a coffee bean are the
result of a roasting process. Darker coffee
beans have been roasted for a longer time at a
higher temperature, and are more aromatic
than lighter coffee beans.
•There are many different types of coffee availa-
ble on the market, containing blends of beans
roasted at different temperatures with different
types of aroma. There is also decaffeinated cof-
fee containing only 2% caffeine. Try using diffe-
rent types of coffee with your espresso machine
to find the flavour and aroma that best suits
your taste.
•Ideally, coffee beans should be ground just befo-
re using them. Remember that your coffee MU-
Do not direct the steam jet
at people, animals or debris.
Danger of burns!
Never place your hands
inside the jet of steam.
Danger of burns!
EE
EENN
NNGG
GGLL
LLII
IISS
SSHH
HH

AROMA RAFFAELLO
61
EE
EENN
NNGG
GGLL
LLII
IISS
SSHH
HH
ST BE GROUND FOR PUMP ESPRESSO MACHI-
NES, which means it must be ground quite fi-
nely.
•It is a good idea to keep ground coffee or cof-
fee beans in the freezer in a hermetically sea-
led container. Coffee easily absorbs odours.
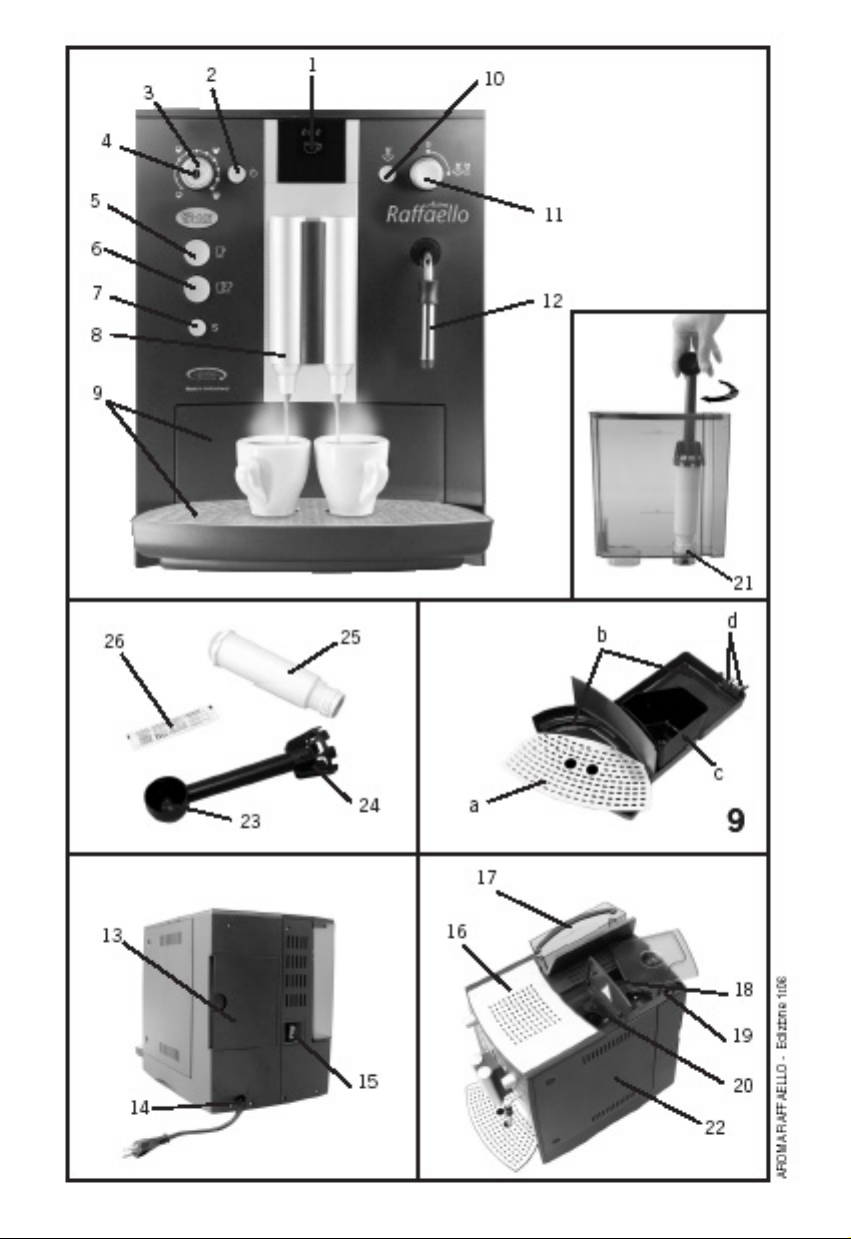
STARTING UP AND PREPARING THE MACHINE
•Carefully remove the machine and all accesso-
ries from the packaging.
•Open the lid, remove the water reservoir (17)
and rinse it with clean, cold water.
•Fill the reservoir no higher than the MAX mark,
place it back in the machine and close the lid.
•Check that the reservoir (17) is positioned correc-
tly. Fill the reservoir with clean, cold water only. Do
not use sparkling water or any other liquid.
Important: To prevent problems caused by lime
scale build-up, it is important to use the machine
with the water-softening filter (25). Alternatively, you
may also use lime scale remover tablets, as descri-
bed in the section on the "lime scale remover pro-
gramme". If you decide to use the water-softening
filter, follow the assembly instructions under the
heading "Filter assembly".
•Open the lid of the coffee bean container (18),
fill it with coffee beans and close the lid again.
Do not use coffee beans which have been trea-
ted with sugar or other additives during or after
roasting, as they could damage the coffee grin-
der. Repair costs due to such damage will not
be covered by the warranty.
The steam/hot water knob (11) must be set to 0.
Filling the system
When you use the appliance for the first time, the pi-
pes inside the machine may not yet be filled with wa-
ter. The machine will signal this as follows:
•When you turn on the machine using the on/off
button (2), the symbol will begin to flash.
•Turn the steam/hot water knob (11) to the right.
At this point the system will fill with water and
water may flow out of the nozzle (12).
•As soon as the symbol starts flashing
again, you may turn the knob back to the left
(11). will begin to flash.
•The service button (7) flashes when the system
has heated up.
•Press the service button (7) to rinse out the sy-
stem through the coffee outlet (8).
•The normal coffee symbol will appear on the di-
splay.
•The machine is now ready for use.
RECOMMENDATION: Place a dish underneath the
outlet to collect water.
You may rinse out the machine at any time during re-
gular operation by letting water flow through the cof-
fee outlet (8), pressing the service button (7).
Starting up the appliance
1a. Remove the power cord from the cord compart-
ment (14) and plug it into a suitable outlet.
2a. Press the power switch (15). The on/off button
(2) will come on.
3a. Press the on/off button (2). will begin to
flash.
4a. Once the machine has been heated up, the ser-
vice button (7) will start flashing.
5a. Press the service button (7) to rinse the system
out through the coffee outlet (8).
6a. The machine is now ready for use.
Setting grind
Important: Grind may be adjusted only when the
coffee grinder is in use.
The coffee grinder may be adapted to suit the roast
of the coffee. We recommend the medium setting
for all roasts.
•Open the coffee bean container lid (18)
•With the coffee grinder in operation, turn the
knob (19) to the desired position. The smaller
the dot next to the knob, the finer the grind. Re-
member that:
–lightly roasted coffee requires a finer grind
–dark-roasted coffee requires a coarser grind
PP
PPRR
RREE
EEPP
PPAA
AARR
RRAA
AATT
TTII
IIOO
OONN
NN
The machine is shipped ready to make its first cup
of coffee. But we recommend you re-programme
the main settings to suit your preferences. First of
all, follow the steps listed under the "Programming"
heading to adjust the filter and water hardness set-
tings.
NOTE: When using the appliance for the first time,
or if the appliance has not been used for some time,
the first coffee you make will not have perfect aro-
ma and should be discarded.

AROMA RAFFAELLO
62
Selecting coffee strength
You may set your preferred coffee strength to three
levels:
=light about 7 gr. ground coffee
(for caffelatte, cappuccino)
=normal about 9 gr. ground coffee
(for Café crème)
=strong about 11 gr. ground coffee
(for Espresso, strong coffee)
As soon as the machine is ready for use, the factory
setting will appear on the display.
It may be altered by repeatedly pressing (4) until the
desired strength appears on the display.
Selecting water quantity
Use the water quantity control knob (3) to determine
the quantity of water:
•turn anti-clockwise to decrease water quantity.
•turn clockwise to increase water quantity.
Water quantity may be altered during the process.
RECOMMENDATION: To determine the ideal water
quantity for your taste or cup size, proceed as fol-
lows when making your first cup of coffee:
•Set the water quantity adjustment knob (3) to
the following positions:
–to the left for a cup of espresso.
–all the way to the right for a larger cup.
•Press the 1 cup selector (5). The machine will
start making coffee.
•Just before you reach the desired quantity of
coffee, turn the water quantity control knob (3)
slowly to the left until the machine stops dispen-
sing coffee.
•Note the position shown on the dots appearing
on the water quantity adjustment knob (3).
MM
MMAA
AAKK
KKII
IINN
NNGG
GG
OO
OONN
NNEE
EE
CC
CCUU
UUPP
PP
OO
OOFF
FF
CC
CCOO
OOFF
FFFF
FFEE
EEEE
EE
Place a pre-heated cup underneath the coffee outlet
(8).
The height of the coffee outlet (8) may be adjusted
precisely to suit the cup size.
•Set the desired coffee strength and water quan-
tity.
•Press the 1 cup selector (5).
•At this point the machine will begin the infusion
procedure.
•The procedure may be interrupted at any time
by pressing the 1 cup (5) or 2 cup selector (6).
Important: If making coffee for the first time, the
grinding chamber is still empty. After the first grind
the "Out of coffee beans" indicator may begin fla-
shing and the machine may not make coffee. If this
happens, press (5) again to repeat the procedure.
MM
MMAA
AAKK
KKII
IINN
NNGG
GG
TT
TTWW
WWOO
OO
CC
CCUU
UUPP
PPSS
SS
OO
OOFF
FF
CC
CCOO
OOFF
FFFF
FFEE
EEEE
EE
•Two grinds will automatically be performed to
make two cups of coffee.
•Place both cups under the coffee outlet (8).
•Set the desired coffee strength and water quan-
tity for one cup.
•Press the 2 cup selector (6).
•At this point the machine begins the infusion
procedure and makes two cups of coffee in a
row
•The procedure may be interrupted at any time
by pressing the 1 cup (5) or 2 cup selector (6).
If the machine should run out of water or coffee
beans between the two cups, or if the trays need
emptying, a signal will appear and the second cup
of coffee will not be made. Follow the instructions to
top up the machine and press only the 1cup selec-
tor (5) to make the second cup of coffee.
UU
UUSS
SSII
IINN
NNGG
GG
PP
PPRR
RREE
EE--
--GG
GGRR
RROO
OOUU
UUNN
NNDD
DD
CC
CCOO
OOFF
FFFF
FFEE
EEEE
EE
•First turn the water quantity control knob (3) to
the desired quantity of water for one cup.
•Open the lid to access the ground coffee
compartment (20). The symbol will flash.
•Fill with a level measuring scoop (23) of ground
coffee and close the lid.
The symbols will appear.
•Place the cup under the coffee outlet (8) and
press the 1 cup button (5).
If you unintentionally open the ground coffee com-
partment and do not press the coffee button after
putting ground coffee into it, the machine will auto-
matically perform a washing cycle through the cof-
fee outlet (8) one minute after the lid is closed and
will then be ready for use again.
Important: The filling compartment is not a stora-
ge compartment. Never put more than one portion
into it and use only freshly ground or vacuum-
packed coffee. Do not use instant coffee. You can
make instant coffee in the cup using the hot water
nozzle (12).
HH
HHEE
EEAA
AATT
TTII
IINN
NNGG
GG
WW
WWAA
AATT
TTEE
EERR
RR
Place a cup under the nozzle (12).
Turn the steam/hot water nozzle to the right (11).
When hot water comes out of the nozzle, the
symbols flash.
EE
EENN
NNGG
GGLL
LLII
IISS
SSHH
HH

AROMA RAFFAELLO
63
EE
EENN
NNGG
GGLL
LLII
IISS
SSHH
HH
Fill the cup up to the desired level and then set the
knob (11) to 0 again.
Be careful not to burn yourself: Hot water may spla-
sh. The nozzle (12) reaches high temperatures whi-
le in use. Let it cool down for a few minutes before
touching it.
PP
PPRR
RROO
OODD
DDUU
UUCC
CCII
IINN
NNGG
GG
SS
SSTT
TTEE
EEAA
AAMM
MM
//
//
FF
FFRR
RROO
OOTT
TTHH
HHII
IINN
NNGG
GG
MM
MMII
IILL
LLKK
KK
•Press the steam preheat button (10). The
symbols will flash.
•When the system is ready, the symbol will
flash and the will stay on.
•Immerse the nozzle (12) in the cup full of liquid
to be heated.
•Turn the steam/hot water knob (11) to the right.
Important: A little water will come out before the
steam.
•Turnthe knob (11) back to 0 to stop.
•Press the steam preheat button (10) to restore
normal operation of the machine.
•Steam may continue to be produced for maxi-
mum 2 minutes, after which the machine will au-
tomatically stop the procedure. To continue with
the procedure, turn the knob (11) to the right
and go back to 0.
Warning – scalding steam hazard: The steam is
very hot! Grasp the nozzle by the black plastic part!
Dry residues accumulating on the nozzle after
frothing milk are hard to remove. Clean immediately
after cooling.
Important: after using the steam wand, it is impor-
tant to rinse the machine through before making
coffee again to cool down the circuit, or the aroma
of the coffee will be spoiled. Place a container under
the coffee outlet (8) and press the service button (7)
or let a little hot water flow through the nozzle (12).
PP
PPRR
RROO
OOGG
GGRR
RRAA
AAMM
MMMM
MMII
IINN
NNGG
GG
Use the following buttons for programming:
Service button S (7)
Programming mode/Confirmation button
Selector (4)
Selection button
On/off button (2)
Interrupts programming
Programming may be performed only when the
on/off button (2) is set to off (Stand-by mode).
The machine allows you to set the following func-
tions:
1. Filter =
2. Water hardness =
3. Temperature =
4. Off time =
1. FILTER
Filter assembly
The machine is supplied with a special filter for the
water reservoir. This resin-based filter protects the
appliance from lime scale deposits and filters out
any substance (such as chlorine and metallic resi-
dues) that can alter the flavour and aroma of the cof-
fee, while leaving the mineral properties of the water
unaltered. For the machine to recognise the presen-
ce of the filter, the filter setting must be program-
med as "On". The factory setting is filter off.
–Setting filter programming to ON:
–Setting filter programming to OFF:
1b. Turn off the machine using the on/off button
(2) (Stand-by mode).
2b. Press the service button (7) for about 2 se-
conds to enter Programming mode.
3b. The symbols will come on in se-
quence.
4b. Wait for the filter symbol to come on and
press the selector (4).
5b. The symbol will start flashing.
6b. Press the (4) selector until both symbols start
flashing, , showing that the filter is
ON.
7b. Confirm by pressing the service button (7) for
about 2 seconds. The symbols will
start flashing.
8b. Empty the water reservoir (17) and screw on
the filter using the filter assembly tool (24)
supplied with the portafilter (21).
9b. Fill the reservoir with cold water and put it
back inside the appliance. The symbol
will start flashing.

AROMA RAFFAELLO
64
EE
EENN
NNGG
GGLL
LLII
IISS
SSHH
HH
10b. Place a recipient underneath the hot water
nozzle (12) and turn the knob (11) to the right.
The system will perform a rinse cycle.
11b. Wait until water stops flowing out of the nozz-
le, then turn the knob (11) to the left again.
•The system quickly heats up and is ready
for use again.
•The service button (7) may carry on fla-
shing. If this happens, press the button
(7) to conduct another short rinse cycle
through the coffee outlet (8).
IMPORTANT: The system must be programmed
either for use of a water filter or for the hardness of
the water and therefore the manual lime scale remo-
val cycle. You cannot use both of these settings at
the same time.
If you are using the filter on the machine and the sy-
stem is programmed to "On", water hardness and
manual lime scale programming cannot be di-
splayed.
The filter loses its effectiveness after about 50 litres
of water. Follow the instructions in the section on
“replacing the water filter” to replace it.
Important: If you have not used the machine very
much, you must replace the filter even if no indica-
tion appears on the display after a maximum of two
months (see the section on “manual filter replace-
ment (25)”).
As a reminder, you may set the replacement date on
the wheel on the top of the filter.
For more thorough prevention of lime scale build-up,
you should run the “lime scale removal” programme
at least once a year even if you regularly use the re-
sin-based filter.
Without filter
If you no longer want to use the filter, you must re-
programme the filter setting to "OFF".
This is important as you must use the lime scale re-
moval programme if you are not using the filter.
1c. Turn off the machine using the on/off button (2)
(Stand-by mode).
2c. Press the service button (7) for about 2 se-
conds to enter Programming mode.
3c. The symbols will come on in sequen-
ce.
4c. Wait until the filter symbol comes on and
press the selector (4).
5c. The symbols will start flashing.
6c. Press the selector (4) until only the is fla-
shing, indicating that the filter has been exclu-
ded (Filter OFF).
7c. Confirm by pressing the service button (7) for
about 2 seconds.
8c. Programming concludes and the system goes
back to Stand-by mode.
Don’t forget to programme water hardness when
not using the filter.
2. WATER HARDNESS
The frequency of lime scale removal depends on the
hardness of your local water supply. Set water hard-
ness correctly as soon as you begin using the ma-
chine so that the system will be able to inform you
when the lime scale procedure is necessary.
First test the water using the litmus paper (26) sup-
plied:
Fill a small container with tap water. Dip the litmus
paper into it and remove it immediately, then shake
it gently.
After about one minute you will be able to read the
results by counting the red dots.
Different levels are distributed as shown below:
–1red dot =
1 -7° dH / 1 - 12.6 °fH =
–2red dots =
8 -14° dH / 12.7 -25.2 °fH =
–3red dots =
15-21° dH / 25.3-37.8 °fH =
–4red dots =
> 21° dH / > 37.8 °fH =
When no red dots are visible, set the .
1d. Turn the machine off using the on/off button (2)
(Stand-by mode)
2d. Press the service button (7) for about 2 se-
conds to go to Programming mode.
3d. The symbols will come on in se-
quence (The water hardness symbol will not ap-
pear if the filter is set to "On"; refer to the "FIL-
TER" section).
4d. Wait until the symbol comes on and confirm
by pressing the selector (4).
5d. The symbols will start flashing.

AROMA RAFFAELLO
65
EE
EENN
NNGG
GGLL
LLII
IISS
SSHH
HH
6d. Press the selector (4) until the symbols corre-
sponding to the desired level flash.
7d. Confirm by pressing the service button (7) for
about 2 seconds.
8d. Programming is completed and the system re-
turns to Stand-by mode.
3. TEMPERATURE
You may alter coffee temperature to suit your prefe-
rences:
Normal =
High =
Maximum =
The factory setting is "High".
1e. Turn off the machine with the on/off button (2)
(Stand-by mode)
2e. Press the service button (7) for about 2 se-
conds to go into Programming mode.
3e. The symbols will come on in se-
quence.
4e. Wait until the temperature symbol appears
and press the selector (4).
5e. The symbols will start flashing.
6e. Press the selector (4) until the symbols corre-
sponding to the desired setting flash.
7e. Confirm by pressing the service button (7) for
about 2 seconds.
8e. Programming is completed and the system re-
turns to Stand-by mode.
4. OFF TIME
This function allows you to determine how much ti-
me the system waits after the last cup of coffee
before returning to Stand-by mode.
The following settings are possible:
–Never =
–30 Min. =
–2hours =
–5hours =
The factory setting is 5 hours.
1f. Turn the machine off with the On/Off button (2)
(Stand-by mode).
2f. Press the service button (7) for about 2 se-
conds to go to Programming mode.
3f. The symbols will come on in se-
quence.
4f. Wait until the symbol comes on, and then
press the selector (4).
5f. The symbols will start flashing.
6f. Press the selector (4) until the symbols corre-
sponding to the desired phase flash.
7f. Confirm by pressing the service button (7) for
about 2 seconds.
8f. Programming is completed and the system re-
turns to Stand-by mode.
CC
CCAA
AARR
RREE
EE
AA
AANN
NNDD
DD
MM
MMAA
AAII
IINN
NNTT
TTEE
EENN
NNAA
AANN
NNCC
CCEE
EE
Replacing the filter (25)
After processing about 50 litres of water, the
filter becomes inefficient. This is signalled on the
display by the symbol, and the service button (7)
flashes.
RECOMMENDATION: Press the service button
only when you want to replace the filter.
You may continue making coffee, hot water and
steam, but we recommend you replace the filter
promptly.
1g. Press the service button (7) for about 2
seconds. The " symbols will flash.
2g. Empty the water reservoir (17) and replace the
filter.
3g. Fill the reservoir with cold water and put it back
in the machine.
4g. Place a recipient under the steam-hot water
nozzle (12) and turn the steam/hot water knob
(11) to the right. The system will perform a rin-
se cycle.
5g. Wait until no more water flows out of the nozzle,
and then turn the knob (11) toward the left.
6g. The system will quickly heat up to the correct
temperature ( flashes), after which it is
ready for use again. The normal coffee symbol
will appear on the display.
Manual filter replacement (25)
Even if you make coffee infrequently, the filter mu-
st be replaced at least every 2 months. No si-
gnal will appear on the display, and the new filter
must be replaced manually.
As a reminder, you may set the replacement date on
the wheel on the top of the filter.

AROMA RAFFAELLO
66
1h. Turn the machine on using the On/Off button (2)
(Operative mode)
2h. Press the service button (7) for about 2
seconds. The symbols will flash, in se-
quence.
3h. Wait until the filter symbol comes on and
press the service button (7) briefly to confirm.
4h. The symbol will start flashing.
5h. Press the service button (7) for about 2
seconds. The symbols will flash.
6h. Proceed as described in point 2g of the section
on "replacing the filter".
CLEANING PROGRAMME
The cleaning programme thoroughly cleans all di-
spensing assemblies, removing coffee residues and
oily deposits which can build up and block up the
machine. To run the programme, use the special ta-
blets available at your Authorised Polti Service Cen-
tre or home delivered by calling 01249-815511.
IMPORTANT: This programme is intended solely
for cleaning the coffee dispenser assembly. It is not
a lime scale remover programme; do not get the ta-
blets for these two uses mixed up.
When the machine requires a cleaning cycle, the
symbol will appear on the display and the
service button (7) will flash.
RECOMMENDATION: Press the service button
only when you want to perform the cleaning cycle.
You may continue making coffee, hot water and
steam, but we recommend you perform the clea-
ning cycle promptly.
Important: The cleaning programme cannot be in-
terrupted once it has started.
1i. Press the service button (7) for about 2
seconds. The symbol will start flashing.
2i. Remove the drip tray (9b) and the water reser-
voir (17) and clean them thoroughly.
3i. Fill the reservoir with cold water, and re-assem-
ble the reservoir and trays on the machine.
4i. The machine will perform a brief washing cycle
and the symbol will start flashing.
RECOMMENDATION: Place a dish of sufficient ca-
pacity (about 0.5 litres) under the coffee outlet (8).
5i. Place the cleaning tablet in the ground coffee
compartment (20) and close the lid. The servi-
ce button (7) will start flashing.
Important: do not put the cleaning tablet in the wa-
ter reservoir (17).
6i. Press the service button (7).
7i. The machine begins the cleaning procedure.
8i. The cleaning procedure is automatic and takes
about 10 minutes. The symbol will start to
flash when the cycle has been completed.
9i. Empty the drip tray (9b) and put it back in posi-
tion.
10i. If necessary, fill the water reservoir (17) with
cold water.
11i. The machine quickly heats up to the right tem-
perature and is ready for use again.
Manual cleaning
If necessary, you can run the cleaning programme
even if the alarm does not appear:
1l. Turn on the machine with the On/Off button (2)
(Operative mode).
2l. Press the service button (7) for about 2
seconds. The and/or symbols
will come on in sequence.
3l. Wait until the symbol comes on and con-
firm by briefly pressing the service button (7).
4l. The symbol will start flashing.
5l. Press the service button (7) again for about 2
seconds. The symbol will start flashing.
6l. Proceed as described above, beginning at point
2i of the "cleaning programme" section.
If you unintentionally start up the cleaning program-
me, you can interrupt it at the start of the cycle by
pressing the On/Off button (2) for about 2 seconds.
LIME SCALE REMOVAL PROGRAMME
If you do not use the special filter (25) regularly, it is
essential to remove lime scale in the appliance
at least once every two months regularly so as
not to compromise the functioning of the appliance
with time. To run the lime scale removal program-
me, use the special Polti lime scale remover, availa-
ble at your Authorised Polti Service Centre.
NOTE: Never use sulphuric acid or any other pro-
duct containing this acid, as it may compromise the
functioning of the appliance. Do not use vinegar or
vinegar-based products for lime scale removal. Do
not use any substance not authorised by the manu-
EE
EENN
NNGG
GGLL
LLII
IISS
SSHH
HH

AROMA RAFFAELLO
67
facturer; use only special Polti lime scale remover.
When the machine requires lime scale removal, the
symbol will appear on the display and the
service button (7) will start flashing.
RECOMMENDATION: Press the service button
before starting the lime scale removal procedure.
You may continue making coffee, hot water and
steam, but we recommend you run the lime scale
removal procedure promptly.
Important: - Do not interrupt the lime scale re-
moval programme once it has started!
1m. Press the service button (7) for about 2
seconds. The symbol will start flashing.
2m. Empty the drip tray (9b) and reassemble it.
The symbol will flash, while the sym-
bol will come on.
3m. Remove the water reservoir (17) and put two
Polti lime scale remover tablets in it (following
the manufacturer’s instructions) with the cor-
responding quantity of water, up to the 0.5 li-
tre mark.
Important: do not put lime scale removal
tablets into the ground coffee compart-
ment (20).
4m. Put the reservoir back into the appliance. The
symbol will start flashing.
5m. Place a recipient of sufficient size (about 1/2
litre.) under the hot water/steam nozzle (12)
6m. Turn the steam/hot water knob (11) to the ri-
ght to open.
7m. The machine will automatically remove lime
scale, and the lime scale removal solution will
intermittently flow out of the hot water nozzle
(12) (about 10 min.). The symbol flashes
during this procedure.
8m. When the symbol starts flashing again,
turn the knob (11) again.
9m. At this point the lime scale removal solution
flows into the drip tray (about 15 Min.).
10m. As soon as the lime scale removal solution
has flowed out, the symbols will
start flashing.
11m. Remove the drip tray (9b) and the water re-
servoir (17) and empty them.
12m. Fill the water reservoir (17) with cold water
and reassemble the water reservoir and drip
tray on the appliance. The symbol will
flash.
13m. Turn the steam/hot water knob (11) to the ri-
ght to open.
14m. The system is once again washed intermitten-
tly through the steam – hot water nozzle (12)
(about 5 minutes).
15m. When the symbol starts flashing, you
can turn the knob (11) again.
16m. The system is washed and water flows into
the drip tray (about 5 minutes).
17m. When the washing cycle has been completed,
the symbol will start flashing.
18m. Empty the drip tray (9b) and reassemble it on
the machine.
19m. The system quickly heats up to the correct
temperature. The service button (7) will flash.
20m. Press the service button (7) to wash the sy-
stem out through the coffee outlet (8).
21m. The machine is now ready for use.
Manual lime scale removal
If necessary, the lime scale removal programme
may be started up before the alarm appears.
1n. Turn the machine on with the On/Off button
(2) (operative mode).
2n. Press the service button (7) for about 2
seconds. The symbols will come on in
sequence.
3n. Wait until the symbol comes on and con-
firm by briefly pressing the service button (7).
The symbol begins flashing.
4n. Press the service button (7) again for about 2
seconds. The symbol will start flashing.
5n. Proceed as described in point 2m of the "Li-
me scale removal programme" section.
If you unintentionally start up the lime scale removal
programme, you can interrupt the procedure at the
start of the cycle by pressing the On/Off button (2)
for about 2 seconds.
GENERAL CLEANING
Never submerge the appliance in water.
Do not use abrasive cleaners.
•Clean the case inside and out using only a soft,
damp cloth.
•Empty the drip tray (9b) and the coffee grounds
container (9c) only when instructed to do so on
the display. Clean with warm, soapy water occa-
sionally.
•When cleaning the drip tray (9b), always remem-
ber to clean the contacts (9d) on the back of
the tray.
EE
EENN
NNGG
GGLL
LLII
IISS
SSHH
HH

AROMA RAFFAELLO
68
•Rinse out the water reservoir every day and fill it
with fresh cold water.
•Clean the hot water and steam nozzle with a
damp cloth after each use.
FOR YOUR OWN SAFETY READ FOLLOWING
INSTRUCTIONS CAREFULLY BEFORE ATTEMPTING
TO CONNECT THIS UNIT TO THE MAINS.
MM
MMAA
AAII
IINN
NNSS
SS
((
((AA
AACC
CC))
))
OO
OOPP
PPEE
EERR
RRAA
AATT
TTII
IIOO
OONN
NN
This unit is designed to operate on 240V, 50 Hz cur-
rent only. Connecting it to other power sources may
damage the unit.
WARNING - This appliance must be earthed.
This appliance may be fitted with a non rewirable
plug, if it is necessary to change the fuse in a non
rewirable plug the fuse cover must be refitted. If the
fuse cover is lost or damaged, the plug must not be
used until a replacement, available from the appli-
ance manufacturer, is obtained. It is important that
the colour of the replacement fuse cover corre-
sponds with the colour marking on the base of the
plug.
If the plug requires to be changed because it is not
suitable for your socket, or becomes damaged, it
should be cut off and an appropriate plug fitted fol-
lowing the wiring instruction (below). The plug re-
moved must be disposed of safely as insertion into
a 13A socket is likely to cause an electrical hazard.
IMPORTANT
These wires in this mains lead are coloured in accor-
dance with the following code.
• Green-and-yellow: Earth • Blue: Neutral
• Brown: Live
As the colours of the wires in the mains leads of this
appliance may not correspond with the coloured
markings identifying the terminals in your plug, pro-
ceed as follows:
The wire which is coloured green-and-yellow must be
connected to the terminal in the plug which is
marked with the letter “E” or by the earth symbol or
green-and-yellow.
The wire which is coloured blue must be connected
to the terminal which is marked with the letter “N” or
coloured black.
The wire which is coloured brown must be connect-
ed to the terminal which is marked with the letter “L”
or coloured red.
GREEN
&
YELLOW
(Earth)
BLUE
(Neutral)
FUSE
(13 amp)
BROWN
(Live)
EE
EENN
NNGG
GGLL
LLII
IISS
SSHH
HH

AROMA RAFFAELLO
69
EE
EENN
NNGG
GGLL
LLII
IISS
SSHH
HH
Symbol Meaning What to do
Flashes – Fill or rinse the water – Open hot water/steam knob (11).
conveyance system.
Flashes – Water reservoir (17) is empty. – Fill with cold water.
– Water reservoir (17) has been – Install the water reservoir.
removed or is incorrectly installed
Flash – Out of coffee beans. – Fill the container (18) with coffee beans.
in ascending order
Flashes – The drip tray (9b) and/or coffee – Empty the drip tray and/or coffee
grounds container (9c) is full. grounds container.
Comes on – The drip tray (9b) and the coffee – Install the drip tray (9a) and the coffee
grounds container (9c) have grounds container (9c).
been removed or incorrectly – Clean the contacts.
installed.
– Drip tray contacts (9d) are dirty.
–System overheated. – Cool down the system.
Flash
Comes on – Machine needs cleaning. – Clean the machine.
Comes on –Machine has lime scale build-up. – Remove lime scale.
Comes on – Filter has expired. – Replace filter.
Flashes – The ground coffee lid (20)–Close lid
is open.
Flashes – The door of the boiler unit (22) – Close door.
is open.
MM
MMEE
EESS
SSSS
SSAA
AAGG
GGEE
EESS
SS
FF
FFRR
RROO
OOMM
MM
TT
TTHH
HHEE
EE
SS
SSYY
YYSS
SSTT
TTEE
EEMM
MM

AROMA RAFFAELLO
70
EE
EENN
NNGG
GGLL
LLII
IISS
SSHH
HH
PROBLEM MEANING SOLUTION
The machine produces – Nozzle (12) is blocked up. – Clean nozzle thoroughly.
neither hot water nor
steam.
Insufficient froth. – Unsuitable milk. – Use cold milk with a 15% fat
content.
The machine produces – You are using too fine a grind. – Change the fineness of the grind
only a few drops of coffee. – You are using ground coffee which – Use more coarsely ground coffee.
The coffee has no “cream”. is too finely ground. – Change the type of coffee used.
– The type of coffee you are using – Use fresh coffee beans.
is not appropriate. – Adjust the grind.
–Your coffee beans are not freshly
roasted.
–Thegrind you are using is not
appropriate for the type of coffee.
The grinding motor is very – Foreign body such as a pebble – Contact the service centr
noisy. in grinding motor. You may continue using the
machine with ground coffee.
The lime scale removal – Filter programmed as "ON". – Programme the filter as "OFF"
programme doesn’t work.
Comes on – The illuminated ring on the – Let the machine warm up at room
"ON/OFF" button (2) is flashing. temperature for one or two hours.
–Let the machine warm up at room
Flash – The appliance is too cold. temperature for one or two hours.
Comes on – The illuminated ring on the – Let the machine warm up at room
"ON/OFF" button (2) is flashing. temperature for one or two hours.
–The appliance has not heated up – Let the machine warm up at room
Flash to operating temperature. temperature for one or two hours.
Comes on – The illuminated ring on the – Call our toll-free number
"ON/OFF" button (2) is flashing.
Flash – The boiler unit is obstructed or – Call our toll-free number
incorrectly installed.
TT
TTRR
RROO
OOUU
UUBB
BBLL
LLEE
EESS
SSHH
HHOO
OOOO
OOTT
TTII
IINN
NNGG
GG

71
EE
EENN
NNGG
GGLL
LLII
IISS
SSHH
HH
NOTE
Table of contents
Other POLTI Coffee Maker manuals

POLTI
POLTI CREMA EXPRESS Parts list manual

POLTI
POLTI COFFEA CS150W User manual

POLTI
POLTI ESPRESSO 2000 Parts list manual

POLTI
POLTI CAPRI User manual

POLTI
POLTI AROMA 850 Parts list manual

POLTI
POLTI CAPUCCI M0S10575 User manual

POLTI
POLTI CAPPUCCI User manual

POLTI
POLTI ESPRESSO 3000 Parts list manual

POLTI
POLTI AROMA 1500DIGIT Parts list manual

POLTI
POLTI Cosmo User manual