AROMA MICHELANGELO
5
EE
EENN
NNGG
GGLL
LLII
IISS
SSHH
HH
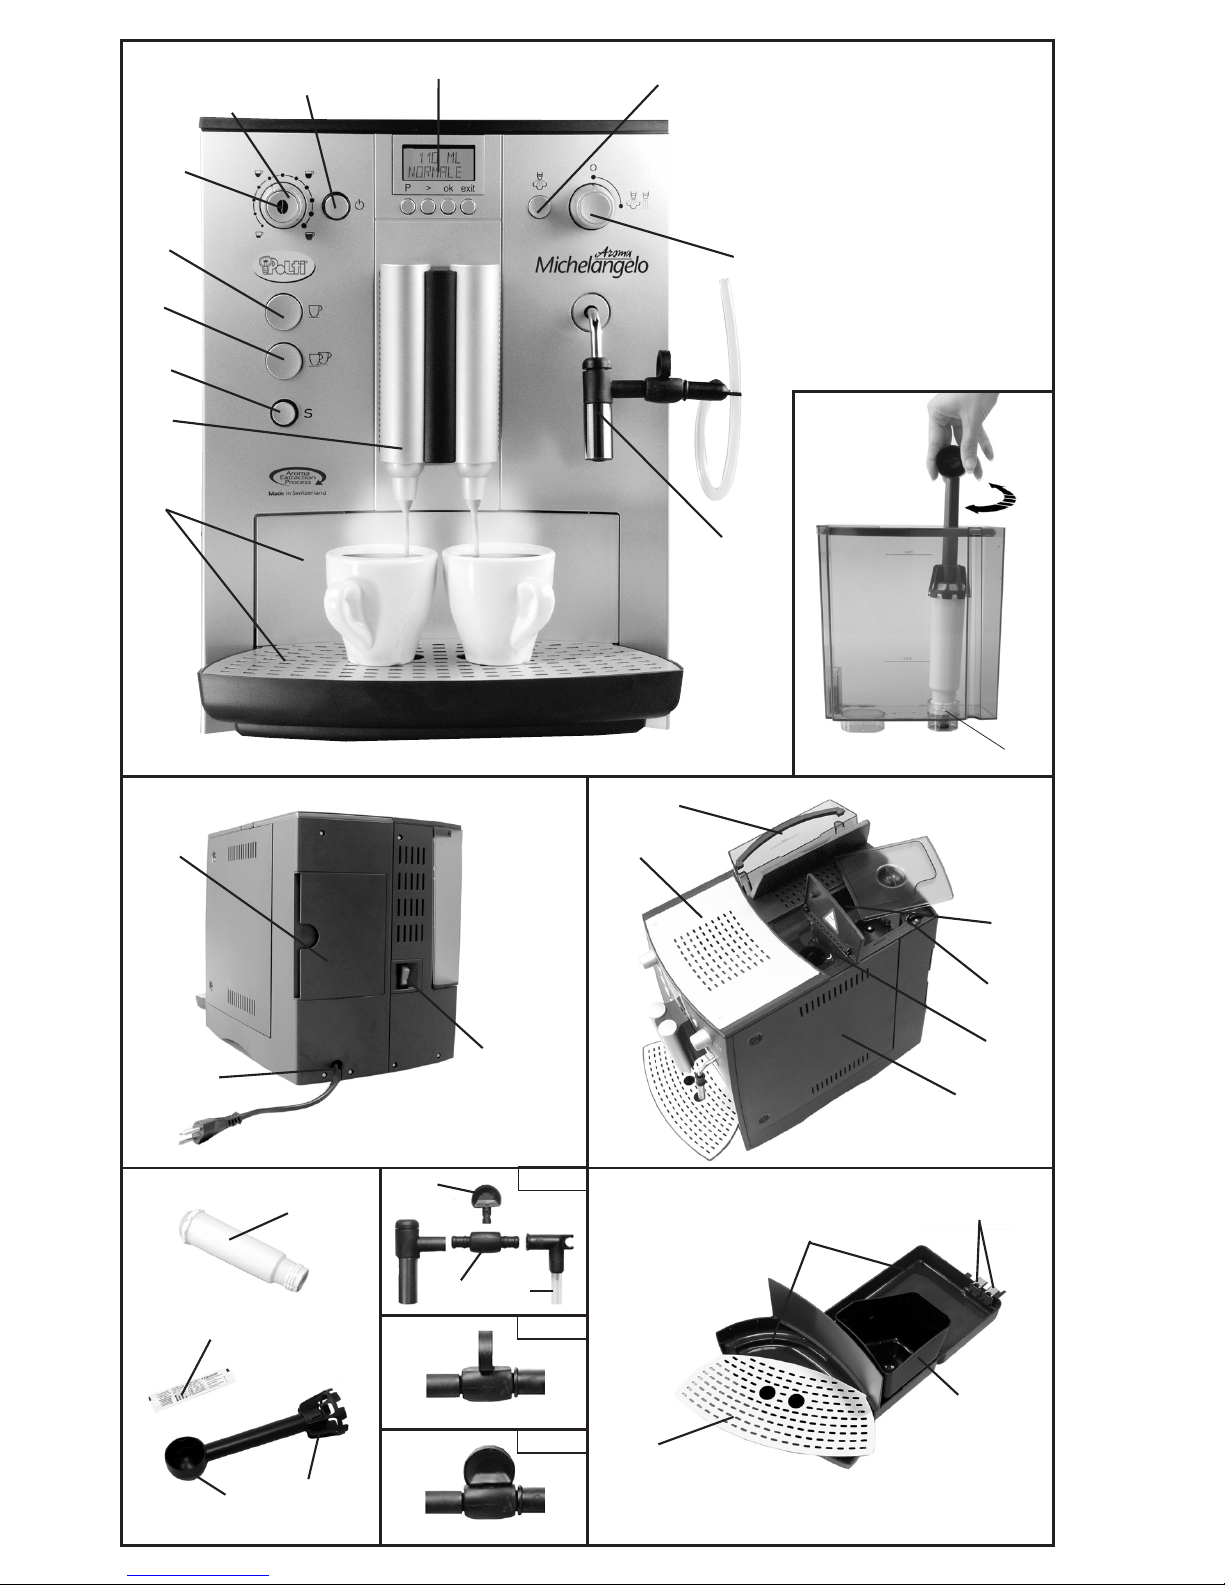
Place a dish underneath the outlet to collect
water.
•Turn the steam/hot water knob (11) to the
right. At this point the system will fill with water
and water may flow out of the nozzle (12).
•When the TURN VALVE command appears, you
may turn the knob (11) to the left again.
•When the machine has heated up, PLEASE
RINSE will appear on the display and the serv-
ice button (7) will start flashing.
•Press the service button (7) to rinse out the sys-
tem through the coffee dispensing nozzle (8).
•The machine is now ready for use.
RECOMMENDATION: Place a dish underneath the
outlet to collect water.
You may rinse out the machine at any time during
regular operation by letting clean water flow
through the coffee outlet (8), pressing the service
button (7).
Starting up the appliance
1a. Remove the power cord from the cord com-
partment (14) and plug it into a suitable outlet.
2a. Press the power switch (15). The on/off button
(2) will come on.
3a. Press the on/off button (2). SYS. IS HEATING
will appear on the display.
4a. When the machine has heated up, PLEASE
RINSE will appear on the display and the serv-
ice button (7) will start flashing.
5a. Press the service button (7) to rinse the system
out through the coffee dispensing nozzle (8).
6a. The coffeemaking symbol will appear on the
display, indicating that the machine is ready for
use again.
Setting grind
Important: Grind may be adjusted only when the
coffee grinder is in use.
The coffee grinder may be adapted to suit the roast
of the coffee. We recommend the medium setting
for all roasts.
•Open the coffee bean container (18) lid
•With the coffee grinder in operation, turn the
knob (19) to the desired position. The smaller
the dot next to the knob, the finer the grind. Re-
member that:
–lightly roasted coffee requires a finer grind
–dark-roasted coffee requires a coarser grind
PP
PPRR
RREE
EEPP
PPAA
AARR
RRAA
AATT
TTII
IIOO
OONN
NN
The machine is shipped ready to make its first cup
of coffee. But we recommend you re-programme
the main settings to suit your preferences. First of
all, follow the steps listed under the “Programming”
heading to adjust the filter and water hardness set-
tings.
NOTE: When using the appliance for the first time,
or if the appliance has not been used for some
time, the first coffee you make will not have perfect
aroma and should be discarded.
Selecting coffee strength
You may set your preferred coffee strength to three
levels:
LIGHT =about 7 gr. ground coffee
(for caffelatte, cappuccino)
NORMAL =about 9 gr. ground coffee
(for Café crème)
STRONG =about 11 gr. ground coffee
(for Espresso, strong coffee)
As soon as the machine is ready for use, the facto-
ry setting will appear on the display.
It may be altered by repeatedly pressing the selec-
tor (4) until the desired strength appears on the dis-
play.
Selecting water quantity
Use the water quantity control knob (3) to deter-
mine the quantity of water:
•turn anti-clockwise to decrease water quantity.
•turn clockwise to increase water quantity.
Water quantity may be altered during the process.
The amount of water used to make coffee is shown
on the first line of the display.
RECOMMENDATION: To determine the ideal wa-
ter quantity for your taste or cup size, proceed as
follows when making your first cup of coffee:
1. Set the water quantity adjustment knob (3) to
the following positions:
a. to the left for a cup of espresso.
b. all the way to the right for a larger cup.
2. Press the 1 cup selector (5). The machine will
start making coffee.
3. Just before you reach the desired quantity of
coffee, turn the water quantity control knob (3)
slowly to the left until the machine stops dis-
pensing coffee.
4. Note the position shown on the dots appearing
on the water quantity adjustment knob (3).
MM
MMAA
AAKK
KKII
IINN
NNGG
GG
OO
OONN
NNEE
EE
CC
CCUU
UUPP
PP
OO
OOFF
FF
CC
CCOO
OOFF
FFFF
FFEE
EEEE
EE
Place a pre-heated cup underneath the coffee dis-
pensing nozzle (8)
The height of the coffee dispensing nozzle (8) may