Posey Sitter On Cue PRO User manual

Sitter On Cue PRO™
Instruction Manual
Before using the Posey Sitter On Cue PRO, read this entire manual and save for future reference.
The Posey Sitter On Cue PRO Fall
Monitor is an important part of your
falls management program.
Ensure all parts of this system
are operational before leaving
a patient unattended.
8645WL

Sitter On Cue PRO
2
Contents
Before You Begin ......................................................................................................................... 3
Features of the Sitter On Cue PRO ............................................................................................4-5
Contents ...................................................................................................................................... 6
Preparing the Sitter On Cue PRO for Use...................................................................................... 7
Alarm Conditions and Light Key.................................................................................................... 8
Setting Alarm Mode ..................................................................................................................... 9
Setting Alarm Tone..................................................................................................................... 10
Adjusting Alarm Volume ............................................................................................................. 11
To Record a Message ................................................................................................................ 12
The HOLD Button ...................................................................................................................... 13
Connecting to AC Power (Optional)............................................................................................. 14
Nurse Call Interface.................................................................................................................... 15
Latching Mode .......................................................................................................................... 16
Monitoring with a Sensor............................................................................................................ 17
Monitoring with Multiple Sensors................................................................................................ 18
The Sitter On Cue PRO and Use of Physical Restraints ............................................................... 19
Mounting the Sitter On Cue PRO ................................................................................................ 20
Fall Monitor Cleaning, Storage and Battery Maintenance ............................................................ 21
Troubleshooting Guide...........................................................................................................22-25
Fall Monitor Specifications and Warranty .................................................................................... 26
Useful Life.................................................................................................................................. 27

Sitter On Cue PRO 3
SYMBOL DEFINITION
WARNING!: Indicates a potentially hazardous situation, which could result
in a serious risk of injury or death to patient or operator and or damage to
equipment or property.
(Without safety alert symbol): Indicates a situation that may result in
damage to equipment or property.
NOTE: Useful additional information and tips
Before You Begin
The Posey Sitter On Cue PRO is an easy to use addition to your falls management program. The
Sitter On Cue PRO provides an early warning when a patient attempts an unassisted exit from a
sensor. This system does not prevent falls or injury from falls and is not a substitute for patient
care, rounding and a comprehensive falls management protocol in your facility.
The Sitter On Cue PRO activates as the patient attempts to rise and removes pressure from the
sensor or unfastens their sensor belt. The Sitter On Cue PRO may be used with an optional cable or
wireless adapter to connect to the nurse call system.
Indications for Use:
Persons who may benefit from the use of the Posey Sitter On Cue PRO include:
• Patients with diminished cognitive or mobility skills
• Patients receiving medications that may cause disorientation, drowsiness, dizziness, or
frequent urination
• Patients (new or existing) with a history of falls, or who are assessed to be at risk of falling based
on your selected fall-risk assessment
• Patients who are restless or prone to get up in the middle of the night, e.g., due to incontinence,
or with nighttime voiding habits
Contraindications:
BEFORE YOU BEGIN
NOTE: The Sitter On Cue PRO may not be suitable for all high fall-risk patients.
The Sitter On Cue PRO should NEVER be used as the only means of surveillance for:
• Agitated, combative or suicidal patients
• Patients at extreme risk of a life-threatening fall
Response Policy:
Make sure your facility has a clearly defined falls management policy
WARNING: Test fall monitor functionality every time before each use and when
leaving the patient unattended.
Ensure the nurse call cable is plugged into both the fall monitor and the wall
port of the nurse call system or that the wireless adapter is paired properly
before leaving the patient unattended. Verify that an alert is received at the
nursing station.

Sitter On Cue PRO
4
Features of the Sitter On Cue PRO
REAR VIEW
FE ATUR ES

Sitter On Cue PRO 5
Features of the Sitter On Cue PRO (Cont.)
• Eight alarm tones. There are eight alarm tone options which can be used in different
patient rooms, or to discern between different caregivers or levels of fall risk for easy patient
identification.
• Four alarm modes. Four alarm modes allow for facility choice regarding caregiver notification
in the event the alarm is triggered. The alarm modes are “Voice and Tone”, “Tone Only”, “Voice
Only” and “Mute.”
• Three alarm volumes. Three alarm volume settings allow for facility choice regarding
caregiver notification in the event the alarm is triggered. The volume options are low, medium
and high. The default alarm tone volume is high. Note: The audible cue volume will always
remain on the lowest setting to promote patient rest but keep the caregiver informed. Audible
cues include confirmation of connections and activation.
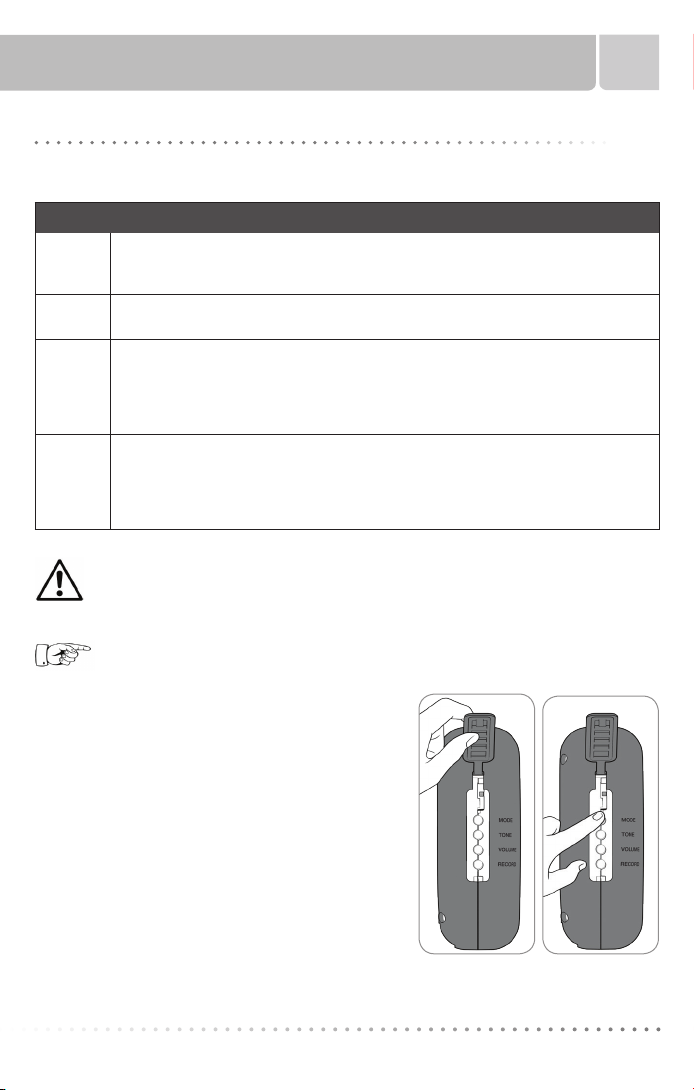
• Custom Recording. Allows a family member, friend or caregiver to record a personal message
that will sound if pressure is removed from the sensor pad or sensor belt is unfastened. The
recording will play only if the alarm mode is set to “Voice” or “Voice and Tone”. This feature can
provide patient communication in their language, or by a caregiver or family member for familiarity.
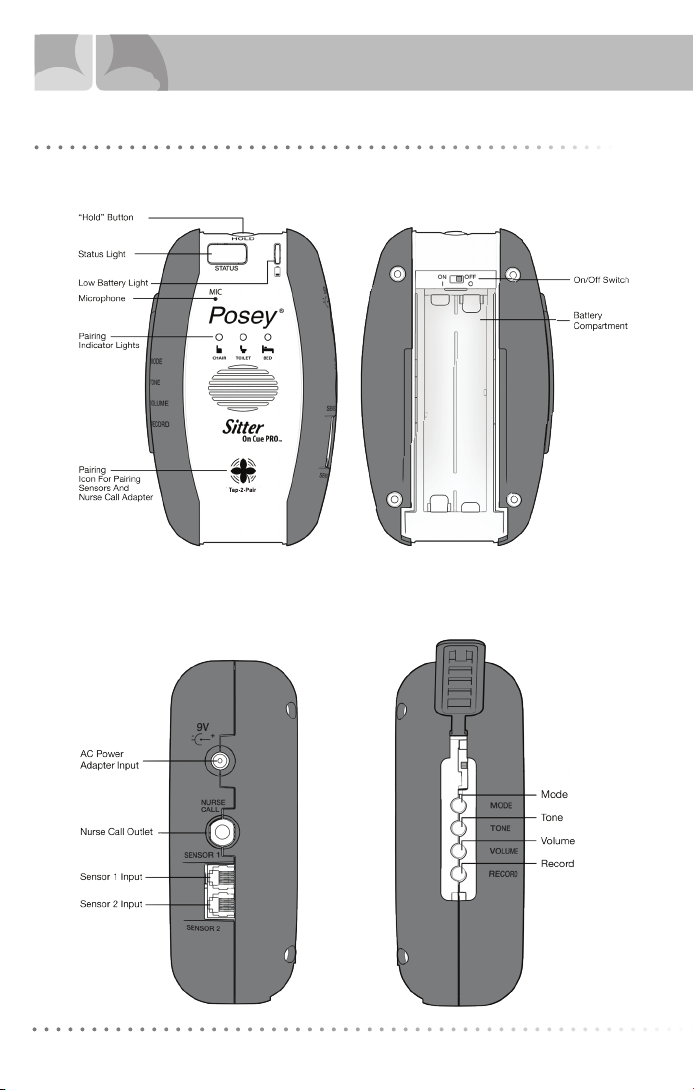
• HOLD Button. Allows the user to pause all monitoring in order to move the patient or adjust the
sensors.
• Multi-Sensor monitoring. This fall monitor connects to any Posey sensor pad. Alarm activates
when weight is removed from sensor pad, or sensor belt is unfastened. While up to five sensors
can be connected to the fall monitor, only one can be used for monitoring at a time.
• Nurse Call Interface. Provides alarm notice at patient’s room and nurse call system notification
points. If connected to nurse call, the Sitter On Cue PRO has the ability to be muted, silencing the
alarm at the patient’s bedside. It will still alarm at nurse call system notification points.
• Latching Mode. When selected, a caregiver is required to interact with the fall monitor after
pressure is removed from the sensor, even if pressure is re-applied to the sensor pad or the
sensor belt is reattached.
• Failsafe sensor alarm. The Posey Sitter On Cue PRO activates if the fall monitor is monitoring
and a sensor cord is removed from the fall monitor.
• Battery operated. The fall monitor utilizes four (4) “AA” alkaline batteries.
• Visual and Audible low battery warning. Low battery LED will flash red when batteries are
low and an audible cue will say “low battery” when batteries are critically low, alerting caregivers
of the need to change batteries.
• AC Power Adapter Input: For connection of optional external AC power supply.
• Impact resistant cover. Helps minimize damage if dropped.
• Audible low battery warning for wireless sensor pad. Audible cue will sound when
batteries are critically low, alerting caregivers of the need to discard and replace the sensor pad.
• Audible low battery warning for wireless Nurse Call Adapter. Audible cue will sound when
batteries are critically low, alerting caregivers of the need to change batteries.
FE ATUR ES
NOTE: NEVER connect other manufacturers’ sensors to a Posey fall monitor.
Use of another manufacturers’ sensors may damage the Posey fall monitor,
cause the fall monitoring system not to function as intended, and will void
the factory warranty.

Sitter On Cue PRO
6
Each Sitter On Cue PRO is Shipped to You With:
• Fall Monitor (1)
•“AA” Alkaline batteries (4)
• Instructions for Use
CONTENTS

Sitter On Cue PRO 7
PREPARING
Preparing the Sitter On Cue PRO for Use
Battery Installation:
Fresh alkaline batteries have an estimated life of 30 days of
daily use. Actual life depends on alarm mode, tone and volume
you select.
1. Slide the power switch to the OFF position before inserting/
changing batteries (Fig. 1).
2. Press down above the arrow and slide the battery
compartment door completely off (Fig. 2). Set battery door
aside.
3. Insert four (4) new “AA” alkaline batteries as pictured inside
the battery compartment (Fig. 3). Take care not to damage
battery contacts.
4. Reattach the battery compartment door. Slide it shut, locking
it into place.
Fall Monitor Low Battery LED will flash red when batteries are
low and an audible cue will say “low battery” every 15 seconds
when batteries are critically low. Change batteries at once.
• Take care when installing new batteries. The fall
monitor will not work if batteries are installed
improperly.
• ALWAYS install a completely new set of batteries when
the Low Battery LED is flashing red. DO NOT replace a
single cell, but all cells in the fall monitor. DO NOT mix
old and new batteries, or battery brands within a battery
pack (4 batteries). Use of mixed batteries, battery leakage, or batteries installed
incorrectly may cause battery damage, and may damage the fall monitor. Remove
any fall monitor from use and send to the appropriate facility authority if batteries
are damaged or corroded or the battery compartment has signs of previous battery
corrosion such as white powder residue.
• Batteries can explode or leak and cause damage to fall monitor if installed incorrectly,
fully discharged, or exposed to liquid, fire or high temperatures. If battery damage has
occurred, or you see any corrosion, remove the fall monitor from use IMMEDIATELY. DO
NOT use the fall monitor if battery damage has been detected.
• Remove batteries when storing for an extended period to prevent depleting the
batteries and potential corrosion.
Fig. 2
Fig. 1
Fig. 3

Sitter On Cue PRO
8
ALARM CONDITIONS AND LIGHT KEY
FLASH and AUDIO CONDITION DESCRIPTION
Slow Green Active
Monitoring
Sensor is connected and pressure is being applied to
the sensor pad or sensor belt is fastened.
Slow Yellow Ready
The sensor will activate and begin monitoring as soon
as pressure is applied to a connected sensor pad or the
sensor belt is fastened.
Rapid Yellow Sensor
Activation
When pressure is applied to a sensor, the fall monitor
will rapidly flash yellow for 3 seconds before the sen-
sor pad is fully activated. If pressure is removed from
the sensor pad prior to the 3 consecutive seconds,
the fall monitor will not activate.
Rapid Red.
Mode, tone and
volume selected
by the user.
High priority
physiological
alarm condition
Activated sensor no longer activated.
Rapid Red.
Tone 1 at high
volume.
High priority
physiological
alarm condition
Two sensors activated.
Rapid Red.
Tone 1 at high
volume.
High priority
technical alarm
condition
Activated wired sensor is detached from Fall Monitor
(failsafe).
Rapid Red.
Tone 1 at high
volume.
High priority
technical alarm
condition
Activated wireless sensor is unpaired from Fall Monitor
(failsafe).
Rapid Red and
flashing battery LED.
Audio cue will indicate
“self test failed.
High priority
technical alarm
condition
Self-test failure.
Slow Red Hold state
For 30 seconds after the hold button is pressed, or 5
minutes if extended hold is activated, monitoring for all
high priority alarm conditions is paused. The alarm will
not activate if pressure is removed from or applied to
the sensor.
Flashing Battery LED.
Audio cue will indicate
“Low Battery”
Low priority
technical alarm
condition
Fall Monitor has low battery.
All high priority alarm conditions are triggered by a situation where the patient may have performed
an unassisted chair, bed or toilet exit or is no longer being monitored.
If the fall monitor is in any alarm condition and then an event occurs to trigger a failsafe alarm, the
fall monitor will transition to the failsafe alarm state. The user must first resolve the failsafe alarm.
The Status LED will flash different colors providing a visual indication of the current state of the fall monitor.

Sitter On Cue PRO 9
SETTING MODE
Setting Alarm Mode
The Sitter On Cue PRO has four (4) alarm modes. These allow you to select an alarm notification
best suited to patient and facility needs.
Mode Features
VOICE &
TONE
Depending on whether a custom voice recording is made, either the factory default
voice or a custom voice recorded message plays once, followed by the selected
alarm tone. The tone continues to play until alarm is resolved.
TONE This is the factory default mode. Selected alarm tone plays until alarm is placed on
hold, pressure is applied to the sensor pad, or the sensor belt is fastened.
VOICE
ONLY
This mode requires the nurse call cable to be plugged into your alarm and the
appropriate wall port from your nurse call system. Custom voice or factory default
voice message plays repeatedly until alarm resolved. This mode also activates the
facility’s nurse call system. Automatically switches to VOICE & TONE if a nurse call
cable is removed from the alarm.
MUTE This mode requires the nurse call cable or wireless nurse call adapter to be
connected/paired to your fall monitor and the appropriate wall port from your nurse
call system. This mode activates the facility’s nurse call system. No sound is played
in the patient’s room. Automatically switches to VOICE & TONE if a nurse call cable
is disconnected or a wireless nurse call adapter loses signal with the fall monitor.
Fig. 4 Fig. 5
Ensure the nurse call cable is plugged into both the fall monitor and the wall
port of the nurse call system or that the wireless adapter is paired properly
before leaving the patient unattended. Verify that an alert is received at the
nursing station.
NOTE: There will be no alert at the nursing station or at the bedside if the nurse call cable
is unplugged from the fall monitor or the wireless adapter is unpaired from the fall monitor.
To Change/Select Mode
Follow these steps to change or select alarm mode:
1. Lift the programming control protective cover (Fig. 4).
2. Ensure fall monitor is on.
3. Press MODE button on left side of fall monitor to
scroll through the mode selections (Fig. 5). The last
mode heard is the mode utilized when the alarm is
activated.
4. Replace the programming control protective cover,
securing it into place.

Sitter On Cue PRO
10
SETTING TONE
Setting Alarm Tone
The Sitter On Cue PRO has eight (8) available tones. This allows you to differentiate between
patients and other equipment alarms.
To Select Tone:
1. Lift the programming control protective
cover (Fig. 4).
2. Ensure fall monitor is on.
3. Press TONE button on left side of fall
monitor to scroll through the tone
selections (Fig. 6).
4. Each time you press the button, tone
will change and a sample plays. The
last sample heard is the tone utilized
when the alarm is activated.
5. Replace the programming control
protective cover, securing it into place.
Fig. 6

Sitter On Cue PRO 11
ADJUSTING VOLUME
Adjusting Alarm Volume
There are three (3) alarm volume settings: low, medium and high (default setting). These allow you
to select the right volume for facility and/or patient needs.
All volume settings are within OSHA standards. For maximum staff alert in noisy areas, use HIGH
(loudest) volume setting.
Fig. 7
NOTE: ALWAYS check to ensure staff can hear alarm at the farthest possible
distance before leaving patient unattended.
To Change Volume:
1. Lift the programming control protective cover (Fig. 4).
2. Ensure fall monitor is on.
3. Press VOLUME button on left side of fall monitor to scroll through the volume selections (Fig. 7).
4. Each time you press the button, the volume changes and a sample plays.
5. Continue to press the VOLUME button until you hear the desired volume. The last sample heard
is the volume in use.
6. Replace the programming control protective cover, securing it into place.

Sitter On Cue PRO
12
To Record a Message
The Posey Sitter On Cue PRO has a feature that allows a caregiver or family member to
communicate a verbal “warning” message about unassisted sensor pad exits or unfastening of the
sensor belt without having to be physically in the room with the patient.
1. Lift the programming control protective cover (Fig. 4).
2. Ensure fall monitor is on.
3. Press and hold the RECORD button on left side of fall monitor
(Fig. 8).
4. Wait for the “begin record” audible cue before speaking. Continue
to hold RECORD button down until you are done speaking.
5. In a normal voice, speak into the microphone aperture labeled
MIC on front, top left corner of fall monitor (Fig. 9).
6. Recording will stop when you release the RECORD button or time
(15 seconds) expires. If you exceed the time allowed, recording
will stop and the fall monitor will give an audible cue “end
record”.
7. Replace the programming control protective cover, securing it
into place.
8. After recording message, remove weight from sensor, or unfasten
sensor belt to play message back. Ensure alarm mode is set
to “Voice and Tone” or “Voice” (nurse call option only) to hear
recording.
9. Check that the message is clear and volume is right for your
patient. Re-record if necessary.
10. If the RECORD button is pushed twice rapidly a 3 second
count down will begin to reset to the factory default
message. If you do not wish to reset, press RECORD again
during the countdown.
Fig. 8
Fig. 9
Microphone MIC
RECORDING A MESSAGE

Sitter On Cue PRO 13
The HOLD Button
Fig. 10
THE HOLD BUTTON
NOTE: HOLD feature will work only when the fall
monitor is actively monitoring or alarming.
To Place the Fall Monitor on HOLD:
1. Press HOLD button on the top of fall monitor once to
initiate a 30 second hold or continuously press the HOLD
button for 3 seconds to initiate an extended hold of 5
minutes. (Fig. 10) The STATUS LED will begin flashing
RED indicating the fall monitor is in HOLD mode an audio
cue will indicate that either a 30 second or 5 minute hold
has been activated.
2. While the fall monitor is in a hold state and the STATUS
LED is flashing red, the alarm will not activate if pressure
is removed from the sensor pad or the sensor belt is
unfastened.
3. If during the time when the fall monitor is on hold, you wish to resume active monitoring, press
the hold button again to cancel the hold.
4. After 30 seconds or 5 minutes:
• If weight is present on the sensor or sensor belt is fastened you will hear a single “beep” and
monitoring will begin.
• If there is no weight on sensor, or sensor belt is not fastened, alarm will be in Ready state and
status LED will flash yellow.
• The Ready state allows patient to be away from bed or chair for extended periods without
alarm activating (e.g., for meals, therapy, toileting etc.). When patient returns and weight is
applied to sensor or sensor belt is fastened, the fall monitor STATUS LED will rapidly flash
yellow for 3 seconds and then “beep” once to indicate monitoring has resumed. The STATUS
LED will flash green. If pressure is removed or the belt is unfastened while the STATUS LED is
rapidly flashing yellow, the fall monitor will return to the Ready state without alarming.
Test the fall monitor and sensor for proper operation prior to putting in service
with a patient, and each time before leaving the patient unattended. If the fall
monitor and/or sensor do not function properly, remove the fall monitor and
sensor from service and replace them with a properly functioning fall monitor
and/or sensor. Ensure the STATUS LED is flashing green, indicating the fall
monitor is monitoring.

Sitter On Cue PRO
14
CONNECTING TO AC POWER
Connecting to AC Power (Optional)
The Posey Sitter On Cue PRO is equipped with an AC power adapter input to allow you to use AC
power to operate the fall monitor. To ensure proper fall monitor function and to prevent damage, use
only an AC power adapter with the following specifications:
• Voltage: 9VDC
• Current: 500 mA min
• Connector: 5.5 mm OD x 2.5 mm ID x 10-12 mm L, center positive
• UL Listed
To Connect to AC Power:
1. Connect the AC power adapter to the Sitter On Cue PRO (Fig. 11).
2. Plug the other end into the wall.
3. Connect a sensor to the fall monitor.
If power is interrupted and there are no batteries installed, the fall monitor will not
function. There is no notification at bedside or nurse call station.
AC power
adapter
input
Fig. 11

Sitter On Cue PRO 15
NURSE CALL INTERFACE
Nurse Call Interface
You can connect the Sitter On Cue PRO to your facility’s nurse call system when you connect
the optional Nurse Call Cable or wireless Nurse Call Adapter. This allows you to add the options
associated with your specific nurse call system such as nursing station notification and patient
room lights & sounds. With this feature, the fall monitor can be:
• Silenced in patient’s room to reduce disturbance to patients
(“Mute”)
• Set for “Voice Only”
Fig. 12
NOTE: Alarm mode automatically switches to “Voice and
Tone” if nurse call cable is removed from the fall monitor
or nurse call adapter is unpaired. This ensures in-room
voice and tone notice to staff if patient attempts to rise.
NOTE: The fall monitor supports both normally open and
normally closed nurse call systems. The manufacturing
default is normally open. If you would like to change to
normally closed, use a small pointed object, for example
a pen, to slide the switch down to the closed position.
(Fig. 12)
To Connect the Nurse Call Interface:
• For Wireless Nurse Call Adapter: See IFU provided with the
Nurse Call Adapter for instructions on pairing the adapter to the
fall monitor and connecting to the nurse call system. (Fig. 13)
• For nurse call cable: Insert one end of cable into nurse call
outlet on right side of alarm. Use care not to plug into sensor
outlet as damage to sensor outlet could occur. Insert the other
end of cable into wall jack of nurse call panel. See IFU provided
with the nurse call cable for additional instructions.
Fig. 13
Ensure the nurse call cable is plugged into both the fall monitor and the wall
port of the nurse call system or that the wireless adapter is paired properly
before leaving the patient unattended. The fall monitor will not notify the user
if the nurse call adapter is disconnected the the wall port.

Sitter On Cue PRO
16
Latching Mode
In non-latching mode (factory default), when weight is re-applied to a sensor or the sensor belt is
reattached the Sitter On Cue PRO will stop signaling the nurse call system.
When Latching mode is selected and an alarm signal is initiated, the nurse call signal will cease
only when the caregiver interacts with the alarm. Even after the patient returns to the sensor pad,
the caregiver must press the HOLD button to stop the alarm from signaling the nurse call system.
Configuring Latching Mode:
1. Access Advanced Setup Mode by pressing and holding the HOLD button while moving the power
switch from the OFF to the ON position.
2. Rapidly press the hold button three times to toggle between Latching and Non-Latching mode.
3. With Latching Mode selected, press the tone button to switch between the following two options:
• “Alarm ceases when patient returns.” – In this mode, if the patient applies pressure to the
sensor or reattaches the sensor belt, the alarm tone will stop. The audio cue “Press hold to
reset alarm” will repeat every 15 seconds until the HOLD button is pressed. This is the factory
default setting.
• “Alarm continues when patient returns.” – In this mode, the alarm tone will continue until the
HOLD button is pressed.
LATCHING MODE

Sitter On Cue PRO 17
Monitoring with a Sensor
All Posey wired and wireless sensors are compatible with the Sitter On Cue PRO. Consult the IFU
included with the sensor for complete setup instructions.
NOTE: Wireless sensors will also be unpaired from the fall monitor when it is
powered off or if the sensors lose signal, such as being moved too far from the
fall monitor.
Test fall monitor functionality every time before each use and when leaving the
patient unattended.
Connecting another manufacturers’ sensors to the Posey fall monitor may damage the
unit and will void the warranty.
FAILSAFE FEATURE
The Posey Sitter on Cue PRO contains “failsafe” features that activate the alarm if an actively
monitored sensor is disconnected from the fall monitor. To silence the alarm, reconnect the sensor
to the same port from which it was removed.
For a wireless sensor, if the communication between the sensor and the fall monitor is lost, the
alarm will sound. This may occur because the sensor was moved too far from the fall monitor, the
sensor battery died, or there was interference with the wireless connection. Press the HOLD button
on the fall monitor to silence the alarm, pair a sensor, and confirm proper operation.
WIRELESS SENSOR INDICATOR LIGHTS
The front of the fall monitor has wireless sensor indicator lights which will turn blue when a sensor
of that type is paired with the fall monitor.
UNPAIRING WIRELESS SENSORS
While not actively monitoring, press and hold the MODE button for three seconds to unpair
all wireless sensors from the fall monitor. If the fall monitor is actively monitoring or alarming,
the actively monitored sensor will not unpair.
MONITORING

Sitter On Cue PRO
18
Monitoring with Multiple Sensors
Up to five sensors (2 wired and 3 wireless) can be connected to the fall monitor allowing
the patient to be transferred from one location to another without moving sensors or
switching out cords.
NOTE: Only one wireless sensor of each type can be paired at a given time (chair, bed
or toilet). While the fall monitor is NOT actively monitoring, if a second wireless sensor of
the same type is paired, it will replace the existing sensor. When the fall monitor is actively
monitoring, an audio cue will indicate that the new sensor could not be paired. Press
HOLD to pause monitoring before connecting a new wireless sensor of the same type.
Transferring a patient between sensors
1. Connect the second sensor to the fall monitor (First sensor may be plugged in or paired, if
wireless).
2. Ensure fall monitor is on.
3. Press HOLD button to pause monitoring for 30 seconds. You have 30 seconds to remove the
patient from the current sensor pad or unfasten the sensor belt. During this time the STATUS LED
will flash red.
4. After 30 seconds, and the patient is off the sensor pad, the alarm will remain in the Ready state.
5. Place the patient on the second sensor or fasten the sensor belt. If the patient is placed on
the sensor pad before the hold expires, the HOLD button can be pressed again to resume
monitoring.
NOTE: While multiple sensors can be connected to the fall monitor, only one can be used
for monitoring at a time. If a first sensor is actively monitoring and pressure is applied to a
second sensor or the sensor belt is fastened, an audible cue will indicate a second sensor
is about to be activated and gives 10 seconds for the person to remove pressure from or
unfasten the sensor. If pressure is not removed or the sensor belt is not unfastened, the
alarm will sound. Press the HOLD button. You have 30 seconds to remove pressure from
at least one of the sensor pads or unfasten the sensor belt.
MONITORING

Sitter On Cue PRO 19
USE OF PHYSICAL RESTRAINTS
The Sitter On Cue PRO and Use of Physical Restraints
If the patient’s care plan calls for the use of a restraint, staff should read and follow all instructions
and warnings for the restraint.
The position of the sensor pad is vital when using a restraint. Make sure the restraint is applied
correctly per instructions for that device. Straps must NOT cross over sensor pad.
For bed use, sensor pad should be placed at shoulder blade level so alarm will activate if patient
sits up, tries to climb over side rails, or scoots to bottom of bed.
*http://www.fda.gov search keyword “HBSW”
If straps cross over sensor pad and patient moves, pressure from straps may
prevent alarm from activating. If patient falls out of bed or chair and is suspended
in the restraint, serious injury or death may occur from chest compression or
suffocation.
• Bed safety: Refer to the Food and Drug Administration (FDA) for the most
recent Hospital Bed Safety Guidelines as well as the Bed Manufacturer for their
Instructions for Use.*
• Fully compliant bed side rails must be UP when restraints are used on a
patient.
To reduce the risk of entrapment, use side rail covers, especially with split side
rails. A failure to do so may result in serious injury or death if patient’s body
goes under, around, through or between the bed side rails.
Use extreme caution with chair cushions. If a cushion dislodges, straps may
loosen and allow patient to slide off seat and become suspended.

Sitter On Cue PRO
20
Mounting the Sitter On Cue PRO
There are multiple mounting options to choose from for the Sitter On Cue PRO:
To purchase brackets contact your Posey sales representative, or call Posey Customer Service at
1.800.447.6739.
MOUNTING
PRIOR TO USING ANY BRACKET, YOU SHOULD CHECK THAT:
• Fall monitor is securely mounted out of the patient’s reach and functions properly by
activating alarm.
• Fall monitor indicator lights are in clear view of staff.
This manual suits for next models
1
Table of contents
Other Posey Medical Equipment manuals

Posey
Posey Twice-As-Tough 2792 User guide

Posey
Posey 8197S User manual

Posey
Posey 25251 User manual

Posey
Posey Twice-As-Tough 2790Q User guide

Posey
Posey 2532A User guide

Posey
Posey Twice-As-Tough 2795 User guide

Posey
Posey Bed 8060 User manual

Posey
Posey Bed 8060 User manual

Posey
Posey 2791Q User guide

Posey
Posey Twice-As-Tough 2792Q User guide
Popular Medical Equipment manuals by other brands

Invacare
Invacare H430A/2 user manual

Armstrong Medical
Armstrong Medical AquaVENT FD140i user manual

Boston Scientific
Boston Scientific RELIANCE 4-FRONT DF4-LLHH PHISICIAN'S LED MANUAL

GE
GE TuffSat User's guide and service manual

Tomey
Tomey OA-2000 instruction manual

Physiomed
Physiomed PHYSIOMED-Expert 2 Service manual