Power Fist 8549768 User manual

V4.1 8549768
Please read and understand all instructions before use. Retain this manual for
future reference.
User Manual
3/16in.
AirHydraulicRiveter

8549768 3/16 in. Air Hydraulic Riveter V4.1
2 For technical questions call 1-800-665-8685
SPECIFICATIONS
Air Consumption @ 90 PSI 4 CFM
Max. Pressure 90 PSI
Nose Pieces 3/16, 5/32, 1/8, 3/32 in.
Air Inlet 1/4 in. NPTF
Recommended Air Hose Size 3/8 in
Application(s) Ideal for auto body work and metal fabrication.
Feature(s) Air power takes away the strain of using a manual
riveter.
Powerful, durable streamlined tool suitable for
setting rivets up to 3/16 in.
Unique quick air relief valve returns cylinder
quickly for high speed assembly operations,
preventing overloading and increasing tool life.
Safety cap collects spent rivets.
A noise-reducing muffler provides a quieter work
environment.
SAFETY
WARNING! Read and understand all instructions before using this tool. The
operator must follow basic precautions to reduce the risk of personal injury
and/or damage to the equipment.
Keep this manual for safety warnings, precautions, operating or inspection and
maintenance instructions.
3/16in.
AirHydraulicRiveter

V4.1 3/16 in. Air Hydraulic Riveter 8549768
Visit www.princessauto.com for more information 3
HAZARD DEFINITIONS
Please familiarize yourself with the hazard notices found in this manual. A notice
is an alert that there is a possibility of property damage, injury or death if certain
instructions are not followed.
DANGER! This notice indicates an immediate and specific hazard that will
result in severe personal injury or death if the proper precautions
are not taken.
WARNING! This notice indicates a specific hazard or unsafe practice that
could result in severe personal injury or death if the proper
precautions are not taken.
CAUTION! This notice indicates a potentially hazardous situation that may result
in minor or moderate injury if proper practices are not taken.
NOTICE! This notice indicates that a specific hazard or unsafe practice will
result in equipment or property damage, but not personal injury.
WORK AREA
1. Operate in a safe work environment. Keep your work area clean, well lit and
free of distractions.
2. Keep anyone not wearing the appropriate safety equipment away from the
work area.
3. Store unused tools properly in a safe and dry location to prevent rust or
damage. Lock tools away and keep out of the reach of children.
4. Do not install or use in the presence of flammable gases, dust or liquids.
PERSONAL SAFETY
WARNING! Wear personal protective equipment approved by the Canadian
Standards Association (CSA) or American National Standards Institute (ANSI).
PERSONAL PROTECTIVE EQUIPMENT
1. Always wear impact safety goggles that provide front and side protection
for the eyes. Eye protection equipment should comply with CSA Z94.6-07
or ANSI Z87.1 standards based on the type of work performed.

8549768 3/16 in. Air Hydraulic Riveter V4.1
4 For technical questions call 1-800-665-8685
2. Wear gloves that provide protection based on the work materials or to
reduce the effects of tool vibration.
3. Wear protective clothing designed for the work environment and tool.
4. Non-skid footwear is recommended to maintain footing and balance in the
work environment.
5. Wear steel toe footwear or steel toe caps to prevent a foot injury from
falling objects.
6. This tool can cause hearing damage. Wear hearing protection gear with an
appropriate Noise Reduction Rating to withstand the decibel levels.
PERSONAL PRECAUTIONS
Control the tool, personal movement and the work environment to avoid
personal injury or damage to tool.
1. Do not operate any tool when tired or under the influence of drugs, alcohol
or medications.
2. Avoid wearing clothes or jewelry that can become entangled with the
moving parts of a tool. Keep long hair covered or bound.
3. Do not overreach when operating a tool. Proper footing and balance
enables better control in unexpected situations.
4. Support the workpiece or clamp it to a stable platform. Holding the
workpiece by hand or against your body may lead to personal injury.
5. Securely hold this tool using both hands. Using a tool with only one hand
can result in loss of control.
SPECIFIC SAFETY PRECAUTIONS
WARNING! DO NOT let comfort or familiarity with product (gained from
repeated use) replace strict adherence to the tool safety rules. If you use
this tool unsafely or incorrectly, you can suffer serious personal injury.
1. Use the correct tool for the job. This tool was designed for a specific function.
Do not modify or alter this tool or use it for an unintended purpose.

V4.1 3/16 in. Air Hydraulic Riveter 8549768
Visit www.princessauto.com for more information 5
2. When operating the tool, use proper eye and hearing protection as well as
protective heavy work gloves and a dust mask if your work creates dust.
3. Never point the tool towards yourself.
4. Never force the tool. Excessive pressure could bend or break the tool,
resulting in damage to your work piece or serious personal injury.
5. Contact with a ‘live’ wire will make exposed metal parts of the tool ‘live’
and shock the operator.
6. After making adjustments, make sure that any adjustment devices are
securely tightened.
7. Remove adjusting keys and wrenches before turning the tool on. A wrench
or a key that is left attached to the tool increases the risk of personal injury.
8. Always keep the air hose away from moving parts on the tool.
9. Wear proper hand and eye protection when searching for a high-pressure
leak. Use wood or cardboard as a backstop instead of hands.
10. Do not fire the rivets into soft surfaces. The riveter was designed to be
used on solid metal surfaces only.
11. Rivets fired too close to the edge workpiece pose the risk of damaging the
workpiece, possibly breaking the workpiece and forcefully launch pieces
causing personal injury.
AIR TOOL PRECAUTIONS
1. Inspect the tool's air hose for cracks, fraying or other faults before each
use. Discontinue use if the air hose is damaged or hissing is heard from
the air hose or connectors, while operating the tool. Replace the defective
component/air hose.
2. Do not allow people, mobile equipment or vehicles to pass over the
unprotected air hose. Position the air hose away from high traffic areas, in
a reinforced conduit or place planks on both sides of the air hose to create
a protective trench.

8549768 3/16 in. Air Hydraulic Riveter V4.1
6 For technical questions call 1-800-665-8685
3. Prevent damage to the air hose by observing the following:
a. Never carry the tool by the air hose.
b. Keep the air hose behind the tool and out of the tool's work path.
c. Keep the air hose away from heat, oil, sharp edges or moving parts.
d. Do not wrap the air hose around the tool as sharp edges may pierce
or crack the air hose. Coil the air hose when storing.
4. A damaged or disconnected air hose under pressure may whip around and
inflict personal injury or damage the work area. Secure the compressor's
air hose to a fixed or permanent structure with clamps or cable ties.
5. Install an in-line shutoff valve or regulator to allow immediate control over
the air supply in an emergency, even if a hose is ruptured.
6. Check the manufacturer’s maximum pressure rating for air tools and
accessories. Compressor outlet pressure must be regulated so as to never
exceed the maximum pressure rating of the tool.
UNPACKING
WARNING! Do not operate the tool if any part is missing. Replace the
missing part before operating. Failure to do so could result in a malfunction
and personal injury.
Remove the parts and accessories from the packaging and inspect for damage.
Make sure that all items in the parts list are included.
ASSEMBLY & INSTALLATION
When this manual refers to a part number, it refers to the included Parts List.
INSTALLING AIR QUICK COUPLER
Prepare a standard 1/4 in. NPT male air quick coupler for use with your tool.
1. Wrap the external threads of the male quick coupler with sealant tape.
a. Wrap the tape in a clockwise direction so it will not unravel.
b. Do not tape all the threads. Leave several leading threads unwrapped
for easier alignment.

V4.1 3/16 in. Air Hydraulic Riveter 8549768
Visit www.princessauto.com for more information 7
2. Screw the quick coupler into the tool's air inlet and tighten with a wrench
until snug.
3. Run compressor at a low volume and check the connection for air leaks.
Do not use the tool until all air leaks are repaired or the faulty component
is replaced.
NOSE PIECES
1. Select the appropriate sized nose piece for your task.
IMPORTANT! There are four different sizes of nosepieces that come with the
air hydraulic riveter.
2. Remove the nosepiece (#1A) by using the wrench (#36) to remove the
frame head (#11).
3. Insert the selected nosepiece into the frame head (#11) and reattach the frame
head (#11) to the frame (#15), securing tightly with the wrench (#36).
4. The hanging ring and pin cap are optional. The riveter can be used without
them. Place the housing cap o-ring (#10A) and hanging clip (#20) outside of
housing cap (#21) then turn and lock pin cap nut (#22) with pin cap (#23) put
inside on housing cap (#21). Hanging ring position can be adjusted before pin
cap nut is locked.
OPERATION
1. Tighten the frame cap nut (#22) to secure the safety cap (#23).
IMPORTANT! Position the slot of the safety cap (#22) to face upward to
avoid spilling the used rivet pins.
2. Select the appropriate size nosepiece to match the rivet’s pin used and
install following the instructions in the Nosepiece section.
IMPORTANT! When drilling holes in the work piece for the rivets, it is
important to use the same diameter of drill bit as the outer diameter of the
rivet you will be using.
3. Connect the air hose from the air compressor to the quick connector of the
air hydraulic riveter.

8549768 3/16 in. Air Hydraulic Riveter V4.1
8 For technical questions call 1-800-665-8685
4. Turn on the air compressor. The regulator should be set to 90 PSI.
WARNING! Do not exceed 90 PSI.
5. Insert the small end of the selected rivet fully through the nosepiece.
WARNING! Keep fingers and objects away from the trigger (#40) when
inserting rivets.
6. Insert the rivet into the predrilled hole in the workpiece.
7. With both hands, firmly grasp the riveter and squeeze the trigger (#40) to activate
the tool. If necessary, repeat the procedure of squeezing the trigger (#40).
8. Once the rivet has been fastened, release the trigger (#40).
9. Once you have finished using the air hydraulic riveter, turn off the air
compressor. Squeeze the trigger to relieve any pressure that may be caused by
compressed air still in the riveter. Disconnect the air hose from the riveter and
store the riveter in a cool, dry place, out of the reach of children.
CARE & MAINTENANCE
1. Make sure the trigger switch is in the OFF position and the air source is
removed from the tool before performing any inspection, maintenance
or cleaning.
2. Maintain the tool with care. A tool in good condition is efficient, easier to
control and will have fewer problems.
3. Inspect the tool components periodically. Repair or replace damaged or
worn components. Only use identical replacement parts when servicing.
4. Daily maintenance: Use a soft, dry cloth to remove all dirt, grease and
debris from the exterior of the tool. Do not use solvents to clean the tool.
IMPORTANT! Do not immerse the tool in liquids.
5. Follow instructions for lubricating and changing accessories.
6. Only use accessories intended for use with this tool.
7. Keep the tool handles clean, dry and free from oil/grease at all times.
8. Maintain the tool’s labels and name plates. These carry important information.
If unreadable or missing, contact Princess Auto Ltd. for replacements.

V4.1 3/16 in. Air Hydraulic Riveter 8549768
Visit www.princessauto.com for more information 9
WARNING! Only qualified service personnel should repair the tool. An
improperly repaired tool may present a hazard to the user and/or others.
ADDING HYDRAULIC OIL
1. Remove the cylinder cap (#33) from the
bottom of the air cylinder (#29) by
using the wrench (#36) to unscrew
cylinder cap (#33). See Figure 1.
2. Remove the piston assembly (#30 to
33) from the air cylinder (#29) by using
pliers (sold separately) to pull out the
piston by grasping the air piston lock
nut and pulling the assembly out.
3. Hold the air cylinder (#29) upside-down
and pour hydraulic oil (sold separately)
into the reservoir and fill to just below
the bottom of the frame lock nut (#27).
See Figure 2.
IMPORTANT! Do not overfill.
4. Return the piston assembly (#30 to 33)
back onto the air cylinder (#29) and use the wrench (#36) to tightly secure the
cylinder cap (#33) onto the air cylinder (#29) sealing in the hydraulic fluid.
CLEANING AND CHANGING THE JAWS
1. Use the wrench (#36) to unscrew and remove the frame head (#11) from
the frame (#15).
2. Unscrew and remove the jaw cases (#6-1 & 6-2) using the wrench (#36).
IMPORTANT! Be careful when removing the jaw cases (#6-1 & 6-2) as there
is a spring (#10) located behind the jaw case (#6-2) that could fly out.
3. Remove the jaws (#7) and jaw pusher (#8) from between the jaw cases
(#6-1 & 6-2).
4. Cleaning and changing the jaws:
Fig. 1
Fig. 2
8549768 3/16 in. Air Hydraulic Riveter V4.1
10 For technical questions call 1-800-665-8685
a. Cleaning the jaws: Clean the jaws using a steel brush and mild
solvent. Before returning the jaw to the tool, apply a light coat of
machine oil to the jaws.
b. Replacing the jaws: If you are replacing the jaws (#7), the entire
assembly (#6-1, 6-2, 7, 8, 9, & 10) must be replaced at the same
time. This is a precaution in the event that other parts had become
damaged when the jaws were damaged.
5. Reinsert the jaws (#7) and jaw pusher (#8) into the jaw cases (#6-1 & 6-2).
IMPORTANT! The wedge on the jaw pusher’s (#8) head must line up between
the jaws (#7), pushing them slightly apart, when reassembling the jaw cases
(#6-1 & 6-2).
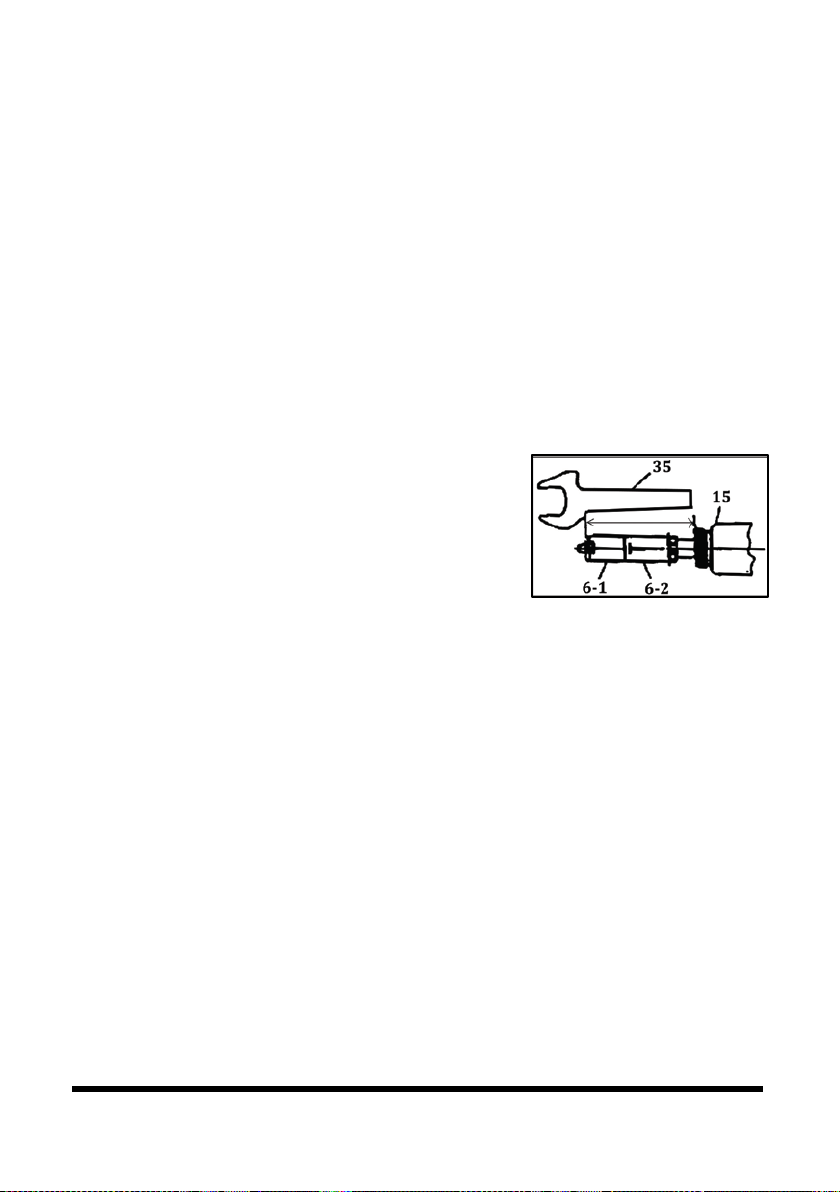
6. Using the wrench gauge (#35), check the
distance from the head of the jaw cases (#6-1
& 6-2) to the mounting threads of the frame
head (#11). With the gauge held at a small
slant, the back of the wrench gauge (#35)
should rest on the beginning of the frame
head (#11) threads, while the front of the
wrench gauge (#35) should rest on the front edge of the jaw case (#6-1). If
the distance from the head of the jaw cases (#6-1 & 6-2) to the mounting
threads do not line up, tighten or loosen the jaw cases (#6-1 & 6-2) until
the distance has been adjusted.
7. Before reassembling, use the wrench gauge (#35) to secure the case lock
nut (#12) against the jaw case assembly.
STROKE-FINE TUNING
When using less than 3/16 in. rivets, adjust the long stroke by 1~2 mm to
improve performance.
1. Use the wrench (#36) to dismantle the frame head (#11), then use the
wrench gauge (#35) and wrench (#36) to loosen the front jaw case (#6-1)
and the end jaw case (#6-2).
Fig. 3

V4.1 3/16 in. Air Hydraulic Riveter 8549768
Visit www.princessauto.com for more information 11
2. Adjust the case lock nut (#12) to move it forward and lengthen the stroke.
Use both wrenches to tighten the case lock nut (#12) and secure the front
jaw case (#6-1) and end jaw case (#6-2).
3. Reinsert the frame head (#11) and secure with the wrench (#36).
STORAGE
Keep the tool and its accessories in a clean, dry location and out of the reach
of children.
DISPOSAL
Recycle a tool damaged beyond repair at the appropriate facility.
Contact your local municipality for a list of disposal facilities or by-laws for
electronic devices, batteries, oil or other toxic liquids.
IMPORTANT! DO NOT pollute the environment by allowing uncontrolled
discharge of waste oil.
DISPOSAL OF HYDRAULIC FLUID
Do not drain hydraulic oil into the sewer system or dispose in an uncontrolled
location. Hydraulic fluid may take up to a year to breakdown in the environment
and the ingredients may still be toxic. Contact your local municipality for proper
disposal instructions or locations.

8549768 3/16 in. Air Hydraulic Riveter V4.1
12 For technical questions call 1-800-665-8685
TROUBLESHOOTING
Visit a Princess Auto Ltd. location for a solution if the tool does not function
properly or parts are missing. If unable to do so, have a qualified technician
service the tool.
Problem(s) Possible Cause(s) Suggested Solution(s)
The jaws will not
open.
The nosepiece is loose. Tighten the nosepiece.
The jaws are dirty. Remove and clean the jaws.
The stroke is too
short.
The rivet pin is not properly
inserted into the riveter.
Fully insert the rivet pin.
The riveter is low on
hydraulic oil.
Top up the hydraulic oil reservoir
and prime the riveter.
The rivet is the wrong size
Use the proper rivet length.
The riveter has
weak pulling
action.
Low air pressure. Check the regulator to verify that
it is set to 90 PSI.
Inadequately sized
compressor.
Upgrade to a suitable compressor
of adequate capability.
Damaged air compressor. Have the compressor serviced by
a qualified service centre.
The riveter is low on
hydraulic oil.
Top up the hydraulic oil reservoir
and prime the riveter.
Leaking air. There are poor hose
connections in the system.
Reconnect the air system using
thread sealant tape on the fittings.
Damaged O-ring. Replace the O-ring.
Dirty air valve or air inlet. Clean and lubricate with
pneumatic tool oil.

V4.1 3/16 in. Air Hydraulic Riveter 8549768
Visit www.princessauto.com for more information 13
PARTS BREAKDOWN

8549768 3/16 in. Air Hydraulic Riveter V4.1
14 For technical questions call 1-800-665-8685
PARTS LIST
# DESCRIPTION
1A Nosepiece 3/16 in.
1B Nosepiece 5/32 in.
1C Nosepiece 1/8 in.
1D Nosepiece 3/32 in.
6-1 Jaw Case Front
(3/32 in., 1/8 in., 5/32 in.)
6-2 Jaw Case End
7 Jaw
8 Jaw Pusher
9 Case Washer Ring
10 Jaw Pusher Spring
10A Frame Cap O-ring 27x2
11 Frame Head
12 Case Lock Nut
13 Back Up Ring
14 Back Up O-ring 12
15 Frame
16
Oil Piston
17 Oil Piston O-ring 22A
18 Back Up Ring
19 Return Spring
20 Hanging Clip
21 Frame Cap
22 Frame Cap Nut
23 Safety Cap
24 Setting Screw Pin
25
Back Up O-ring 12
26 Back Up Ring
27 Frame Lock Nut
# DESCRIPTION
28 Rubber Cushion
29 Air Cylinder
30-1 Air Piston Stem
30-2 Air Piston Insert
30-3 Air Piston Lock Nut
30-4 Large Iron Plate
30-5 Small Iron Plate
31A Air Piston Ring
32 Cylinder O-ring 67.94x2.62
33 Cylinder Cap
35 Wrench Gauge
36 Wrench
37
Trigger Pin
38 Connector
39 Trigger Rod
40 Trigger
41 Connector
42 Trigger Lever
43 Lever Pin
44 Valve Pusher
44A Valve Spring
45
Valve
45A Valve Collar
45B Collar O-ring 5
46 Valve Spring
51 Valve Cap O-ring 11
52 Valve Cap
53 Muffler

V4.1 3/16 in. Air Hydraulic Riveter 8549768
Visit www.princessauto.com for more information 15

8549768 3/16 in. Air Hydraulic Riveter V4.1
16 For technical questions call 1-800-665-8685

V4,1 8549768
Vous devez lire et comprendre toutes les instructions avant d'utiliser l'appareil.
Conservez ce manuel afin de pouvoir le consulter plus tard.
Manuel d'utilisateur
Riveteusehydraulique
de3/16po

8549768 Riveteuse hydraulique de 3/16 po V4,1
2 En cas de questions techniques, appelez le 1-800-665-8685
SPÉCIFICATIONS
Consommation d'air à
90 lb/po carré
4 pi cubes/min
Pression max. 90 lb/po carré
Embouts 3/16, 5/32, 1/8, 3/32 po
Entrée d'air 1/4 po NPTF
Taille de tuyau à air
recommandée
3/8 po
Application(s) Idéale pour les travaux de carrosserie et les fabrications en
métal
Caractéristique(s) La puissance pneumatique élimine les tensions que présente
l'utilisation d'une riveteuse manuelle.
Outil profilé, puissant et durable pour installer des rivets d'un
diamètre maximum de 3/16 po
La soupape de décharge d'air rapide unique ramène le
cylindre rapidement pour exécuter des travaux de montage à
grande vitesse, ce qui empêche les surcharges et augmente
la durée de vie de l'outil.
Le capuchon de sécurité recueille les rivets usagés.
Un silencieux de réduction de bruit fournit un environnement
de travail plus calme.
SÉCURITÉ
AVERTISSEMENT ! Veuillez lire et comprendre toutes les instructions avant
d'utiliser cet outil. L'utilisateur doit respecter les précautions de base
lorsqu'il utilise cet outil afin de réduire le risque de blessure ou de
dommage à l'équipement.
Riveteusehydraulique
de3/16po

V4,1 Riveteuse hydraulique de 3/16 po 8549768
Visitez www.princessauto.com pour plus d'informations 3
Conservez ce manuel qui contient les avertissements de sécurité, les
précautions, les instructions de fonctionnement ou d'inspection et d'entretien.
DÉFINITIONS DE DANGER
Veuillez-vous familiariser avec les avis de danger qui sont présentés dans ce
manuel. Un avis est une alerte indiquant qu'il existe un risque de dommage à la
propriété, de blessure ou de décès si on ne respecte pas certaines instructions.
DANGER ! Cet avis indique un risque immédiat et particulier qui
entraînera des blessures corporelles graves ou même la
mort si on omet de prendre les précautions nécessaires.
AVERTISSEMENT ! Cet avis indique un risque particulier ou une pratique non
sécuritaire qui pourrait entraîner des blessures
corporelles graves ou même la mort si on omet de
prendre les précautions nécessaires.
ATTENTION ! Cet avis indique une situation possiblement dangereuse qui
peut entraîner des blessures mineures ou modérées si on
ne procède pas de la façon recommandée.
AVIS ! Cet avis indique un risque particulier ou une pratique
non sécuritaire qui entraînera des dommages au niveau
de l'équipement ou des biens, mais non des
blessures corporelles.
AIRE DE TRAVAIL
1. Travaillez dans un environnement de travail sécuritaire. Gardez votre aire
de travail propre, bien éclairée et exempte de toute distraction.
2. Assurez-vous que les personnes qui ne portent pas l'équipement de
sécurité approprié ne se trouvent pas à proximité de l'aire de travail.
3. Rangez les outils correctement dans un lieu sécurisé et sec. Gardez les
outils hors de la portée des enfants.
4. N'installez pas et n'utilisez pas d'outils électriques en présence de gaz, de
poussière ou de liquides inflammables.

8549768 Riveteuse hydraulique de 3/16 po V4,1
4 En cas de questions techniques, appelez le 1-800-665-8685
SÉCURITÉ PERSONNELLE
AVERTISSEMENT ! Portez de l'équipement de protection personnelle
homologué par l'Association canadienne de normalisation (CSA) ou
l'American National Standards Institute (ANSI).
ÉQUIPEMENT DE PROTECTION PERSONNELLE
1. Portez toujours des lunettes antiprojections qui offrent une protection
frontale et latérale pour les yeux. L'équipement de protection des yeux
devrait être conforme à la norme CSA Z94.6-07 ou ANSI Z87.1 fonction du
type de travail effectué.
2. Portez des gants qui protègent en fonction des matériaux de travail et pour
réduire les effets des vibrations de l'outil.
3. Portez des vêtements de protection conçus pour l'environnement de travail
et pour l'outil.
4. Les chaussures antidérapantes sont recommandées pour maintenir la
stabilité et l'équilibre au sein de l'environnement de travail.
5. Portez des chaussures à embout d'acier ou à coquilles d'acier pour éviter
les blessures aux pieds dues à la chute d'objets.
6. Cet outil peut causer des dommages à l'ouïe. Portez un dispositif de
protection anti-bruit présentant une cote de réduction du bruit adéquate en
fonction du niveau de décibels.
PRÉCAUTIONS PERSONNELLES
Gardez le contrôle de l'outil, de vos mouvements et de l'environnement de
travail pour éviter les blessures ou le bris de l'outil.
1. N'utilisez pas l'outil si vous êtes fatigué ou sous l'effet de drogues, d'alcool
ou de médicaments.
2. Évitez de porter des vêtements ou des bijoux pouvant se prendre dans les
pièces mobiles d'un outil. Gardez les cheveux longs recouverts ou attachés.
3. N'utilisez pas l'outil si vous devez étirer les bras pour vous en servir. Une
stabilité et un équilibre appropriés sont nécessaires afin d'avoir un meilleur
contrôle en cas de situations inattendues.
Table of contents
Languages:
Other Power Fist Rivet Tools manuals


