Powerex MH-C9000PRO User manual

PRINTED IN TAIWAN A03-3713506-001
Thank you for purchasing the Powerex MH-C9000PRO
Professional Charger-Analyzer. Read these
instructions carefully before operating this unit.
GENERAL PRECAUTIONS
Do not charge battery cells other than NiMH or NiCD. Please
check with the battery manufacturer to ensure it can accept the
programmed charging and discharging rates.
Do not expose the unit to rain or moisture due to the risk of fire.
Do not operate the charger if it appears damaged in any way.
Always place the battery cells with positive tip facing the top.
Incorrect polarity may cause fire or explosion. Observe polarity
diagrams located on the charger.
Do not allow the unit to be exposed to direct sunlight. Operate
in a well-ventilated area. Do not place unit on the carpet.
Do not allow the battery terminals to become shorted.
To reduce the risk of damage to the power cord, always pull by
connector rather than the cord.
Use only the supplied adapter or optional regional and car
adapter offered by Maha Energy. Using third party accessories
voids the product warranty.
FEATURES & SPECIFICATIONS
Four independent slots for AA or AAA NiMH batteries.
4 Modes of Operation: Charge, Break-In, Discharge, and Refresh &
Analyze.
Memory Settings: Remembers the last settings that were used
(Modes and Value) to make it easier to setup next time.
Easy Setup: Set settings for 1 slot and apply same settings to all
slots.
Large Backlit LCD Display (with On/Off option).
Digitally displays the Capacity, Voltage, Time, and Rate.
19 selectable charging rates from 0.2A to 2.0A.
10 selectable discharging rates from 0.1A to 1.0A.
Worldwide power supply.
Optional car adapter.
Charge Time:
1 Hour (2000mAh battery at 2000mA
charge rate)
Charge Rate:
Programmable from 0.2A to 2.0A in
increments of 0.1A
Discharge Rate:
Programmable from 0.1A to 1.0A in
increments of 0.1A
Battery Conditioner:
Yes
Top-off Charging Rate:
100mA
Maintenance Charging Rate:
10mA
Discharge Termination:
Voltage 0.90V
Supported Capacity*:
100 to 4,000mAh
Charger Input Voltage:
DC: 12V 2.0A
Power Supply Input:
AC: 100-240V 50/60Hz
Charger Size:
4.25” x 4.25” x 2” (LWH)
* Always ensure that the batteries can accept the programmed rates.
GENERAL BATTERY EDUCATION
Choosing the Right Charge & Discharge Rate
Charging at a rate below 30% of the battery capacity and above 100% of
the battery capacity is not recommended.
Charging too slow may prevent the charger from terminating correctly.
Charging too fast may overheat and damage the battery.
Typically speaking, a slower charge rate will yield better battery
performance but requires longer time. A faster charge rate may not
charge as fully and battery temperature can be higher.
As for the Discharge rate, do not exceed 100% of the battery capacity.
Select a Discharge rate that is similar to your application.
AAA Batteries:
Battery Capacity (mAh)
Charge Rate (mA)
Discharge Rate (mA)
700
300
100
800
400
200
900
400
200
1000
500
200
1100
500
200
1200
600
300
AA Batteries:
Battery Capacity (mAh)
Charge Rate (mA)
Discharge Rate (mA)
1800
900
400
2200
1100
500
2400
1200
600
2600
1300
600
2700
1300
600
Battery Matching
In most devices, usually two or more batteries are used together. When
batteries are used in a series, the performance is limited by the worst
one. In other words, one poorly performing battery can significantly
reduce the device runtime.
Battery matching refers to grouping batteries with similar “actual”
capacity. To perform this, use the Refresh & Analyze mode to determine
the battery capacity. Group the batteries with capacity within about +/- 5%
of the rated capacity.
Battery “Forming”
New batteries and those stored for an extended period become
chemically deactivated. Battery forming is a charge-discharge-charge
cycle which forces a full charge into the battery at a very slow rate. This
process activates the battery. In certain cases, it needs to be repeated
two or three times.
Battery forming can be performed using the Break-In mode.
MH-C9000PRO
Professional Charger-Analyzer

PRINTED IN TAIWAN A03-3713506-001
4 MODES OF OPERATION
This section describes the various modes and when to use them. To
enable each mode, refer to the “Operation”section.
MODE
WHEN TO USE
Charge
To charge or to add energy to batteries.
Break-In
To active batteries that have been in storage
for an extended time (longer than 6 months).
Discharge
To discharge or remove all energy from
batteries.
Refresh & Analyze
To analyze battery for its available capacity.
Used to determine the health of the battery
based on the actual amount of capacity it
can hold. Also used for batteries not
performing well.
GETTING STARTED
1. Make sure there are no batteries inserted into the charger prior to
connecting the power. Connect the power adapter DC connector to
the charger.
Plug the power adapter into a compatible outlet.
TIP: When operating the charger outside of its intended region of
use, simply use a plug-adapter. A voltage transformer is not
required.
2. Use the buttons to make selections.
Use the UP and DOWN arrow buttons ▲▼ to choose the
desired Mode.
Use the SLOT button to go to the desired battery slot.
Press the ENTER button to make a selection.
3. Insert a AA or AAA battery in Slot 1.
Note: Insert the Negative (-) end first for AA and AAA batteries as
shown below.
Inserting AA / AAA Batteries
NOTE: It is normal for the batteries to become hot during charging
and discharging. It is also normal for a faint noise to emanate from
the charger during operation.
4. If no batteries are inserted during the startup, the charger will go into
standby mode with the screen turned off.
5. When a battery is inserted, the LCD will display an arrow below the
slot number and prompt for the mode by flashing “MODE.”
Use the UP and DOWN arrow buttons to choose the desired mode.
Press the “ENTER”button to make the selection.
If no button is pressed within 10 seconds, the charger will
proceed to the last used setting.
If more than one battery is inserted at a time (without the button
pressed), the charger will prompt for programming in the order in
which the batteries were inserted.
6. When the programmed mode for a slot is completed, “DONE”will be
displayed to the right of the slot number.
The data will be stored as long as the battery is inserted in the
charger. It will be lost upon removal of the battery.
Additional Selections:
To Turn On/Off Backlight Screen:
Default Light: The screen will remain lit for 15 seconds from
your last button press and then it will Turn Off. It will
automatically turn back On once any button is pressed.
Permanently Turn On Backlight: Press the UP and DOWN
Arrow Buttons ▲▼ at the same time for 2 seconds.
To Go Back to Default Light: Press the UP and DOWN Arrow
Buttons ▲▼ at the same time for 2 seconds.
OPERATION
Charge Mode
Charges the battery at the selected rate. Refer to the “General
Battery Education” section (page 1) on choosing an appropriate
rate.
Useful when battery needs to be recharged without determining the
capacity of the battery. It should be used on batteries known to be in
good condition and have been in continuous use.
To use CHARGE Mode:
1. Insert a battery into Slot 1 of the charger.
2. Use the UP and DOWN arrow buttons to go to the ‘Charge’
Mode and press the “ENTER” button to select the mode.
3. The charger will prompt for the charge rate by flashing “SET
CHG RATE.” Use the UP and DOWN arrow buttons to select
the desired charge rate. Press ENTER to make the selection.
(Note: If you would like to apply the same function and settings
to the rest of the slots, Press AND Hold the ENTER button for
2 seconds instead of only pressing ENTER).
During the Charge Mode, the batteries are being charged.
Once the Charge Mode has finished charging the batteries, “DONE” will
be displayed next to the slot number that is done. The charger will display
the accumulated energy that is put into the battery, NOT the Available
Capacity of the battery.

PRINTED IN TAIWAN A03-3713506-001
Break-In Mode (IEC Capacity Analysis)
Applies a 16-hour 0.1C charge (0.1 times the capacity of the
battery), rest of one hour, followed by a 0.2C discharge, rest again,
and finally a 16-hour 0.1C recharge again.
This process is also known as “Battery Forming.” Recommended
with batteries that cannot be rescued by the Refresh & Analyze
mode.
Requires 39 to 45 hours to complete.
The process follows the IEC standard for determining battery
capacity.
The Discharge Mode must be done first before using the Break-
In Mode.
To use BREAK-IN Mode:
1. Insert a battery into Slot 1 of the charger.
2. Use the UP and DOWN arrow buttons to go to the ‘Break-In’
Mode and press the “ENTER” button to select the mode.
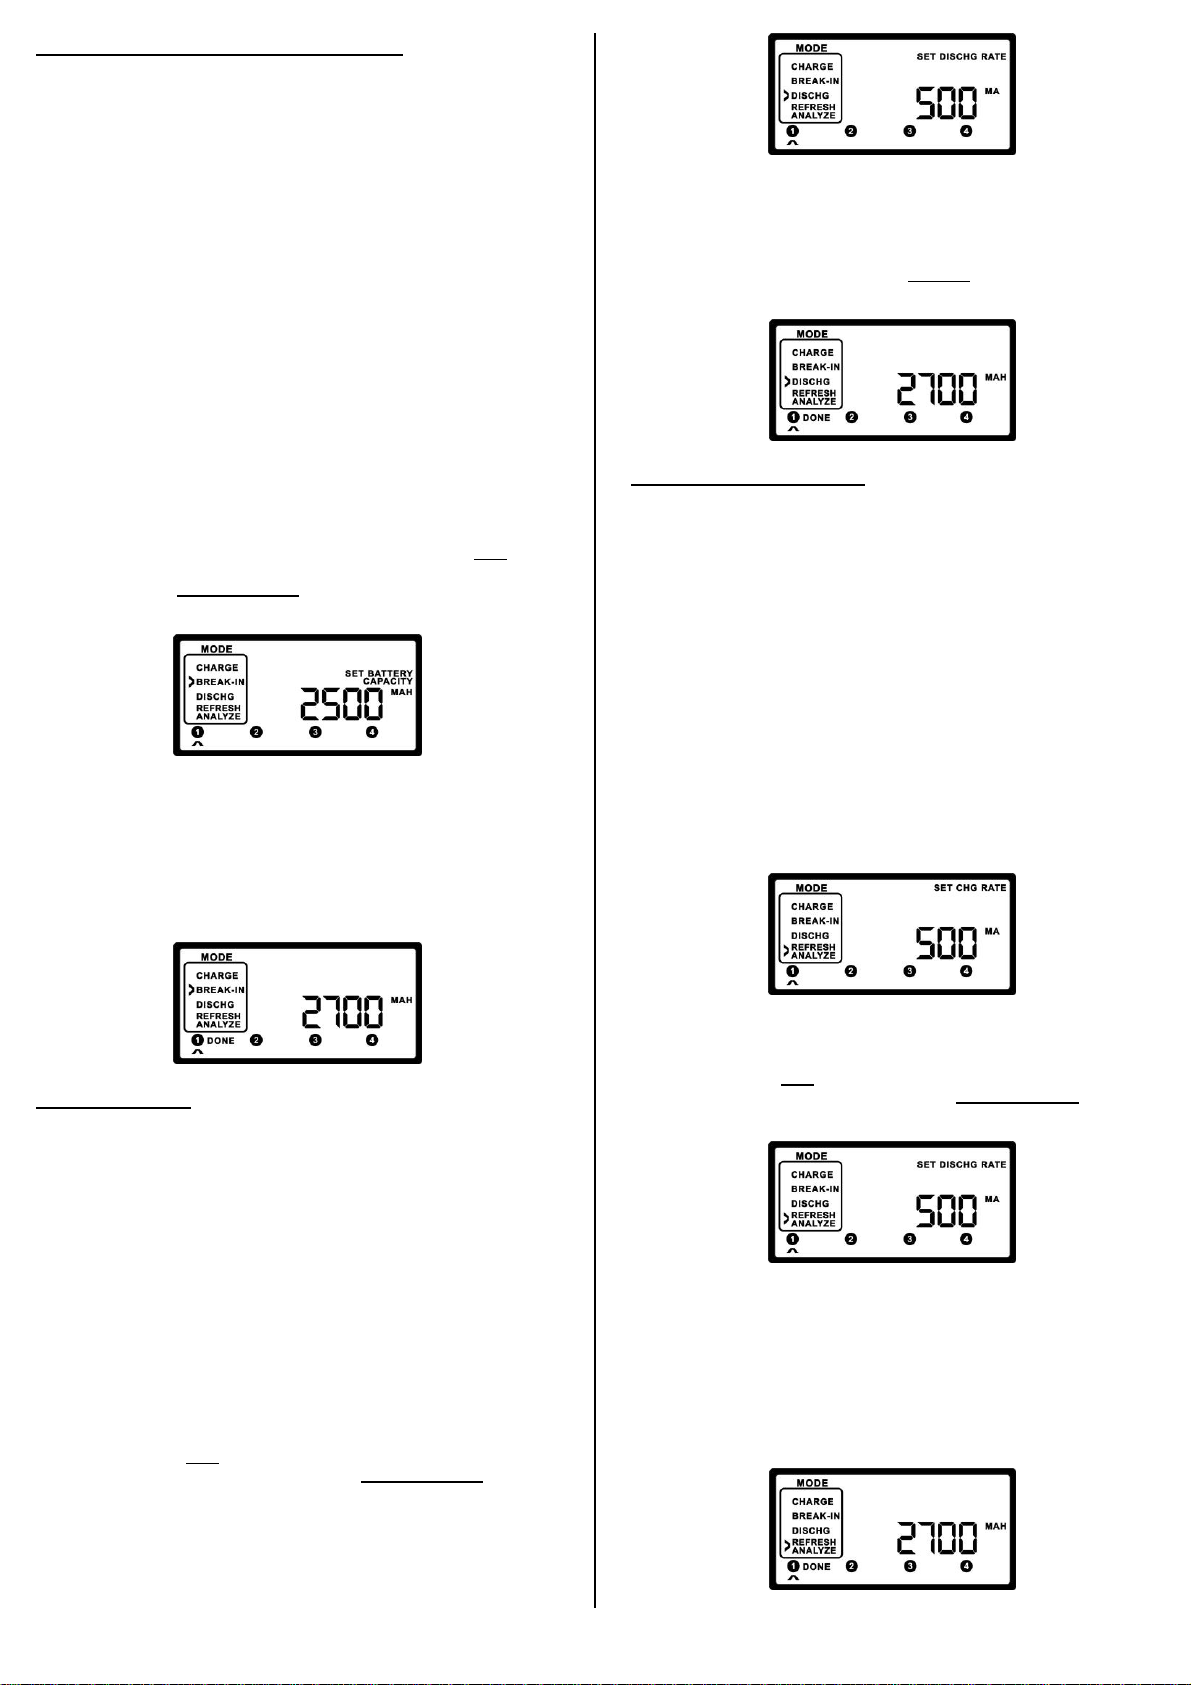
3. The charger will prompt for the battery capacity in order to
calculate the charge and discharge rates automatically. The
“SET BATTERY CAPACITY” will flash. Use the UP and
DOWN arrow buttons to choose the capacity presented on the
battery label. Press ENTER to make the selection. (Note: If you
would like to apply the same function and settings to the rest of
the slots, Press AND Hold the ENTER button for 2 seconds
instead of only pressing ENTER).
The Break-In Mode will perform the following steps:
Charge then Rest for 1 hour
Discharge then Rest for 1 hour
Charge until fully charged
Once the Break-In Mode has finished breaking in the batteries, “DONE”
will be displayed next to the slot number that is done. The charger will
display the Available Capacity of the battery.
Discharge Mode
Discharges the battery at the selected rate. Refer to the “General
Battery Education” section (page 1) on choosing an appropriate
rate.
Useful for analyzing the amount of charge stored in the battery prior
to using the Discharge mode. Battery not recharged at the end of the
cycle.
To use DISCHARGE Mode:
1. Insert a battery into Slot 1 of the charger.
2. Use the UP and DOWN arrow buttons to go to the ‘Discharge’
Mode and press the “ENTER” button to select the mode.
3. The charger will prompt for the discharge rate by flashing “SET
DISCHG RATE.” Use the UP and DOWN arrow buttons to
choose the desired discharge rate. Press ENTER to make the
selection. (Note: If you would like to apply the same function
and settings to the rest of the slots, Press AND Hold the
ENTER button for 2 seconds instead of only pressing ENTER).
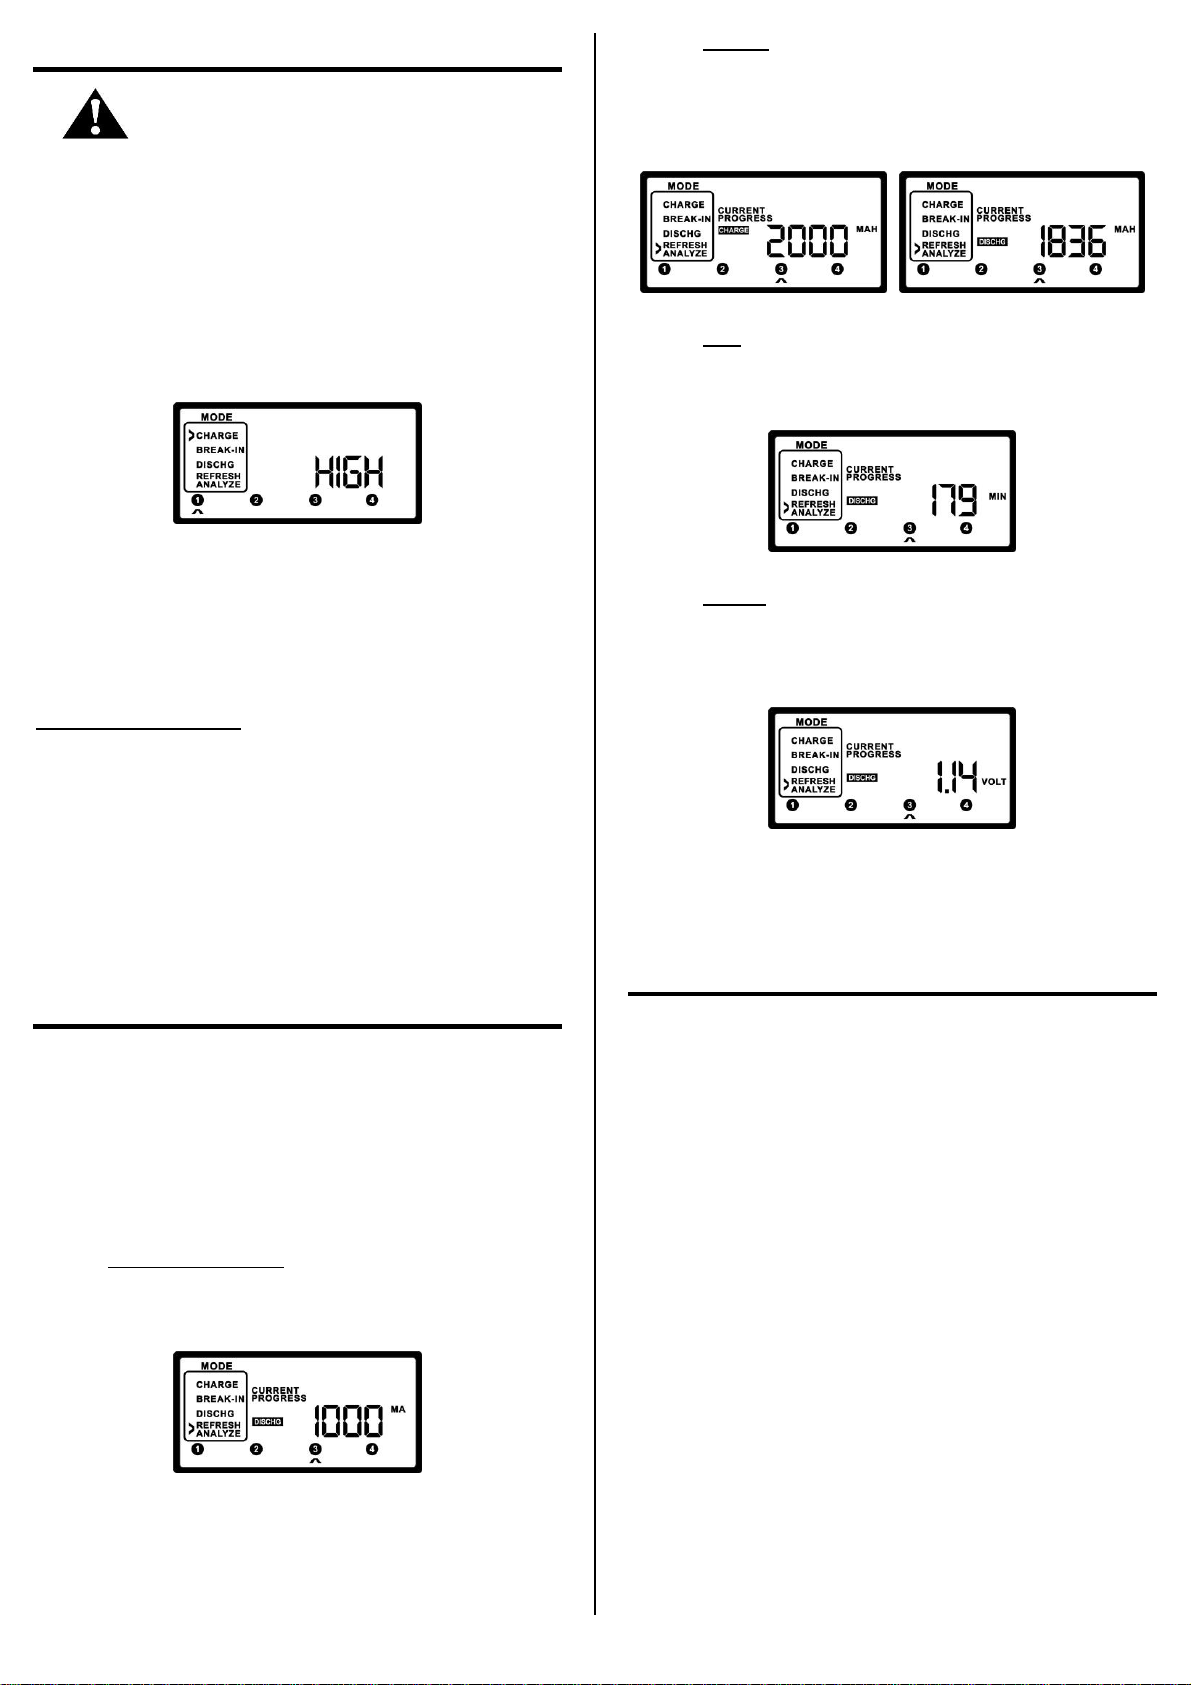
During the Discharge Mode, the energy is being removed from the
batteries.
Once the Charge Mode has finished discharging the batteries, “DONE”
will be displayed next to the slot number that is done. The charger will
display the accumulated energy that is removed from the battery, NOT
the Available Capacity of the battery.
Refresh & Analyze Mode
Conditions and analyzes the batteries at the selected charge and
discharge rates. Refer to the “General Battery Education” section
(page 1) on choosing an appropriate rate.
Reports the Available Capacity at the end of the cycle.
Useful when the battery actual capacity needs to be determined.
Also useful for battery with degraded performance.
To use REFRESH & ANALYZE Mode:
1. Insert a battery into Slot 1 of the charger.
2. Use the UP and DOWN arrow buttons to go to the ‘Refresh &
Analyze’ Mode and press the “ENTER” button to select the
mode.
3. The charger will prompt for the charge rate by flashing “SET
CHG RATE.” Use the UP and DOWN arrow buttons to choose
the desired charge rate. Press ENTER to make the selection.
4. The charger will prompt for the discharge rate by flashing “SET
DISCHG RATE.” Use the UP and DOWN arrow buttons to
choose the desired discharge. Press ENTER to make the
selection. (Note: If you would like to apply the same function
and settings to the rest of the slots, Press AND Hold the
ENTER button for 2 seconds instead of only pressing ENTER).
The process of the Refresh & Analyze Mode is as follows:
Charge, then Rest for 1 hour
Discharge, then Rest for 1 hour
Charge until fully charged
Once the Refresh and Analyze Mode has finished analyzing and
conditioning the batteries, “DONE” will be displayed next to the slot
number that is done. The charger will display the available capacity of the
battery.

PRINTED IN TAIWAN A03-3713506-001
TROUBLESHOOT
= Caution! Batteries may be hot to touch.
Note which slot number has the flashing number and triangle
(battery fault).
Unplug the charger.
Allow the batteries to cool down for 30 minutes before handling
them.
Remove the faulty battery from the slot.
To ensure safety, the charger performs a battery health “impedance
check” at the beginning of the program. If the battery fails this test,
“HIGH” would be displayed and program will be terminated.
Typically, alkaline and extremely aged batteries will fail this test. For
a rechargeable battery, it is recommended for the battery to be
discarded.
NOTE: This test is not performed for the discharge mode.
If this detection is believed to be incorrect, a discharge can be
performed first.
Battery Rescue Steps
For batteries that do not perform favorably after using the mode
recommended above, the following sequence can be applied.
1. Refresh & Analyze for one to three times.
2. If capacity is still low, use Break-In mode.
3. If steps 1 and 2 shows some capacity improvement (> 10%), repeat
Break-In mode for one to three times. If no significant improvement
is observed, the battery is probably at the end of useful life.
4. If the battery capacity is less than 60% of the rated capacity, it is
recommended to recycle and replace the battery.
DISPLAYED INFORMATION
When the programs are in-progress, the charger will display the
battery status for each occupied slot consecutively. The screen will
first show an arrow below the active slot and display the information.
The next slot(s) occupied follows.
Press the “SLOT”button at any time to jump to the next occupied
slot. Press this button multiple times if necessary, to go to the
desired slot.
The following information is displayed on the screen:
Charge/Discharge Rate:
This is the number followed by the unit “MA.” This is the actual
charging or discharging rate. Note that this number will go up
and down slightly from selected rate due to the pulse charging.
Capacity:
This is the number followed by the unit “MAH.” This is the
accumulated charging or discharging capacity. If it is
accumulated charging capacity, “CHARGE” will be displayed in
a black box. If it is discharging capacity, “DISCHG” will be
displayed in a black box.
Time:
This is the number followed by the unit “MIN.” This is the time
elapsed for the particular routine such as charging, discharging,
or rest in the program.
Voltage:
This is the number followed by the unit “VOLT.” It represents
the battery voltage. If you compare this with a voltmeter while
charging, the values will not match as a voltmeter is unable to
measure the battery voltage during charging or discharging.
At any given time during the program, the charger will either be
charging, discharging or resting. The LCD displays the action in
black boxes containing CHARGE, DISCHG, or REST.
WARRANTY
The MH-C9000PRO Professional Charger-Analyzer has a 3-Year
Limited Warranty.
See website, www.mahaenergy.com, for more details. To obtain
warranty service, contact Maha Energy Corporation Service Department
at 1-800-376-9992. When returning the unit for warranty service, the
product owner must obtain a return merchandise authorization number
from a service representative.
Manufactured By:
MAHA ENERGY CORP.
Tel: 1-800-376-9992
www.mahaenergy.com
Copyrighted ® 1993-2020 Maha Energy Corp.
Table of contents
Other Powerex Batteries Charger manuals
Popular Batteries Charger manuals by other brands

DCI
DCI DigiTrak SBC quick start guide

Bosch
Bosch BAT 430 Original instructions

Viridian
Viridian EcoLite Charge Points Operation manual

Pro Charging Systems
Pro Charging Systems DP24/12 Safety, installation and operating instructions

Milwaukee
Milwaukee 48-59-0192 Operator's manual

Scanstrut
Scanstrut ROKK Bezel installation manual